ECE3340 - HW 4A - Analysis of excerpts from the class
your name, ID
You must answer in the narrative style and in full sentences (good grammar and prose are a plus). Show your thinking and reasoning in your discussion or explanation. Do not just show a number or a graph as your answer. Your work is treated with respect like any technical/scientific article, where figures, tables are used to support the discussion, not the essence. Hence, your discussion is the essence.
Instructor’s comments
are in italic and highlighted in light red.
There are a number in the class who did honest, excellent work
with very high scores. It worthwhile for you to review and see
what classmates did and understand what is expected of this
course.
1A. (40 pts) Choose either 1A (this) or 1B below.
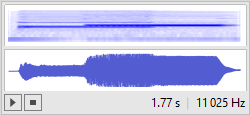
Separate two musical sounds that incidentally overlapped in time.
Listen to the below:
It was a concerto mistake: the second instrument started 1/2-note too soon (~0.5 sec) before the first instrument stopped. You will "sound-shop" (like "photoshop") such that the second sound starts 1/2-note later, immediately after the first sound stops.
See Fourier Tutorial for explanation.
Instructor’s
comments. Although the entire answer was already posted
in this blog, (and
a few unabashedly copied and pasted into HW), one doesnot learn
anything until going through the steps and gain insight. The work
below is selected because the
author described one’s understanding along the way.
If you wonder why some gets so
high score in the class and why the HW asks such “stupid things”
as the below:
You must answer in the narrative style ... Show your thinking and reasoning in your discussion or explanation. Do not just show a number or a graph as your answer.
then read through various examples to know why.
Author’s Answer - bold and highlighted are by Instructor
Instructor’s
comments. Excellent work. This same problem has been
given in many years, and this is the best ever that Intructor has
ever seen because of two things:
1- the dedication of the work in using far more filter bands for
both sounds than all previous
2- the clarity in explanation of the approach, although previous
work also had excellent explanation, this work has slightly more
details such that someone who is
totally unfamiliar with this course can completely understand
what the author did.
If you wish to know what “Show your thinking and reasoning in your discussion or
explanation” is like, read examples in this file and
below is one.
We would like to define an audiodataGet function to help us acquire the audio data of the sample and also its sampling rate. The function would pass two argument to object {x,srate1} so that we could later use in the PSD analysis App.
In[265]:=
![Graphics: 19483 19483 6 19483 19483 6 19483 293
PlotLabel /. Options[{audiodataGet[xaudio_] :=
{AudioData[#][[1]], #[[1, 2]]} & @ xaudio ;, ,
RowBox[{RowBox[{{x, srate1}, =, RowBox[{audiodataGet, [,
InterpretationBox[GraphicsBox[{{GrayLevel[0.9], RectangleBox[{0,
0}, {360, -164}]},
{InsetBox[GraphicsBox[InsetBox[GraphicsBox[RasterBox[{{0.450434,
0.441146, 0.430905, 0.436235, 0.415675, 0.422205, 0.397473,
0.392151, 0.376597, 0.366427, 0.368128, 0.372967, 0.372593,
0.353326, 0.352644, 0.341321, 0.336053, 0.320796, 0.327306,
0.288979, 0.308864, 0.28104, 0.286381, 0.262804, 0.275725,
0.259161, 0.215479, 0.244009, 0.219167, 0.219986, 0.164715,
0.213558, 0.178171, 0.140195, 0.170384, 0.12916, 0.150066,
0.164757, 0.189708, 0.140224, 0.247229, 0.266543, 0.260418,
0.221265, 0.239668, 0.28554, 0.20785, 0.245946, 0.22701,
0.270067, 0.187391, 0.272877, 0.227781, 0.248532, 0.273303,
0.287274, 0.26159, 0.246528, 0.217804, 0.200525, 0.220677,
0.233855, 0.260937, 0.256393, 0.267537, 0.252475, 0.284507,
0.281014, 0.279515, 0.246243, 0.270379, 0.286201, 0.256058,
0.264012, 0.276209, 0.254487, 0.289291, 0.26501, 0.274288,
0.253071, 0.268192, 0.300214, 0.280448, 0.286127, 0.261134,
0.277688, 0.276613, 0.29239, 0.281473, 0.268143, 0.277618,
0.278949, 0.265326, 0.292102, 0.279343, 0.264461, 0.284835,
0.286315, 0.287732, 0.290766, 0.296421, 0.291071, 0.291936,
0.280191, 0.305065, 0.27244, 0.271393, 0.284126, 0.275812,
0.23777, 0.226512, 0.252025, 0.238851, 0.248671, 0.267721,
0.294617, 0.291678, 0.289626}, {0.450434, 0.441146, 0.430905,
0.436235, 0.415675, 0.422205, 0.397473, 0.392151, 0.376597,
0.366427, 0.368128, 0.372967, 0.372593, 0.353326, 0.352644,
0.341321, 0.336053, 0.320796, 0.327306, 0.288979, 0.308864,
0.28104, 0.286381, 0.262804, 0.275725, 0.259161, 0.215479,
0.244009, 0.219167, 0.219986, 0.164715, 0.213558, 0.178171,
0.140195, 0.170384, 0.12916, 0.150066, 0.164757, 0.189708,
0.140224, 0.247229, 0.266543, 0.260418, 0.221265, 0.239668,
0.28554, 0.20785, 0.245946, 0.22701, 0.270067, 0.187391,
0.272877, 0.227781, 0.248532, 0.273303, 0.287274, 0.26159,
0.246528, 0.217804, 0.200525, 0.220677, 0.233855, 0.260937,
0.256393, 0.267537, 0.252475, 0.284507, 0.281014, 0.279515,
0.246243, 0.270379, 0.286201, 0.256058, 0.264012, 0.276209,
0.254487, 0.289291, 0.26501, 0.274288, 0.253071, 0.268192,
0.300214, 0.280448, 0.286127, 0.261134, 0.277688, 0.276613,
0.29239, 0.281473, 0.268143, 0.277618, 0.278949, 0.265326,
0.292102, 0.279343, 0.264461, 0.284835, 0.286315, 0.287732,
0.290766, 0.296421, 0.291071, 0.291936, 0.280191, 0.305065,
0.27244, 0.271393, 0.284126, 0.275812, 0.23777, 0.226512,
0.252025, 0.238851, 0.248671, 0.267721, 0.294617, 0.291678,
0.289626}, {0.450434, 0.441146, 0.430905, 0.436235, 0.415675,
0.422205, 0.397473, 0.392151, 0.376597, 0.366427, 0.368128,
0.372967, 0.372593, 0.353326, 0.352644, 0.341321, 0.336053,
0.320796, 0.327306, 0.288979, 0.308864, 0.28104, 0.286381,
0.262804, 0.275725, 0.259161, 0.215479, 0.244009, 0.219167,
0.219986, 0.164715, 0.213558, 0.178171, 0.140195, 0.170384,
0.12916, 0.150066, 0.164757, 0.189708, 0.140224, 0.247229,
0.266543, 0.260418, 0.221265, 0.239668, 0.28554, 0.20785,
0.245946, 0.22701, 0.270067, 0.187391, 0.272877, 0.227781,
0.248532, 0.273303, 0.287274, 0.26159, 0.246528, 0.217804,
0.200525, 0.220677, 0.233855, 0.260937, 0.256393, 0.267537,
0.252475, 0.284507, 0.281014, 0.279515, 0.246243, 0.270379,
0.286201, 0.256058, 0.264012, 0.276209, 0.254487, 0.289291,
0.26501, 0.274288, 0.253071, 0.268192, 0.300214, 0.280448,
0.286127, 0.261134, 0.277688, 0.276613, 0.29239, 0.281473,
0.268143, 0.277618, 0.278949, 0.265326, 0.292102, 0.279343,
0.264461, 0.284835, 0.286315, 0.287732, 0.290766, 0.296421,
0.291071, 0.291936, 0.280191, 0.305065, 0.27244, 0.271393,
0.284126, 0.275812, 0.23777, 0.226512, 0.252025, 0.238851,
0.248671, 0.267721, 0.294617, 0.291678, 0.289626}, {0.450434,
0.441146, 0.430905, 0.436235, 0.415675, 0.422205, 0.397473,
0.392151, 0.376597, 0.366427, 0.368128, 0.372967, 0.372593,
0.353326, 0.352644, 0.341321, 0.336053, 0.320796, 0.327306,
0.288979, 0.308864, 0.28104, 0.286381, 0.262804, 0.275725,
0.259161, 0.215479, 0.244009, 0.219167, 0.219986, 0.164715,
0.213558, 0.178171, 0.140195, 0.170384, 0.12916, 0.150066,
0.164757, 0.189708, 0.140224, 0.247229, 0.266543, 0.260418,
0.221265, 0.239668, 0.28554, 0.20785, 0.245946, 0.22701,
0.270067, 0.187391, 0.272877, 0.227781, 0.248532, 0.273303,
0.287274, 0.26159, 0.246528, 0.217804, 0.200525, 0.220677,
0.233855, 0.260937, 0.256393, 0.267537, 0.252475, 0.284507,
0.281014, 0.279515, 0.246243, 0.270379, 0.286201, 0.256058,
0.264012, 0.276209, 0.254487, 0.289291, 0.26501, 0.274288,
0.253071, 0.268192, 0.300214, 0.280448, 0.286127, 0.261134,
0.277688, 0.276613, 0.29239, 0.281473, 0.268143, 0.277618,
0.278949, 0.265326, 0.292102, 0.279343, 0.264461, 0.284835,
0.286315, 0.287732, 0.290766, 0.296421, 0.291071, 0.291936,
0.280191, 0.305065, 0.27244, 0.271393, 0.284126, 0.275812,
0.23777, 0.226512, 0.252025, 0.238851, 0.248671, 0.267721,
0.294617, 0.291678, 0.289626}, {0.450434, 0.441146, 0.430905,
0.436235, 0.415675, 0.422205, 0.397473, 0.392151, 0.376597,
0.366427, 0.368128, 0.372967, 0.372593, 0.353326, 0.352644,
0.341321, 0.336053, 0.320796, 0.327306, 0.288979, 0.308864,
0.28104, 0.286381, 0.262804, 0.275725, 0.259161, 0.215479,
0.244009, 0.219167, 0.219986, 0.164715, 0.213558, 0.178171,
0.140195, 0.170384, 0.12916, 0.150066, 0.164757, 0.189708,
0.140224, 0.247229, 0.266543, 0.260418, 0.221265, 0.239668,
0.28554, 0.20785, 0.245946, 0.22701, 0.270067, 0.187391,
0.272877, 0.227781, 0.248532, 0.273303, 0.287274, 0.26159,
0.246528, 0.217804, 0.200525, 0.220677, 0.233855, 0.260937,
0.256393, 0.267537, 0.252475, 0.284507, 0.281014, 0.279515,
0.246243, 0.270379, 0.286201, 0.256058, 0.264012, 0.276209,
0.254487, 0.289291, 0.26501, 0.274288, 0.253071, 0.268192,
0.300214, 0.280448, 0.286127, 0.261134, 0.277688, 0.276613,
0.29239, 0.281473, 0.268143, 0.277618, 0.278949, 0.265326,
0.292102, 0.279343, 0.264461, 0.284835, 0.286315, 0.287732,
0.290766, 0.296421, 0.291071, 0.291936, 0.280191, 0.305065,
0.27244, 0.271393, 0.284126, 0.275812, 0.23777, 0.226512,
0.252025, 0.238851, 0.248671, 0.267721, 0.294617, 0.291678,
0.289626}, {0.450434, 0.441146, 0.430905, 0.436235, 0.415675,
0.422205, 0.397473, 0.392151, 0.376597, 0.366427, 0.368128,
0.372967, 0.372593, 0.353326, 0.352644, 0.341321, 0.336053,
0.320796, 0.327306, 0.288979, 0.308864, 0.28104, 0.286381,
0.262804, 0.275725, 0.259161, 0.215479, 0.244009, 0.219167,
0.219986, 0.164715, 0.213558, 0.178171, 0.140195, 0.170384,
0.12916, 0.150066, 0.164757, 0.189708, 0.140224, 0.247229,
0.266543, 0.260418, 0.221265, 0.239668, 0.28554, 0.20785,
0.245946, 0.22701, 0.270067, 0.187391, 0.272877, 0.227781,
0.248532, 0.273303, 0.287274, 0.26159, 0.246528, 0.217804,
0.200525, 0.220677, 0.233855, 0.260937, 0.256393, 0.267537,
0.252475, 0.284507, 0.281014, 0.279515, 0.246243, 0.270379,
0.286201, 0.256058, 0.264012, 0.276209, 0.254487, 0.289291,
0.26501, 0.274288, 0.253071, 0.268192, 0.300214, 0.280448,
0.286127, 0.261134, 0.277688, 0.276613, 0.29239, 0.281473,
0.268143, 0.277618, 0.278949, 0.265326, 0.292102, 0.279343,
0.264461, 0.284835, 0.286315, 0.287732, 0.290766, 0.296421,
0.291071, 0.291936, 0.280191, 0.305065, 0.27244, 0.271393,
0.284126, 0.275812, 0.23777, 0.226512, 0.252025, 0.238851,
0.248671, 0.267721, 0.294617, 0.291678, 0.289626}, {0.119771,
0.150876, 0.147637, 0.181649, 0.143006, 0.109381, 0.136185,
0.194252, 0.191829, 0.124318, 0.149028, 0.149428, 0.0902791,
0.174586, 0.144796, 0.120407, 0.165507, 0.189246, 0.150104,
0.180982, 0.152796, 0.0965253, 0.120748, 0.187443, 0.160231,
0.165157, 0.143546, 0.155725, 0.117646, 0.125036, 0.126772,
0.135444, 0.141762, 0.170345, 0.114505, 0.116832, 0.16271,
0.174504, 0.163404, 0.152664, 0.182086, 0.121941, 0.141057,
0.174604, 0.131218, 0.140484, 0.188917, 0.127376, 0.16991,
0.156496, 0.119469, 0.164727, 0.113953, 0.181733, 0.200938,
0.210693, 0.170044, 0.192697, 0.147419, 0.202921, 0.208256,
0.216734, 0.200781, 0.177135, 0.177109, 0.139037, 0.162681,
0.0728616, 0.151225, 0.186282, 0.158087, 0.121905, 0.183381,
0.178484, 0.187736, 0.151122, 0.178234, 0.138905, 0.156034,
0.170861, 0.146859, 0.158404, 0.168949, 0.188883, 0.153032,
0.196801, 0.0506713, 0.176193, 0.166891, 0.155927, 0.136664,
0.177733, 0.142018, 0.169596, 0.108443, 0.159616, 0.126281,
0.130765, 0.101702, 0.175138, 0.163148, 0.164344, 0.169921,
0.154804, 0.157788, 0.128264, 0.10807, 0.137504, 0.168891,
0.13098, 0.125518, 0.15939, 0.110838, 0.158217, 0.165841,
0.163301, 0.140466, 0.147523}, {0.119771, 0.150876, 0.147637,
0.181649, 0.143006, 0.109381, 0.136185, 0.194252, 0.191829,
0.124318, 0.149028, 0.149428, 0.0902791, 0.174586, 0.144796,
0.120407, 0.165507, 0.189246, 0.150104, 0.180982, 0.152796,
0.0965253, 0.120748, 0.187443, 0.160231, 0.165157, 0.143546,
0.155725, 0.117646, 0.125036, 0.126772, 0.135444, 0.141762,
0.170345, 0.114505, 0.116832, 0.16271, 0.174504, 0.163404,
0.152664, 0.182086, 0.121941, 0.141057, 0.174604, 0.131218,
0.140484, 0.188917, 0.127376, 0.16991, 0.156496, 0.119469,
0.164727, 0.113953, 0.181733, 0.200938, 0.210693, 0.170044,
0.192697, 0.147419, 0.202921, 0.208256, 0.216734, 0.200781,
0.177135, 0.177109, 0.139037, 0.162681, 0.0728616, 0.151225,
0.186282, 0.158087, 0.121905, 0.183381, 0.178484, 0.187736,
0.151122, 0.178234, 0.138905, 0.156034, 0.170861, 0.146859,
0.158404, 0.168949, 0.188883, 0.153032, 0.196801, 0.0506713,
0.176193, 0.166891, 0.155927, 0.136664, 0.177733, 0.142018,
0.169596, 0.108443, 0.159616, 0.126281, 0.130765, 0.101702,
0.175138, 0.163148, 0.164344, 0.169921, 0.154804, 0.157788,
0.128264, 0.10807, 0.137504, 0.168891, 0.13098, 0.125518,
0.15939, 0.110838, 0.158217, 0.165841, 0.163301, 0.140466,
0.147523}, {0.119771, 0.150876, 0.147637, 0.181649, 0.143006,
0.109381, 0.136185, 0.194252, 0.191829, 0.124318, 0.149028,
0.149428, 0.0902791, 0.174586, 0.144796, 0.120407, 0.165507,
0.189246, 0.150104, 0.180982, 0.152796, 0.0965253, 0.120748,
0.187443, 0.160231, 0.165157, 0.143546, 0.155725, 0.117646,
0.125036, 0.126772, 0.135444, 0.141762, 0.170345, 0.114505,
0.116832, 0.16271, 0.174504, 0.163404, 0.152664, 0.182086,
0.121941, 0.141057, 0.174604, 0.131218, 0.140484, 0.188917,
0.127376, 0.16991, 0.156496, 0.119469, 0.164727, 0.113953,
0.181733, 0.200938, 0.210693, 0.170044, 0.192697, 0.147419,
0.202921, 0.208256, 0.216734, 0.200781, 0.177135, 0.177109,
0.139037, 0.162681, 0.0728616, 0.151225, 0.186282, 0.158087,
0.121905, 0.183381, 0.178484, 0.187736, 0.151122, 0.178234,
0.138905, 0.156034, 0.170861, 0.146859, 0.158404, 0.168949,
0.188883, 0.153032, 0.196801, 0.0506713, 0.176193, 0.166891,
0.155927, 0.136664, 0.177733, 0.142018, 0.169596, 0.108443,
0.159616, 0.126281, 0.130765, 0.101702, 0.175138, 0.163148,
0.164344, 0.169921, 0.154804, 0.157788, 0.128264, 0.10807,
0.137504, 0.168891, 0.13098, 0.125518, 0.15939, 0.110838,
0.158217, 0.165841, 0.163301, 0.140466, 0.147523}, {0.119771,
0.150876, 0.147637, 0.181649, 0.143006, 0.109381, 0.136185,
0.194252, 0.191829, 0.124318, 0.149028, 0.149428, 0.0902791,
0.174586, 0.144796, 0.120407, 0.165507, 0.189246, 0.150104,
0.180982, 0.152796, 0.0965253, 0.120748, 0.187443, 0.160231,
0.165157, 0.143546, 0.155725, 0.117646, 0.125036, 0.126772,
0.135444, 0.141762, 0.170345, 0.114505, 0.116832, 0.16271,
0.174504, 0.163404, 0.152664, 0.182086, 0.121941, 0.141057,
0.174604, 0.131218, 0.140484, 0.188917, 0.127376, 0.16991,
0.156496, 0.119469, 0.164727, 0.113953, 0.181733, 0.200938,
0.210693, 0.170044, 0.192697, 0.147419, 0.202921, 0.208256,
0.216734, 0.200781, 0.177135, 0.177109, 0.139037, 0.162681,
0.0728616, 0.151225, 0.186282, 0.158087, 0.121905, 0.183381,
0.178484, 0.187736, 0.151122, 0.178234, 0.138905, 0.156034,
0.170861, 0.146859, 0.158404, 0.168949, 0.188883, 0.153032,
0.196801, 0.0506713, 0.176193, 0.166891, 0.155927, 0.136664,
0.177733, 0.142018, 0.169596, 0.108443, 0.159616, 0.126281,
0.130765, 0.101702, 0.175138, 0.163148, 0.164344, 0.169921,
0.154804, 0.157788, 0.128264, 0.10807, 0.137504, 0.168891,
0.13098, 0.125518, 0.15939, 0.110838, 0.158217, 0.165841,
0.163301, 0.140466, 0.147523}, {0.148695, 0.135531, 0.106408,
0.126577, 0.155807, 0.184763, 0.189924, 0.105495, 0.151599,
0.171809, 0.163184, 0.148267, 0.171754, 0.11515, 0.131483,
0.141547, 0.118968, 0.194928, 0.134516, 0.116777, 0.160869,
0.123235, 0.0856959, 0.109015, 0.156909, 0.179542, 0.132608,
0.0945772, 0.145061, 0.117812, 0.140455, 0.0932092, 0.155085,
0.178218, 0.157313, 0.118822, 0.176852, 0.158659, 0.137727,
0.166062, 0.146324, 0.146015, 0.156365, 0.131415, 0.153938,
0.144952, 0.126173, 0.125673, 0.165404, 0.150754, 0.115524,
0.148752, 0.134449, 0.172288, 0.114638, 0.185482, 0.0979991,
0.143853, 0.143912, 0.178416, 0.170147, 0.216614, 0.172058,
0.138583, 0.182609, 0.162316, 0.155398, 0.141126, 0.153407,
0.180111, 0.179264, 0.138033, 0.183835, 0.165063, 0.182173,
0.118936, 0.100919, 0.129362, 0.0801641, 0.121735, 0.144044,
0.133324, 0.127505, 0.189177, 0.151466, 0.155236, 0.131812,
0.131984, 0.170639, 0.183447, 0.171217, 0.132726, 0.127929,
0.0980572, 0.121758, 0.134733, 0.120247, 0.0799687, 0.107481,
0.149784, 0.155632, 0.178178, 0.145358, 0.145394, 0.144015,
0.144384, 0.140909, 0.119241, 0.142375, 0.105467, 0.101784,
0.176972, 0.107863, 0.14192, 0.142106, 0.162272, 0.139229,
0.123669}, {0.148695, 0.135531, 0.106408, 0.126577, 0.155807,
0.184763, 0.189924, 0.105495, 0.151599, 0.171809, 0.163184,
0.148267, 0.171754, 0.11515, 0.131483, 0.141547, 0.118968,
0.194928, 0.134516, 0.116777, 0.160869, 0.123235, 0.0856959,
0.109015, 0.156909, 0.179542, 0.132608, 0.0945772, 0.145061,
0.117812, 0.140455, 0.0932092, 0.155085, 0.178218, 0.157313,
0.118822, 0.176852, 0.158659, 0.137727, 0.166062, 0.146324,
0.146015, 0.156365, 0.131415, 0.153938, 0.144952, 0.126173,
0.125673, 0.165404, 0.150754, 0.115524, 0.148752, 0.134449,
0.172288, 0.114638, 0.185482, 0.0979991, 0.143853, 0.143912,
0.178416, 0.170147, 0.216614, 0.172058, 0.138583, 0.182609,
0.162316, 0.155398, 0.141126, 0.153407, 0.180111, 0.179264,
0.138033, 0.183835, 0.165063, 0.182173, 0.118936, 0.100919,
0.129362, 0.0801641, 0.121735, 0.144044, 0.133324, 0.127505,
0.189177, 0.151466, 0.155236, 0.131812, 0.131984, 0.170639,
0.183447, 0.171217, 0.132726, 0.127929, 0.0980572, 0.121758,
0.134733, 0.120247, 0.0799687, 0.107481, 0.149784, 0.155632,
0.178178, 0.145358, 0.145394, 0.144015, 0.144384, 0.140909,
0.119241, 0.142375, 0.105467, 0.101784, 0.176972, 0.107863,
0.14192, 0.142106, 0.162272, 0.139229, 0.123669}, {0.148695,
0.135531, 0.106408, 0.126577, 0.155807, 0.184763, 0.189924,
0.105495, 0.151599, 0.171809, 0.163184, 0.148267, 0.171754,
0.11515, 0.131483, 0.141547, 0.118968, 0.194928, 0.134516,
0.116777, 0.160869, 0.123235, 0.0856959, 0.109015, 0.156909,
0.179542, 0.132608, 0.0945772, 0.145061, 0.117812, 0.140455,
0.0932092, 0.155085, 0.178218, 0.157313, 0.118822, 0.176852,
0.158659, 0.137727, 0.166062, 0.146324, 0.146015, 0.156365,
0.131415, 0.153938, 0.144952, 0.126173, 0.125673, 0.165404,
0.150754, 0.115524, 0.148752, 0.134449, 0.172288, 0.114638,
0.185482, 0.0979991, 0.143853, 0.143912, 0.178416, 0.170147,
0.216614, 0.172058, 0.138583, 0.182609, 0.162316, 0.155398,
0.141126, 0.153407, 0.180111, 0.179264, 0.138033, 0.183835,
0.165063, 0.182173, 0.118936, 0.100919, 0.129362, 0.0801641,
0.121735, 0.144044, 0.133324, 0.127505, 0.189177, 0.151466,
0.155236, 0.131812, 0.131984, 0.170639, 0.183447, 0.171217,
0.132726, 0.127929, 0.0980572, 0.121758, 0.134733, 0.120247,
0.0799687, 0.107481, 0.149784, 0.155632, 0.178178, 0.145358,
0.145394, 0.144015, 0.144384, 0.140909, 0.119241, 0.142375,
0.105467, 0.101784, 0.176972, 0.107863, 0.14192, 0.142106,
0.162272, 0.139229, 0.123669}, {0.148695, 0.135531, 0.106408,
0.126577, 0.155807, 0.184763, 0.189924, 0.105495, 0.151599,
0.171809, 0.163184, 0.148267, 0.171754, 0.11515, 0.131483,
0.141547, 0.118968, 0.194928, 0.134516, 0.116777, 0.160869,
0.123235, 0.0856959, 0.109015, 0.156909, 0.179542, 0.132608,
0.0945772, 0.145061, 0.117812, 0.140455, 0.0932092, 0.155085,
0.178218, 0.157313, 0.118822, 0.176852, 0.158659, 0.137727,
0.166062, 0.146324, 0.146015, 0.156365, 0.131415, 0.153938,
0.144952, 0.126173, 0.125673, 0.165404, 0.150754, 0.115524,
0.148752, 0.134449, 0.172288, 0.114638, 0.185482, 0.0979991,
0.143853, 0.143912, 0.178416, 0.170147, 0.216614, 0.172058,
0.138583, 0.182609, 0.162316, 0.155398, 0.141126, 0.153407,
0.180111, 0.179264, 0.138033, 0.183835, 0.165063, 0.182173,
0.118936, 0.100919, 0.129362, 0.0801641, 0.121735, 0.144044,
0.133324, 0.127505, 0.189177, 0.151466, 0.155236, 0.131812,
0.131984, 0.170639, 0.183447, 0.171217, 0.132726, 0.127929,
0.0980572, 0.121758, 0.134733, 0.120247, 0.0799687, 0.107481,
0.149784, 0.155632, 0.178178, 0.145358, 0.145394, 0.144015,
0.144384, 0.140909, 0.119241, 0.142375, 0.105467, 0.101784,
0.176972, 0.107863, 0.14192, 0.142106, 0.162272, 0.139229,
0.123669}, {0.148695, 0.135531, 0.106408, 0.126577, 0.155807,
0.184763, 0.189924, 0.105495, 0.151599, 0.171809, 0.163184,
0.148267, 0.171754, 0.11515, 0.131483, 0.141547, 0.118968,
0.194928, 0.134516, 0.116777, 0.160869, 0.123235, 0.0856959,
0.109015, 0.156909, 0.179542, 0.132608, 0.0945772, 0.145061,
0.117812, 0.140455, 0.0932092, 0.155085, 0.178218, 0.157313,
0.118822, 0.176852, 0.158659, 0.137727, 0.166062, 0.146324,
0.146015, 0.156365, 0.131415, 0.153938, 0.144952, 0.126173,
0.125673, 0.165404, 0.150754, 0.115524, 0.148752, 0.134449,
0.172288, 0.114638, 0.185482, 0.0979991, 0.143853, 0.143912,
0.178416, 0.170147, 0.216614, 0.172058, 0.138583, 0.182609,
0.162316, 0.155398, 0.141126, 0.153407, 0.180111, 0.179264,
0.138033, 0.183835, 0.165063, 0.182173, 0.118936, 0.100919,
0.129362, 0.0801641, 0.121735, 0.144044, 0.133324, 0.127505,
0.189177, 0.151466, 0.155236, 0.131812, 0.131984, 0.170639,
0.183447, 0.171217, 0.132726, 0.127929, 0.0980572, 0.121758,
0.134733, 0.120247, 0.0799687, 0.107481, 0.149784, 0.155632,
0.178178, 0.145358, 0.145394, 0.144015, 0.144384, 0.140909,
0.119241, 0.142375, 0.105467, 0.101784, 0.176972, 0.107863,
0.14192, 0.142106, 0.162272, 0.139229, 0.123669}, {0.132305,
0.106942, 0.137149, 0.154541, 0.167589, 0.173943, 0.203723,
0.222467, 0.157923, 0.20426, 0.196482, 0.178444, 0.186073,
0.193911, 0.127419, 0.191399, 0.173742, 0.161907, 0.1781,
0.18399, 0.116896, 0.201379, 0.195937, 0.173112, 0.180244,
0.180311, 0.188218, 0.174149, 0.167809, 0.140985, 0.189595,
0.16213, 0.179369, 0.20579, 0.150415, 0.179195, 0.208001,
0.158399, 0.157598, 0.192699, 0.165613, 0.169744, 0.156872,
0.133615, 0.195429, 0.165421, 0.184665, 0.198672, 0.174369,
0.150584, 0.190886, 0.141982, 0.15731, 0.198571, 0.146764,
0.174438, 0.111135, 0.196183, 0.17502, 0.185827, 0.141962,
0.233036, 0.200694, 0.155986, 0.218034, 0.158727, 0.241867,
0.140084, 0.224506, 0.137767, 0.22604, 0.170976, 0.199884,
0.173731, 0.0781535, 0.158049, 0.179221, 0.133636, 0.08725,
0.180945, 0.154038, 0.109937, 0.11221, 0.140671, 0.129262,
0.113629, 0.140062, 0.143651, 0.133154, 0.145122, 0.147785,
0.130023, 0.128118, 0.160062, 0.141811, 0.143954, 0.157258,
0.160408, 0.13027, 0.130309, 0.145328, 0.174831, 0.150286,
0.149797, 0.139856, 0.114669, 0.148287, 0.141127, 0.124554,
0.14031, 0.119845, 0.145826, 0.116818, 0.122212, 0.103695,
0.0932835, 0.157369, 0.115146}, {0.132305, 0.106942, 0.137149,
0.154541, 0.167589, 0.173943, 0.203723, 0.222467, 0.157923,
0.20426, 0.196482, 0.178444, 0.186073, 0.193911, 0.127419,
0.191399, 0.173742, 0.161907, 0.1781, 0.18399, 0.116896,
0.201379, 0.195937, 0.173112, 0.180244, 0.180311, 0.188218,
0.174149, 0.167809, 0.140985, 0.189595, 0.16213, 0.179369,
0.20579, 0.150415, 0.179195, 0.208001, 0.158399, 0.157598,
0.192699, 0.165613, 0.169744, 0.156872, 0.133615, 0.195429,
0.165421, 0.184665, 0.198672, 0.174369, 0.150584, 0.190886,
0.141982, 0.15731, 0.198571, 0.146764, 0.174438, 0.111135,
0.196183, 0.17502, 0.185827, 0.141962, 0.233036, 0.200694,
0.155986, 0.218034, 0.158727, 0.241867, 0.140084, 0.224506,
0.137767, 0.22604, 0.170976, 0.199884, 0.173731, 0.0781535,
0.158049, 0.179221, 0.133636, 0.08725, 0.180945, 0.154038,
0.109937, 0.11221, 0.140671, 0.129262, 0.113629, 0.140062,
0.143651, 0.133154, 0.145122, 0.147785, 0.130023, 0.128118,
0.160062, 0.141811, 0.143954, 0.157258, 0.160408, 0.13027,
0.130309, 0.145328, 0.174831, 0.150286, 0.149797, 0.139856,
0.114669, 0.148287, 0.141127, 0.124554, 0.14031, 0.119845,
0.145826, 0.116818, 0.122212, 0.103695, 0.0932835, 0.157369,
0.115146}, {0.132305, 0.106942, 0.137149, 0.154541, 0.167589,
0.173943, 0.203723, 0.222467, 0.157923, 0.20426, 0.196482,
0.178444, 0.186073, 0.193911, 0.127419, 0.191399, 0.173742,
0.161907, 0.1781, 0.18399, 0.116896, 0.201379, 0.195937,
0.173112, 0.180244, 0.180311, 0.188218, 0.174149, 0.167809,
0.140985, 0.189595, 0.16213, 0.179369, 0.20579, 0.150415,
0.179195, 0.208001, 0.158399, 0.157598, 0.192699, 0.165613,
0.169744, 0.156872, 0.133615, 0.195429, 0.165421, 0.184665,
0.198672, 0.174369, 0.150584, 0.190886, 0.141982, 0.15731,
0.198571, 0.146764, 0.174438, 0.111135, 0.196183, 0.17502,
0.185827, 0.141962, 0.233036, 0.200694, 0.155986, 0.218034,
0.158727, 0.241867, 0.140084, 0.224506, 0.137767, 0.22604,
0.170976, 0.199884, 0.173731, 0.0781535, 0.158049, 0.179221,
0.133636, 0.08725, 0.180945, 0.154038, 0.109937, 0.11221,
0.140671, 0.129262, 0.113629, 0.140062, 0.143651, 0.133154,
0.145122, 0.147785, 0.130023, 0.128118, 0.160062, 0.141811,
0.143954, 0.157258, 0.160408, 0.13027, 0.130309, 0.145328,
0.174831, 0.150286, 0.149797, 0.139856, 0.114669, 0.148287,
0.141127, 0.124554, 0.14031, 0.119845, 0.145826, 0.116818,
0.122212, 0.103695, 0.0932835, 0.157369, 0.115146}, {0.132305,
0.106942, 0.137149, 0.154541, 0.167589, 0.173943, 0.203723,
0.222467, 0.157923, 0.20426, 0.196482, 0.178444, 0.186073,
0.193911, 0.127419, 0.191399, 0.173742, 0.161907, 0.1781,
0.18399, 0.116896, 0.201379, 0.195937, 0.173112, 0.180244,
0.180311, 0.188218, 0.174149, 0.167809, 0.140985, 0.189595,
0.16213, 0.179369, 0.20579, 0.150415, 0.179195, 0.208001,
0.158399, 0.157598, 0.192699, 0.165613, 0.169744, 0.156872,
0.133615, 0.195429, 0.165421, 0.184665, 0.198672, 0.174369,
0.150584, 0.190886, 0.141982, 0.15731, 0.198571, 0.146764,
0.174438, 0.111135, 0.196183, 0.17502, 0.185827, 0.141962,
0.233036, 0.200694, 0.155986, 0.218034, 0.158727, 0.241867,
0.140084, 0.224506, 0.137767, 0.22604, 0.170976, 0.199884,
0.173731, 0.0781535, 0.158049, 0.179221, 0.133636, 0.08725,
0.180945, 0.154038, 0.109937, 0.11221, 0.140671, 0.129262,
0.113629, 0.140062, 0.143651, 0.133154, 0.145122, 0.147785,
0.130023, 0.128118, 0.160062, 0.141811, 0.143954, 0.157258,
0.160408, 0.13027, 0.130309, 0.145328, 0.174831, 0.150286,
0.149797, 0.139856, 0.114669, 0.148287, 0.141127, 0.124554,
0.14031, 0.119845, 0.145826, 0.116818, 0.122212, 0.103695,
0.0932835, 0.157369, 0.115146}, {0.132305, 0.106942, 0.137149,
0.154541, 0.167589, 0.173943, 0.203723, 0.222467, 0.157923,
0.20426, 0.196482, 0.178444, 0.186073, 0.193911, 0.127419,
0.191399, 0.173742, 0.161907, 0.1781, 0.18399, 0.116896,
0.201379, 0.195937, 0.173112, 0.180244, 0.180311, 0.188218,
0.174149, 0.167809, 0.140985, 0.189595, 0.16213, 0.179369,
0.20579, 0.150415, 0.179195, 0.208001, 0.158399, 0.157598,
0.192699, 0.165613, 0.169744, 0.156872, 0.133615, 0.195429,
0.165421, 0.184665, 0.198672, 0.174369, 0.150584, 0.190886,
0.141982, 0.15731, 0.198571, 0.146764, 0.174438, 0.111135,
0.196183, 0.17502, 0.185827, 0.141962, 0.233036, 0.200694,
0.155986, 0.218034, 0.158727, 0.241867, 0.140084, 0.224506,
0.137767, 0.22604, 0.170976, 0.199884, 0.173731, 0.0781535,
0.158049, 0.179221, 0.133636, 0.08725, 0.180945, 0.154038,
0.109937, 0.11221, 0.140671, 0.129262, 0.113629, 0.140062,
0.143651, 0.133154, 0.145122, 0.147785, 0.130023, 0.128118,
0.160062, 0.141811, 0.143954, 0.157258, 0.160408, 0.13027,
0.130309, 0.145328, 0.174831, 0.150286, 0.149797, 0.139856,
0.114669, 0.148287, 0.141127, 0.124554, 0.14031, 0.119845,
0.145826, 0.116818, 0.122212, 0.103695, 0.0932835, 0.157369,
0.115146}, {0.132305, 0.106942, 0.137149, 0.154541, 0.167589,
0.173943, 0.203723, 0.222467, 0.157923, 0.20426, 0.196482,
0.178444, 0.186073, 0.193911, 0.127419, 0.191399, 0.173742,
0.161907, 0.1781, 0.18399, 0.116896, 0.201379, 0.195937,
0.173112, 0.180244, 0.180311, 0.188218, 0.174149, 0.167809,
0.140985, 0.189595, 0.16213, 0.179369, 0.20579, 0.150415,
0.179195, 0.208001, 0.158399, 0.157598, 0.192699, 0.165613,
0.169744, 0.156872, 0.133615, 0.195429, 0.165421, 0.184665,
0.198672, 0.174369, 0.150584, 0.190886, 0.141982, 0.15731,
0.198571, 0.146764, 0.174438, 0.111135, 0.196183, 0.17502,
0.185827, 0.141962, 0.233036, 0.200694, 0.155986, 0.218034,
0.158727, 0.241867, 0.140084, 0.224506, 0.137767, 0.22604,
0.170976, 0.199884, 0.173731, 0.0781535, 0.158049, 0.179221,
0.133636, 0.08725, 0.180945, 0.154038, 0.109937, 0.11221,
0.140671, 0.129262, 0.113629, 0.140062, 0.143651, 0.133154,
0.145122, 0.147785, 0.130023, 0.128118, 0.160062, 0.141811,
0.143954, 0.157258, 0.160408, 0.13027, 0.130309, 0.145328,
0.174831, 0.150286, 0.149797, 0.139856, 0.114669, 0.148287,
0.141127, 0.124554, 0.14031, 0.119845, 0.145826, 0.116818,
0.122212, 0.103695, 0.0932835, 0.157369, 0.115146}, {0.103209,
0.134398, 0.114297, 0.125936, 0.172851, 0.244173, 0.243625,
0.233536, 0.210503, 0.128514, 0.216467, 0.19996, 0.209774,
0.227114, 0.230818, 0.208777, 0.232235, 0.216844, 0.225167,
0.186199, 0.167465, 0.207013, 0.21777, 0.197959, 0.215003,
0.211154, 0.222149, 0.234475, 0.211458, 0.218835, 0.227486,
0.217079, 0.219118, 0.228611, 0.171371, 0.205362, 0.199044,
0.185424, 0.185625, 0.224073, 0.194787, 0.240053, 0.218978,
0.215477, 0.23546, 0.234757, 0.200879, 0.221527, 0.207317,
0.203142, 0.184827, 0.147508, 0.208869, 0.213754, 0.113174,
0.198896, 0.192774, 0.19018, 0.2119, 0.232951, 0.196702,
0.205572, 0.205254, 0.228582, 0.22561, 0.205486, 0.239406,
0.159996, 0.228337, 0.193872, 0.25055, 0.166842, 0.210581,
0.186817, 0.237212, 0.158628, 0.198721, 0.189475, 0.202094,
0.19706, 0.163679, 0.196292, 0.206325, 0.169302, 0.156762,
0.195984, 0.19106, 0.137577, 0.0900151, 0.174999, 0.190947,
0.120973, 0.120899, 0.162586, 0.163558, 0.103274, 0.135147,
0.129939, 0.173401, 0.107895, 0.135015, 0.175011, 0.167357,
0.151569, 0.158893, 0.156669, 0.167742, 0.0773702, 0.115417,
0.126878, 0.15302, 0.0992318, 0.143231, 0.137177, 0.132447,
0.127999, 0.139249, 0.118715}, {0.103209, 0.134398, 0.114297,
0.125936, 0.172851, 0.244173, 0.243625, 0.233536, 0.210503,
0.128514, 0.216467, 0.19996, 0.209774, 0.227114, 0.230818,
0.208777, 0.232235, 0.216844, 0.225167, 0.186199, 0.167465,
0.207013, 0.21777, 0.197959, 0.215003, 0.211154, 0.222149,
0.234475, 0.211458, 0.218835, 0.227486, 0.217079, 0.219118,
0.228611, 0.171371, 0.205362, 0.199044, 0.185424, 0.185625,
0.224073, 0.194787, 0.240053, 0.218978, 0.215477, 0.23546,
0.234757, 0.200879, 0.221527, 0.207317, 0.203142, 0.184827,
0.147508, 0.208869, 0.213754, 0.113174, 0.198896, 0.192774,
0.19018, 0.2119, 0.232951, 0.196702, 0.205572, 0.205254,
0.228582, 0.22561, 0.205486, 0.239406, 0.159996, 0.228337,
0.193872, 0.25055, 0.166842, 0.210581, 0.186817, 0.237212,
0.158628, 0.198721, 0.189475, 0.202094, 0.19706, 0.163679,
0.196292, 0.206325, 0.169302, 0.156762, 0.195984, 0.19106,
0.137577, 0.0900151, 0.174999, 0.190947, 0.120973, 0.120899,
0.162586, 0.163558, 0.103274, 0.135147, 0.129939, 0.173401,
0.107895, 0.135015, 0.175011, 0.167357, 0.151569, 0.158893,
0.156669, 0.167742, 0.0773702, 0.115417, 0.126878, 0.15302,
0.0992318, 0.143231, 0.137177, 0.132447, 0.127999, 0.139249,
0.118715}, {0.103209, 0.134398, 0.114297, 0.125936, 0.172851,
0.244173, 0.243625, 0.233536, 0.210503, 0.128514, 0.216467,
0.19996, 0.209774, 0.227114, 0.230818, 0.208777, 0.232235,
0.216844, 0.225167, 0.186199, 0.167465, 0.207013, 0.21777,
0.197959, 0.215003, 0.211154, 0.222149, 0.234475, 0.211458,
0.218835, 0.227486, 0.217079, 0.219118, 0.228611, 0.171371,
0.205362, 0.199044, 0.185424, 0.185625, 0.224073, 0.194787,
0.240053, 0.218978, 0.215477, 0.23546, 0.234757, 0.200879,
0.221527, 0.207317, 0.203142, 0.184827, 0.147508, 0.208869,
0.213754, 0.113174, 0.198896, 0.192774, 0.19018, 0.2119,
0.232951, 0.196702, 0.205572, 0.205254, 0.228582, 0.22561,
0.205486, 0.239406, 0.159996, 0.228337, 0.193872, 0.25055,
0.166842, 0.210581, 0.186817, 0.237212, 0.158628, 0.198721,
0.189475, 0.202094, 0.19706, 0.163679, 0.196292, 0.206325,
0.169302, 0.156762, 0.195984, 0.19106, 0.137577, 0.0900151,
0.174999, 0.190947, 0.120973, 0.120899, 0.162586, 0.163558,
0.103274, 0.135147, 0.129939, 0.173401, 0.107895, 0.135015,
0.175011, 0.167357, 0.151569, 0.158893, 0.156669, 0.167742,
0.0773702, 0.115417, 0.126878, 0.15302, 0.0992318, 0.143231,
0.137177, 0.132447, 0.127999, 0.139249, 0.118715}, {0.103209,
0.134398, 0.114297, 0.125936, 0.172851, 0.244173, 0.243625,
0.233536, 0.210503, 0.128514, 0.216467, 0.19996, 0.209774,
0.227114, 0.230818, 0.208777, 0.232235, 0.216844, 0.225167,
0.186199, 0.167465, 0.207013, 0.21777, 0.197959, 0.215003,
0.211154, 0.222149, 0.234475, 0.211458, 0.218835, 0.227486,
0.217079, 0.219118, 0.228611, 0.171371, 0.205362, 0.199044,
0.185424, 0.185625, 0.224073, 0.194787, 0.240053, 0.218978,
0.215477, 0.23546, 0.234757, 0.200879, 0.221527, 0.207317,
0.203142, 0.184827, 0.147508, 0.208869, 0.213754, 0.113174,
0.198896, 0.192774, 0.19018, 0.2119, 0.232951, 0.196702,
0.205572, 0.205254, 0.228582, 0.22561, 0.205486, 0.239406,
0.159996, 0.228337, 0.193872, 0.25055, 0.166842, 0.210581,
0.186817, 0.237212, 0.158628, 0.198721, 0.189475, 0.202094,
0.19706, 0.163679, 0.196292, 0.206325, 0.169302, 0.156762,
0.195984, 0.19106, 0.137577, 0.0900151, 0.174999, 0.190947,
0.120973, 0.120899, 0.162586, 0.163558, 0.103274, 0.135147,
0.129939, 0.173401, 0.107895, 0.135015, 0.175011, 0.167357,
0.151569, 0.158893, 0.156669, 0.167742, 0.0773702, 0.115417,
0.126878, 0.15302, 0.0992318, 0.143231, 0.137177, 0.132447,
0.127999, 0.139249, 0.118715}, {0.104636, 0.156567, 0.0772948,
0.117778, 0.189515, 0.322165, 0.276792, 0.314587, 0.268385,
0.258179, 0.267394, 0.216733, 0.229171, 0.172449, 0.224025,
0.239496, 0.131922, 0.244453, 0.176458, 0.23645, 0.205948,
0.232932, 0.277066, 0.20337, 0.24427, 0.214644, 0.227046,
0.155532, 0.171964, 0.178323, 0.196008, 0.196032, 0.210363,
0.225722, 0.225054, 0.22194, 0.238764, 0.224871, 0.232154,
0.274775, 0.189794, 0.192686, 0.228952, 0.214454, 0.188336,
0.172544, 0.138804, 0.256876, 0.218709, 0.19804, 0.255895,
0.234875, 0.201618, 0.261365, 0.206692, 0.158673, 0.260241,
0.169934, 0.185553, 0.227954, 0.145145, 0.148504, 0.248911,
0.132856, 0.232628, 0.22523, 0.22635, 0.218192, 0.260719,
0.181328, 0.210431, 0.19387, 0.229247, 0.181733, 0.153453,
0.202745, 0.228856, 0.165085, 0.117889, 0.214757, 0.201169,
0.165828, 0.142865, 0.201776, 0.171991, 0.153244, 0.141504,
0.192861, 0.194898, 0.129385, 0.149937, 0.19319, 0.194432,
0.157312, 0.119653, 0.193245, 0.20048, 0.164028, 0.157488,
0.181629, 0.173243, 0.16185, 0.183296, 0.181543, 0.161676,
0.159499, 0.173855, 0.178487, 0.152353, 0.144599, 0.135042,
0.134424, 0.153318, 0.146137, 0.114315, 0.138051, 0.13429,
0.128222}, {0.104636, 0.156567, 0.0772948, 0.117778, 0.189515,
0.322165, 0.276792, 0.314587, 0.268385, 0.258179, 0.267394,
0.216733, 0.229171, 0.172449, 0.224025, 0.239496, 0.131922,
0.244453, 0.176458, 0.23645, 0.205948, 0.232932, 0.277066,
0.20337, 0.24427, 0.214644, 0.227046, 0.155532, 0.171964,
0.178323, 0.196008, 0.196032, 0.210363, 0.225722, 0.225054,
0.22194, 0.238764, 0.224871, 0.232154, 0.274775, 0.189794,
0.192686, 0.228952, 0.214454, 0.188336, 0.172544, 0.138804,
0.256876, 0.218709, 0.19804, 0.255895, 0.234875, 0.201618,
0.261365, 0.206692, 0.158673, 0.260241, 0.169934, 0.185553,
0.227954, 0.145145, 0.148504, 0.248911, 0.132856, 0.232628,
0.22523, 0.22635, 0.218192, 0.260719, 0.181328, 0.210431,
0.19387, 0.229247, 0.181733, 0.153453, 0.202745, 0.228856,
0.165085, 0.117889, 0.214757, 0.201169, 0.165828, 0.142865,
0.201776, 0.171991, 0.153244, 0.141504, 0.192861, 0.194898,
0.129385, 0.149937, 0.19319, 0.194432, 0.157312, 0.119653,
0.193245, 0.20048, 0.164028, 0.157488, 0.181629, 0.173243,
0.16185, 0.183296, 0.181543, 0.161676, 0.159499, 0.173855,
0.178487, 0.152353, 0.144599, 0.135042, 0.134424, 0.153318,
0.146137, 0.114315, 0.138051, 0.13429, 0.128222}, {0.104636,
0.156567, 0.0772948, 0.117778, 0.189515, 0.322165, 0.276792,
0.314587, 0.268385, 0.258179, 0.267394, 0.216733, 0.229171,
0.172449, 0.224025, 0.239496, 0.131922, 0.244453, 0.176458,
0.23645, 0.205948, 0.232932, 0.277066, 0.20337, 0.24427,
0.214644, 0.227046, 0.155532, 0.171964, 0.178323, 0.196008,
0.196032, 0.210363, 0.225722, 0.225054, 0.22194, 0.238764,
0.224871, 0.232154, 0.274775, 0.189794, 0.192686, 0.228952,
0.214454, 0.188336, 0.172544, 0.138804, 0.256876, 0.218709,
0.19804, 0.255895, 0.234875, 0.201618, 0.261365, 0.206692,
0.158673, 0.260241, 0.169934, 0.185553, 0.227954, 0.145145,
0.148504, 0.248911, 0.132856, 0.232628, 0.22523, 0.22635,
0.218192, 0.260719, 0.181328, 0.210431, 0.19387, 0.229247,
0.181733, 0.153453, 0.202745, 0.228856, 0.165085, 0.117889,
0.214757, 0.201169, 0.165828, 0.142865, 0.201776, 0.171991,
0.153244, 0.141504, 0.192861, 0.194898, 0.129385, 0.149937,
0.19319, 0.194432, 0.157312, 0.119653, 0.193245, 0.20048,
0.164028, 0.157488, 0.181629, 0.173243, 0.16185, 0.183296,
0.181543, 0.161676, 0.159499, 0.173855, 0.178487, 0.152353,
0.144599, 0.135042, 0.134424, 0.153318, 0.146137, 0.114315,
0.138051, 0.13429, 0.128222}, {0.104636, 0.156567, 0.0772948,
0.117778, 0.189515, 0.322165, 0.276792, 0.314587, 0.268385,
0.258179, 0.267394, 0.216733, 0.229171, 0.172449, 0.224025,
0.239496, 0.131922, 0.244453, 0.176458, 0.23645, 0.205948,
0.232932, 0.277066, 0.20337, 0.24427, 0.214644, 0.227046,
0.155532, 0.171964, 0.178323, 0.196008, 0.196032, 0.210363,
0.225722, 0.225054, 0.22194, 0.238764, 0.224871, 0.232154,
0.274775, 0.189794, 0.192686, 0.228952, 0.214454, 0.188336,
0.172544, 0.138804, 0.256876, 0.218709, 0.19804, 0.255895,
0.234875, 0.201618, 0.261365, 0.206692, 0.158673, 0.260241,
0.169934, 0.185553, 0.227954, 0.145145, 0.148504, 0.248911,
0.132856, 0.232628, 0.22523, 0.22635, 0.218192, 0.260719,
0.181328, 0.210431, 0.19387, 0.229247, 0.181733, 0.153453,
0.202745, 0.228856, 0.165085, 0.117889, 0.214757, 0.201169,
0.165828, 0.142865, 0.201776, 0.171991, 0.153244, 0.141504,
0.192861, 0.194898, 0.129385, 0.149937, 0.19319, 0.194432,
0.157312, 0.119653, 0.193245, 0.20048, 0.164028, 0.157488,
0.181629, 0.173243, 0.16185, 0.183296, 0.181543, 0.161676,
0.159499, 0.173855, 0.178487, 0.152353, 0.144599, 0.135042,
0.134424, 0.153318, 0.146137, 0.114315, 0.138051, 0.13429,
0.128222}, {0.104636, 0.156567, 0.0772948, 0.117778, 0.189515,
0.322165, 0.276792, 0.314587, 0.268385, 0.258179, 0.267394,
0.216733, 0.229171, 0.172449, 0.224025, 0.239496, 0.131922,
0.244453, 0.176458, 0.23645, 0.205948, 0.232932, 0.277066,
0.20337, 0.24427, 0.214644, 0.227046, 0.155532, 0.171964,
0.178323, 0.196008, 0.196032, 0.210363, 0.225722, 0.225054,
0.22194, 0.238764, 0.224871, 0.232154, 0.274775, 0.189794,
0.192686, 0.228952, 0.214454, 0.188336, 0.172544, 0.138804,
0.256876, 0.218709, 0.19804, 0.255895, 0.234875, 0.201618,
0.261365, 0.206692, 0.158673, 0.260241, 0.169934, 0.185553,
0.227954, 0.145145, 0.148504, 0.248911, 0.132856, 0.232628,
0.22523, 0.22635, 0.218192, 0.260719, 0.181328, 0.210431,
0.19387, 0.229247, 0.181733, 0.153453, 0.202745, 0.228856,
0.165085, 0.117889, 0.214757, 0.201169, 0.165828, 0.142865,
0.201776, 0.171991, 0.153244, 0.141504, 0.192861, 0.194898,
0.129385, 0.149937, 0.19319, 0.194432, 0.157312, 0.119653,
0.193245, 0.20048, 0.164028, 0.157488, 0.181629, 0.173243,
0.16185, 0.183296, 0.181543, 0.161676, 0.159499, 0.173855,
0.178487, 0.152353, 0.144599, 0.135042, 0.134424, 0.153318,
0.146137, 0.114315, 0.138051, 0.13429, 0.128222}, {0.104636,
0.156567, 0.0772948, 0.117778, 0.189515, 0.322165, 0.276792,
0.314587, 0.268385, 0.258179, 0.267394, 0.216733, 0.229171,
0.172449, 0.224025, 0.239496, 0.131922, 0.244453, 0.176458,
0.23645, 0.205948, 0.232932, 0.277066, 0.20337, 0.24427,
0.214644, 0.227046, 0.155532, 0.171964, 0.178323, 0.196008,
0.196032, 0.210363, 0.225722, 0.225054, 0.22194, 0.238764,
0.224871, 0.232154, 0.274775, 0.189794, 0.192686, 0.228952,
0.214454, 0.188336, 0.172544, 0.138804, 0.256876, 0.218709,
0.19804, 0.255895, 0.234875, 0.201618, 0.261365, 0.206692,
0.158673, 0.260241, 0.169934, 0.185553, 0.227954, 0.145145,
0.148504, 0.248911, 0.132856, 0.232628, 0.22523, 0.22635,
0.218192, 0.260719, 0.181328, 0.210431, 0.19387, 0.229247,
0.181733, 0.153453, 0.202745, 0.228856, 0.165085, 0.117889,
0.214757, 0.201169, 0.165828, 0.142865, 0.201776, 0.171991,
0.153244, 0.141504, 0.192861, 0.194898, 0.129385, 0.149937,
0.19319, 0.194432, 0.157312, 0.119653, 0.193245, 0.20048,
0.164028, 0.157488, 0.181629, 0.173243, 0.16185, 0.183296,
0.181543, 0.161676, 0.159499, 0.173855, 0.178487, 0.152353,
0.144599, 0.135042, 0.134424, 0.153318, 0.146137, 0.114315,
0.138051, 0.13429, 0.128222}, {0.0585376, 0.146327, 0.108767,
0.115557, 0.19975, 0.5297, 0.597535, 0.502256, 0.60903,
0.610243, 0.612134, 0.606436, 0.559782, 0.582578, 0.522404,
0.55227, 0.57197, 0.537596, 0.569602, 0.53923, 0.558962,
0.552182, 0.531731, 0.562844, 0.530124, 0.545448, 0.561372,
0.550776, 0.56209, 0.551474, 0.562277, 0.548381, 0.550288,
0.55886, 0.541532, 0.553969, 0.541885, 0.546268, 0.550279,
0.547981, 0.558469, 0.55587, 0.559328, 0.561592, 0.549873,
0.549613, 0.543533, 0.544565, 0.537398, 0.526265, 0.538825,
0.546342, 0.544578, 0.553164, 0.56808, 0.561459, 0.554302,
0.560441, 0.549375, 0.539756, 0.538292, 0.52115, 0.526616,
0.531872, 0.530434, 0.553813, 0.555245, 0.551468, 0.577122,
0.567819, 0.539281, 0.552629, 0.493914, 0.449303, 0.416266,
0.230792, 0.197839, 0.286951, 0.343914, 0.278748, 0.30281,
0.276822, 0.151504, 0.207606, 0.265424, 0.248392, 0.224802,
0.233601, 0.201845, 0.248936, 0.189008, 0.250512, 0.228337,
0.136319, 0.246952, 0.238738, 0.195164, 0.243573, 0.217721,
0.223386, 0.249359, 0.175097, 0.242246, 0.239271, 0.191097,
0.250546, 0.204941, 0.204305, 0.237595, 0.177583, 0.165396,
0.191186, 0.125248, 0.169321, 0.152658, 0.120767, 0.118861,
0.0869682}, {0.0585376, 0.146327, 0.108767, 0.115557, 0.19975,
0.5297, 0.597535, 0.502256, 0.60903, 0.610243, 0.612134,
0.606436, 0.559782, 0.582578, 0.522404, 0.55227, 0.57197,
0.537596, 0.569602, 0.53923, 0.558962, 0.552182, 0.531731,
0.562844, 0.530124, 0.545448, 0.561372, 0.550776, 0.56209,
0.551474, 0.562277, 0.548381, 0.550288, 0.55886, 0.541532,
0.553969, 0.541885, 0.546268, 0.550279, 0.547981, 0.558469,
0.55587, 0.559328, 0.561592, 0.549873, 0.549613, 0.543533,
0.544565, 0.537398, 0.526265, 0.538825, 0.546342, 0.544578,
0.553164, 0.56808, 0.561459, 0.554302, 0.560441, 0.549375,
0.539756, 0.538292, 0.52115, 0.526616, 0.531872, 0.530434,
0.553813, 0.555245, 0.551468, 0.577122, 0.567819, 0.539281,
0.552629, 0.493914, 0.449303, 0.416266, 0.230792, 0.197839,
0.286951, 0.343914, 0.278748, 0.30281, 0.276822, 0.151504,
0.207606, 0.265424, 0.248392, 0.224802, 0.233601, 0.201845,
0.248936, 0.189008, 0.250512, 0.228337, 0.136319, 0.246952,
0.238738, 0.195164, 0.243573, 0.217721, 0.223386, 0.249359,
0.175097, 0.242246, 0.239271, 0.191097, 0.250546, 0.204941,
0.204305, 0.237595, 0.177583, 0.165396, 0.191186, 0.125248,
0.169321, 0.152658, 0.120767, 0.118861, 0.0869682}, {0.0585376,
0.146327, 0.108767, 0.115557, 0.19975, 0.5297, 0.597535,
0.502256, 0.60903, 0.610243, 0.612134, 0.606436, 0.559782,
0.582578, 0.522404, 0.55227, 0.57197, 0.537596, 0.569602,
0.53923, 0.558962, 0.552182, 0.531731, 0.562844, 0.530124,
0.545448, 0.561372, 0.550776, 0.56209, 0.551474, 0.562277,
0.548381, 0.550288, 0.55886, 0.541532, 0.553969, 0.541885,
0.546268, 0.550279, 0.547981, 0.558469, 0.55587, 0.559328,
0.561592, 0.549873, 0.549613, 0.543533, 0.544565, 0.537398,
0.526265, 0.538825, 0.546342, 0.544578, 0.553164, 0.56808,
0.561459, 0.554302, 0.560441, 0.549375, 0.539756, 0.538292,
0.52115, 0.526616, 0.531872, 0.530434, 0.553813, 0.555245,
0.551468, 0.577122, 0.567819, 0.539281, 0.552629, 0.493914,
0.449303, 0.416266, 0.230792, 0.197839, 0.286951, 0.343914,
0.278748, 0.30281, 0.276822, 0.151504, 0.207606, 0.265424,
0.248392, 0.224802, 0.233601, 0.201845, 0.248936, 0.189008,
0.250512, 0.228337, 0.136319, 0.246952, 0.238738, 0.195164,
0.243573, 0.217721, 0.223386, 0.249359, 0.175097, 0.242246,
0.239271, 0.191097, 0.250546, 0.204941, 0.204305, 0.237595,
0.177583, 0.165396, 0.191186, 0.125248, 0.169321, 0.152658,
0.120767, 0.118861, 0.0869682}, {0.0585376, 0.146327, 0.108767,
0.115557, 0.19975, 0.5297, 0.597535, 0.502256, 0.60903,
0.610243, 0.612134, 0.606436, 0.559782, 0.582578, 0.522404,
0.55227, 0.57197, 0.537596, 0.569602, 0.53923, 0.558962,
0.552182, 0.531731, 0.562844, 0.530124, 0.545448, 0.561372,
0.550776, 0.56209, 0.551474, 0.562277, 0.548381, 0.550288,
0.55886, 0.541532, 0.553969, 0.541885, 0.546268, 0.550279,
0.547981, 0.558469, 0.55587, 0.559328, 0.561592, 0.549873,
0.549613, 0.543533, 0.544565, 0.537398, 0.526265, 0.538825,
0.546342, 0.544578, 0.553164, 0.56808, 0.561459, 0.554302,
0.560441, 0.549375, 0.539756, 0.538292, 0.52115, 0.526616,
0.531872, 0.530434, 0.553813, 0.555245, 0.551468, 0.577122,
0.567819, 0.539281, 0.552629, 0.493914, 0.449303, 0.416266,
0.230792, 0.197839, 0.286951, 0.343914, 0.278748, 0.30281,
0.276822, 0.151504, 0.207606, 0.265424, 0.248392, 0.224802,
0.233601, 0.201845, 0.248936, 0.189008, 0.250512, 0.228337,
0.136319, 0.246952, 0.238738, 0.195164, 0.243573, 0.217721,
0.223386, 0.249359, 0.175097, 0.242246, 0.239271, 0.191097,
0.250546, 0.204941, 0.204305, 0.237595, 0.177583, 0.165396,
0.191186, 0.125248, 0.169321, 0.152658, 0.120767, 0.118861,
0.0869682}, {0.107928, 0.145272, 0.112451, 0.115611, 0.162151,
0.604432, 0.692425, 0.696352, 0.778637, 0.793982, 0.797186,
0.771631, 0.742055, 0.733981, 0.706865, 0.708569, 0.737045,
0.706471, 0.718448, 0.699881, 0.715796, 0.706999, 0.702462,
0.714943, 0.694139, 0.70689, 0.715746, 0.715172, 0.721649,
0.715711, 0.715026, 0.711779, 0.705661, 0.717388, 0.70591,
0.710964, 0.704378, 0.709157, 0.712844, 0.699881, 0.728529,
0.718033, 0.705374, 0.726767, 0.703021, 0.698377, 0.714568,
0.692827, 0.689056, 0.704989, 0.690371, 0.700338, 0.724098,
0.712841, 0.716781, 0.734916, 0.706266, 0.710125, 0.715778,
0.682493, 0.692023, 0.696419, 0.671081, 0.688825, 0.713852,
0.702313, 0.713712, 0.732413, 0.717207, 0.721741, 0.710181,
0.666068, 0.647033, 0.596134, 0.473239, 0.419226, 0.408723,
0.426502, 0.337298, 0.429996, 0.383055, 0.292724, 0.361827,
0.359733, 0.337536, 0.293516, 0.347485, 0.332148, 0.330014,
0.303491, 0.352537, 0.289614, 0.308821, 0.352467, 0.31372,
0.315907, 0.329302, 0.310493, 0.32507, 0.331376, 0.311149,
0.340023, 0.306642, 0.311703, 0.338965, 0.293528, 0.322439,
0.319427, 0.263093, 0.294582, 0.25747, 0.196395, 0.2222,
0.183578, 0.138578, 0.1882, 0.111407, 0.162107}, {0.107928,
0.145272, 0.112451, 0.115611, 0.162151, 0.604432, 0.692425,
0.696352, 0.778637, 0.793982, 0.797186, 0.771631, 0.742055,
0.733981, 0.706865, 0.708569, 0.737045, 0.706471, 0.718448,
0.699881, 0.715796, 0.706999, 0.702462, 0.714943, 0.694139,
0.70689, 0.715746, 0.715172, 0.721649, 0.715711, 0.715026,
0.711779, 0.705661, 0.717388, 0.70591, 0.710964, 0.704378,
0.709157, 0.712844, 0.699881, 0.728529, 0.718033, 0.705374,
0.726767, 0.703021, 0.698377, 0.714568, 0.692827, 0.689056,
0.704989, 0.690371, 0.700338, 0.724098, 0.712841, 0.716781,
0.734916, 0.706266, 0.710125, 0.715778, 0.682493, 0.692023,
0.696419, 0.671081, 0.688825, 0.713852, 0.702313, 0.713712,
0.732413, 0.717207, 0.721741, 0.710181, 0.666068, 0.647033,
0.596134, 0.473239, 0.419226, 0.408723, 0.426502, 0.337298,
0.429996, 0.383055, 0.292724, 0.361827, 0.359733, 0.337536,
0.293516, 0.347485, 0.332148, 0.330014, 0.303491, 0.352537,
0.289614, 0.308821, 0.352467, 0.31372, 0.315907, 0.329302,
0.310493, 0.32507, 0.331376, 0.311149, 0.340023, 0.306642,
0.311703, 0.338965, 0.293528, 0.322439, 0.319427, 0.263093,
0.294582, 0.25747, 0.196395, 0.2222, 0.183578, 0.138578, 0.1882,
0.111407, 0.162107}, {0.107928, 0.145272, 0.112451, 0.115611,
0.162151, 0.604432, 0.692425, 0.696352, 0.778637, 0.793982,
0.797186, 0.771631, 0.742055, 0.733981, 0.706865, 0.708569,
0.737045, 0.706471, 0.718448, 0.699881, 0.715796, 0.706999,
0.702462, 0.714943, 0.694139, 0.70689, 0.715746, 0.715172,
0.721649, 0.715711, 0.715026, 0.711779, 0.705661, 0.717388,
0.70591, 0.710964, 0.704378, 0.709157, 0.712844, 0.699881,
0.728529, 0.718033, 0.705374, 0.726767, 0.703021, 0.698377,
0.714568, 0.692827, 0.689056, 0.704989, 0.690371, 0.700338,
0.724098, 0.712841, 0.716781, 0.734916, 0.706266, 0.710125,
0.715778, 0.682493, 0.692023, 0.696419, 0.671081, 0.688825,
0.713852, 0.702313, 0.713712, 0.732413, 0.717207, 0.721741,
0.710181, 0.666068, 0.647033, 0.596134, 0.473239, 0.419226,
0.408723, 0.426502, 0.337298, 0.429996, 0.383055, 0.292724,
0.361827, 0.359733, 0.337536, 0.293516, 0.347485, 0.332148,
0.330014, 0.303491, 0.352537, 0.289614, 0.308821, 0.352467,
0.31372, 0.315907, 0.329302, 0.310493, 0.32507, 0.331376,
0.311149, 0.340023, 0.306642, 0.311703, 0.338965, 0.293528,
0.322439, 0.319427, 0.263093, 0.294582, 0.25747, 0.196395,
0.2222, 0.183578, 0.138578, 0.1882, 0.111407, 0.162107},
{0.107928, 0.145272, 0.112451, 0.115611, 0.162151, 0.604432,
0.692425, 0.696352, 0.778637, 0.793982, 0.797186, 0.771631,
0.742055, 0.733981, 0.706865, 0.708569, 0.737045, 0.706471,
0.718448, 0.699881, 0.715796, 0.706999, 0.702462, 0.714943,
0.694139, 0.70689, 0.715746, 0.715172, 0.721649, 0.715711,
0.715026, 0.711779, 0.705661, 0.717388, 0.70591, 0.710964,
0.704378, 0.709157, 0.712844, 0.699881, 0.728529, 0.718033,
0.705374, 0.726767, 0.703021, 0.698377, 0.714568, 0.692827,
0.689056, 0.704989, 0.690371, 0.700338, 0.724098, 0.712841,
0.716781, 0.734916, 0.706266, 0.710125, 0.715778, 0.682493,
0.692023, 0.696419, 0.671081, 0.688825, 0.713852, 0.702313,
0.713712, 0.732413, 0.717207, 0.721741, 0.710181, 0.666068,
0.647033, 0.596134, 0.473239, 0.419226, 0.408723, 0.426502,
0.337298, 0.429996, 0.383055, 0.292724, 0.361827, 0.359733,
0.337536, 0.293516, 0.347485, 0.332148, 0.330014, 0.303491,
0.352537, 0.289614, 0.308821, 0.352467, 0.31372, 0.315907,
0.329302, 0.310493, 0.32507, 0.331376, 0.311149, 0.340023,
0.306642, 0.311703, 0.338965, 0.293528, 0.322439, 0.319427,
0.263093, 0.294582, 0.25747, 0.196395, 0.2222, 0.183578,
0.138578, 0.1882, 0.111407, 0.162107}, {0.107928, 0.145272,
0.112451, 0.115611, 0.162151, 0.604432, 0.692425, 0.696352,
0.778637, 0.793982, 0.797186, 0.771631, 0.742055, 0.733981,
0.706865, 0.708569, 0.737045, 0.706471, 0.718448, 0.699881,
0.715796, 0.706999, 0.702462, 0.714943, 0.694139, 0.70689,
0.715746, 0.715172, 0.721649, 0.715711, 0.715026, 0.711779,
0.705661, 0.717388, 0.70591, 0.710964, 0.704378, 0.709157,
0.712844, 0.699881, 0.728529, 0.718033, 0.705374, 0.726767,
0.703021, 0.698377, 0.714568, 0.692827, 0.689056, 0.704989,
0.690371, 0.700338, 0.724098, 0.712841, 0.716781, 0.734916,
0.706266, 0.710125, 0.715778, 0.682493, 0.692023, 0.696419,
0.671081, 0.688825, 0.713852, 0.702313, 0.713712, 0.732413,
0.717207, 0.721741, 0.710181, 0.666068, 0.647033, 0.596134,
0.473239, 0.419226, 0.408723, 0.426502, 0.337298, 0.429996,
0.383055, 0.292724, 0.361827, 0.359733, 0.337536, 0.293516,
0.347485, 0.332148, 0.330014, 0.303491, 0.352537, 0.289614,
0.308821, 0.352467, 0.31372, 0.315907, 0.329302, 0.310493,
0.32507, 0.331376, 0.311149, 0.340023, 0.306642, 0.311703,
0.338965, 0.293528, 0.322439, 0.319427, 0.263093, 0.294582,
0.25747, 0.196395, 0.2222, 0.183578, 0.138578, 0.1882, 0.111407,
0.162107}, {0.107928, 0.145272, 0.112451, 0.115611, 0.162151,
0.604432, 0.692425, 0.696352, 0.778637, 0.793982, 0.797186,
0.771631, 0.742055, 0.733981, 0.706865, 0.708569, 0.737045,
0.706471, 0.718448, 0.699881, 0.715796, 0.706999, 0.702462,
0.714943, 0.694139, 0.70689, 0.715746, 0.715172, 0.721649,
0.715711, 0.715026, 0.711779, 0.705661, 0.717388, 0.70591,
0.710964, 0.704378, 0.709157, 0.712844, 0.699881, 0.728529,
0.718033, 0.705374, 0.726767, 0.703021, 0.698377, 0.714568,
0.692827, 0.689056, 0.704989, 0.690371, 0.700338, 0.724098,
0.712841, 0.716781, 0.734916, 0.706266, 0.710125, 0.715778,
0.682493, 0.692023, 0.696419, 0.671081, 0.688825, 0.713852,
0.702313, 0.713712, 0.732413, 0.717207, 0.721741, 0.710181,
0.666068, 0.647033, 0.596134, 0.473239, 0.419226, 0.408723,
0.426502, 0.337298, 0.429996, 0.383055, 0.292724, 0.361827,
0.359733, 0.337536, 0.293516, 0.347485, 0.332148, 0.330014,
0.303491, 0.352537, 0.289614, 0.308821, 0.352467, 0.31372,
0.315907, 0.329302, 0.310493, 0.32507, 0.331376, 0.311149,
0.340023, 0.306642, 0.311703, 0.338965, 0.293528, 0.322439,
0.319427, 0.263093, 0.294582, 0.25747, 0.196395, 0.2222,
0.183578, 0.138578, 0.1882, 0.111407, 0.162107}, {0.102138,
0.146256, 0.10433, 0.12477, 0.104707, 0.525962, 0.531558,
0.625054, 0.660795, 0.680382, 0.685974, 0.646625, 0.648425,
0.612077, 0.627529, 0.597011, 0.634633, 0.605099, 0.604372,
0.593077, 0.612532, 0.595914, 0.605198, 0.606175, 0.592451,
0.60454, 0.60605, 0.611408, 0.613493, 0.612602, 0.599739,
0.61343, 0.596184, 0.610483, 0.607214, 0.603435, 0.600817,
0.608896, 0.59971, 0.668729, 0.57533, 0.678561, 0.762395,
0.503807, 0.712878, 0.765685, 0.485705, 0.753359, 0.762926,
0.525171, 0.763687, 0.775249, 0.510408, 0.772071, 0.780366,
0.518855, 0.788488, 0.754019, 0.578414, 0.801143, 0.730699,
0.615969, 0.801784, 0.735858, 0.591046, 0.811521, 0.756735,
0.593656, 0.82169, 0.726812, 0.660439, 0.809817, 0.687199,
0.709452, 0.766805, 0.724507, 0.718288, 0.729226, 0.751239,
0.725338, 0.735399, 0.741736, 0.730913, 0.730232, 0.73693,
0.739628, 0.734382, 0.733406, 0.735445, 0.736321, 0.733248,
0.737663, 0.736298, 0.734236, 0.735722, 0.736162, 0.736111,
0.73596, 0.735652, 0.734691, 0.736126, 0.734212, 0.73717,
0.73625, 0.734606, 0.73499, 0.728902, 0.691492, 0.638773,
0.558446, 0.483659, 0.450524, 0.429686, 0.408927, 0.374167,
0.312872, 0.244978, 0.213585}, {0.102138, 0.146256, 0.10433,
0.12477, 0.104707, 0.525962, 0.531558, 0.625054, 0.660795,
0.680382, 0.685974, 0.646625, 0.648425, 0.612077, 0.627529,
0.597011, 0.634633, 0.605099, 0.604372, 0.593077, 0.612532,
0.595914, 0.605198, 0.606175, 0.592451, 0.60454, 0.60605,
0.611408, 0.613493, 0.612602, 0.599739, 0.61343, 0.596184,
0.610483, 0.607214, 0.603435, 0.600817, 0.608896, 0.59971,
0.668729, 0.57533, 0.678561, 0.762395, 0.503807, 0.712878,
0.765685, 0.485705, 0.753359, 0.762926, 0.525171, 0.763687,
0.775249, 0.510408, 0.772071, 0.780366, 0.518855, 0.788488,
0.754019, 0.578414, 0.801143, 0.730699, 0.615969, 0.801784,
0.735858, 0.591046, 0.811521, 0.756735, 0.593656, 0.82169,
0.726812, 0.660439, 0.809817, 0.687199, 0.709452, 0.766805,
0.724507, 0.718288, 0.729226, 0.751239, 0.725338, 0.735399,
0.741736, 0.730913, 0.730232, 0.73693, 0.739628, 0.734382,
0.733406, 0.735445, 0.736321, 0.733248, 0.737663, 0.736298,
0.734236, 0.735722, 0.736162, 0.736111, 0.73596, 0.735652,
0.734691, 0.736126, 0.734212, 0.73717, 0.73625, 0.734606,
0.73499, 0.728902, 0.691492, 0.638773, 0.558446, 0.483659,
0.450524, 0.429686, 0.408927, 0.374167, 0.312872, 0.244978,
0.213585}, {0.102138, 0.146256, 0.10433, 0.12477, 0.104707,
0.525962, 0.531558, 0.625054, 0.660795, 0.680382, 0.685974,
0.646625, 0.648425, 0.612077, 0.627529, 0.597011, 0.634633,
0.605099, 0.604372, 0.593077, 0.612532, 0.595914, 0.605198,
0.606175, 0.592451, 0.60454, 0.60605, 0.611408, 0.613493,
0.612602, 0.599739, 0.61343, 0.596184, 0.610483, 0.607214,
0.603435, 0.600817, 0.608896, 0.59971, 0.668729, 0.57533,
0.678561, 0.762395, 0.503807, 0.712878, 0.765685, 0.485705,
0.753359, 0.762926, 0.525171, 0.763687, 0.775249, 0.510408,
0.772071, 0.780366, 0.518855, 0.788488, 0.754019, 0.578414,
0.801143, 0.730699, 0.615969, 0.801784, 0.735858, 0.591046,
0.811521, 0.756735, 0.593656, 0.82169, 0.726812, 0.660439,
0.809817, 0.687199, 0.709452, 0.766805, 0.724507, 0.718288,
0.729226, 0.751239, 0.725338, 0.735399, 0.741736, 0.730913,
0.730232, 0.73693, 0.739628, 0.734382, 0.733406, 0.735445,
0.736321, 0.733248, 0.737663, 0.736298, 0.734236, 0.735722,
0.736162, 0.736111, 0.73596, 0.735652, 0.734691, 0.736126,
0.734212, 0.73717, 0.73625, 0.734606, 0.73499, 0.728902,
0.691492, 0.638773, 0.558446, 0.483659, 0.450524, 0.429686,
0.408927, 0.374167, 0.312872, 0.244978, 0.213585}, {0.102138,
0.146256, 0.10433, 0.12477, 0.104707, 0.525962, 0.531558,
0.625054, 0.660795, 0.680382, 0.685974, 0.646625, 0.648425,
0.612077, 0.627529, 0.597011, 0.634633, 0.605099, 0.604372,
0.593077, 0.612532, 0.595914, 0.605198, 0.606175, 0.592451,
0.60454, 0.60605, 0.611408, 0.613493, 0.612602, 0.599739,
0.61343, 0.596184, 0.610483, 0.607214, 0.603435, 0.600817,
0.608896, 0.59971, 0.668729, 0.57533, 0.678561, 0.762395,
0.503807, 0.712878, 0.765685, 0.485705, 0.753359, 0.762926,
0.525171, 0.763687, 0.775249, 0.510408, 0.772071, 0.780366,
0.518855, 0.788488, 0.754019, 0.578414, 0.801143, 0.730699,
0.615969, 0.801784, 0.735858, 0.591046, 0.811521, 0.756735,
0.593656, 0.82169, 0.726812, 0.660439, 0.809817, 0.687199,
0.709452, 0.766805, 0.724507, 0.718288, 0.729226, 0.751239,
0.725338, 0.735399, 0.741736, 0.730913, 0.730232, 0.73693,
0.739628, 0.734382, 0.733406, 0.735445, 0.736321, 0.733248,
0.737663, 0.736298, 0.734236, 0.735722, 0.736162, 0.736111,
0.73596, 0.735652, 0.734691, 0.736126, 0.734212, 0.73717,
0.73625, 0.734606, 0.73499, 0.728902, 0.691492, 0.638773,
0.558446, 0.483659, 0.450524, 0.429686, 0.408927, 0.374167,
0.312872, 0.244978, 0.213585}, {0.102138, 0.146256, 0.10433,
0.12477, 0.104707, 0.525962, 0.531558, 0.625054, 0.660795,
0.680382, 0.685974, 0.646625, 0.648425, 0.612077, 0.627529,
0.597011, 0.634633, 0.605099, 0.604372, 0.593077, 0.612532,
0.595914, 0.605198, 0.606175, 0.592451, 0.60454, 0.60605,
0.611408, 0.613493, 0.612602, 0.599739, 0.61343, 0.596184,
0.610483, 0.607214, 0.603435, 0.600817, 0.608896, 0.59971,
0.668729, 0.57533, 0.678561, 0.762395, 0.503807, 0.712878,
0.765685, 0.485705, 0.753359, 0.762926, 0.525171, 0.763687,
0.775249, 0.510408, 0.772071, 0.780366, 0.518855, 0.788488,
0.754019, 0.578414, 0.801143, 0.730699, 0.615969, 0.801784,
0.735858, 0.591046, 0.811521, 0.756735, 0.593656, 0.82169,
0.726812, 0.660439, 0.809817, 0.687199, 0.709452, 0.766805,
0.724507, 0.718288, 0.729226, 0.751239, 0.725338, 0.735399,
0.741736, 0.730913, 0.730232, 0.73693, 0.739628, 0.734382,
0.733406, 0.735445, 0.736321, 0.733248, 0.737663, 0.736298,
0.734236, 0.735722, 0.736162, 0.736111, 0.73596, 0.735652,
0.734691, 0.736126, 0.734212, 0.73717, 0.73625, 0.734606,
0.73499, 0.728902, 0.691492, 0.638773, 0.558446, 0.483659,
0.450524, 0.429686, 0.408927, 0.374167, 0.312872, 0.244978,
0.213585}, {0.102138, 0.146256, 0.10433, 0.12477, 0.104707,
0.525962, 0.531558, 0.625054, 0.660795, 0.680382, 0.685974,
0.646625, 0.648425, 0.612077, 0.627529, 0.597011, 0.634633,
0.605099, 0.604372, 0.593077, 0.612532, 0.595914, 0.605198,
0.606175, 0.592451, 0.60454, 0.60605, 0.611408, 0.613493,
0.612602, 0.599739, 0.61343, 0.596184, 0.610483, 0.607214,
0.603435, 0.600817, 0.608896, 0.59971, 0.668729, 0.57533,
0.678561, 0.762395, 0.503807, 0.712878, 0.765685, 0.485705,
0.753359, 0.762926, 0.525171, 0.763687, 0.775249, 0.510408,
0.772071, 0.780366, 0.518855, 0.788488, 0.754019, 0.578414,
0.801143, 0.730699, 0.615969, 0.801784, 0.735858, 0.591046,
0.811521, 0.756735, 0.593656, 0.82169, 0.726812, 0.660439,
0.809817, 0.687199, 0.709452, 0.766805, 0.724507, 0.718288,
0.729226, 0.751239, 0.725338, 0.735399, 0.741736, 0.730913,
0.730232, 0.73693, 0.739628, 0.734382, 0.733406, 0.735445,
0.736321, 0.733248, 0.737663, 0.736298, 0.734236, 0.735722,
0.736162, 0.736111, 0.73596, 0.735652, 0.734691, 0.736126,
0.734212, 0.73717, 0.73625, 0.734606, 0.73499, 0.728902,
0.691492, 0.638773, 0.558446, 0.483659, 0.450524, 0.429686,
0.408927, 0.374167, 0.312872, 0.244978, 0.213585}, {0.104426,
0.129884, 0.121058, 0.114537, 0.133108, 0.324693, 0.290704,
0.324838, 0.263345, 0.292815, 0.287124, 0.202254, 0.302185,
0.179113, 0.310352, 0.221038, 0.279562, 0.245593, 0.234256,
0.227339, 0.271929, 0.164052, 0.236579, 0.237445, 0.20196,
0.248714, 0.248636, 0.233756, 0.234385, 0.240255, 0.198272,
0.273672, 0.222751, 0.237495, 0.256097, 0.216817, 0.222361,
0.245473, 0.438518, 0.655441, 0.838822, 0.88789, 0.881133,
0.880912, 0.89425, 0.907696, 0.915384, 0.933323, 0.939901,
0.93572, 0.936668, 0.935875, 0.939703, 0.949613, 0.951471,
0.948874, 0.950748, 0.951684, 0.95069, 0.963636, 0.963979,
0.962536, 0.965265, 0.963557, 0.964652, 0.972444, 0.973636,
0.974092, 0.979583, 0.976577, 0.976993, 0.983619, 0.986056,
0.987264, 0.992961, 0.992551, 0.994544, 0.996755, 0.998311,
0.999183, 0.999008, 0.998978, 0.997948, 0.998709, 0.999144,
0.999718, 1., 0.999106, 0.999192, 0.998695, 0.998942, 0.999052,
0.999051, 0.999379, 0.998847, 0.998843, 0.999354, 0.998959,
0.9992, 0.99889, 0.999137, 0.998408, 0.998947, 0.998978,
0.998844, 0.996744, 0.990128, 0.949809, 0.879108, 0.781069,
0.681203, 0.618002, 0.581565, 0.552137, 0.506932, 0.436137,
0.317421, 0.276735}, {0.104426, 0.129884, 0.121058, 0.114537,
0.133108, 0.324693, 0.290704, 0.324838, 0.263345, 0.292815,
0.287124, 0.202254, 0.302185, 0.179113, 0.310352, 0.221038,
0.279562, 0.245593, 0.234256, 0.227339, 0.271929, 0.164052,
0.236579, 0.237445, 0.20196, 0.248714, 0.248636, 0.233756,
0.234385, 0.240255, 0.198272, 0.273672, 0.222751, 0.237495,
0.256097, 0.216817, 0.222361, 0.245473, 0.438518, 0.655441,
0.838822, 0.88789, 0.881133, 0.880912, 0.89425, 0.907696,
0.915384, 0.933323, 0.939901, 0.93572, 0.936668, 0.935875,
0.939703, 0.949613, 0.951471, 0.948874, 0.950748, 0.951684,
0.95069, 0.963636, 0.963979, 0.962536, 0.965265, 0.963557,
0.964652, 0.972444, 0.973636, 0.974092, 0.979583, 0.976577,
0.976993, 0.983619, 0.986056, 0.987264, 0.992961, 0.992551,
0.994544, 0.996755, 0.998311, 0.999183, 0.999008, 0.998978,
0.997948, 0.998709, 0.999144, 0.999718, 1., 0.999106, 0.999192,
0.998695, 0.998942, 0.999052, 0.999051, 0.999379, 0.998847,
0.998843, 0.999354, 0.998959, 0.9992, 0.99889, 0.999137,
0.998408, 0.998947, 0.998978, 0.998844, 0.996744, 0.990128,
0.949809, 0.879108, 0.781069, 0.681203, 0.618002, 0.581565,
0.552137, 0.506932, 0.436137, 0.317421, 0.276735}, {0.104426,
0.129884, 0.121058, 0.114537, 0.133108, 0.324693, 0.290704,
0.324838, 0.263345, 0.292815, 0.287124, 0.202254, 0.302185,
0.179113, 0.310352, 0.221038, 0.279562, 0.245593, 0.234256,
0.227339, 0.271929, 0.164052, 0.236579, 0.237445, 0.20196,
0.248714, 0.248636, 0.233756, 0.234385, 0.240255, 0.198272,
0.273672, 0.222751, 0.237495, 0.256097, 0.216817, 0.222361,
0.245473, 0.438518, 0.655441, 0.838822, 0.88789, 0.881133,
0.880912, 0.89425, 0.907696, 0.915384, 0.933323, 0.939901,
0.93572, 0.936668, 0.935875, 0.939703, 0.949613, 0.951471,
0.948874, 0.950748, 0.951684, 0.95069, 0.963636, 0.963979,
0.962536, 0.965265, 0.963557, 0.964652, 0.972444, 0.973636,
0.974092, 0.979583, 0.976577, 0.976993, 0.983619, 0.986056,
0.987264, 0.992961, 0.992551, 0.994544, 0.996755, 0.998311,
0.999183, 0.999008, 0.998978, 0.997948, 0.998709, 0.999144,
0.999718, 1., 0.999106, 0.999192, 0.998695, 0.998942, 0.999052,
0.999051, 0.999379, 0.998847, 0.998843, 0.999354, 0.998959,
0.9992, 0.99889, 0.999137, 0.998408, 0.998947, 0.998978,
0.998844, 0.996744, 0.990128, 0.949809, 0.879108, 0.781069,
0.681203, 0.618002, 0.581565, 0.552137, 0.506932, 0.436137,
0.317421, 0.276735}, {0.0869757, 0.123518, 0.10625, 0.0748925,
0.13305, 0.218797, 0.249276, 0.189258, 0.189318, 0.202667,
0.187869, 0.178186, 0.164748, 0.1537, 0.1677, 0.142744,
0.142598, 0.11334, 0.149163, 0.148466, 0.0793525, 0.175828,
0.162009, 0.172866, 0.165607, 0.156917, 0.156166, 0.161589,
0.162257, 0.149444, 0.100628, 0.129846, 0.142204, 0.159507,
0.120546, 0.175531, 0.16571, 0.111364, 0.358562, 0.614854,
0.760432, 0.802818, 0.785238, 0.786284, 0.799359, 0.805814,
0.819298, 0.832688, 0.84032, 0.836535, 0.828131, 0.827615,
0.841422, 0.846494, 0.845413, 0.849083, 0.843609, 0.846026,
0.846752, 0.855507, 0.859422, 0.860384, 0.855467, 0.857947,
0.861379, 0.862619, 0.866983, 0.869791, 0.869333, 0.868828,
0.872624, 0.871996, 0.879098, 0.881692, 0.882784, 0.883424,
0.885981, 0.887727, 0.888446, 0.890025, 0.889442, 0.88921,
0.88841, 0.88951, 0.889099, 0.890295, 0.889845, 0.88984,
0.889573, 0.888923, 0.889174, 0.889402, 0.889552, 0.889408,
0.889283, 0.888993, 0.889514, 0.889246, 0.889782, 0.889515,
0.889193, 0.888736, 0.889067, 0.889378, 0.889088, 0.887981,
0.88536, 0.85525, 0.796403, 0.712481, 0.621357, 0.55182,
0.512067, 0.493952, 0.456641, 0.398821, 0.307422, 0.263649},
{0.0869757, 0.123518, 0.10625, 0.0748925, 0.13305, 0.218797,
0.249276, 0.189258, 0.189318, 0.202667, 0.187869, 0.178186,
0.164748, 0.1537, 0.1677, 0.142744, 0.142598, 0.11334, 0.149163,
0.148466, 0.0793525, 0.175828, 0.162009, 0.172866, 0.165607,
0.156917, 0.156166, 0.161589, 0.162257, 0.149444, 0.100628,
0.129846, 0.142204, 0.159507, 0.120546, 0.175531, 0.16571,
0.111364, 0.358562, 0.614854, 0.760432, 0.802818, 0.785238,
0.786284, 0.799359, 0.805814, 0.819298, 0.832688, 0.84032,
0.836535, 0.828131, 0.827615, 0.841422, 0.846494, 0.845413,
0.849083, 0.843609, 0.846026, 0.846752, 0.855507, 0.859422,
0.860384, 0.855467, 0.857947, 0.861379, 0.862619, 0.866983,
0.869791, 0.869333, 0.868828, 0.872624, 0.871996, 0.879098,
0.881692, 0.882784, 0.883424, 0.885981, 0.887727, 0.888446,
0.890025, 0.889442, 0.88921, 0.88841, 0.88951, 0.889099,
0.890295, 0.889845, 0.88984, 0.889573, 0.888923, 0.889174,
0.889402, 0.889552, 0.889408, 0.889283, 0.888993, 0.889514,
0.889246, 0.889782, 0.889515, 0.889193, 0.888736, 0.889067,
0.889378, 0.889088, 0.887981, 0.88536, 0.85525, 0.796403,
0.712481, 0.621357, 0.55182, 0.512067, 0.493952, 0.456641,
0.398821, 0.307422, 0.263649}, {0.0869757, 0.123518, 0.10625,
0.0748925, 0.13305, 0.218797, 0.249276, 0.189258, 0.189318,
0.202667, 0.187869, 0.178186, 0.164748, 0.1537, 0.1677,
0.142744, 0.142598, 0.11334, 0.149163, 0.148466, 0.0793525,
0.175828, 0.162009, 0.172866, 0.165607, 0.156917, 0.156166,
0.161589, 0.162257, 0.149444, 0.100628, 0.129846, 0.142204,
0.159507, 0.120546, 0.175531, 0.16571, 0.111364, 0.358562,
0.614854, 0.760432, 0.802818, 0.785238, 0.786284, 0.799359,
0.805814, 0.819298, 0.832688, 0.84032, 0.836535, 0.828131,
0.827615, 0.841422, 0.846494, 0.845413, 0.849083, 0.843609,
0.846026, 0.846752, 0.855507, 0.859422, 0.860384, 0.855467,
0.857947, 0.861379, 0.862619, 0.866983, 0.869791, 0.869333,
0.868828, 0.872624, 0.871996, 0.879098, 0.881692, 0.882784,
0.883424, 0.885981, 0.887727, 0.888446, 0.890025, 0.889442,
0.88921, 0.88841, 0.88951, 0.889099, 0.890295, 0.889845,
0.88984, 0.889573, 0.888923, 0.889174, 0.889402, 0.889552,
0.889408, 0.889283, 0.888993, 0.889514, 0.889246, 0.889782,
0.889515, 0.889193, 0.888736, 0.889067, 0.889378, 0.889088,
0.887981, 0.88536, 0.85525, 0.796403, 0.712481, 0.621357,
0.55182, 0.512067, 0.493952, 0.456641, 0.398821, 0.307422,
0.263649}, {0.0869757, 0.123518, 0.10625, 0.0748925, 0.13305,
0.218797, 0.249276, 0.189258, 0.189318, 0.202667, 0.187869,
0.178186, 0.164748, 0.1537, 0.1677, 0.142744, 0.142598, 0.11334,
0.149163, 0.148466, 0.0793525, 0.175828, 0.162009, 0.172866,
0.165607, 0.156917, 0.156166, 0.161589, 0.162257, 0.149444,
0.100628, 0.129846, 0.142204, 0.159507, 0.120546, 0.175531,
0.16571, 0.111364, 0.358562, 0.614854, 0.760432, 0.802818,
0.785238, 0.786284, 0.799359, 0.805814, 0.819298, 0.832688,
0.84032, 0.836535, 0.828131, 0.827615, 0.841422, 0.846494,
0.845413, 0.849083, 0.843609, 0.846026, 0.846752, 0.855507,
0.859422, 0.860384, 0.855467, 0.857947, 0.861379, 0.862619,
0.866983, 0.869791, 0.869333, 0.868828, 0.872624, 0.871996,
0.879098, 0.881692, 0.882784, 0.883424, 0.885981, 0.887727,
0.888446, 0.890025, 0.889442, 0.88921, 0.88841, 0.88951,
0.889099, 0.890295, 0.889845, 0.88984, 0.889573, 0.888923,
0.889174, 0.889402, 0.889552, 0.889408, 0.889283, 0.888993,
0.889514, 0.889246, 0.889782, 0.889515, 0.889193, 0.888736,
0.889067, 0.889378, 0.889088, 0.887981, 0.88536, 0.85525,
0.796403, 0.712481, 0.621357, 0.55182, 0.512067, 0.493952,
0.456641, 0.398821, 0.307422, 0.263649}, {0.106716, 0.0680527,
0.0837368, 0.0840642, 0.127479, 0.171746, 0.182341, 0.155953,
0.160309, 0.134363, 0.178914, 0.104508, 0.161076, 0.10858,
0.143273, 0.170692, 0.15096, 0.160911, 0.149484, 0.11768,
0.157974, 0.120738, 0.158428, 0.131556, 0.149473, 0.135183,
0.144907, 0.136346, 0.0928688, 0.171687, 0.125241, 0.153224,
0.159259, 0.110401, 0.157123, 0.12786, 0.133707, 0.186861,
0.16287, 0.396508, 0.381984, 0.409644, 0.366567, 0.3625,
0.382833, 0.375951, 0.37696, 0.394796, 0.406441, 0.389908,
0.379025, 0.369643, 0.394863, 0.402043, 0.383187, 0.398682,
0.394348, 0.39114, 0.39442, 0.402121, 0.396088, 0.409445,
0.390066, 0.387107, 0.409645, 0.402705, 0.399388, 0.414437,
0.398922, 0.404063, 0.418824, 0.390325, 0.412358, 0.413078,
0.413989, 0.413659, 0.407753, 0.417932, 0.412522, 0.414154,
0.418792, 0.40993, 0.415015, 0.417576, 0.409635, 0.418935,
0.412825, 0.412054, 0.419029, 0.40959, 0.414936, 0.416479,
0.409618, 0.417096, 0.414168, 0.411981, 0.417363, 0.410619,
0.417216, 0.417661, 0.408718, 0.417037, 0.413406, 0.4134,
0.418255, 0.409994, 0.427173, 0.420714, 0.397458, 0.372201,
0.320471, 0.254642, 0.218146, 0.228054, 0.233516, 0.21761,
0.19787, 0.157114}, {0.106716, 0.0680527, 0.0837368, 0.0840642,
0.127479, 0.171746, 0.182341, 0.155953, 0.160309, 0.134363,
0.178914, 0.104508, 0.161076, 0.10858, 0.143273, 0.170692,
0.15096, 0.160911, 0.149484, 0.11768, 0.157974, 0.120738,
0.158428, 0.131556, 0.149473, 0.135183, 0.144907, 0.136346,
0.0928688, 0.171687, 0.125241, 0.153224, 0.159259, 0.110401,
0.157123, 0.12786, 0.133707, 0.186861, 0.16287, 0.396508,
0.381984, 0.409644, 0.366567, 0.3625, 0.382833, 0.375951,
0.37696, 0.394796, 0.406441, 0.389908, 0.379025, 0.369643,
0.394863, 0.402043, 0.383187, 0.398682, 0.394348, 0.39114,
0.39442, 0.402121, 0.396088, 0.409445, 0.390066, 0.387107,
0.409645, 0.402705, 0.399388, 0.414437, 0.398922, 0.404063,
0.418824, 0.390325, 0.412358, 0.413078, 0.413989, 0.413659,
0.407753, 0.417932, 0.412522, 0.414154, 0.418792, 0.40993,
0.415015, 0.417576, 0.409635, 0.418935, 0.412825, 0.412054,
0.419029, 0.40959, 0.414936, 0.416479, 0.409618, 0.417096,
0.414168, 0.411981, 0.417363, 0.410619, 0.417216, 0.417661,
0.408718, 0.417037, 0.413406, 0.4134, 0.418255, 0.409994,
0.427173, 0.420714, 0.397458, 0.372201, 0.320471, 0.254642,
0.218146, 0.228054, 0.233516, 0.21761, 0.19787, 0.157114},
{0.106716, 0.0680527, 0.0837368, 0.0840642, 0.127479, 0.171746,
0.182341, 0.155953, 0.160309, 0.134363, 0.178914, 0.104508,
0.161076, 0.10858, 0.143273, 0.170692, 0.15096, 0.160911,
0.149484, 0.11768, 0.157974, 0.120738, 0.158428, 0.131556,
0.149473, 0.135183, 0.144907, 0.136346, 0.0928688, 0.171687,
0.125241, 0.153224, 0.159259, 0.110401, 0.157123, 0.12786,
0.133707, 0.186861, 0.16287, 0.396508, 0.381984, 0.409644,
0.366567, 0.3625, 0.382833, 0.375951, 0.37696, 0.394796,
0.406441, 0.389908, 0.379025, 0.369643, 0.394863, 0.402043,
0.383187, 0.398682, 0.394348, 0.39114, 0.39442, 0.402121,
0.396088, 0.409445, 0.390066, 0.387107, 0.409645, 0.402705,
0.399388, 0.414437, 0.398922, 0.404063, 0.418824, 0.390325,
0.412358, 0.413078, 0.413989, 0.413659, 0.407753, 0.417932,
0.412522, 0.414154, 0.418792, 0.40993, 0.415015, 0.417576,
0.409635, 0.418935, 0.412825, 0.412054, 0.419029, 0.40959,
0.414936, 0.416479, 0.409618, 0.417096, 0.414168, 0.411981,
0.417363, 0.410619, 0.417216, 0.417661, 0.408718, 0.417037,
0.413406, 0.4134, 0.418255, 0.409994, 0.427173, 0.420714,
0.397458, 0.372201, 0.320471, 0.254642, 0.218146, 0.228054,
0.233516, 0.21761, 0.19787, 0.157114}, {0.106716, 0.0680527,
0.0837368, 0.0840642, 0.127479, 0.171746, 0.182341, 0.155953,
0.160309, 0.134363, 0.178914, 0.104508, 0.161076, 0.10858,
0.143273, 0.170692, 0.15096, 0.160911, 0.149484, 0.11768,
0.157974, 0.120738, 0.158428, 0.131556, 0.149473, 0.135183,
0.144907, 0.136346, 0.0928688, 0.171687, 0.125241, 0.153224,
0.159259, 0.110401, 0.157123, 0.12786, 0.133707, 0.186861,
0.16287, 0.396508, 0.381984, 0.409644, 0.366567, 0.3625,
0.382833, 0.375951, 0.37696, 0.394796, 0.406441, 0.389908,
0.379025, 0.369643, 0.394863, 0.402043, 0.383187, 0.398682,
0.394348, 0.39114, 0.39442, 0.402121, 0.396088, 0.409445,
0.390066, 0.387107, 0.409645, 0.402705, 0.399388, 0.414437,
0.398922, 0.404063, 0.418824, 0.390325, 0.412358, 0.413078,
0.413989, 0.413659, 0.407753, 0.417932, 0.412522, 0.414154,
0.418792, 0.40993, 0.415015, 0.417576, 0.409635, 0.418935,
0.412825, 0.412054, 0.419029, 0.40959, 0.414936, 0.416479,
0.409618, 0.417096, 0.414168, 0.411981, 0.417363, 0.410619,
0.417216, 0.417661, 0.408718, 0.417037, 0.413406, 0.4134,
0.418255, 0.409994, 0.427173, 0.420714, 0.397458, 0.372201,
0.320471, 0.254642, 0.218146, 0.228054, 0.233516, 0.21761,
0.19787, 0.157114}, {0.116626, 0.131289, 0.0922174, 0.0809994,
0.120523, 0.162734, 0.193011, 0.150006, 0.158238, 0.175569,
0.109351, 0.153073, 0.130869, 0.0961905, 0.164383, 0.12619,
0.111777, 0.114638, 0.152884, 0.109945, 0.106052, 0.162624,
0.159327, 0.149792, 0.0758043, 0.125722, 0.155436, 0.134052,
0.130191, 0.126502, 0.13342, 0.108166, 0.127444, 0.13729,
0.139717, 0.159684, 0.107789, 0.173444, 0.162472, 0.204162,
0.219704, 0.239216, 0.255538, 0.245911, 0.217715, 0.246053,
0.241074, 0.238615, 0.244567, 0.240187, 0.234427, 0.266026,
0.248666, 0.261178, 0.277712, 0.254797, 0.227351, 0.246166,
0.208523, 0.255388, 0.279161, 0.2169, 0.273203, 0.281899,
0.213763, 0.276164, 0.272466, 0.178373, 0.272814, 0.234466,
0.223259, 0.291748, 0.248964, 0.25474, 0.258242, 0.252424,
0.272148, 0.2447, 0.267675, 0.273645, 0.2332, 0.278813,
0.246848, 0.251926, 0.273351, 0.247287, 0.263652, 0.278027,
0.239499, 0.27799, 0.25366, 0.25934, 0.280642, 0.247843,
0.263279, 0.274406, 0.247379, 0.27486, 0.253803, 0.256121,
0.280255, 0.243512, 0.266647, 0.273866, 0.23886, 0.276506,
0.256913, 0.258961, 0.268781, 0.200686, 0.18602, 0.191452,
0.184798, 0.179691, 0.138852, 0.106209, 0.150259, 0.122491},
{0.116626, 0.131289, 0.0922174, 0.0809994, 0.120523, 0.162734,
0.193011, 0.150006, 0.158238, 0.175569, 0.109351, 0.153073,
0.130869, 0.0961905, 0.164383, 0.12619, 0.111777, 0.114638,
0.152884, 0.109945, 0.106052, 0.162624, 0.159327, 0.149792,
0.0758043, 0.125722, 0.155436, 0.134052, 0.130191, 0.126502,
0.13342, 0.108166, 0.127444, 0.13729, 0.139717, 0.159684,
0.107789, 0.173444, 0.162472, 0.204162, 0.219704, 0.239216,
0.255538, 0.245911, 0.217715, 0.246053, 0.241074, 0.238615,
0.244567, 0.240187, 0.234427, 0.266026, 0.248666, 0.261178,
0.277712, 0.254797, 0.227351, 0.246166, 0.208523, 0.255388,
0.279161, 0.2169, 0.273203, 0.281899, 0.213763, 0.276164,
0.272466, 0.178373, 0.272814, 0.234466, 0.223259, 0.291748,
0.248964, 0.25474, 0.258242, 0.252424, 0.272148, 0.2447,
0.267675, 0.273645, 0.2332, 0.278813, 0.246848, 0.251926,
0.273351, 0.247287, 0.263652, 0.278027, 0.239499, 0.27799,
0.25366, 0.25934, 0.280642, 0.247843, 0.263279, 0.274406,
0.247379, 0.27486, 0.253803, 0.256121, 0.280255, 0.243512,
0.266647, 0.273866, 0.23886, 0.276506, 0.256913, 0.258961,
0.268781, 0.200686, 0.18602, 0.191452, 0.184798, 0.179691,
0.138852, 0.106209, 0.150259, 0.122491}, {0.116626, 0.131289,
0.0922174, 0.0809994, 0.120523, 0.162734, 0.193011, 0.150006,
0.158238, 0.175569, 0.109351, 0.153073, 0.130869, 0.0961905,
0.164383, 0.12619, 0.111777, 0.114638, 0.152884, 0.109945,
0.106052, 0.162624, 0.159327, 0.149792, 0.0758043, 0.125722,
0.155436, 0.134052, 0.130191, 0.126502, 0.13342, 0.108166,
0.127444, 0.13729, 0.139717, 0.159684, 0.107789, 0.173444,
0.162472, 0.204162, 0.219704, 0.239216, 0.255538, 0.245911,
0.217715, 0.246053, 0.241074, 0.238615, 0.244567, 0.240187,
0.234427, 0.266026, 0.248666, 0.261178, 0.277712, 0.254797,
0.227351, 0.246166, 0.208523, 0.255388, 0.279161, 0.2169,
0.273203, 0.281899, 0.213763, 0.276164, 0.272466, 0.178373,
0.272814, 0.234466, 0.223259, 0.291748, 0.248964, 0.25474,
0.258242, 0.252424, 0.272148, 0.2447, 0.267675, 0.273645,
0.2332, 0.278813, 0.246848, 0.251926, 0.273351, 0.247287,
0.263652, 0.278027, 0.239499, 0.27799, 0.25366, 0.25934,
0.280642, 0.247843, 0.263279, 0.274406, 0.247379, 0.27486,
0.253803, 0.256121, 0.280255, 0.243512, 0.266647, 0.273866,
0.23886, 0.276506, 0.256913, 0.258961, 0.268781, 0.200686,
0.18602, 0.191452, 0.184798, 0.179691, 0.138852, 0.106209,
0.150259, 0.122491}, {0.116626, 0.131289, 0.0922174, 0.0809994,
0.120523, 0.162734, 0.193011, 0.150006, 0.158238, 0.175569,
0.109351, 0.153073, 0.130869, 0.0961905, 0.164383, 0.12619,
0.111777, 0.114638, 0.152884, 0.109945, 0.106052, 0.162624,
0.159327, 0.149792, 0.0758043, 0.125722, 0.155436, 0.134052,
0.130191, 0.126502, 0.13342, 0.108166, 0.127444, 0.13729,
0.139717, 0.159684, 0.107789, 0.173444, 0.162472, 0.204162,
0.219704, 0.239216, 0.255538, 0.245911, 0.217715, 0.246053,
0.241074, 0.238615, 0.244567, 0.240187, 0.234427, 0.266026,
0.248666, 0.261178, 0.277712, 0.254797, 0.227351, 0.246166,
0.208523, 0.255388, 0.279161, 0.2169, 0.273203, 0.281899,
0.213763, 0.276164, 0.272466, 0.178373, 0.272814, 0.234466,
0.223259, 0.291748, 0.248964, 0.25474, 0.258242, 0.252424,
0.272148, 0.2447, 0.267675, 0.273645, 0.2332, 0.278813,
0.246848, 0.251926, 0.273351, 0.247287, 0.263652, 0.278027,
0.239499, 0.27799, 0.25366, 0.25934, 0.280642, 0.247843,
0.263279, 0.274406, 0.247379, 0.27486, 0.253803, 0.256121,
0.280255, 0.243512, 0.266647, 0.273866, 0.23886, 0.276506,
0.256913, 0.258961, 0.268781, 0.200686, 0.18602, 0.191452,
0.184798, 0.179691, 0.138852, 0.106209, 0.150259, 0.122491},
{0.111455, 0.142326, 0.112518, 0.0909621, 0.168544, 0.18956,
0.13853, 0.190178, 0.184635, 0.152209, 0.179252, 0.163703,
0.119091, 0.115403, 0.165789, 0.137541, 0.164652, 0.149838,
0.13503, 0.169743, 0.159869, 0.11252, 0.178853, 0.167484,
0.134217, 0.154767, 0.182082, 0.151177, 0.160021, 0.170251,
0.158911, 0.141921, 0.156958, 0.174782, 0.121499, 0.163719,
0.167151, 0.130801, 0.166226, 0.213666, 0.177491, 0.147272,
0.194005, 0.165329, 0.175725, 0.107819, 0.193689, 0.234594,
0.23873, 0.186103, 0.222008, 0.180824, 0.188256, 0.19544,
0.194313, 0.20869, 0.19158, 0.162777, 0.229646, 0.254166,
0.189658, 0.102468, 0.208814, 0.183969, 0.224942, 0.219517,
0.207575, 0.242624, 0.219173, 0.213559, 0.216272, 0.22957,
0.210259, 0.142163, 0.196212, 0.231111, 0.20675, 0.16045,
0.209721, 0.218177, 0.22881, 0.109927, 0.203705, 0.242648,
0.217256, 0.171901, 0.208043, 0.217008, 0.230175, 0.149275,
0.206773, 0.219501, 0.208051, 0.153196, 0.211862, 0.212021,
0.218158, 0.138655, 0.204923, 0.226532, 0.20526, 0.159795,
0.201507, 0.218568, 0.225824, 0.146, 0.201857, 0.231916,
0.20437, 0.207611, 0.171312, 0.163377, 0.126706, 0.160387,
0.114132, 0.142445, 0.10047, 0.0944151}, {0.111455, 0.142326,
0.112518, 0.0909621, 0.168544, 0.18956, 0.13853, 0.190178,
0.184635, 0.152209, 0.179252, 0.163703, 0.119091, 0.115403,
0.165789, 0.137541, 0.164652, 0.149838, 0.13503, 0.169743,
0.159869, 0.11252, 0.178853, 0.167484, 0.134217, 0.154767,
0.182082, 0.151177, 0.160021, 0.170251, 0.158911, 0.141921,
0.156958, 0.174782, 0.121499, 0.163719, 0.167151, 0.130801,
0.166226, 0.213666, 0.177491, 0.147272, 0.194005, 0.165329,
0.175725, 0.107819, 0.193689, 0.234594, 0.23873, 0.186103,
0.222008, 0.180824, 0.188256, 0.19544, 0.194313, 0.20869,
0.19158, 0.162777, 0.229646, 0.254166, 0.189658, 0.102468,
0.208814, 0.183969, 0.224942, 0.219517, 0.207575, 0.242624,
0.219173, 0.213559, 0.216272, 0.22957, 0.210259, 0.142163,
0.196212, 0.231111, 0.20675, 0.16045, 0.209721, 0.218177,
0.22881, 0.109927, 0.203705, 0.242648, 0.217256, 0.171901,
0.208043, 0.217008, 0.230175, 0.149275, 0.206773, 0.219501,
0.208051, 0.153196, 0.211862, 0.212021, 0.218158, 0.138655,
0.204923, 0.226532, 0.20526, 0.159795, 0.201507, 0.218568,
0.225824, 0.146, 0.201857, 0.231916, 0.20437, 0.207611,
0.171312, 0.163377, 0.126706, 0.160387, 0.114132, 0.142445,
0.10047, 0.0944151}, {0.111455, 0.142326, 0.112518, 0.0909621,
0.168544, 0.18956, 0.13853, 0.190178, 0.184635, 0.152209,
0.179252, 0.163703, 0.119091, 0.115403, 0.165789, 0.137541,
0.164652, 0.149838, 0.13503, 0.169743, 0.159869, 0.11252,
0.178853, 0.167484, 0.134217, 0.154767, 0.182082, 0.151177,
0.160021, 0.170251, 0.158911, 0.141921, 0.156958, 0.174782,
0.121499, 0.163719, 0.167151, 0.130801, 0.166226, 0.213666,
0.177491, 0.147272, 0.194005, 0.165329, 0.175725, 0.107819,
0.193689, 0.234594, 0.23873, 0.186103, 0.222008, 0.180824,
0.188256, 0.19544, 0.194313, 0.20869, 0.19158, 0.162777,
0.229646, 0.254166, 0.189658, 0.102468, 0.208814, 0.183969,
0.224942, 0.219517, 0.207575, 0.242624, 0.219173, 0.213559,
0.216272, 0.22957, 0.210259, 0.142163, 0.196212, 0.231111,
0.20675, 0.16045, 0.209721, 0.218177, 0.22881, 0.109927,
0.203705, 0.242648, 0.217256, 0.171901, 0.208043, 0.217008,
0.230175, 0.149275, 0.206773, 0.219501, 0.208051, 0.153196,
0.211862, 0.212021, 0.218158, 0.138655, 0.204923, 0.226532,
0.20526, 0.159795, 0.201507, 0.218568, 0.225824, 0.146,
0.201857, 0.231916, 0.20437, 0.207611, 0.171312, 0.163377,
0.126706, 0.160387, 0.114132, 0.142445, 0.10047, 0.0944151},
{0.111455, 0.142326, 0.112518, 0.0909621, 0.168544, 0.18956,
0.13853, 0.190178, 0.184635, 0.152209, 0.179252, 0.163703,
0.119091, 0.115403, 0.165789, 0.137541, 0.164652, 0.149838,
0.13503, 0.169743, 0.159869, 0.11252, 0.178853, 0.167484,
0.134217, 0.154767, 0.182082, 0.151177, 0.160021, 0.170251,
0.158911, 0.141921, 0.156958, 0.174782, 0.121499, 0.163719,
0.167151, 0.130801, 0.166226, 0.213666, 0.177491, 0.147272,
0.194005, 0.165329, 0.175725, 0.107819, 0.193689, 0.234594,
0.23873, 0.186103, 0.222008, 0.180824, 0.188256, 0.19544,
0.194313, 0.20869, 0.19158, 0.162777, 0.229646, 0.254166,
0.189658, 0.102468, 0.208814, 0.183969, 0.224942, 0.219517,
0.207575, 0.242624, 0.219173, 0.213559, 0.216272, 0.22957,
0.210259, 0.142163, 0.196212, 0.231111, 0.20675, 0.16045,
0.209721, 0.218177, 0.22881, 0.109927, 0.203705, 0.242648,
0.217256, 0.171901, 0.208043, 0.217008, 0.230175, 0.149275,
0.206773, 0.219501, 0.208051, 0.153196, 0.211862, 0.212021,
0.218158, 0.138655, 0.204923, 0.226532, 0.20526, 0.159795,
0.201507, 0.218568, 0.225824, 0.146, 0.201857, 0.231916,
0.20437, 0.207611, 0.171312, 0.163377, 0.126706, 0.160387,
0.114132, 0.142445, 0.10047, 0.0944151}, {0.115858, 0.117249,
0.111028, 0.0786875, 0.191825, 0.31398, 0.384299, 0.438956,
0.429055, 0.420585, 0.37346, 0.326897, 0.326453, 0.339202,
0.337459, 0.348822, 0.341172, 0.347817, 0.344123, 0.332384,
0.333216, 0.35187, 0.353839, 0.364672, 0.36465, 0.352886,
0.343118, 0.342315, 0.333204, 0.340896, 0.343051, 0.343613,
0.346671, 0.339466, 0.345374, 0.34716, 0.344586, 0.349192,
0.349603, 0.346083, 0.349441, 0.356122, 0.350522, 0.356522,
0.352935, 0.347224, 0.369822, 0.357132, 0.362953, 0.381402,
0.334012, 0.379426, 0.357368, 0.36718, 0.373889, 0.331308,
0.357575, 0.337213, 0.396692, 0.337574, 0.395757, 0.358776,
0.340492, 0.393631, 0.350144, 0.390626, 0.366208, 0.347656,
0.347546, 0.333772, 0.371493, 0.354462, 0.370008, 0.28039,
0.307988, 0.178822, 0.247898, 0.260739, 0.236575, 0.265479,
0.258125, 0.277972, 0.268999, 0.263373, 0.25481, 0.271916,
0.246008, 0.246295, 0.260112, 0.279745, 0.257241, 0.248062,
0.225007, 0.283148, 0.247877, 0.24258, 0.248007, 0.273528,
0.261021, 0.2364, 0.243193, 0.264636, 0.262774, 0.222949,
0.259032, 0.263859, 0.275454, 0.245532, 0.238304, 0.243162,
0.226599, 0.194514, 0.162415, 0.16504, 0.15342, 0.100625,
0.120067, 0.109642}, {0.115858, 0.117249, 0.111028, 0.0786875,
0.191825, 0.31398, 0.384299, 0.438956, 0.429055, 0.420585,
0.37346, 0.326897, 0.326453, 0.339202, 0.337459, 0.348822,
0.341172, 0.347817, 0.344123, 0.332384, 0.333216, 0.35187,
0.353839, 0.364672, 0.36465, 0.352886, 0.343118, 0.342315,
0.333204, 0.340896, 0.343051, 0.343613, 0.346671, 0.339466,
0.345374, 0.34716, 0.344586, 0.349192, 0.349603, 0.346083,
0.349441, 0.356122, 0.350522, 0.356522, 0.352935, 0.347224,
0.369822, 0.357132, 0.362953, 0.381402, 0.334012, 0.379426,
0.357368, 0.36718, 0.373889, 0.331308, 0.357575, 0.337213,
0.396692, 0.337574, 0.395757, 0.358776, 0.340492, 0.393631,
0.350144, 0.390626, 0.366208, 0.347656, 0.347546, 0.333772,
0.371493, 0.354462, 0.370008, 0.28039, 0.307988, 0.178822,
0.247898, 0.260739, 0.236575, 0.265479, 0.258125, 0.277972,
0.268999, 0.263373, 0.25481, 0.271916, 0.246008, 0.246295,
0.260112, 0.279745, 0.257241, 0.248062, 0.225007, 0.283148,
0.247877, 0.24258, 0.248007, 0.273528, 0.261021, 0.2364,
0.243193, 0.264636, 0.262774, 0.222949, 0.259032, 0.263859,
0.275454, 0.245532, 0.238304, 0.243162, 0.226599, 0.194514,
0.162415, 0.16504, 0.15342, 0.100625, 0.120067, 0.109642},
{0.115858, 0.117249, 0.111028, 0.0786875, 0.191825, 0.31398,
0.384299, 0.438956, 0.429055, 0.420585, 0.37346, 0.326897,
0.326453, 0.339202, 0.337459, 0.348822, 0.341172, 0.347817,
0.344123, 0.332384, 0.333216, 0.35187, 0.353839, 0.364672,
0.36465, 0.352886, 0.343118, 0.342315, 0.333204, 0.340896,
0.343051, 0.343613, 0.346671, 0.339466, 0.345374, 0.34716,
0.344586, 0.349192, 0.349603, 0.346083, 0.349441, 0.356122,
0.350522, 0.356522, 0.352935, 0.347224, 0.369822, 0.357132,
0.362953, 0.381402, 0.334012, 0.379426, 0.357368, 0.36718,
0.373889, 0.331308, 0.357575, 0.337213, 0.396692, 0.337574,
0.395757, 0.358776, 0.340492, 0.393631, 0.350144, 0.390626,
0.366208, 0.347656, 0.347546, 0.333772, 0.371493, 0.354462,
0.370008, 0.28039, 0.307988, 0.178822, 0.247898, 0.260739,
0.236575, 0.265479, 0.258125, 0.277972, 0.268999, 0.263373,
0.25481, 0.271916, 0.246008, 0.246295, 0.260112, 0.279745,
0.257241, 0.248062, 0.225007, 0.283148, 0.247877, 0.24258,
0.248007, 0.273528, 0.261021, 0.2364, 0.243193, 0.264636,
0.262774, 0.222949, 0.259032, 0.263859, 0.275454, 0.245532,
0.238304, 0.243162, 0.226599, 0.194514, 0.162415, 0.16504,
0.15342, 0.100625, 0.120067, 0.109642}, {0.0729802, 0.0720974,
0.107587, 0.107738, 0.20424, 0.428123, 0.558305, 0.59032,
0.59479, 0.559669, 0.503964, 0.455313, 0.45336, 0.456674,
0.451182, 0.450401, 0.453687, 0.462363, 0.465515, 0.463762,
0.461822, 0.475597, 0.487219, 0.495022, 0.497673, 0.485788,
0.470643, 0.465594, 0.450807, 0.456515, 0.459036, 0.458113,
0.46412, 0.468661, 0.466542, 0.47814, 0.480673, 0.479809,
0.481873, 0.477607, 0.47671, 0.477373, 0.462171, 0.458902,
0.474574, 0.48479, 0.497765, 0.497648, 0.4999, 0.51408,
0.500273, 0.511183, 0.498158, 0.48559, 0.476634, 0.445708,
0.460953, 0.465273, 0.504047, 0.487044, 0.517058, 0.510891,
0.514848, 0.537592, 0.509081, 0.511547, 0.490423, 0.463306,
0.447656, 0.424443, 0.46298, 0.481817, 0.477516, 0.399274,
0.34638, 0.202169, 0.292406, 0.278281, 0.29043, 0.308259,
0.265961, 0.29424, 0.303483, 0.289244, 0.263653, 0.267685,
0.205142, 0.266871, 0.257892, 0.22964, 0.20498, 0.278854,
0.196824, 0.268547, 0.176732, 0.264194, 0.240546, 0.230273,
0.244582, 0.247658, 0.2343, 0.212759, 0.24475, 0.220533,
0.260564, 0.204488, 0.246301, 0.250442, 0.234902, 0.218155,
0.2011, 0.190231, 0.184459, 0.136534, 0.164715, 0.130261,
0.131251, 0.124482}, {0.0729802, 0.0720974, 0.107587, 0.107738,
0.20424, 0.428123, 0.558305, 0.59032, 0.59479, 0.559669,
0.503964, 0.455313, 0.45336, 0.456674, 0.451182, 0.450401,
0.453687, 0.462363, 0.465515, 0.463762, 0.461822, 0.475597,
0.487219, 0.495022, 0.497673, 0.485788, 0.470643, 0.465594,
0.450807, 0.456515, 0.459036, 0.458113, 0.46412, 0.468661,
0.466542, 0.47814, 0.480673, 0.479809, 0.481873, 0.477607,
0.47671, 0.477373, 0.462171, 0.458902, 0.474574, 0.48479,
0.497765, 0.497648, 0.4999, 0.51408, 0.500273, 0.511183,
0.498158, 0.48559, 0.476634, 0.445708, 0.460953, 0.465273,
0.504047, 0.487044, 0.517058, 0.510891, 0.514848, 0.537592,
0.509081, 0.511547, 0.490423, 0.463306, 0.447656, 0.424443,
0.46298, 0.481817, 0.477516, 0.399274, 0.34638, 0.202169,
0.292406, 0.278281, 0.29043, 0.308259, 0.265961, 0.29424,
0.303483, 0.289244, 0.263653, 0.267685, 0.205142, 0.266871,
0.257892, 0.22964, 0.20498, 0.278854, 0.196824, 0.268547,
0.176732, 0.264194, 0.240546, 0.230273, 0.244582, 0.247658,
0.2343, 0.212759, 0.24475, 0.220533, 0.260564, 0.204488,
0.246301, 0.250442, 0.234902, 0.218155, 0.2011, 0.190231,
0.184459, 0.136534, 0.164715, 0.130261, 0.131251, 0.124482},
{0.0729802, 0.0720974, 0.107587, 0.107738, 0.20424, 0.428123,
0.558305, 0.59032, 0.59479, 0.559669, 0.503964, 0.455313,
0.45336, 0.456674, 0.451182, 0.450401, 0.453687, 0.462363,
0.465515, 0.463762, 0.461822, 0.475597, 0.487219, 0.495022,
0.497673, 0.485788, 0.470643, 0.465594, 0.450807, 0.456515,
0.459036, 0.458113, 0.46412, 0.468661, 0.466542, 0.47814,
0.480673, 0.479809, 0.481873, 0.477607, 0.47671, 0.477373,
0.462171, 0.458902, 0.474574, 0.48479, 0.497765, 0.497648,
0.4999, 0.51408, 0.500273, 0.511183, 0.498158, 0.48559,
0.476634, 0.445708, 0.460953, 0.465273, 0.504047, 0.487044,
0.517058, 0.510891, 0.514848, 0.537592, 0.509081, 0.511547,
0.490423, 0.463306, 0.447656, 0.424443, 0.46298, 0.481817,
0.477516, 0.399274, 0.34638, 0.202169, 0.292406, 0.278281,
0.29043, 0.308259, 0.265961, 0.29424, 0.303483, 0.289244,
0.263653, 0.267685, 0.205142, 0.266871, 0.257892, 0.22964,
0.20498, 0.278854, 0.196824, 0.268547, 0.176732, 0.264194,
0.240546, 0.230273, 0.244582, 0.247658, 0.2343, 0.212759,
0.24475, 0.220533, 0.260564, 0.204488, 0.246301, 0.250442,
0.234902, 0.218155, 0.2011, 0.190231, 0.184459, 0.136534,
0.164715, 0.130261, 0.131251, 0.124482}, {0.0843689, 0.0998261,
0.106823, 0.0824824, 0.20672, 0.411252, 0.542548, 0.51961,
0.543911, 0.493453, 0.450137, 0.408835, 0.413774, 0.407405,
0.394389, 0.382598, 0.400414, 0.406958, 0.415693, 0.421662,
0.410873, 0.425185, 0.440871, 0.43782, 0.44928, 0.437082,
0.417079, 0.422386, 0.396, 0.402249, 0.406778, 0.39648,
0.406763, 0.425168, 0.411389, 0.433651, 0.438523, 0.428012,
0.433736, 0.424571, 0.424102, 0.426207, 0.397863, 0.40142,
0.418339, 0.421294, 0.444784, 0.453121, 0.451133, 0.47353,
0.461184, 0.446223, 0.454764, 0.428693, 0.409496, 0.400446,
0.377699, 0.405499, 0.44898, 0.442523, 0.461155, 0.47534,
0.4686, 0.486593, 0.47563, 0.451935, 0.438296, 0.412632,
0.363369, 0.355005, 0.41054, 0.423972, 0.419378, 0.365716,
0.285985, 0.210397, 0.238063, 0.24634, 0.245842, 0.229184,
0.212745, 0.242661, 0.248585, 0.235124, 0.247509, 0.231454,
0.161376, 0.201152, 0.170383, 0.167191, 0.16774, 0.173922,
0.159887, 0.218407, 0.200813, 0.176387, 0.154542, 0.154213,
0.176171, 0.175386, 0.132557, 0.163515, 0.153302, 0.171117,
0.16196, 0.124311, 0.158954, 0.154739, 0.163969, 0.172536,
0.16281, 0.135883, 0.135224, 0.0434486, 0.143987, 0.0987526,
0.125752, 0.0876477}, {0.0843689, 0.0998261, 0.106823,
0.0824824, 0.20672, 0.411252, 0.542548, 0.51961, 0.543911,
0.493453, 0.450137, 0.408835, 0.413774, 0.407405, 0.394389,
0.382598, 0.400414, 0.406958, 0.415693, 0.421662, 0.410873,
0.425185, 0.440871, 0.43782, 0.44928, 0.437082, 0.417079,
0.422386, 0.396, 0.402249, 0.406778, 0.39648, 0.406763,
0.425168, 0.411389, 0.433651, 0.438523, 0.428012, 0.433736,
0.424571, 0.424102, 0.426207, 0.397863, 0.40142, 0.418339,
0.421294, 0.444784, 0.453121, 0.451133, 0.47353, 0.461184,
0.446223, 0.454764, 0.428693, 0.409496, 0.400446, 0.377699,
0.405499, 0.44898, 0.442523, 0.461155, 0.47534, 0.4686,
0.486593, 0.47563, 0.451935, 0.438296, 0.412632, 0.363369,
0.355005, 0.41054, 0.423972, 0.419378, 0.365716, 0.285985,
0.210397, 0.238063, 0.24634, 0.245842, 0.229184, 0.212745,
0.242661, 0.248585, 0.235124, 0.247509, 0.231454, 0.161376,
0.201152, 0.170383, 0.167191, 0.16774, 0.173922, 0.159887,
0.218407, 0.200813, 0.176387, 0.154542, 0.154213, 0.176171,
0.175386, 0.132557, 0.163515, 0.153302, 0.171117, 0.16196,
0.124311, 0.158954, 0.154739, 0.163969, 0.172536, 0.16281,
0.135883, 0.135224, 0.0434486, 0.143987, 0.0987526, 0.125752,
0.0876477}, {0.0843689, 0.0998261, 0.106823, 0.0824824, 0.20672,
0.411252, 0.542548, 0.51961, 0.543911, 0.493453, 0.450137,
0.408835, 0.413774, 0.407405, 0.394389, 0.382598, 0.400414,
0.406958, 0.415693, 0.421662, 0.410873, 0.425185, 0.440871,
0.43782, 0.44928, 0.437082, 0.417079, 0.422386, 0.396, 0.402249,
0.406778, 0.39648, 0.406763, 0.425168, 0.411389, 0.433651,
0.438523, 0.428012, 0.433736, 0.424571, 0.424102, 0.426207,
0.397863, 0.40142, 0.418339, 0.421294, 0.444784, 0.453121,
0.451133, 0.47353, 0.461184, 0.446223, 0.454764, 0.428693,
0.409496, 0.400446, 0.377699, 0.405499, 0.44898, 0.442523,
0.461155, 0.47534, 0.4686, 0.486593, 0.47563, 0.451935,
0.438296, 0.412632, 0.363369, 0.355005, 0.41054, 0.423972,
0.419378, 0.365716, 0.285985, 0.210397, 0.238063, 0.24634,
0.245842, 0.229184, 0.212745, 0.242661, 0.248585, 0.235124,
0.247509, 0.231454, 0.161376, 0.201152, 0.170383, 0.167191,
0.16774, 0.173922, 0.159887, 0.218407, 0.200813, 0.176387,
0.154542, 0.154213, 0.176171, 0.175386, 0.132557, 0.163515,
0.153302, 0.171117, 0.16196, 0.124311, 0.158954, 0.154739,
0.163969, 0.172536, 0.16281, 0.135883, 0.135224, 0.0434486,
0.143987, 0.0987526, 0.125752, 0.0876477}, {0.102016, 0.107982,
0.11809, 0.108409, 0.201887, 0.284697, 0.340621, 0.185543,
0.291366, 0.234303, 0.2244, 0.198807, 0.217879, 0.207052,
0.173405, 0.0701399, 0.222181, 0.212279, 0.197534, 0.225649,
0.161802, 0.199421, 0.23335, 0.183629, 0.227887, 0.223509,
0.187792, 0.217185, 0.172001, 0.188665, 0.196261, 0.172687,
0.186707, 0.230644, 0.165877, 0.218161, 0.239137, 0.193418,
0.233804, 0.218222, 0.258552, 0.274089, 0.232764, 0.227865,
0.21567, 0.255108, 0.27506, 0.222636, 0.222217, 0.298876,
0.249738, 0.151552, 0.284367, 0.242581, 0.207471, 0.259479,
0.218309, 0.228385, 0.278016, 0.163687, 0.259677, 0.299947,
0.189088, 0.264497, 0.306934, 0.281765, 0.231231, 0.277129,
0.274944, 0.264867, 0.241729, 0.194165, 0.262391, 0.236595,
0.144341, 0.187217, 0.163972, 0.123569, 0.178664, 0.183913,
0.147155, 0.165834, 0.164518, 0.173223, 0.189948, 0.173511,
0.146779, 0.192087, 0.153385, 0.172908, 0.151783, 0.157051,
0.138708, 0.114546, 0.170657, 0.151638, 0.168904, 0.155468,
0.157414, 0.154732, 0.139139, 0.136485, 0.166702, 0.174028,
0.139322, 0.158714, 0.129481, 0.183554, 0.196302, 0.172318,
0.16961, 0.10299, 0.0926786, 0.0952586, 0.0988122, 0.135509,
0.122723, 0.119254}, {0.102016, 0.107982, 0.11809, 0.108409,
0.201887, 0.284697, 0.340621, 0.185543, 0.291366, 0.234303,
0.2244, 0.198807, 0.217879, 0.207052, 0.173405, 0.0701399,
0.222181, 0.212279, 0.197534, 0.225649, 0.161802, 0.199421,
0.23335, 0.183629, 0.227887, 0.223509, 0.187792, 0.217185,
0.172001, 0.188665, 0.196261, 0.172687, 0.186707, 0.230644,
0.165877, 0.218161, 0.239137, 0.193418, 0.233804, 0.218222,
0.258552, 0.274089, 0.232764, 0.227865, 0.21567, 0.255108,
0.27506, 0.222636, 0.222217, 0.298876, 0.249738, 0.151552,
0.284367, 0.242581, 0.207471, 0.259479, 0.218309, 0.228385,
0.278016, 0.163687, 0.259677, 0.299947, 0.189088, 0.264497,
0.306934, 0.281765, 0.231231, 0.277129, 0.274944, 0.264867,
0.241729, 0.194165, 0.262391, 0.236595, 0.144341, 0.187217,
0.163972, 0.123569, 0.178664, 0.183913, 0.147155, 0.165834,
0.164518, 0.173223, 0.189948, 0.173511, 0.146779, 0.192087,
0.153385, 0.172908, 0.151783, 0.157051, 0.138708, 0.114546,
0.170657, 0.151638, 0.168904, 0.155468, 0.157414, 0.154732,
0.139139, 0.136485, 0.166702, 0.174028, 0.139322, 0.158714,
0.129481, 0.183554, 0.196302, 0.172318, 0.16961, 0.10299,
0.0926786, 0.0952586, 0.0988122, 0.135509, 0.122723, 0.119254},
{0.102016, 0.107982, 0.11809, 0.108409, 0.201887, 0.284697,
0.340621, 0.185543, 0.291366, 0.234303, 0.2244, 0.198807,
0.217879, 0.207052, 0.173405, 0.0701399, 0.222181, 0.212279,
0.197534, 0.225649, 0.161802, 0.199421, 0.23335, 0.183629,
0.227887, 0.223509, 0.187792, 0.217185, 0.172001, 0.188665,
0.196261, 0.172687, 0.186707, 0.230644, 0.165877, 0.218161,
0.239137, 0.193418, 0.233804, 0.218222, 0.258552, 0.274089,
0.232764, 0.227865, 0.21567, 0.255108, 0.27506, 0.222636,
0.222217, 0.298876, 0.249738, 0.151552, 0.284367, 0.242581,
0.207471, 0.259479, 0.218309, 0.228385, 0.278016, 0.163687,
0.259677, 0.299947, 0.189088, 0.264497, 0.306934, 0.281765,
0.231231, 0.277129, 0.274944, 0.264867, 0.241729, 0.194165,
0.262391, 0.236595, 0.144341, 0.187217, 0.163972, 0.123569,
0.178664, 0.183913, 0.147155, 0.165834, 0.164518, 0.173223,
0.189948, 0.173511, 0.146779, 0.192087, 0.153385, 0.172908,
0.151783, 0.157051, 0.138708, 0.114546, 0.170657, 0.151638,
0.168904, 0.155468, 0.157414, 0.154732, 0.139139, 0.136485,
0.166702, 0.174028, 0.139322, 0.158714, 0.129481, 0.183554,
0.196302, 0.172318, 0.16961, 0.10299, 0.0926786, 0.0952586,
0.0988122, 0.135509, 0.122723, 0.119254}, {0.110375, 0.115477,
0.131289, 0.108866, 0.178103, 0.176385, 0.177705, 0.189377,
0.0975892, 0.159812, 0.134607, 0.168283, 0.152244, 0.126256,
0.121092, 0.123889, 0.164814, 0.0937738, 0.139636, 0.12357,
0.146068, 0.155799, 0.111158, 0.129262, 0.13412, 0.147305,
0.137505, 0.13613, 0.153999, 0.119914, 0.134301, 0.156248,
0.128955, 0.139828, 0.0940786, 0.153476, 0.0955936, 0.152774,
0.196079, 0.191413, 0.218115, 0.214623, 0.232206, 0.207741,
0.220579, 0.231014, 0.218817, 0.222577, 0.218466, 0.21615,
0.231785, 0.22625, 0.204485, 0.213423, 0.235616, 0.220571,
0.226682, 0.217292, 0.214259, 0.224417, 0.217998, 0.232538,
0.248996, 0.237059, 0.223304, 0.247608, 0.267915, 0.239614,
0.23348, 0.257606, 0.224028, 0.233427, 0.206127, 0.182666,
0.160569, 0.188359, 0.170517, 0.154135, 0.157927, 0.133405,
0.0868383, 0.124025, 0.0976583, 0.17656, 0.145004, 0.14001,
0.110222, 0.130346, 0.113542, 0.136569, 0.133984, 0.156999,
0.141115, 0.1219, 0.141101, 0.0948053, 0.130382, 0.158877,
0.102838, 0.1552, 0.11693, 0.144135, 0.142575, 0.108721,
0.135888, 0.14428, 0.12721, 0.179843, 0.161467, 0.159895,
0.154907, 0.113662, 0.0876244, 0.0863974, 0.109446, 0.128229,
0.12181, 0.130917}, {0.110375, 0.115477, 0.131289, 0.108866,
0.178103, 0.176385, 0.177705, 0.189377, 0.0975892, 0.159812,
0.134607, 0.168283, 0.152244, 0.126256, 0.121092, 0.123889,
0.164814, 0.0937738, 0.139636, 0.12357, 0.146068, 0.155799,
0.111158, 0.129262, 0.13412, 0.147305, 0.137505, 0.13613,
0.153999, 0.119914, 0.134301, 0.156248, 0.128955, 0.139828,
0.0940786, 0.153476, 0.0955936, 0.152774, 0.196079, 0.191413,
0.218115, 0.214623, 0.232206, 0.207741, 0.220579, 0.231014,
0.218817, 0.222577, 0.218466, 0.21615, 0.231785, 0.22625,
0.204485, 0.213423, 0.235616, 0.220571, 0.226682, 0.217292,
0.214259, 0.224417, 0.217998, 0.232538, 0.248996, 0.237059,
0.223304, 0.247608, 0.267915, 0.239614, 0.23348, 0.257606,
0.224028, 0.233427, 0.206127, 0.182666, 0.160569, 0.188359,
0.170517, 0.154135, 0.157927, 0.133405, 0.0868383, 0.124025,
0.0976583, 0.17656, 0.145004, 0.14001, 0.110222, 0.130346,
0.113542, 0.136569, 0.133984, 0.156999, 0.141115, 0.1219,
0.141101, 0.0948053, 0.130382, 0.158877, 0.102838, 0.1552,
0.11693, 0.144135, 0.142575, 0.108721, 0.135888, 0.14428,
0.12721, 0.179843, 0.161467, 0.159895, 0.154907, 0.113662,
0.0876244, 0.0863974, 0.109446, 0.128229, 0.12181, 0.130917},
{0.124381, 0.111274, 0.117596, 0.124479, 0.145325, 0.153497,
0.140615, 0.120596, 0.175346, 0.118888, 0.146911, 0.146513,
0.141113, 0.16119, 0.153449, 0.164613, 0.132887, 0.143277,
0.125195, 0.137615, 0.139929, 0.139252, 0.152481, 0.149173,
0.138717, 0.161084, 0.117617, 0.148047, 0.143745, 0.139873,
0.146127, 0.151076, 0.144732, 0.122511, 0.153836, 0.129133,
0.169631, 0.169137, 0.197184, 0.195842, 0.182095, 0.121902,
0.163006, 0.191067, 0.172276, 0.190689, 0.200832, 0.174508,
0.137044, 0.160221, 0.152725, 0.127566, 0.133848, 0.180915,
0.193371, 0.196146, 0.146064, 0.166528, 0.145603, 0.140475,
0.158121, 0.142725, 0.169939, 0.179114, 0.174865, 0.201556,
0.2018, 0.206257, 0.196077, 0.210677, 0.189877, 0.133698,
0.196124, 0.155337, 0.185893, 0.184438, 0.16919, 0.175591,
0.192943, 0.168904, 0.166225, 0.17406, 0.193704, 0.161243,
0.172505, 0.152884, 0.17601, 0.147178, 0.176893, 0.173152,
0.17684, 0.170789, 0.161132, 0.178333, 0.164735, 0.158754,
0.183613, 0.191019, 0.180852, 0.18142, 0.171606, 0.171768,
0.170844, 0.167885, 0.158321, 0.186734, 0.194448, 0.19839,
0.18938, 0.192294, 0.196256, 0.16051, 0.125884, 0.100581,
0.114257, 0.121726, 0.127302, 0.138984}, {0.124381, 0.111274,
0.117596, 0.124479, 0.145325, 0.153497, 0.140615, 0.120596,
0.175346, 0.118888, 0.146911, 0.146513, 0.141113, 0.16119,
0.153449, 0.164613, 0.132887, 0.143277, 0.125195, 0.137615,
0.139929, 0.139252, 0.152481, 0.149173, 0.138717, 0.161084,
0.117617, 0.148047, 0.143745, 0.139873, 0.146127, 0.151076,
0.144732, 0.122511, 0.153836, 0.129133, 0.169631, 0.169137,
0.197184, 0.195842, 0.182095, 0.121902, 0.163006, 0.191067,
0.172276, 0.190689, 0.200832, 0.174508, 0.137044, 0.160221,
0.152725, 0.127566, 0.133848, 0.180915, 0.193371, 0.196146,
0.146064, 0.166528, 0.145603, 0.140475, 0.158121, 0.142725,
0.169939, 0.179114, 0.174865, 0.201556, 0.2018, 0.206257,
0.196077, 0.210677, 0.189877, 0.133698, 0.196124, 0.155337,
0.185893, 0.184438, 0.16919, 0.175591, 0.192943, 0.168904,
0.166225, 0.17406, 0.193704, 0.161243, 0.172505, 0.152884,
0.17601, 0.147178, 0.176893, 0.173152, 0.17684, 0.170789,
0.161132, 0.178333, 0.164735, 0.158754, 0.183613, 0.191019,
0.180852, 0.18142, 0.171606, 0.171768, 0.170844, 0.167885,
0.158321, 0.186734, 0.194448, 0.19839, 0.18938, 0.192294,
0.196256, 0.16051, 0.125884, 0.100581, 0.114257, 0.121726,
0.127302, 0.138984}, {0.124381, 0.111274, 0.117596, 0.124479,
0.145325, 0.153497, 0.140615, 0.120596, 0.175346, 0.118888,
0.146911, 0.146513, 0.141113, 0.16119, 0.153449, 0.164613,
0.132887, 0.143277, 0.125195, 0.137615, 0.139929, 0.139252,
0.152481, 0.149173, 0.138717, 0.161084, 0.117617, 0.148047,
0.143745, 0.139873, 0.146127, 0.151076, 0.144732, 0.122511,
0.153836, 0.129133, 0.169631, 0.169137, 0.197184, 0.195842,
0.182095, 0.121902, 0.163006, 0.191067, 0.172276, 0.190689,
0.200832, 0.174508, 0.137044, 0.160221, 0.152725, 0.127566,
0.133848, 0.180915, 0.193371, 0.196146, 0.146064, 0.166528,
0.145603, 0.140475, 0.158121, 0.142725, 0.169939, 0.179114,
0.174865, 0.201556, 0.2018, 0.206257, 0.196077, 0.210677,
0.189877, 0.133698, 0.196124, 0.155337, 0.185893, 0.184438,
0.16919, 0.175591, 0.192943, 0.168904, 0.166225, 0.17406,
0.193704, 0.161243, 0.172505, 0.152884, 0.17601, 0.147178,
0.176893, 0.173152, 0.17684, 0.170789, 0.161132, 0.178333,
0.164735, 0.158754, 0.183613, 0.191019, 0.180852, 0.18142,
0.171606, 0.171768, 0.170844, 0.167885, 0.158321, 0.186734,
0.194448, 0.19839, 0.18938, 0.192294, 0.196256, 0.16051,
0.125884, 0.100581, 0.114257, 0.121726, 0.127302, 0.138984},
{0.109654, 0.0860362, 0.0977656, 0.124522, 0.132338, 0.115499,
0.145102, 0.127272, 0.147607, 0.091158, 0.147927, 0.152104,
0.118944, 0.163537, 0.150059, 0.135769, 0.139401, 0.0957113,
0.141367, 0.122829, 0.13096, 0.141009, 0.145385, 0.14014,
0.110694, 0.150625, 0.0985711, 0.144377, 0.148857, 0.137339,
0.153762, 0.141907, 0.140163, 0.140096, 0.111099, 0.143675,
0.141914, 0.138247, 0.189762, 0.201494, 0.165264, 0.151096,
0.145329, 0.168011, 0.178311, 0.187149, 0.185908, 0.169123,
0.156206, 0.148185, 0.155193, 0.123208, 0.10427, 0.18579,
0.17153, 0.172906, 0.161544, 0.162423, 0.130214, 0.155903,
0.136438, 0.156263, 0.175004, 0.145232, 0.165559, 0.203945,
0.176211, 0.200581, 0.182292, 0.193299, 0.138776, 0.133881,
0.169552, 0.185026, 0.181275, 0.180489, 0.172364, 0.173382,
0.170832, 0.161706, 0.16658, 0.176106, 0.171829, 0.143196,
0.169372, 0.170429, 0.161231, 0.149243, 0.169625, 0.173281,
0.186077, 0.16033, 0.152553, 0.181093, 0.165623, 0.149769,
0.169751, 0.183645, 0.181126, 0.167829, 0.156057, 0.174965,
0.161493, 0.1578, 0.153039, 0.179154, 0.201057, 0.2004,
0.191185, 0.19017, 0.19194, 0.173782, 0.135271, 0.105313,
0.107733, 0.130599, 0.110624, 0.139077}, {0.109654, 0.0860362,
0.0977656, 0.124522, 0.132338, 0.115499, 0.145102, 0.127272,
0.147607, 0.091158, 0.147927, 0.152104, 0.118944, 0.163537,
0.150059, 0.135769, 0.139401, 0.0957113, 0.141367, 0.122829,
0.13096, 0.141009, 0.145385, 0.14014, 0.110694, 0.150625,
0.0985711, 0.144377, 0.148857, 0.137339, 0.153762, 0.141907,
0.140163, 0.140096, 0.111099, 0.143675, 0.141914, 0.138247,
0.189762, 0.201494, 0.165264, 0.151096, 0.145329, 0.168011,
0.178311, 0.187149, 0.185908, 0.169123, 0.156206, 0.148185,
0.155193, 0.123208, 0.10427, 0.18579, 0.17153, 0.172906,
0.161544, 0.162423, 0.130214, 0.155903, 0.136438, 0.156263,
0.175004, 0.145232, 0.165559, 0.203945, 0.176211, 0.200581,
0.182292, 0.193299, 0.138776, 0.133881, 0.169552, 0.185026,
0.181275, 0.180489, 0.172364, 0.173382, 0.170832, 0.161706,
0.16658, 0.176106, 0.171829, 0.143196, 0.169372, 0.170429,
0.161231, 0.149243, 0.169625, 0.173281, 0.186077, 0.16033,
0.152553, 0.181093, 0.165623, 0.149769, 0.169751, 0.183645,
0.181126, 0.167829, 0.156057, 0.174965, 0.161493, 0.1578,
0.153039, 0.179154, 0.201057, 0.2004, 0.191185, 0.19017,
0.19194, 0.173782, 0.135271, 0.105313, 0.107733, 0.130599,
0.110624, 0.139077}, {0.0981093, 0.101464, 0.126618, 0.0905593,
0.0879016, 0.108364, 0.0958048, 0.163116, 0.134793, 0.145415,
0.175314, 0.0758245, 0.113229, 0.134277, 0.0755691, 0.120507,
0.146666, 0.130989, 0.115638, 0.11099, 0.127274, 0.149874,
0.129436, 0.123216, 0.158287, 0.0980638, 0.106866, 0.169333,
0.118811, 0.0926635, 0.135354, 0.126819, 0.119759, 0.116928,
0.128882, 0.12378, 0.119651, 0.125601, 0.179583, 0.136724,
0.159195, 0.161025, 0.141546, 0.0976676, 0.124074, 0.122706,
0.136715, 0.135048, 0.0771348, 0.131546, 0.13016, 0.106108,
0.141776, 0.14615, 0.118297, 0.134726, 0.146912, 0.115866,
0.136323, 0.106453, 0.164963, 0.0856049, 0.156707, 0.149514,
0.132018, 0.17702, 0.217785, 0.164535, 0.147904, 0.18884,
0.212979, 0.162556, 0.140852, 0.128087, 0.0986258, 0.106263,
0.13349, 0.109653, 0.127362, 0.0860358, 0.123902, 0.110499,
0.105523, 0.126615, 0.125206, 0.123492, 0.110285, 0.105297,
0.101857, 0.110446, 0.139123, 0.0940051, 0.126837, 0.0975396,
0.113537, 0.1466, 0.0932358, 0.120098, 0.123113, 0.0819791,
0.0974724, 0.0901421, 0.110214, 0.0631149, 0.101826, 0.105899,
0.140411, 0.140716, 0.114581, 0.122851, 0.135014, 0.106615,
0.122374, 0.0646508, 0.112627, 0.114392, 0.096867, 0.103004},
{0.0981093, 0.101464, 0.126618, 0.0905593, 0.0879016, 0.108364,
0.0958048, 0.163116, 0.134793, 0.145415, 0.175314, 0.0758245,
0.113229, 0.134277, 0.0755691, 0.120507, 0.146666, 0.130989,
0.115638, 0.11099, 0.127274, 0.149874, 0.129436, 0.123216,
0.158287, 0.0980638, 0.106866, 0.169333, 0.118811, 0.0926635,
0.135354, 0.126819, 0.119759, 0.116928, 0.128882, 0.12378,
0.119651, 0.125601, 0.179583, 0.136724, 0.159195, 0.161025,
0.141546, 0.0976676, 0.124074, 0.122706, 0.136715, 0.135048,
0.0771348, 0.131546, 0.13016, 0.106108, 0.141776, 0.14615,
0.118297, 0.134726, 0.146912, 0.115866, 0.136323, 0.106453,
0.164963, 0.0856049, 0.156707, 0.149514, 0.132018, 0.17702,
0.217785, 0.164535, 0.147904, 0.18884, 0.212979, 0.162556,
0.140852, 0.128087, 0.0986258, 0.106263, 0.13349, 0.109653,
0.127362, 0.0860358, 0.123902, 0.110499, 0.105523, 0.126615,
0.125206, 0.123492, 0.110285, 0.105297, 0.101857, 0.110446,
0.139123, 0.0940051, 0.126837, 0.0975396, 0.113537, 0.1466,
0.0932358, 0.120098, 0.123113, 0.0819791, 0.0974724, 0.0901421,
0.110214, 0.0631149, 0.101826, 0.105899, 0.140411, 0.140716,
0.114581, 0.122851, 0.135014, 0.106615, 0.122374, 0.0646508,
0.112627, 0.114392, 0.096867, 0.103004}, {0.106696, 0.110943,
0.135777, 0.109804, 0.101412, 0.148139, 0.235976, 0.219714,
0.275808, 0.25657, 0.217513, 0.2544, 0.233159, 0.211483,
0.241219, 0.226699, 0.2113, 0.240497, 0.220102, 0.228467,
0.241035, 0.197328, 0.236666, 0.23239, 0.198554, 0.233914,
0.235987, 0.197983, 0.236619, 0.223372, 0.210859, 0.235757,
0.214719, 0.215926, 0.230106, 0.216696, 0.23008, 0.23525,
0.202268, 0.241613, 0.230416, 0.210483, 0.252082, 0.235134,
0.218118, 0.226981, 0.21463, 0.2124, 0.222379, 0.215826,
0.222633, 0.233552, 0.237475, 0.24273, 0.242122, 0.220791,
0.241665, 0.226741, 0.211255, 0.21621, 0.21618, 0.215608,
0.222619, 0.216823, 0.225885, 0.222603, 0.251939, 0.270387,
0.254278, 0.253058, 0.247093, 0.226819, 0.201496, 0.203443,
0.142352, 0.127772, 0.136894, 0.141356, 0.126658, 0.124675,
0.0877009, 0.134468, 0.15942, 0.133982, 0.130214, 0.147833,
0.12188, 0.0977332, 0.0800694, 0.132096, 0.108868, 0.109344,
0.111145, 0.100874, 0.0874776, 0.15704, 0.118912, 0.102276,
0.0904855, 0.100126, 0.121274, 0.108345, 0.0969949, 0.0880463,
0.107838, 0.097734, 0.0865928, 0.126295, 0.117075, 0.0892948,
0.0986396, 0.125603, 0.0987391, 0.117534, 0.12417, 0.115211,
0.127119, 0.124376}, {0.106696, 0.110943, 0.135777, 0.109804,
0.101412, 0.148139, 0.235976, 0.219714, 0.275808, 0.25657,
0.217513, 0.2544, 0.233159, 0.211483, 0.241219, 0.226699,
0.2113, 0.240497, 0.220102, 0.228467, 0.241035, 0.197328,
0.236666, 0.23239, 0.198554, 0.233914, 0.235987, 0.197983,
0.236619, 0.223372, 0.210859, 0.235757, 0.214719, 0.215926,
0.230106, 0.216696, 0.23008, 0.23525, 0.202268, 0.241613,
0.230416, 0.210483, 0.252082, 0.235134, 0.218118, 0.226981,
0.21463, 0.2124, 0.222379, 0.215826, 0.222633, 0.233552,
0.237475, 0.24273, 0.242122, 0.220791, 0.241665, 0.226741,
0.211255, 0.21621, 0.21618, 0.215608, 0.222619, 0.216823,
0.225885, 0.222603, 0.251939, 0.270387, 0.254278, 0.253058,
0.247093, 0.226819, 0.201496, 0.203443, 0.142352, 0.127772,
0.136894, 0.141356, 0.126658, 0.124675, 0.0877009, 0.134468,
0.15942, 0.133982, 0.130214, 0.147833, 0.12188, 0.0977332,
0.0800694, 0.132096, 0.108868, 0.109344, 0.111145, 0.100874,
0.0874776, 0.15704, 0.118912, 0.102276, 0.0904855, 0.100126,
0.121274, 0.108345, 0.0969949, 0.0880463, 0.107838, 0.097734,
0.0865928, 0.126295, 0.117075, 0.0892948, 0.0986396, 0.125603,
0.0987391, 0.117534, 0.12417, 0.115211, 0.127119, 0.124376},
{0.106696, 0.110943, 0.135777, 0.109804, 0.101412, 0.148139,
0.235976, 0.219714, 0.275808, 0.25657, 0.217513, 0.2544,
0.233159, 0.211483, 0.241219, 0.226699, 0.2113, 0.240497,
0.220102, 0.228467, 0.241035, 0.197328, 0.236666, 0.23239,
0.198554, 0.233914, 0.235987, 0.197983, 0.236619, 0.223372,
0.210859, 0.235757, 0.214719, 0.215926, 0.230106, 0.216696,
0.23008, 0.23525, 0.202268, 0.241613, 0.230416, 0.210483,
0.252082, 0.235134, 0.218118, 0.226981, 0.21463, 0.2124,
0.222379, 0.215826, 0.222633, 0.233552, 0.237475, 0.24273,
0.242122, 0.220791, 0.241665, 0.226741, 0.211255, 0.21621,
0.21618, 0.215608, 0.222619, 0.216823, 0.225885, 0.222603,
0.251939, 0.270387, 0.254278, 0.253058, 0.247093, 0.226819,
0.201496, 0.203443, 0.142352, 0.127772, 0.136894, 0.141356,
0.126658, 0.124675, 0.0877009, 0.134468, 0.15942, 0.133982,
0.130214, 0.147833, 0.12188, 0.0977332, 0.0800694, 0.132096,
0.108868, 0.109344, 0.111145, 0.100874, 0.0874776, 0.15704,
0.118912, 0.102276, 0.0904855, 0.100126, 0.121274, 0.108345,
0.0969949, 0.0880463, 0.107838, 0.097734, 0.0865928, 0.126295,
0.117075, 0.0892948, 0.0986396, 0.125603, 0.0987391, 0.117534,
0.12417, 0.115211, 0.127119, 0.124376}, {0.0979324, 0.108778,
0.126872, 0.103133, 0.12276, 0.205055, 0.326194, 0.350345,
0.382224, 0.372824, 0.340737, 0.35069, 0.338938, 0.322779,
0.325925, 0.319942, 0.319433, 0.337765, 0.319958, 0.318741,
0.329628, 0.314026, 0.319576, 0.322958, 0.312531, 0.324407,
0.328954, 0.315092, 0.324772, 0.319568, 0.313998, 0.319709,
0.308574, 0.309155, 0.325081, 0.31863, 0.32294, 0.333886,
0.326011, 0.337236, 0.33354, 0.326207, 0.334018, 0.322291,
0.311756, 0.312045, 0.314245, 0.312672, 0.320518, 0.320961,
0.329127, 0.340628, 0.343663, 0.346238, 0.344823, 0.325717,
0.319286, 0.309847, 0.300504, 0.30205, 0.310965, 0.321628,
0.331975, 0.332253, 0.336893, 0.34424, 0.337336, 0.345325,
0.350685, 0.317732, 0.279862, 0.308088, 0.286045, 0.263903,
0.199588, 0.125255, 0.177836, 0.203107, 0.202528, 0.184669,
0.156658, 0.150573, 0.147873, 0.0981295, 0.10049, 0.147996,
0.132715, 0.110887, 0.105738, 0.145248, 0.0865655, 0.13865,
0.109829, 0.112876, 0.0912542, 0.127892, 0.132142, 0.110005,
0.114441, 0.126863, 0.110219, 0.0895547, 0.103402, 0.0826764,
0.09372, 0.0650008, 0.092297, 0.116514, 0.102751, 0.0778662,
0.0959109, 0.111453, 0.089997, 0.134276, 0.0943614, 0.122365,
0.113572, 0.118897}, {0.0979324, 0.108778, 0.126872, 0.103133,
0.12276, 0.205055, 0.326194, 0.350345, 0.382224, 0.372824,
0.340737, 0.35069, 0.338938, 0.322779, 0.325925, 0.319942,
0.319433, 0.337765, 0.319958, 0.318741, 0.329628, 0.314026,
0.319576, 0.322958, 0.312531, 0.324407, 0.328954, 0.315092,
0.324772, 0.319568, 0.313998, 0.319709, 0.308574, 0.309155,
0.325081, 0.31863, 0.32294, 0.333886, 0.326011, 0.337236,
0.33354, 0.326207, 0.334018, 0.322291, 0.311756, 0.312045,
0.314245, 0.312672, 0.320518, 0.320961, 0.329127, 0.340628,
0.343663, 0.346238, 0.344823, 0.325717, 0.319286, 0.309847,
0.300504, 0.30205, 0.310965, 0.321628, 0.331975, 0.332253,
0.336893, 0.34424, 0.337336, 0.345325, 0.350685, 0.317732,
0.279862, 0.308088, 0.286045, 0.263903, 0.199588, 0.125255,
0.177836, 0.203107, 0.202528, 0.184669, 0.156658, 0.150573,
0.147873, 0.0981295, 0.10049, 0.147996, 0.132715, 0.110887,
0.105738, 0.145248, 0.0865655, 0.13865, 0.109829, 0.112876,
0.0912542, 0.127892, 0.132142, 0.110005, 0.114441, 0.126863,
0.110219, 0.0895547, 0.103402, 0.0826764, 0.09372, 0.0650008,
0.092297, 0.116514, 0.102751, 0.0778662, 0.0959109, 0.111453,
0.089997, 0.134276, 0.0943614, 0.122365, 0.113572, 0.118897},
{0.118271, 0.098698, 0.13006, 0.106364, 0.106286, 0.219235,
0.307391, 0.339089, 0.35429, 0.355727, 0.313304, 0.323384,
0.32395, 0.301268, 0.295109, 0.303171, 0.29745, 0.315788,
0.298047, 0.292395, 0.301378, 0.29975, 0.289232, 0.300188,
0.292971, 0.298146, 0.309133, 0.292061, 0.295786, 0.302276,
0.290608, 0.290148, 0.292261, 0.283268, 0.303025, 0.301243,
0.300839, 0.313674, 0.309137, 0.31644, 0.319169, 0.300827,
0.304393, 0.299155, 0.276063, 0.277889, 0.295851, 0.289048,
0.299425, 0.307184, 0.313859, 0.32285, 0.317822, 0.322907,
0.323472, 0.298477, 0.28085, 0.283631, 0.272199, 0.274669,
0.294535, 0.30125, 0.320077, 0.328687, 0.316236, 0.326821,
0.310558, 0.311417, 0.325222, 0.278582, 0.237567, 0.293715,
0.264722, 0.241193, 0.193409, 0.161632, 0.160907, 0.180396,
0.191527, 0.169682, 0.133758, 0.102227, 0.137033, 0.134106,
0.110232, 0.135189, 0.128567, 0.114069, 0.0347476, 0.152213,
0.113139, 0.129154, 0.073958, 0.108544, 0.0783428, 0.0863846,
0.121789, 0.109996, 0.116598, 0.135663, 0.103147, 0.107498,
0.0853829, 0.127523, 0.108336, 0.071597, 0.1249, 0.0795007,
0.0888589, 0.109345, 0.0777782, 0.0932763, 0.0837908, 0.124858,
0.105863, 0.115437, 0.095006, 0.0721523}, {0.118271, 0.098698,
0.13006, 0.106364, 0.106286, 0.219235, 0.307391, 0.339089,
0.35429, 0.355727, 0.313304, 0.323384, 0.32395, 0.301268,
0.295109, 0.303171, 0.29745, 0.315788, 0.298047, 0.292395,
0.301378, 0.29975, 0.289232, 0.300188, 0.292971, 0.298146,
0.309133, 0.292061, 0.295786, 0.302276, 0.290608, 0.290148,
0.292261, 0.283268, 0.303025, 0.301243, 0.300839, 0.313674,
0.309137, 0.31644, 0.319169, 0.300827, 0.304393, 0.299155,
0.276063, 0.277889, 0.295851, 0.289048, 0.299425, 0.307184,
0.313859, 0.32285, 0.317822, 0.322907, 0.323472, 0.298477,
0.28085, 0.283631, 0.272199, 0.274669, 0.294535, 0.30125,
0.320077, 0.328687, 0.316236, 0.326821, 0.310558, 0.311417,
0.325222, 0.278582, 0.237567, 0.293715, 0.264722, 0.241193,
0.193409, 0.161632, 0.160907, 0.180396, 0.191527, 0.169682,
0.133758, 0.102227, 0.137033, 0.134106, 0.110232, 0.135189,
0.128567, 0.114069, 0.0347476, 0.152213, 0.113139, 0.129154,
0.073958, 0.108544, 0.0783428, 0.0863846, 0.121789, 0.109996,
0.116598, 0.135663, 0.103147, 0.107498, 0.0853829, 0.127523,
0.108336, 0.071597, 0.1249, 0.0795007, 0.0888589, 0.109345,
0.0777782, 0.0932763, 0.0837908, 0.124858, 0.105863, 0.115437,
0.095006, 0.0721523}, {0.121597, 0.0882514, 0.116908, 0.0909641,
0.103432, 0.19037, 0.176013, 0.205266, 0.193246, 0.216886,
0.108541, 0.171329, 0.200306, 0.154662, 0.14494, 0.189768,
0.150847, 0.178334, 0.158821, 0.150383, 0.157423, 0.154987,
0.138684, 0.166767, 0.136941, 0.150094, 0.187212, 0.127373,
0.143265, 0.188499, 0.143693, 0.14217, 0.180179, 0.143822,
0.167428, 0.16956, 0.16474, 0.182034, 0.145636, 0.188918,
0.203269, 0.10611, 0.157384, 0.186621, 0.12652, 0.134564,
0.179442, 0.141174, 0.173052, 0.172675, 0.177216, 0.197451,
0.129604, 0.1737, 0.209719, 0.111826, 0.149331, 0.173317,
0.143987, 0.14071, 0.179899, 0.118585, 0.188142, 0.220093,
0.15666, 0.193986, 0.180694, 0.155797, 0.201899, 0.194686,
0.176812, 0.215922, 0.120644, 0.118113, 0.132413, 0.141794,
0.105709, 0.137769, 0.115797, 0.122301, 0.109748, 0.116249,
0.113626, 0.127609, 0.084989, 0.121349, 0.109902, 0.102387,
0.068921, 0.148049, 0.100167, 0.114234, 0.105037, 0.128231,
0.0623091, 0.117022, 0.0780477, 0.108231, 0.0841205, 0.141015,
0.104301, 0.11527, 0.107034, 0.125879, 0.103814, 0.122028,
0.158174, 0.0801594, 0.111645, 0.126147, 0.0876945, 0.100642,
0.0466317, 0.109106, 0.124142, 0.0624485, 0.0801681, 0.0774572},
{0.121597, 0.0882514, 0.116908, 0.0909641, 0.103432, 0.19037,
0.176013, 0.205266, 0.193246, 0.216886, 0.108541, 0.171329,
0.200306, 0.154662, 0.14494, 0.189768, 0.150847, 0.178334,
0.158821, 0.150383, 0.157423, 0.154987, 0.138684, 0.166767,
0.136941, 0.150094, 0.187212, 0.127373, 0.143265, 0.188499,
0.143693, 0.14217, 0.180179, 0.143822, 0.167428, 0.16956,
0.16474, 0.182034, 0.145636, 0.188918, 0.203269, 0.10611,
0.157384, 0.186621, 0.12652, 0.134564, 0.179442, 0.141174,
0.173052, 0.172675, 0.177216, 0.197451, 0.129604, 0.1737,
0.209719, 0.111826, 0.149331, 0.173317, 0.143987, 0.14071,
0.179899, 0.118585, 0.188142, 0.220093, 0.15666, 0.193986,
0.180694, 0.155797, 0.201899, 0.194686, 0.176812, 0.215922,
0.120644, 0.118113, 0.132413, 0.141794, 0.105709, 0.137769,
0.115797, 0.122301, 0.109748, 0.116249, 0.113626, 0.127609,
0.084989, 0.121349, 0.109902, 0.102387, 0.068921, 0.148049,
0.100167, 0.114234, 0.105037, 0.128231, 0.0623091, 0.117022,
0.0780477, 0.108231, 0.0841205, 0.141015, 0.104301, 0.11527,
0.107034, 0.125879, 0.103814, 0.122028, 0.158174, 0.0801594,
0.111645, 0.126147, 0.0876945, 0.100642, 0.0466317, 0.109106,
0.124142, 0.0624485, 0.0801681, 0.0774572}, {0.0943684,
0.102842, 0.117399, 0.0667467, 0.109972, 0.140343, 0.114732,
0.137817, 0.150906, 0.13171, 0.148763, 0.0797258, 0.102371,
0.152957, 0.104004, 0.107993, 0.115469, 0.126286, 0.126121,
0.11696, 0.12994, 0.135223, 0.124809, 0.0773213, 0.143126,
0.118645, 0.0401975, 0.154638, 0.092389, 0.100687, 0.116357,
0.108722, 0.0979634, 0.101228, 0.149183, 0.108762, 0.122804,
0.131474, 0.14645, 0.108812, 0.126523, 0.164925, 0.0991238,
0.138392, 0.148769, 0.116882, 0.0968869, 0.0787731, 0.108825,
0.0763519, 0.132188, 0.109864, 0.135491, 0.152918, 0.142965,
0.15195, 0.170706, 0.12725, 0.10458, 0.108872, 0.126771,
0.17903, 0.164803, 0.103407, 0.127685, 0.0980413, 0.141211,
0.154233, 0.174405, 0.204232, 0.140604, 0.19154, 0.122987,
0.0896126, 0.12097, 0.0996958, 0.113087, 0.132978, 0.0968379,
0.117991, 0.098374, 0.0847576, 0.0924431, 0.10656, 0.111957,
0.116384, 0.0842633, 0.0839604, 0.0761401, 0.125982, 0.0809099,
0.0894139, 0.104413, 0.128305, 0.101702, 0.0535228, 0.0720865,
0.066982, 0.101872, 0.0976315, 0.0564306, 0.104974, 0.102927,
0.114207, 0.0915212, 0.145573, 0.180836, 0.102885, 0.0903195,
0.115215, 0.0709995, 0.109072, 0.102522, 0.0903624, 0.0984952,
0.0742804, 0.0770673, 0.0913839}, {0.108411, 0.110604, 0.124366,
0.102108, 0.10458, 0.135616, 0.108341, 0.139798, 0.151105,
0.139256, 0.133124, 0.127479, 0.128469, 0.135037, 0.150252,
0.133091, 0.160106, 0.148279, 0.140677, 0.168342, 0.137193,
0.138582, 0.143791, 0.14202, 0.139917, 0.112555, 0.126605,
0.135332, 0.145689, 0.124485, 0.148359, 0.136033, 0.12511,
0.157469, 0.157565, 0.158774, 0.166295, 0.15815, 0.173787,
0.138738, 0.154086, 0.16863, 0.139997, 0.0957011, 0.0877847,
0.092873, 0.116694, 0.142968, 0.154956, 0.163652, 0.189902,
0.177887, 0.189206, 0.177976, 0.148487, 0.0943929, 0.176067,
0.164189, 0.185012, 0.194229, 0.174678, 0.206752, 0.209673,
0.187618, 0.182501, 0.171142, 0.179884, 0.213124, 0.213795,
0.231286, 0.240727, 0.226814, 0.156396, 0.138813, 0.106802,
0.131626, 0.133164, 0.0884593, 0.0740992, 0.115304, 0.107508,
0.110303, 0.117348, 0.11939, 0.131224, 0.120632, 0.0820849,
0.0969369, 0.0908406, 0.106404, 0.117817, 0.105892, 0.0743566,
0.133269, 0.110812, 0.0978178, 0.0885901, 0.0890289, 0.117319,
0.0991623, 0.0973158, 0.0808916, 0.113362, 0.105621, 0.114458,
0.150568, 0.196154, 0.110095, 0.140415, 0.135812, 0.120507,
0.113004, 0.100121, 0.107882, 0.0956314, 0.115562, 0.107988,
0.108025}, {0.108411, 0.110604, 0.124366, 0.102108, 0.10458,
0.135616, 0.108341, 0.139798, 0.151105, 0.139256, 0.133124,
0.127479, 0.128469, 0.135037, 0.150252, 0.133091, 0.160106,
0.148279, 0.140677, 0.168342, 0.137193, 0.138582, 0.143791,
0.14202, 0.139917, 0.112555, 0.126605, 0.135332, 0.145689,
0.124485, 0.148359, 0.136033, 0.12511, 0.157469, 0.157565,
0.158774, 0.166295, 0.15815, 0.173787, 0.138738, 0.154086,
0.16863, 0.139997, 0.0957011, 0.0877847, 0.092873, 0.116694,
0.142968, 0.154956, 0.163652, 0.189902, 0.177887, 0.189206,
0.177976, 0.148487, 0.0943929, 0.176067, 0.164189, 0.185012,
0.194229, 0.174678, 0.206752, 0.209673, 0.187618, 0.182501,
0.171142, 0.179884, 0.213124, 0.213795, 0.231286, 0.240727,
0.226814, 0.156396, 0.138813, 0.106802, 0.131626, 0.133164,
0.0884593, 0.0740992, 0.115304, 0.107508, 0.110303, 0.117348,
0.11939, 0.131224, 0.120632, 0.0820849, 0.0969369, 0.0908406,
0.106404, 0.117817, 0.105892, 0.0743566, 0.133269, 0.110812,
0.0978178, 0.0885901, 0.0890289, 0.117319, 0.0991623, 0.0973158,
0.0808916, 0.113362, 0.105621, 0.114458, 0.150568, 0.196154,
0.110095, 0.140415, 0.135812, 0.120507, 0.113004, 0.100121,
0.107882, 0.0956314, 0.115562, 0.107988, 0.108025}, {0.103623,
0.0849911, 0.107675, 0.109162, 0.0977347, 0.128753, 0.121839,
0.117392, 0.150202, 0.123904, 0.143007, 0.0850291, 0.093677,
0.124268, 0.106267, 0.149557, 0.159272, 0.144786, 0.138459,
0.160323, 0.160201, 0.102475, 0.147089, 0.145068, 0.118041,
0.114767, 0.113733, 0.123294, 0.123648, 0.135619, 0.145554,
0.132864, 0.13894, 0.131879, 0.153514, 0.137449, 0.156588,
0.155458, 0.241065, 0.273806, 0.180641, 0.222268, 0.1892,
0.135642, 0.172465, 0.164557, 0.169279, 0.113584, 0.118402,
0.136599, 0.14568, 0.184552, 0.180583, 0.160085, 0.132415,
0.155199, 0.172086, 0.168956, 0.185399, 0.183749, 0.203406,
0.217534, 0.202347, 0.207065, 0.183969, 0.181159, 0.211092,
0.213156, 0.207507, 0.215576, 0.234608, 0.213671, 0.180997,
0.131261, 0.1188, 0.150536, 0.127604, 0.117657, 0.132485,
0.120707, 0.124162, 0.104547, 0.0953771, 0.101279, 0.11221,
0.133518, 0.107657, 0.111055, 0.0980383, 0.127193, 0.123786,
0.124356, 0.0984131, 0.137565, 0.104867, 0.114447, 0.0841541,
0.106538, 0.106364, 0.129384, 0.104725, 0.10835, 0.123982,
0.129452, 0.104168, 0.157053, 0.182498, 0.19223, 0.216113,
0.222912, 0.19339, 0.182031, 0.17792, 0.106526, 0.140424,
0.132751, 0.113027, 0.148271}, {0.103623, 0.0849911, 0.107675,
0.109162, 0.0977347, 0.128753, 0.121839, 0.117392, 0.150202,
0.123904, 0.143007, 0.0850291, 0.093677, 0.124268, 0.106267,
0.149557, 0.159272, 0.144786, 0.138459, 0.160323, 0.160201,
0.102475, 0.147089, 0.145068, 0.118041, 0.114767, 0.113733,
0.123294, 0.123648, 0.135619, 0.145554, 0.132864, 0.13894,
0.131879, 0.153514, 0.137449, 0.156588, 0.155458, 0.241065,
0.273806, 0.180641, 0.222268, 0.1892, 0.135642, 0.172465,
0.164557, 0.169279, 0.113584, 0.118402, 0.136599, 0.14568,
0.184552, 0.180583, 0.160085, 0.132415, 0.155199, 0.172086,
0.168956, 0.185399, 0.183749, 0.203406, 0.217534, 0.202347,
0.207065, 0.183969, 0.181159, 0.211092, 0.213156, 0.207507,
0.215576, 0.234608, 0.213671, 0.180997, 0.131261, 0.1188,
0.150536, 0.127604, 0.117657, 0.132485, 0.120707, 0.124162,
0.104547, 0.0953771, 0.101279, 0.11221, 0.133518, 0.107657,
0.111055, 0.0980383, 0.127193, 0.123786, 0.124356, 0.0984131,
0.137565, 0.104867, 0.114447, 0.0841541, 0.106538, 0.106364,
0.129384, 0.104725, 0.10835, 0.123982, 0.129452, 0.104168,
0.157053, 0.182498, 0.19223, 0.216113, 0.222912, 0.19339,
0.182031, 0.17792, 0.106526, 0.140424, 0.132751, 0.113027,
0.148271}, {0.0972476, 0.105523, 0.098242, 0.0845561, 0.0980194,
0.147071, 0.176298, 0.112806, 0.156614, 0.143415, 0.0839433,
0.152633, 0.145098, 0.109309, 0.0910752, 0.124009, 0.165363,
0.111199, 0.133434, 0.160839, 0.106924, 0.14782, 0.13531,
0.106017, 0.0889733, 0.145896, 0.148664, 0.0990815, 0.135786,
0.1548, 0.132741, 0.116089, 0.118829, 0.130918, 0.0947392,
0.129604, 0.156355, 0.159695, 0.336456, 0.411769, 0.311675,
0.35002, 0.272711, 0.176604, 0.267507, 0.211589, 0.199675,
0.245107, 0.230596, 0.168267, 0.191034, 0.1288, 0.191085,
0.200102, 0.152278, 0.196275, 0.19936, 0.135347, 0.151156,
0.1066, 0.18575, 0.219304, 0.141151, 0.178158, 0.179991,
0.156423, 0.190128, 0.168234, 0.131358, 0.118981, 0.106987,
0.165473, 0.199477, 0.186317, 0.173104, 0.193635, 0.181415,
0.184799, 0.195667, 0.197699, 0.198765, 0.190801, 0.193008,
0.190016, 0.192002, 0.185269, 0.196252, 0.186442, 0.191738,
0.195875, 0.18961, 0.201074, 0.200588, 0.196562, 0.195717,
0.191006, 0.195889, 0.193509, 0.191869, 0.190571, 0.196121,
0.193468, 0.198481, 0.197501, 0.190211, 0.214987, 0.311783,
0.350724, 0.37829, 0.381822, 0.338752, 0.307175, 0.278055,
0.228289, 0.228581, 0.216908, 0.207666, 0.222347}, {0.0972476,
0.105523, 0.098242, 0.0845561, 0.0980194, 0.147071, 0.176298,
0.112806, 0.156614, 0.143415, 0.0839433, 0.152633, 0.145098,
0.109309, 0.0910752, 0.124009, 0.165363, 0.111199, 0.133434,
0.160839, 0.106924, 0.14782, 0.13531, 0.106017, 0.0889733,
0.145896, 0.148664, 0.0990815, 0.135786, 0.1548, 0.132741,
0.116089, 0.118829, 0.130918, 0.0947392, 0.129604, 0.156355,
0.159695, 0.336456, 0.411769, 0.311675, 0.35002, 0.272711,
0.176604, 0.267507, 0.211589, 0.199675, 0.245107, 0.230596,
0.168267, 0.191034, 0.1288, 0.191085, 0.200102, 0.152278,
0.196275, 0.19936, 0.135347, 0.151156, 0.1066, 0.18575,
0.219304, 0.141151, 0.178158, 0.179991, 0.156423, 0.190128,
0.168234, 0.131358, 0.118981, 0.106987, 0.165473, 0.199477,
0.186317, 0.173104, 0.193635, 0.181415, 0.184799, 0.195667,
0.197699, 0.198765, 0.190801, 0.193008, 0.190016, 0.192002,
0.185269, 0.196252, 0.186442, 0.191738, 0.195875, 0.18961,
0.201074, 0.200588, 0.196562, 0.195717, 0.191006, 0.195889,
0.193509, 0.191869, 0.190571, 0.196121, 0.193468, 0.198481,
0.197501, 0.190211, 0.214987, 0.311783, 0.350724, 0.37829,
0.381822, 0.338752, 0.307175, 0.278055, 0.228289, 0.228581,
0.216908, 0.207666, 0.222347}, {0.0960397, 0.0933866, 0.104653,
0.085462, 0.130349, 0.210613, 0.194297, 0.244027, 0.247095,
0.254572, 0.225229, 0.217354, 0.221626, 0.215245, 0.207164,
0.211926, 0.212698, 0.225211, 0.215739, 0.211198, 0.228013,
0.213623, 0.209124, 0.22295, 0.227383, 0.213747, 0.211735,
0.218303, 0.218139, 0.203226, 0.215375, 0.220577, 0.205666,
0.20848, 0.218683, 0.211226, 0.196221, 0.229085, 0.352007,
0.425302, 0.311461, 0.325501, 0.299426, 0.274541, 0.310935,
0.246532, 0.226922, 0.169613, 0.240907, 0.172846, 0.228353,
0.2042, 0.212436, 0.212059, 0.212455, 0.215966, 0.263732,
0.252153, 0.249452, 0.229905, 0.202052, 0.196231, 0.224354,
0.228864, 0.218354, 0.226064, 0.219446, 0.233855, 0.23469,
0.243268, 0.213303, 0.226284, 0.24025, 0.209294, 0.199696,
0.184169, 0.18314, 0.17337, 0.165789, 0.186371, 0.19154,
0.203068, 0.207721, 0.211561, 0.218375, 0.211069, 0.218234,
0.212535, 0.205372, 0.199559, 0.193514, 0.199435, 0.202625,
0.19897, 0.20212, 0.203196, 0.214452, 0.209754, 0.205406,
0.20751, 0.203323, 0.20776, 0.203119, 0.200505, 0.194734,
0.211793, 0.314538, 0.373438, 0.394702, 0.398647, 0.355679,
0.314591, 0.287086, 0.245537, 0.237335, 0.219622, 0.220451,
0.222914}, {0.103281, 0.0988053, 0.100575, 0.100497, 0.126085,
0.269215, 0.333013, 0.381464, 0.39538, 0.386221, 0.352037,
0.344389, 0.341809, 0.322575, 0.314528, 0.326131, 0.333763,
0.341053, 0.339605, 0.335685, 0.33304, 0.330536, 0.332037,
0.336348, 0.336213, 0.336788, 0.334027, 0.328057, 0.326787,
0.3245, 0.321602, 0.321119, 0.320027, 0.322438, 0.327557,
0.330139, 0.33058, 0.336711, 0.333825, 0.355553, 0.332225,
0.325136, 0.318698, 0.335755, 0.333767, 0.329066, 0.320675,
0.321473, 0.32103, 0.317651, 0.330398, 0.342946, 0.349383,
0.342512, 0.334785, 0.326072, 0.324073, 0.32948, 0.336099,
0.33587, 0.335267, 0.330822, 0.327131, 0.33067, 0.348161,
0.359356, 0.353569, 0.34309, 0.326077, 0.326711, 0.329578,
0.326447, 0.303502, 0.286195, 0.252244, 0.183704, 0.198101,
0.226788, 0.221231, 0.195916, 0.173439, 0.160197, 0.177452,
0.198856, 0.211659, 0.203666, 0.207699, 0.204422, 0.190611,
0.16181, 0.132169, 0.12222, 0.129843, 0.166434, 0.173095,
0.176484, 0.180189, 0.175866, 0.177818, 0.173918, 0.158994,
0.157893, 0.154399, 0.11477, 0.108308, 0.136194, 0.225339,
0.261406, 0.266532, 0.275653, 0.247262, 0.209589, 0.188421,
0.170441, 0.151937, 0.110357, 0.149855, 0.130272}, {0.103281,
0.0988053, 0.100575, 0.100497, 0.126085, 0.269215, 0.333013,
0.381464, 0.39538, 0.386221, 0.352037, 0.344389, 0.341809,
0.322575, 0.314528, 0.326131, 0.333763, 0.341053, 0.339605,
0.335685, 0.33304, 0.330536, 0.332037, 0.336348, 0.336213,
0.336788, 0.334027, 0.328057, 0.326787, 0.3245, 0.321602,
0.321119, 0.320027, 0.322438, 0.327557, 0.330139, 0.33058,
0.336711, 0.333825, 0.355553, 0.332225, 0.325136, 0.318698,
0.335755, 0.333767, 0.329066, 0.320675, 0.321473, 0.32103,
0.317651, 0.330398, 0.342946, 0.349383, 0.342512, 0.334785,
0.326072, 0.324073, 0.32948, 0.336099, 0.33587, 0.335267,
0.330822, 0.327131, 0.33067, 0.348161, 0.359356, 0.353569,
0.34309, 0.326077, 0.326711, 0.329578, 0.326447, 0.303502,
0.286195, 0.252244, 0.183704, 0.198101, 0.226788, 0.221231,
0.195916, 0.173439, 0.160197, 0.177452, 0.198856, 0.211659,
0.203666, 0.207699, 0.204422, 0.190611, 0.16181, 0.132169,
0.12222, 0.129843, 0.166434, 0.173095, 0.176484, 0.180189,
0.175866, 0.177818, 0.173918, 0.158994, 0.157893, 0.154399,
0.11477, 0.108308, 0.136194, 0.225339, 0.261406, 0.266532,
0.275653, 0.247262, 0.209589, 0.188421, 0.170441, 0.151937,
0.110357, 0.149855, 0.130272}, {0.102062, 0.100613, 0.0856596,
0.0900138, 0.132901, 0.264195, 0.334075, 0.378757, 0.391902,
0.377446, 0.345377, 0.335815, 0.331425, 0.305683, 0.3044,
0.316196, 0.327536, 0.336033, 0.330759, 0.324366, 0.321548,
0.320701, 0.324039, 0.326251, 0.32627, 0.326711, 0.325696,
0.317905, 0.315896, 0.312185, 0.307405, 0.310052, 0.309901,
0.313441, 0.321039, 0.323915, 0.327921, 0.332127, 0.333144,
0.333652, 0.332048, 0.320694, 0.307368, 0.299145, 0.295739,
0.309843, 0.3148, 0.320524, 0.32648, 0.324743, 0.332646,
0.345896, 0.34194, 0.333952, 0.322591, 0.302756, 0.289809,
0.305673, 0.316334, 0.327379, 0.330778, 0.330348, 0.331298,
0.333794, 0.348543, 0.355699, 0.345278, 0.322005, 0.29677,
0.296065, 0.302127, 0.313677, 0.295178, 0.28043, 0.246196,
0.174535, 0.183194, 0.224444, 0.220684, 0.203354, 0.164736,
0.139428, 0.155065, 0.179486, 0.17976, 0.170083, 0.17768,
0.170442, 0.184379, 0.155166, 0.150126, 0.152689, 0.162603,
0.174081, 0.149276, 0.161612, 0.131889, 0.139604, 0.147152,
0.136788, 0.150573, 0.124434, 0.141303, 0.129501, 0.157935,
0.114865, 0.138569, 0.128998, 0.135762, 0.0852357, 0.141503,
0.0837523, 0.136689, 0.12716, 0.103241, 0.142269, 0.0910142,
0.119673}, {0.102131, 0.0947792, 0.091104, 0.0900055, 0.136839,
0.169626, 0.22022, 0.225017, 0.244275, 0.227739, 0.217692,
0.193647, 0.200791, 0.16479, 0.18123, 0.186251, 0.192998,
0.213056, 0.171242, 0.171852, 0.192312, 0.188592, 0.187019,
0.20737, 0.197558, 0.183355, 0.192463, 0.191169, 0.187992,
0.176279, 0.179309, 0.185938, 0.17528, 0.180512, 0.200276,
0.179104, 0.191997, 0.207496, 0.214964, 0.18428, 0.197403,
0.195354, 0.178795, 0.163571, 0.163831, 0.185241, 0.187884,
0.183256, 0.197561, 0.205352, 0.206698, 0.221417, 0.205788,
0.181168, 0.183406, 0.161927, 0.142537, 0.193059, 0.188496,
0.205265, 0.207579, 0.194198, 0.20672, 0.210191, 0.203837,
0.220242, 0.221831, 0.20578, 0.144145, 0.18928, 0.117994,
0.207518, 0.195161, 0.171011, 0.146997, 0.128987, 0.0894904,
0.130876, 0.105355, 0.100896, 0.120173, 0.0987106, 0.117838,
0.116675, 0.10983, 0.0983863, 0.125059, 0.11501, 0.123034,
0.0987483, 0.0931554, 0.107916, 0.0808451, 0.118217, 0.0773042,
0.0922753, 0.0822436, 0.113906, 0.0988829, 0.109871, 0.119972,
0.0880406, 0.092006, 0.110978, 0.107022, 0.116372, 0.0830692,
0.0763081, 0.067131, 0.110246, 0.118563, 0.099601, 0.110545,
0.0809279, 0.112928, 0.140584, 0.0764786, 0.0717616}, {0.102131,
0.0947792, 0.091104, 0.0900055, 0.136839, 0.169626, 0.22022,
0.225017, 0.244275, 0.227739, 0.217692, 0.193647, 0.200791,
0.16479, 0.18123, 0.186251, 0.192998, 0.213056, 0.171242,
0.171852, 0.192312, 0.188592, 0.187019, 0.20737, 0.197558,
0.183355, 0.192463, 0.191169, 0.187992, 0.176279, 0.179309,
0.185938, 0.17528, 0.180512, 0.200276, 0.179104, 0.191997,
0.207496, 0.214964, 0.18428, 0.197403, 0.195354, 0.178795,
0.163571, 0.163831, 0.185241, 0.187884, 0.183256, 0.197561,
0.205352, 0.206698, 0.221417, 0.205788, 0.181168, 0.183406,
0.161927, 0.142537, 0.193059, 0.188496, 0.205265, 0.207579,
0.194198, 0.20672, 0.210191, 0.203837, 0.220242, 0.221831,
0.20578, 0.144145, 0.18928, 0.117994, 0.207518, 0.195161,
0.171011, 0.146997, 0.128987, 0.0894904, 0.130876, 0.105355,
0.100896, 0.120173, 0.0987106, 0.117838, 0.116675, 0.10983,
0.0983863, 0.125059, 0.11501, 0.123034, 0.0987483, 0.0931554,
0.107916, 0.0808451, 0.118217, 0.0773042, 0.0922753, 0.0822436,
0.113906, 0.0988829, 0.109871, 0.119972, 0.0880406, 0.092006,
0.110978, 0.107022, 0.116372, 0.0830692, 0.0763081, 0.067131,
0.110246, 0.118563, 0.099601, 0.110545, 0.0809279, 0.112928,
0.140584, 0.0764786, 0.0717616}, {0.0426072, 0.124905, 0.102903,
0.099735, 0.135764, 0.130066, 0.0986625, 0.184264, 0.112155,
0.106529, 0.158854, 0.0651733, 0.129244, 0.138749, 0.0967612,
0.120367, 0.15185, 0.128666, 0.180396, 0.176424, 0.136839,
0.141683, 0.152399, 0.125529, 0.11243, 0.147597, 0.113004,
0.117407, 0.0917517, 0.112425, 0.146494, 0.13037, 0.145151,
0.151316, 0.1339, 0.176441, 0.149157, 0.136047, 0.144495,
0.105266, 0.122668, 0.144736, 0.133472, 0.119368, 0.131997,
0.151426, 0.15097, 0.163796, 0.171596, 0.150281, 0.154126,
0.132401, 0.174168, 0.164825, 0.121805, 0.148717, 0.119071,
0.135622, 0.14312, 0.132999, 0.134923, 0.122186, 0.174973,
0.169941, 0.178628, 0.170329, 0.0920013, 0.167556, 0.162058,
0.190937, 0.181551, 0.148548, 0.143398, 0.123133, 0.0978825,
0.163924, 0.0984946, 0.101596, 0.135671, 0.103086, 0.121389,
0.0999409, 0.134572, 0.0958393, 0.0991026, 0.085241, 0.119144,
0.124975, 0.0838442, 0.131827, 0.133732, 0.132262, 0.106456,
0.121523, 0.128205, 0.0959124, 0.0989206, 0.106427, 0.0682254,
0.102089, 0.0967278, 0.124762, 0.127333, 0.0939382, 0.133165,
0.111984, 0.0973087, 0.125222, 0.0943425, 0.120105, 0.108115,
0.0655684, 0.064268, 0.105118, 0.0990778, 0.137145, 0.0721078,
0.0815871}, {0.0740824, 0.139505, 0.114577, 0.103996, 0.0876537,
0.098548, 0.145727, 0.156725, 0.173774, 0.133252, 0.179157,
0.16067, 0.120502, 0.166368, 0.14484, 0.126298, 0.137302,
0.134522, 0.147314, 0.171864, 0.121115, 0.145018, 0.184779,
0.123601, 0.117725, 0.157956, 0.119035, 0.153434, 0.107488,
0.126677, 0.166724, 0.144164, 0.151029, 0.14113, 0.118731,
0.15049, 0.170613, 0.155513, 0.114145, 0.145349, 0.117106,
0.158554, 0.173764, 0.141964, 0.180415, 0.179415, 0.103939,
0.167546, 0.161391, 0.15096, 0.122328, 0.123445, 0.152545,
0.168035, 0.128554, 0.168231, 0.167423, 0.139004, 0.182266,
0.15384, 0.155416, 0.132014, 0.158909, 0.158473, 0.150025,
0.16519, 0.149745, 0.150301, 0.128597, 0.202584, 0.181942,
0.142889, 0.159823, 0.159269, 0.117018, 0.154995, 0.127046,
0.120162, 0.157084, 0.119881, 0.0836713, 0.0969299, 0.113019,
0.133465, 0.122393, 0.120002, 0.110749, 0.129612, 0.12394,
0.15949, 0.131739, 0.136165, 0.0959894, 0.112584, 0.145511,
0.0925442, 0.0990381, 0.086418, 0.0766458, 0.122487, 0.0921153,
0.141721, 0.117702, 0.0931281, 0.12811, 0.102807, 0.114699,
0.118881, 0.114638, 0.126902, 0.0963914, 0.0735256, 0.136841,
0.127631, 0.103602, 0.114909, 0.103197, 0.119181}, {0.0740824,
0.139505, 0.114577, 0.103996, 0.0876537, 0.098548, 0.145727,
0.156725, 0.173774, 0.133252, 0.179157, 0.16067, 0.120502,
0.166368, 0.14484, 0.126298, 0.137302, 0.134522, 0.147314,
0.171864, 0.121115, 0.145018, 0.184779, 0.123601, 0.117725,
0.157956, 0.119035, 0.153434, 0.107488, 0.126677, 0.166724,
0.144164, 0.151029, 0.14113, 0.118731, 0.15049, 0.170613,
0.155513, 0.114145, 0.145349, 0.117106, 0.158554, 0.173764,
0.141964, 0.180415, 0.179415, 0.103939, 0.167546, 0.161391,
0.15096, 0.122328, 0.123445, 0.152545, 0.168035, 0.128554,
0.168231, 0.167423, 0.139004, 0.182266, 0.15384, 0.155416,
0.132014, 0.158909, 0.158473, 0.150025, 0.16519, 0.149745,
0.150301, 0.128597, 0.202584, 0.181942, 0.142889, 0.159823,
0.159269, 0.117018, 0.154995, 0.127046, 0.120162, 0.157084,
0.119881, 0.0836713, 0.0969299, 0.113019, 0.133465, 0.122393,
0.120002, 0.110749, 0.129612, 0.12394, 0.15949, 0.131739,
0.136165, 0.0959894, 0.112584, 0.145511, 0.0925442, 0.0990381,
0.086418, 0.0766458, 0.122487, 0.0921153, 0.141721, 0.117702,
0.0931281, 0.12811, 0.102807, 0.114699, 0.118881, 0.114638,
0.126902, 0.0963914, 0.0735256, 0.136841, 0.127631, 0.103602,
0.114909, 0.103197, 0.119181}, {0.110931, 0.102123, 0.114479,
0.114998, 0.11157, 0.0822772, 0.138848, 0.150333, 0.11265,
0.143494, 0.146144, 0.137687, 0.133221, 0.145341, 0.144517,
0.116906, 0.142792, 0.0979599, 0.137917, 0.14058, 0.137467,
0.167213, 0.157543, 0.155916, 0.100352, 0.147912, 0.142667,
0.0788339, 0.135258, 0.121424, 0.150878, 0.145842, 0.10811,
0.123913, 0.130334, 0.159354, 0.151181, 0.133144, 0.152502,
0.125548, 0.127309, 0.130188, 0.151194, 0.154806, 0.168554,
0.15348, 0.13493, 0.142561, 0.0983391, 0.119839, 0.134165,
0.107999, 0.132687, 0.141556, 0.146005, 0.112007, 0.152743,
0.111657, 0.146058, 0.180593, 0.159136, 0.158791, 0.121351,
0.147183, 0.158625, 0.180631, 0.163601, 0.148621, 0.143419,
0.195145, 0.149132, 0.137457, 0.127377, 0.145976, 0.103371,
0.11305, 0.117065, 0.11627, 0.147032, 0.0607757, 0.0884471,
0.124163, 0.0933741, 0.13678, 0.0902486, 0.138079, 0.0669238,
0.101769, 0.14912, 0.142389, 0.103891, 0.122002, 0.0928807,
0.104013, 0.139456, 0.109922, 0.117374, 0.113728, 0.114296,
0.124934, 0.0944122, 0.114547, 0.119719, 0.117925, 0.124606,
0.0886198, 0.132105, 0.0852234, 0.0825536, 0.0928769, 0.105329,
0.091638, 0.149494, 0.118439, 0.105283, 0.11294, 0.119692,
0.134028}, {0.12549, 0.0990096, 0.131981, 0.0940572, 0.110921,
0.138201, 0.10344, 0.143299, 0.152125, 0.114329, 0.12502,
0.124353, 0.0882005, 0.13916, 0.123252, 0.137699, 0.118637,
0.127988, 0.129678, 0.138717, 0.122304, 0.101473, 0.14264,
0.104376, 0.131745, 0.0928661, 0.101551, 0.11394, 0.12895,
0.136197, 0.0907259, 0.108014, 0.133825, 0.143377, 0.138477,
0.132712, 0.121903, 0.0999318, 0.13286, 0.108335, 0.116141,
0.0968722, 0.128855, 0.143463, 0.126869, 0.166925, 0.148567,
0.0952146, 0.0769102, 0.120438, 0.116919, 0.122496, 0.0733621,
0.0838318, 0.100487, 0.109717, 0.147532, 0.15604, 0.164312,
0.159987, 0.150044, 0.152228, 0.143674, 0.119148, 0.153372,
0.174855, 0.133007, 0.134844, 0.152894, 0.148559, 0.138001,
0.19142, 0.135697, 0.102508, 0.129899, 0.142849, 0.100519,
0.086293, 0.120339, 0.0977466, 0.118995, 0.090037, 0.116377,
0.116941, 0.11216, 0.0830494, 0.0958436, 0.10206, 0.133654,
0.0955692, 0.141179, 0.105126, 0.0983462, 0.151786, 0.116782,
0.136874, 0.11598, 0.114478, 0.122084, 0.117794, 0.112888,
0.119568, 0.125604, 0.108042, 0.131638, 0.105044, 0.144904,
0.107093, 0.112555, 0.0951451, 0.122673, 0.117411, 0.132255,
0.122236, 0.117026, 0.108238, 0.125122, 0.129903}, {0.0770276,
0.0926815, 0.127886, 0.100963, 0.103814, 0.1198, 0.26785,
0.251735, 0.248511, 0.254735, 0.211268, 0.159568, 0.173609,
0.190754, 0.193289, 0.219488, 0.196696, 0.219889, 0.21611,
0.214182, 0.215561, 0.207685, 0.20042, 0.206296, 0.206242,
0.211029, 0.211894, 0.209508, 0.208528, 0.216212, 0.231346,
0.225665, 0.213123, 0.215061, 0.214244, 0.206767, 0.206347,
0.182587, 0.206538, 0.221527, 0.19004, 0.207498, 0.205477,
0.226241, 0.262331, 0.253248, 0.225666, 0.211011, 0.18275,
0.179917, 0.207645, 0.204006, 0.20723, 0.201381, 0.171331,
0.226255, 0.259386, 0.266856, 0.261334, 0.242601, 0.213172,
0.22422, 0.18475, 0.150144, 0.20552, 0.200625, 0.198553,
0.231138, 0.219367, 0.279535, 0.322068, 0.276886, 0.232255,
0.177087, 0.102956, 0.141655, 0.153143, 0.144263, 0.179379,
0.179876, 0.146528, 0.192529, 0.163421, 0.146712, 0.152238,
0.100303, 0.151775, 0.156705, 0.157662, 0.182671, 0.134888,
0.122668, 0.140645, 0.120071, 0.151337, 0.115342, 0.133407,
0.154273, 0.151014, 0.140373, 0.154254, 0.116188, 0.173756,
0.134953, 0.144313, 0.157766, 0.134774, 0.136825, 0.145133,
0.14034, 0.153398, 0.12411, 0.0876252, 0.100124, 0.110573,
0.0969348, 0.0911267, 0.076844}, {0.112741, 0.0917931,
0.0916301, 0.102178, 0.130525, 0.208695, 0.364994, 0.436145,
0.422975, 0.388401, 0.319303, 0.270904, 0.277004, 0.294605,
0.33301, 0.352721, 0.344719, 0.375807, 0.369973, 0.359504,
0.349419, 0.333761, 0.326504, 0.328968, 0.343454, 0.345415,
0.347855, 0.349032, 0.353143, 0.352366, 0.353886, 0.357196,
0.357814, 0.356231, 0.3558, 0.351204, 0.343102, 0.3348,
0.341399, 0.323005, 0.336726, 0.368486, 0.335128, 0.320623,
0.431303, 0.44367, 0.39423, 0.317805, 0.28481, 0.340743,
0.379114, 0.40055, 0.390654, 0.336123, 0.268669, 0.395529,
0.429988, 0.392341, 0.392489, 0.415701, 0.402506, 0.388813,
0.362246, 0.318951, 0.276856, 0.276518, 0.345563, 0.369263,
0.253376, 0.412491, 0.492053, 0.437364, 0.255905, 0.311467,
0.273568, 0.303806, 0.326725, 0.323233, 0.357587, 0.36593,
0.358644, 0.359189, 0.290404, 0.315834, 0.324551, 0.303054,
0.319136, 0.331664, 0.342857, 0.353426, 0.340129, 0.328157,
0.330041, 0.324598, 0.322758, 0.31932, 0.323568, 0.331422,
0.335847, 0.337293, 0.338177, 0.329138, 0.333134, 0.328405,
0.323492, 0.325463, 0.324776, 0.320526, 0.304911, 0.26954,
0.222334, 0.179676, 0.161418, 0.179202, 0.185326, 0.195905,
0.191807, 0.212484}, {0.112741, 0.0917931, 0.0916301, 0.102178,
0.130525, 0.208695, 0.364994, 0.436145, 0.422975, 0.388401,
0.319303, 0.270904, 0.277004, 0.294605, 0.33301, 0.352721,
0.344719, 0.375807, 0.369973, 0.359504, 0.349419, 0.333761,
0.326504, 0.328968, 0.343454, 0.345415, 0.347855, 0.349032,
0.353143, 0.352366, 0.353886, 0.357196, 0.357814, 0.356231,
0.3558, 0.351204, 0.343102, 0.3348, 0.341399, 0.323005,
0.336726, 0.368486, 0.335128, 0.320623, 0.431303, 0.44367,
0.39423, 0.317805, 0.28481, 0.340743, 0.379114, 0.40055,
0.390654, 0.336123, 0.268669, 0.395529, 0.429988, 0.392341,
0.392489, 0.415701, 0.402506, 0.388813, 0.362246, 0.318951,
0.276856, 0.276518, 0.345563, 0.369263, 0.253376, 0.412491,
0.492053, 0.437364, 0.255905, 0.311467, 0.273568, 0.303806,
0.326725, 0.323233, 0.357587, 0.36593, 0.358644, 0.359189,
0.290404, 0.315834, 0.324551, 0.303054, 0.319136, 0.331664,
0.342857, 0.353426, 0.340129, 0.328157, 0.330041, 0.324598,
0.322758, 0.31932, 0.323568, 0.331422, 0.335847, 0.337293,
0.338177, 0.329138, 0.333134, 0.328405, 0.323492, 0.325463,
0.324776, 0.320526, 0.304911, 0.26954, 0.222334, 0.179676,
0.161418, 0.179202, 0.185326, 0.195905, 0.191807, 0.212484},
{0.111025, 0.0890525, 0.101824, 0.0938653, 0.10962, 0.237139,
0.350609, 0.465156, 0.442259, 0.382378, 0.331936, 0.271385,
0.280832, 0.27597, 0.346723, 0.354716, 0.350292, 0.391634,
0.38164, 0.361871, 0.351259, 0.33674, 0.324353, 0.328613,
0.352049, 0.351202, 0.353403, 0.355741, 0.359495, 0.355199,
0.34771, 0.352602, 0.364348, 0.358145, 0.364289, 0.36431,
0.351854, 0.354811, 0.350893, 0.299788, 0.356303, 0.397639,
0.353537, 0.319884, 0.448773, 0.46747, 0.416986, 0.316856,
0.276157, 0.364921, 0.412333, 0.443188, 0.428461, 0.380008,
0.337224, 0.427079, 0.440061, 0.366173, 0.37881, 0.437738,
0.44097, 0.425921, 0.398429, 0.347964, 0.271645, 0.262638,
0.369527, 0.387935, 0.293198, 0.428951, 0.500065, 0.448029,
0.22465, 0.33879, 0.331691, 0.346403, 0.371082, 0.37681,
0.399988, 0.409558, 0.407798, 0.399007, 0.35869, 0.360963,
0.369798, 0.358764, 0.367, 0.379812, 0.389937, 0.396539,
0.387619, 0.381269, 0.378803, 0.374216, 0.371212, 0.368676,
0.373349, 0.380845, 0.381565, 0.385976, 0.387592, 0.37929,
0.378876, 0.37712, 0.373051, 0.37278, 0.373457, 0.370692,
0.34929, 0.305656, 0.238866, 0.17931, 0.196217, 0.20891,
0.219277, 0.225503, 0.228417, 0.244302}, {0.0906934, 0.0732878,
0.108756, 0.116183, 0.0974142, 0.198181, 0.280587, 0.330992,
0.298881, 0.228064, 0.221218, 0.200193, 0.191385, 0.177585,
0.229308, 0.226385, 0.212308, 0.268482, 0.249548, 0.226055,
0.227721, 0.211721, 0.189552, 0.207473, 0.237063, 0.215506,
0.229475, 0.223556, 0.221918, 0.226331, 0.208829, 0.210162,
0.236933, 0.227382, 0.240477, 0.242858, 0.224853, 0.245822,
0.229097, 0.203721, 0.258381, 0.288456, 0.269288, 0.252356,
0.308377, 0.323905, 0.290954, 0.236603, 0.178891, 0.256393,
0.295108, 0.32783, 0.308086, 0.296982, 0.274193, 0.308336,
0.287976, 0.209516, 0.233159, 0.295845, 0.317475, 0.306936,
0.294739, 0.238593, 0.206892, 0.156102, 0.281326, 0.279104,
0.262702, 0.320979, 0.335124, 0.30293, 0.236154, 0.248316,
0.265103, 0.260129, 0.279662, 0.288313, 0.29464, 0.302827,
0.304955, 0.299016, 0.287912, 0.27349, 0.279559, 0.27752,
0.278497, 0.285958, 0.293382, 0.292925, 0.287677, 0.292259,
0.28523, 0.284421, 0.284405, 0.279498, 0.285891, 0.29021,
0.279696, 0.291046, 0.294828, 0.2869, 0.286235, 0.284141,
0.283136, 0.282524, 0.278234, 0.286973, 0.265211, 0.232831,
0.181135, 0.126844, 0.156388, 0.168194, 0.178141, 0.166857,
0.175917, 0.189327}, {0.0674513, 0.0608927, 0.114134, 0.107514,
0.0814101, 0.0895811, 0.179677, 0.108219, 0.190344, 0.188448,
0.143182, 0.159298, 0.165278, 0.168215, 0.171526, 0.150195,
0.157147, 0.163905, 0.0895066, 0.110303, 0.135004, 0.136645,
0.136413, 0.133836, 0.1366, 0.161571, 0.150448, 0.164716,
0.184487, 0.126507, 0.135683, 0.155865, 0.129123, 0.122506,
0.133039, 0.086612, 0.112023, 0.13479, 0.146133, 0.150264,
0.132497, 0.152897, 0.181146, 0.101331, 0.169015, 0.16765,
0.136113, 0.172747, 0.130203, 0.129302, 0.131582, 0.131969,
0.173661, 0.11412, 0.175195, 0.129911, 0.179806, 0.159993,
0.143219, 0.186652, 0.137304, 0.167911, 0.165256, 0.163406,
0.160599, 0.146471, 0.203732, 0.17131, 0.159539, 0.172887,
0.175694, 0.189566, 0.152601, 0.140865, 0.114445, 0.137838,
0.140727, 0.105741, 0.122081, 0.127824, 0.0996808, 0.107292,
0.125946, 0.0913821, 0.130991, 0.124605, 0.0761085, 0.149013,
0.0996445, 0.143312, 0.151602, 0.0629858, 0.133206, 0.123603,
0.0843024, 0.132843, 0.120724, 0.1427, 0.160285, 0.0988248,
0.119332, 0.128406, 0.0927489, 0.133377, 0.111548, 0.115095,
0.169947, 0.108579, 0.108173, 0.1067, 0.0784841, 0.118026,
0.087236, 0.10246, 0.0988235, 0.0990394, 0.0872174, 0.0915867},
{0.0913347, 0.0567813, 0.114005, 0.0827321, 0.0892532,
0.0943329, 0.141661, 0.125567, 0.179076, 0.181793, 0.131541,
0.179894, 0.167137, 0.117644, 0.176302, 0.165168, 0.139785,
0.187639, 0.147259, 0.157724, 0.185608, 0.137815, 0.173033,
0.17665, 0.104378, 0.165869, 0.157387, 0.0904219, 0.179689,
0.152034, 0.136196, 0.170193, 0.151477, 0.142839, 0.185062,
0.12831, 0.171173, 0.184364, 0.080642, 0.186486, 0.162456,
0.13753, 0.176415, 0.109204, 0.143721, 0.166382, 0.154882,
0.164069, 0.174668, 0.146864, 0.1434, 0.194302, 0.156804,
0.171851, 0.191292, 0.138886, 0.188654, 0.147478, 0.152118,
0.179697, 0.144279, 0.161593, 0.180814, 0.183969, 0.130211,
0.199295, 0.167789, 0.201143, 0.16632, 0.149749, 0.166392,
0.0964034, 0.153676, 0.159083, 0.124022, 0.146461, 0.121165,
0.112625, 0.122732, 0.106776, 0.131881, 0.0590747, 0.13438,
0.122402, 0.12576, 0.127298, 0.102383, 0.11002, 0.116889,
0.0816353, 0.0993979, 0.110407, 0.0900107, 0.0865124, 0.0962278,
0.105199, 0.120113, 0.115075, 0.105756, 0.103757, 0.106934,
0.100141, 0.0989937, 0.0984713, 0.0972692, 0.105626, 0.1142,
0.118545, 0.0723489, 0.0820328, 0.097036, 0.107456, 0.097251,
0.109364, 0.0870869, 0.068793, 0.0921044, 0.0652891}, {0.088125,
0.0608266, 0.110514, 0.0902442, 0.063561, 0.13758, 0.179008,
0.165832, 0.189771, 0.146764, 0.148858, 0.182211, 0.153128,
0.167458, 0.1714, 0.142705, 0.167375, 0.15208, 0.140978,
0.168851, 0.147184, 0.15516, 0.175017, 0.152394, 0.152914,
0.159437, 0.144545, 0.146227, 0.174882, 0.12456, 0.172095,
0.16522, 0.137841, 0.173385, 0.150243, 0.157812, 0.161013,
0.157168, 0.162506, 0.165682, 0.15247, 0.150688, 0.168615,
0.103655, 0.156626, 0.164956, 0.112801, 0.173707, 0.147036,
0.147774, 0.155342, 0.176128, 0.156315, 0.167566, 0.154486,
0.167556, 0.184782, 0.112216, 0.128959, 0.195258, 0.134426,
0.150237, 0.128733, 0.156525, 0.134289, 0.198223, 0.131542,
0.188639, 0.170441, 0.150994, 0.188692, 0.142397, 0.164877,
0.145102, 0.122587, 0.103526, 0.100173, 0.110195, 0.0789105,
0.128586, 0.0997942, 0.126619, 0.0821749, 0.115242, 0.0918755,
0.111459, 0.108768, 0.0960106, 0.106778, 0.103011, 0.0848528,
0.0913161, 0.0776494, 0.0888201, 0.103145, 0.108553, 0.109619,
0.0804495, 0.0690755, 0.0636727, 0.0723598, 0.106869, 0.100308,
0.0986266, 0.0801073, 0.0768888, 0.0858015, 0.0797223,
0.0921114, 0.0842573, 0.0651335, 0.092822, 0.0784817, 0.104573,
0.100229, 0.0686305, 0.0862505, 0.0788745}, {0.084715,
0.0804631, 0.094919, 0.101357, 0.0921241, 0.115449, 0.137338,
0.143002, 0.173214, 0.132771, 0.135474, 0.161943, 0.0910963,
0.154474, 0.134573, 0.116785, 0.118867, 0.112936, 0.0882906,
0.136949, 0.113212, 0.116234, 0.162978, 0.0837789, 0.136076,
0.150351, 0.106009, 0.149955, 0.143306, 0.115606, 0.142484,
0.126148, 0.0923063, 0.129934, 0.0946514, 0.105419, 0.138367,
0.109346, 0.121954, 0.148845, 0.0820104, 0.123203, 0.141434,
0.129418, 0.150964, 0.148276, 0.105099, 0.136167, 0.0870239,
0.102238, 0.130619, 0.147692, 0.136856, 0.148643, 0.108261,
0.129974, 0.175274, 0.152534, 0.162444, 0.180855, 0.110248,
0.16972, 0.148914, 0.132976, 0.121375, 0.181219, 0.163951,
0.172703, 0.153214, 0.154567, 0.20145, 0.19736, 0.158291,
0.130343, 0.067671, 0.0773372, 0.0796775, 0.113014, 0.0959881,
0.110439, 0.0600616, 0.106945, 0.0935893, 0.11156, 0.0900635,
0.0947864, 0.0859471, 0.0755771, 0.10607, 0.095772, 0.0996587,
0.100293, 0.0850727, 0.0801993, 0.103409, 0.0447319, 0.10343,
0.0894097, 0.0794843, 0.0700389, 0.0803638, 0.0965868, 0.076117,
0.0633727, 0.0914983, 0.0533548, 0.0937255, 0.096846, 0.0904989,
0.0847275, 0.0897669, 0.0988811, 0.0838247, 0.108059, 0.0895804,
0.0844407, 0.0573951, 0.074807}, {0.084715, 0.0804631, 0.094919,
0.101357, 0.0921241, 0.115449, 0.137338, 0.143002, 0.173214,
0.132771, 0.135474, 0.161943, 0.0910963, 0.154474, 0.134573,
0.116785, 0.118867, 0.112936, 0.0882906, 0.136949, 0.113212,
0.116234, 0.162978, 0.0837789, 0.136076, 0.150351, 0.106009,
0.149955, 0.143306, 0.115606, 0.142484, 0.126148, 0.0923063,
0.129934, 0.0946514, 0.105419, 0.138367, 0.109346, 0.121954,
0.148845, 0.0820104, 0.123203, 0.141434, 0.129418, 0.150964,
0.148276, 0.105099, 0.136167, 0.0870239, 0.102238, 0.130619,
0.147692, 0.136856, 0.148643, 0.108261, 0.129974, 0.175274,
0.152534, 0.162444, 0.180855, 0.110248, 0.16972, 0.148914,
0.132976, 0.121375, 0.181219, 0.163951, 0.172703, 0.153214,
0.154567, 0.20145, 0.19736, 0.158291, 0.130343, 0.067671,
0.0773372, 0.0796775, 0.113014, 0.0959881, 0.110439, 0.0600616,
0.106945, 0.0935893, 0.11156, 0.0900635, 0.0947864, 0.0859471,
0.0755771, 0.10607, 0.095772, 0.0996587, 0.100293, 0.0850727,
0.0801993, 0.103409, 0.0447319, 0.10343, 0.0894097, 0.0794843,
0.0700389, 0.0803638, 0.0965868, 0.076117, 0.0633727, 0.0914983,
0.0533548, 0.0937255, 0.096846, 0.0904989, 0.0847275, 0.0897669,
0.0988811, 0.0838247, 0.108059, 0.0895804, 0.0844407, 0.0573951,
0.074807}, {0.0883462, 0.0757886, 0.0740582, 0.0827286,
0.0829395, 0.0853792, 0.110042, 0.178926, 0.179987, 0.203307,
0.186959, 0.109001, 0.176776, 0.164048, 0.149566, 0.170687,
0.164319, 0.165542, 0.184733, 0.16072, 0.164344, 0.181906,
0.144927, 0.166253, 0.167013, 0.119072, 0.175504, 0.165054,
0.126435, 0.178295, 0.168529, 0.154598, 0.1921, 0.176031,
0.173341, 0.186395, 0.150053, 0.166983, 0.151435, 0.111126,
0.169955, 0.173858, 0.126644, 0.186921, 0.193337, 0.150451,
0.194027, 0.19194, 0.148281, 0.180066, 0.158955, 0.152832,
0.152208, 0.13825, 0.156334, 0.179914, 0.156374, 0.191625,
0.182403, 0.121171, 0.207697, 0.199809, 0.142192, 0.1608,
0.155469, 0.137068, 0.192364, 0.157042, 0.149785, 0.202162,
0.123527, 0.166113, 0.175663, 0.127636, 0.150057, 0.109171,
0.113598, 0.0974359, 0.0861441, 0.0886937, 0.132067, 0.132379,
0.0921991, 0.105757, 0.112361, 0.0996544, 0.0854636, 0.100257,
0.107895, 0.0880493, 0.0922038, 0.0869515, 0.0921347, 0.117021,
0.0682917, 0.0899874, 0.108305, 0.101986, 0.0711402, 0.0933442,
0.0776764, 0.0749722, 0.0954158, 0.0730828, 0.0794868,
0.0710612, 0.0871777, 0.0985235, 0.0651141, 0.0654675, 0.071412,
0.0842652, 0.0901342, 0.068831, 0.0878771, 0.0888892, 0.0937049,
0.0668658}, {0.0846904, 0.0648952, 0.0966647, 0.0708679,
0.112985, 0.179351, 0.161789, 0.216059, 0.290516, 0.333202,
0.32094, 0.291895, 0.279572, 0.271043, 0.27305, 0.293363,
0.291799, 0.29298, 0.302181, 0.290686, 0.287352, 0.294927,
0.281485, 0.289339, 0.293855, 0.281668, 0.295922, 0.290576,
0.284992, 0.298184, 0.29537, 0.293123, 0.305975, 0.299549,
0.301901, 0.309657, 0.299195, 0.30031, 0.295468, 0.278551,
0.286555, 0.280564, 0.274054, 0.298811, 0.305091, 0.30507,
0.311936, 0.307429, 0.298506, 0.306917, 0.299006, 0.293962,
0.288873, 0.266842, 0.261812, 0.271005, 0.277032, 0.310579,
0.31619, 0.300323, 0.306959, 0.298237, 0.290035, 0.296167,
0.278159, 0.27295, 0.278958, 0.248846, 0.237081, 0.291798,
0.311507, 0.309365, 0.2982, 0.272167, 0.249209, 0.205105,
0.191003, 0.159322, 0.123698, 0.158064, 0.217806, 0.216559,
0.186087, 0.171207, 0.157418, 0.120542, 0.130203, 0.148417,
0.117746, 0.140457, 0.147517, 0.151348, 0.133743, 0.153268,
0.131045, 0.0959931, 0.142454, 0.136122, 0.122885, 0.122879,
0.130356, 0.129184, 0.127656, 0.100783, 0.104309, 0.100525,
0.0893515, 0.114524, 0.106144, 0.109881, 0.102954, 0.0838395,
0.0805481, 0.0837636, 0.110119, 0.0645198, 0.115306, 0.0829363},
{0.0567637, 0.0886938, 0.0901105, 0.0707722, 0.104351, 0.229986,
0.222659, 0.241346, 0.332791, 0.348331, 0.33852, 0.319277,
0.278556, 0.283629, 0.289294, 0.312679, 0.306603, 0.320637,
0.308358, 0.309802, 0.30783, 0.303294, 0.301813, 0.306227,
0.306871, 0.302967, 0.311554, 0.303684, 0.309876, 0.308672,
0.307462, 0.310341, 0.313018, 0.315664, 0.322687, 0.320132,
0.322849, 0.32692, 0.304013, 0.307159, 0.312449, 0.290138,
0.293691, 0.298606, 0.308586, 0.325254, 0.318903, 0.317882,
0.323281, 0.32926, 0.325285, 0.327285, 0.314524, 0.294579,
0.276964, 0.263136, 0.282527, 0.315059, 0.321537, 0.319539,
0.310216, 0.30796, 0.326216, 0.324204, 0.315056, 0.320448,
0.300713, 0.272411, 0.234292, 0.273274, 0.324015, 0.309751,
0.297493, 0.291446, 0.259517, 0.230442, 0.200522, 0.161297,
0.150481, 0.178842, 0.220871, 0.217578, 0.206357, 0.179028,
0.164604, 0.131443, 0.141289, 0.146597, 0.136653, 0.133162,
0.162701, 0.152868, 0.143821, 0.154431, 0.137777, 0.122024,
0.135307, 0.152381, 0.108493, 0.140071, 0.113992, 0.14815,
0.101305, 0.127467, 0.104602, 0.12305, 0.137611, 0.145791,
0.135909, 0.0900382, 0.139511, 0.141273, 0.131945, 0.119887,
0.0894794, 0.0999137, 0.107065, 0.0902962}, {0.0876663,
0.0814531, 0.0671399, 0.0779573, 0.117759, 0.21434, 0.218566,
0.22133, 0.247103, 0.237854, 0.231143, 0.232014, 0.163073,
0.195293, 0.194356, 0.217642, 0.2013, 0.233657, 0.195274,
0.212895, 0.217072, 0.197209, 0.205489, 0.214999, 0.206532,
0.206186, 0.217055, 0.202551, 0.217614, 0.205381, 0.199024,
0.210277, 0.202764, 0.212921, 0.225851, 0.206741, 0.221184,
0.234706, 0.276563, 0.298161, 0.353753, 0.278399, 0.255154,
0.318915, 0.308509, 0.336073, 0.305642, 0.299562, 0.335419,
0.27687, 0.329292, 0.288153, 0.325713, 0.321501, 0.325999,
0.313939, 0.330505, 0.311614, 0.328641, 0.331458, 0.308382,
0.337548, 0.289719, 0.352041, 0.31079, 0.332258, 0.341128,
0.31082, 0.328854, 0.335485, 0.312423, 0.326304, 0.334606,
0.317634, 0.344596, 0.325035, 0.339256, 0.336773, 0.338902,
0.334857, 0.340577, 0.336756, 0.33926, 0.337542, 0.337585,
0.340524, 0.338966, 0.341405, 0.337065, 0.339228, 0.337128,
0.340702, 0.337205, 0.338946, 0.338425, 0.339059, 0.338536,
0.337011, 0.337759, 0.336478, 0.339507, 0.336478, 0.336812,
0.336541, 0.337448, 0.333753, 0.331252, 0.348074, 0.366684,
0.373161, 0.355839, 0.322299, 0.28404, 0.257837, 0.231872,
0.193612, 0.144458, 0.16156}, {0.0729331, 0.0873337, 0.0655706,
0.0771368, 0.127608, 0.149291, 0.164699, 0.117025, 0.125628,
0.0806714, 0.116698, 0.10007, 0.115003, 0.113221, 0.103365,
0.102943, 0.106052, 0.0808464, 0.133163, 0.106043, 0.099484,
0.116032, 0.128784, 0.125934, 0.112915, 0.117176, 0.0903272,
0.0782093, 0.100892, 0.106043, 0.119908, 0.0980898, 0.109264,
0.105596, 0.0877393, 0.134097, 0.128116, 0.147498, 0.310057,
0.406721, 0.410204, 0.373117, 0.352838, 0.385937, 0.417299,
0.399608, 0.386365, 0.389143, 0.388855, 0.391346, 0.37718,
0.385563, 0.38676, 0.402593, 0.395811, 0.401656, 0.397626,
0.40668, 0.40378, 0.405084, 0.406683, 0.400068, 0.409679,
0.408555, 0.409601, 0.408322, 0.409804, 0.408805, 0.413004,
0.411013, 0.414784, 0.409997, 0.416755, 0.415863, 0.418611,
0.418786, 0.421375, 0.422577, 0.423541, 0.422944, 0.425391,
0.426061, 0.425408, 0.425157, 0.425529, 0.426291, 0.425667,
0.425766, 0.425642, 0.424624, 0.425993, 0.425588, 0.426029,
0.425414, 0.425922, 0.426176, 0.426007, 0.425578, 0.425338,
0.425153, 0.426129, 0.425471, 0.424789, 0.425261, 0.425153,
0.425158, 0.429511, 0.451559, 0.468352, 0.472126, 0.450542,
0.413098, 0.371299, 0.333412, 0.292766, 0.229024, 0.172679,
0.192183}, {0.0827749, 0.085404, 0.0949307, 0.0806426, 0.121765,
0.114487, 0.147809, 0.163645, 0.0881503, 0.12289, 0.152285,
0.108733, 0.139741, 0.111774, 0.119596, 0.136811, 0.0794404,
0.135918, 0.116072, 0.11185, 0.114979, 0.101085, 0.107306,
0.126125, 0.137401, 0.0991228, 0.111312, 0.133039, 0.0921495,
0.12523, 0.0629821, 0.125234, 0.0842294, 0.102985, 0.121283,
0.104504, 0.120617, 0.117587, 0.265969, 0.338603, 0.349915,
0.321844, 0.303733, 0.331978, 0.355817, 0.337378, 0.331682,
0.328902, 0.316898, 0.332623, 0.308031, 0.319541, 0.324058,
0.334851, 0.320934, 0.337744, 0.328678, 0.333362, 0.338714,
0.334775, 0.341243, 0.340522, 0.339705, 0.339703, 0.345078,
0.345184, 0.340642, 0.346234, 0.343273, 0.336969, 0.341709,
0.335104, 0.352646, 0.343309, 0.348111, 0.344743, 0.352049,
0.349869, 0.353346, 0.352638, 0.357286, 0.355058, 0.354369,
0.354495, 0.354142, 0.355337, 0.353226, 0.355602, 0.355239,
0.352762, 0.3541, 0.353572, 0.35494, 0.353425, 0.353547,
0.356225, 0.356139, 0.35303, 0.354569, 0.353638, 0.355107,
0.352883, 0.353529, 0.35511, 0.354912, 0.357498, 0.365173,
0.386898, 0.39534, 0.395491, 0.377472, 0.351658, 0.319848,
0.284827, 0.250165, 0.181012, 0.131272, 0.162473}, {0.0993756,
0.0566975, 0.0928326, 0.0875405, 0.120818, 0.154463, 0.178938,
0.19101, 0.122573, 0.0944084, 0.15614, 0.0891972, 0.125536,
0.139019, 0.126736, 0.143652, 0.127479, 0.135179, 0.147018,
0.132032, 0.104634, 0.140273, 0.13141, 0.113821, 0.145252,
0.130756, 0.123055, 0.132058, 0.125994, 0.115283, 0.127215,
0.112594, 0.125599, 0.152131, 0.0900123, 0.150156, 0.141308,
0.133998, 0.141571, 0.184752, 0.198045, 0.144897, 0.0688219,
0.162664, 0.170612, 0.129087, 0.16439, 0.188827, 0.125085,
0.172347, 0.153282, 0.137443, 0.17082, 0.140208, 0.150556,
0.172107, 0.16902, 0.102147, 0.158749, 0.120822, 0.186874,
0.181302, 0.164052, 0.148966, 0.193386, 0.154872, 0.0787686,
0.164435, 0.173696, 0.168221, 0.184004, 0.199778, 0.166771,
0.141308, 0.150012, 0.102074, 0.105415, 0.115398, 0.138104,
0.140779, 0.141377, 0.127548, 0.138481, 0.0915364, 0.109121,
0.124696, 0.104219, 0.143835, 0.131514, 0.129151, 0.12018,
0.0887462, 0.113205, 0.108542, 0.0979898, 0.143715, 0.134438,
0.118867, 0.114587, 0.0939301, 0.116688, 0.0995601, 0.09942,
0.13448, 0.127799, 0.104152, 0.144853, 0.14445, 0.147822,
0.115241, 0.125352, 0.138788, 0.144127, 0.117595, 0.128508,
0.103173, 0.0668556, 0.0913123}, {0.0933458, 0.0445283,
0.0834095, 0.0893019, 0.138089, 0.184005, 0.157474, 0.194157,
0.194659, 0.190657, 0.137236, 0.195588, 0.115554, 0.15135,
0.205987, 0.163927, 0.156524, 0.194568, 0.18168, 0.120455,
0.189067, 0.182801, 0.156131, 0.175853, 0.181837, 0.177874,
0.164697, 0.164557, 0.199695, 0.177463, 0.109544, 0.197419,
0.171296, 0.146617, 0.193463, 0.166913, 0.120221, 0.180543,
0.190072, 0.160444, 0.125421, 0.179885, 0.203066, 0.197208,
0.168902, 0.154925, 0.182059, 0.172643, 0.208201, 0.173624,
0.105803, 0.181461, 0.194734, 0.16452, 0.125679, 0.21732,
0.225031, 0.214648, 0.177128, 0.129794, 0.143608, 0.141458,
0.182801, 0.169837, 0.140642, 0.171751, 0.194163, 0.228966,
0.178619, 0.191058, 0.239837, 0.235163, 0.194234, 0.128907,
0.162437, 0.11887, 0.151058, 0.0996839, 0.128846, 0.144719,
0.0874026, 0.126597, 0.0939123, 0.109096, 0.0980348, 0.106824,
0.102685, 0.121553, 0.097577, 0.0849356, 0.0987116, 0.102674,
0.0789493, 0.103637, 0.0698497, 0.100656, 0.0899801, 0.0951087,
0.0887353, 0.108939, 0.0861353, 0.0596362, 0.0858838, 0.0987325,
0.0701128, 0.0965459, 0.0906824, 0.0738139, 0.0913072,
0.0487087, 0.0901794, 0.0889038, 0.073251, 0.0876513, 0.0913516,
0.0800455, 0.0867386, 0.0865596}, {0.0882484, 0.0599606,
0.0887434, 0.0754466, 0.149419, 0.183502, 0.291324, 0.338847,
0.324308, 0.307417, 0.297079, 0.291632, 0.276747, 0.313255,
0.322963, 0.300917, 0.293121, 0.294275, 0.286883, 0.288185,
0.280887, 0.281152, 0.278383, 0.260402, 0.281946, 0.289744,
0.272645, 0.288148, 0.287683, 0.265727, 0.265298, 0.254351,
0.225763, 0.220868, 0.238298, 0.256668, 0.289007, 0.302831,
0.32048, 0.327823, 0.309582, 0.311704, 0.293913, 0.250698,
0.252558, 0.243303, 0.253708, 0.186004, 0.244757, 0.280425,
0.296224, 0.303913, 0.332392, 0.333963, 0.321225, 0.323851,
0.290702, 0.290856, 0.324203, 0.29177, 0.237283, 0.203287,
0.290449, 0.282209, 0.278846, 0.287979, 0.316098, 0.339231,
0.324709, 0.300982, 0.333344, 0.354328, 0.338176, 0.263047,
0.249092, 0.189632, 0.198639, 0.211053, 0.237695, 0.252102,
0.191302, 0.191234, 0.166202, 0.133567, 0.16106, 0.145851,
0.161226, 0.0910681, 0.171499, 0.159223, 0.138352, 0.0823615,
0.122384, 0.0937563, 0.112572, 0.137155, 0.129163, 0.0895392,
0.117418, 0.112617, 0.108634, 0.0866955, 0.0948934, 0.129878,
0.0952872, 0.134901, 0.0765958, 0.103477, 0.0969925, 0.107976,
0.0926612, 0.0892304, 0.0858352, 0.0869419, 0.0965911,
0.0854492, 0.104243, 0.0869562}, {0.0974351, 0.0866273,
0.0890976, 0.0308433, 0.139612, 0.237448, 0.363128, 0.355334,
0.35339, 0.33833, 0.340962, 0.321057, 0.31483, 0.3499, 0.353615,
0.349317, 0.311889, 0.318685, 0.325192, 0.313567, 0.313435,
0.307003, 0.299737, 0.2953, 0.305471, 0.31245, 0.316625,
0.312599, 0.302687, 0.29428, 0.282642, 0.27003, 0.261503,
0.241994, 0.261146, 0.293064, 0.320777, 0.339369, 0.348619,
0.360678, 0.350651, 0.330331, 0.302234, 0.246501, 0.254292,
0.271151, 0.265734, 0.215056, 0.262353, 0.3165, 0.331681,
0.332916, 0.361503, 0.366401, 0.356726, 0.331513, 0.277625,
0.283828, 0.353808, 0.328303, 0.261958, 0.247246, 0.325409,
0.322401, 0.299952, 0.335724, 0.332453, 0.363646, 0.337044,
0.284606, 0.34226, 0.376247, 0.363287, 0.271246, 0.247981,
0.208314, 0.197948, 0.236189, 0.26228, 0.276217, 0.225578,
0.216022, 0.190543, 0.0902498, 0.171464, 0.184587, 0.183202,
0.120114, 0.189877, 0.18423, 0.15634, 0.124832, 0.145177,
0.111612, 0.145575, 0.164148, 0.155604, 0.131908, 0.14499,
0.145909, 0.121264, 0.1097, 0.122864, 0.128238, 0.126135,
0.139818, 0.117729, 0.127744, 0.0771498, 0.114713, 0.111193,
0.092516, 0.0911283, 0.116279, 0.118941, 0.106834, 0.109582,
0.0933993}, {0.0875977, 0.0990508, 0.0643888, 0.0322031,
0.117815, 0.194683, 0.304416, 0.267495, 0.266134, 0.225281,
0.270581, 0.247159, 0.223562, 0.259263, 0.257745, 0.272562,
0.191351, 0.230754, 0.247988, 0.209223, 0.228793, 0.228511,
0.209243, 0.209337, 0.224066, 0.225918, 0.231038, 0.224458,
0.21997, 0.213017, 0.18553, 0.194799, 0.208239, 0.146699,
0.191036, 0.230826, 0.224751, 0.243378, 0.256446, 0.262875,
0.255166, 0.227459, 0.211371, 0.147512, 0.173421, 0.201804,
0.192446, 0.196068, 0.204227, 0.24687, 0.239466, 0.227282,
0.264616, 0.26462, 0.249071, 0.235142, 0.170554, 0.200651,
0.277685, 0.222343, 0.201028, 0.207312, 0.249713, 0.263493,
0.210436, 0.256628, 0.206639, 0.261639, 0.218138, 0.186585,
0.258378, 0.264112, 0.272729, 0.186431, 0.153742, 0.154247,
0.147825, 0.169584, 0.189348, 0.21436, 0.180758, 0.172416,
0.111528, 0.10314, 0.121187, 0.130205, 0.151284, 0.130229,
0.149517, 0.156063, 0.147412, 0.127425, 0.133949, 0.12003,
0.1051, 0.0940078, 0.127433, 0.125669, 0.141784, 0.147211,
0.130195, 0.140301, 0.136917, 0.123272, 0.123072, 0.0979735,
0.11022, 0.0828744, 0.112522, 0.12468, 0.10744, 0.0996054,
0.086938, 0.10506, 0.113287, 0.093426, 0.101601, 0.095451},
{0.0842613, 0.102354, 0.0602218, 0.0693097, 0.091721, 0.165792,
0.186127, 0.187967, 0.158338, 0.167468, 0.125095, 0.151486,
0.125802, 0.154915, 0.132313, 0.098008, 0.17248, 0.147946,
0.0903153, 0.164912, 0.141123, 0.0363996, 0.17476, 0.108831,
0.0786793, 0.153533, 0.119617, 0.13134, 0.140541, 0.0946136,
0.127853, 0.121343, 0.115713, 0.154794, 0.1312, 0.109212,
0.168714, 0.156703, 0.119744, 0.183663, 0.133356, 0.149529,
0.155997, 0.149326, 0.153859, 0.131084, 0.131778, 0.161812,
0.12946, 0.127884, 0.16955, 0.169663, 0.163124, 0.156764,
0.153197, 0.155805, 0.131398, 0.134565, 0.174008, 0.183742,
0.155399, 0.199064, 0.172034, 0.172577, 0.179606, 0.123264,
0.160242, 0.148091, 0.127858, 0.155696, 0.168466, 0.152984,
0.0979203, 0.13567, 0.125225, 0.104278, 0.0868749, 0.131938,
0.138722, 0.127607, 0.123538, 0.143949, 0.144509, 0.142634,
0.144747, 0.133402, 0.130168, 0.137547, 0.105616, 0.099022,
0.128572, 0.127357, 0.124799, 0.142625, 0.134486, 0.130933,
0.1401, 0.127989, 0.126599, 0.144219, 0.129785, 0.142525,
0.134565, 0.138671, 0.139636, 0.111861, 0.127642, 0.131278,
0.126651, 0.124733, 0.102148, 0.0927543, 0.096997, 0.0788647,
0.100409, 0.0881453, 0.0781044, 0.0830488}, {0.0733248,
0.0976207, 0.0853446, 0.0445193, 0.0732514, 0.153819, 0.149123,
0.161262, 0.202722, 0.182168, 0.182623, 0.205943, 0.171103,
0.172101, 0.194516, 0.139531, 0.175768, 0.187734, 0.160997,
0.187552, 0.18082, 0.15122, 0.199906, 0.179324, 0.149599,
0.201279, 0.166659, 0.159517, 0.195703, 0.165823, 0.179739,
0.1889, 0.161343, 0.182233, 0.173658, 0.150507, 0.192208,
0.155917, 0.135652, 0.213741, 0.192725, 0.193443, 0.200242,
0.187508, 0.196907, 0.197786, 0.16016, 0.173867, 0.182333,
0.139559, 0.188064, 0.162015, 0.10489, 0.186467, 0.173518,
0.199739, 0.170708, 0.176198, 0.15702, 0.181313, 0.165826,
0.143057, 0.13717, 0.154554, 0.191519, 0.146843, 0.150184,
0.167653, 0.195411, 0.183658, 0.215239, 0.208319, 0.172378,
0.17331, 0.110433, 0.119237, 0.141626, 0.112825, 0.114908,
0.13521, 0.136153, 0.135721, 0.15419, 0.0998932, 0.140459,
0.107499, 0.113174, 0.135558, 0.120782, 0.0977602, 0.11542,
0.0930368, 0.131102, 0.111267, 0.123234, 0.134791, 0.103868,
0.113507, 0.0928013, 0.112902, 0.143518, 0.124506, 0.129102,
0.126343, 0.0962488, 0.120277, 0.123844, 0.076416, 0.117975,
0.0781641, 0.112348, 0.0979364, 0.124635, 0.112188, 0.0863936,
0.0946037, 0.0794241, 0.09075}, {0.101963, 0.0666504, 0.0795831,
0.0794605, 0.0884139, 0.107044, 0.15407, 0.154543, 0.143839,
0.20209, 0.185838, 0.177503, 0.143446, 0.152925, 0.182582,
0.078756, 0.139822, 0.192353, 0.125261, 0.083086, 0.183772,
0.153194, 0.10892, 0.173409, 0.165859, 0.150693, 0.159401,
0.157856, 0.171674, 0.111413, 0.155301, 0.184254, 0.11888,
0.134926, 0.178948, 0.13742, 0.0909367, 0.185928, 0.150149,
0.165394, 0.180168, 0.191623, 0.182881, 0.183939, 0.196932,
0.146093, 0.149086, 0.159978, 0.18647, 0.110525, 0.148502,
0.198233, 0.15358, 0.145999, 0.200806, 0.186956, 0.151436,
0.146312, 0.152938, 0.177318, 0.163918, 0.189861, 0.160991,
0.181037, 0.185823, 0.193509, 0.155565, 0.151207, 0.216473,
0.187798, 0.173734, 0.135755, 0.140885, 0.169101, 0.14405,
0.127373, 0.152792, 0.162368, 0.162276, 0.150604, 0.160362,
0.143587, 0.159928, 0.140565, 0.156322, 0.147521, 0.138728,
0.14559, 0.133335, 0.148705, 0.144043, 0.140782, 0.158538,
0.138951, 0.144119, 0.148576, 0.144502, 0.149268, 0.14593,
0.138205, 0.150908, 0.144917, 0.148139, 0.146642, 0.143057,
0.14915, 0.138803, 0.131009, 0.108541, 0.0934822, 0.11536,
0.137201, 0.124978, 0.127104, 0.117453, 0.113347, 0.0976541,
0.105534}, {0.0918857, 0.0655646, 0.0967591, 0.0700379,
0.0922957, 0.134433, 0.11198, 0.113623, 0.164902, 0.202216,
0.144176, 0.147322, 0.176236, 0.137638, 0.166247, 0.182788,
0.149183, 0.169456, 0.164977, 0.158934, 0.161984, 0.158222,
0.162061, 0.167872, 0.151423, 0.162048, 0.173516, 0.144418,
0.159378, 0.184134, 0.151153, 0.142936, 0.169332, 0.150345,
0.16917, 0.153609, 0.138043, 0.164013, 0.146802, 0.168186,
0.153094, 0.11805, 0.150399, 0.185422, 0.183175, 0.146799,
0.172664, 0.153924, 0.179904, 0.171236, 0.148019, 0.170965,
0.167139, 0.161936, 0.162649, 0.167548, 0.179767, 0.191107,
0.184772, 0.163177, 0.169945, 0.192701, 0.206833, 0.170384,
0.1661, 0.199327, 0.144311, 0.174511, 0.20165, 0.135815,
0.204527, 0.132993, 0.17626, 0.1163, 0.135524, 0.142541,
0.121149, 0.136269, 0.104842, 0.143364, 0.121727, 0.108249,
0.124621, 0.0890842, 0.116387, 0.11193, 0.0993168, 0.122857,
0.0766819, 0.118662, 0.0955749, 0.0648503, 0.124196, 0.0790363,
0.116436, 0.11692, 0.10203, 0.0947684, 0.0954182, 0.108404,
0.0751268, 0.0966564, 0.0855562, 0.108596, 0.0775453, 0.0854346,
0.129805, 0.0872076, 0.0771836, 0.0929009, 0.0779415, 0.0198589,
0.0939997, 0.0731051, 0.056491, 0.0826503, 0.0725633,
0.0918389}, {0.0635055, 0.0891361, 0.111091, 0.0719513,
0.0745546, 0.120129, 0.254473, 0.276437, 0.277661, 0.271988,
0.248696, 0.244979, 0.256893, 0.228399, 0.20981, 0.245529,
0.224775, 0.183961, 0.219619, 0.199785, 0.174788, 0.210325,
0.200374, 0.201676, 0.209583, 0.204488, 0.216782, 0.215147,
0.206831, 0.235325, 0.22857, 0.222569, 0.223773, 0.209395,
0.191877, 0.202085, 0.175291, 0.191837, 0.241415, 0.24461,
0.253658, 0.258951, 0.249275, 0.247745, 0.2502, 0.257295,
0.242707, 0.233825, 0.200488, 0.173556, 0.211148, 0.204117,
0.232721, 0.247104, 0.281787, 0.282478, 0.268921, 0.259695,
0.277632, 0.270634, 0.253247, 0.240931, 0.199582, 0.237183,
0.218689, 0.175725, 0.224246, 0.274464, 0.31311, 0.275191,
0.268305, 0.272009, 0.263529, 0.197796, 0.22588, 0.243333,
0.189747, 0.192562, 0.207076, 0.195788, 0.129003, 0.176667,
0.171419, 0.136474, 0.176306, 0.182592, 0.154077, 0.152641,
0.147835, 0.162439, 0.0961273, 0.131541, 0.129779, 0.0975038,
0.155107, 0.144381, 0.150743, 0.127022, 0.128428, 0.128865,
0.0838222, 0.133142, 0.113571, 0.100801, 0.131378, 0.0903348,
0.141391, 0.102044, 0.112153, 0.118879, 0.0942415, 0.113899,
0.108068, 0.07491, 0.0551759, 0.0993155, 0.0781572, 0.0981624},
{0.0919296, 0.0914288, 0.107932, 0.073445, 0.0805578, 0.186528,
0.321024, 0.317729, 0.316946, 0.280882, 0.301429, 0.298832,
0.285527, 0.283768, 0.254923, 0.257947, 0.277283, 0.215223,
0.249398, 0.235921, 0.195565, 0.240966, 0.231855, 0.206876,
0.262406, 0.236908, 0.228286, 0.271597, 0.233977, 0.245169,
0.268036, 0.250454, 0.236142, 0.25968, 0.2186, 0.241856,
0.228391, 0.240508, 0.279433, 0.272484, 0.283728, 0.302991,
0.269806, 0.251226, 0.281659, 0.286142, 0.257353, 0.282306,
0.259169, 0.21368, 0.254589, 0.244607, 0.251363, 0.284859,
0.314366, 0.320584, 0.273707, 0.246002, 0.300129, 0.308759,
0.278046, 0.26971, 0.131245, 0.287458, 0.253699, 0.172637,
0.256703, 0.309295, 0.33407, 0.286245, 0.281711, 0.28598,
0.293245, 0.252682, 0.242377, 0.257661, 0.209183, 0.192578,
0.236042, 0.202237, 0.155315, 0.192081, 0.187153, 0.158759,
0.202568, 0.195964, 0.164105, 0.134415, 0.170896, 0.145036,
0.112711, 0.140589, 0.110159, 0.111968, 0.158623, 0.153234,
0.141713, 0.105433, 0.125226, 0.124086, 0.0843992, 0.121688,
0.123919, 0.0935128, 0.134958, 0.11764, 0.106224, 0.101899,
0.113675, 0.117616, 0.0756753, 0.107869, 0.0958932, 0.0755586,
0.0723995, 0.0973466, 0.0936127, 0.0976981}, {0.0705551,
0.107255, 0.0909585, 0.101403, 0.112483, 0.167433, 0.172089,
0.145037, 0.163253, 0.164295, 0.149312, 0.156689, 0.124277,
0.126581, 0.13922, 0.134313, 0.129625, 0.159651, 0.120812,
0.144317, 0.170008, 0.13151, 0.142296, 0.155256, 0.144402,
0.133983, 0.145351, 0.136027, 0.147637, 0.13765, 0.129109,
0.158549, 0.140137, 0.146324, 0.171184, 0.148551, 0.149458,
0.149132, 0.117923, 0.131166, 0.131008, 0.143227, 0.148903,
0.156114, 0.138019, 0.165967, 0.137594, 0.109235, 0.157485,
0.167652, 0.125938, 0.175664, 0.17621, 0.118294, 0.120197,
0.127547, 0.175728, 0.184311, 0.177313, 0.163148, 0.172991,
0.199335, 0.181001, 0.138624, 0.170018, 0.197909, 0.191002,
0.223509, 0.202785, 0.156222, 0.190483, 0.205175, 0.168129,
0.0772664, 0.136227, 0.0937539, 0.072768, 0.106554, 0.0723513,
0.130893, 0.111376, 0.0782287, 0.0968181, 0.125328, 0.113738,
0.0716784, 0.108873, 0.107823, 0.0942175, 0.110235, 0.10426,
0.0932799, 0.0568108, 0.123781, 0.0806361, 0.105126, 0.0959634,
0.0891226, 0.108428, 0.116073, 0.0928608, 0.10623, 0.0847816,
0.120043, 0.0778826, 0.114688, 0.101509, 0.101377, 0.0411381,
0.0836546, 0.0909852, 0.0942434, 0.081719, 0.0795501, 0.0826176,
0.103048, 0.0986637, 0.0735298}, {0.0456851, 0.104545, 0.106876,
0.0971383, 0.111898, 0.150913, 0.152137, 0.139346, 0.158756,
0.174327, 0.135773, 0.165126, 0.180827, 0.152968, 0.168113,
0.170786, 0.148523, 0.169913, 0.151727, 0.161052, 0.167138,
0.124314, 0.139961, 0.1566, 0.136229, 0.152635, 0.158437,
0.131217, 0.160283, 0.166456, 0.153147, 0.177761, 0.177403,
0.163129, 0.176598, 0.153905, 0.150908, 0.159784, 0.166801,
0.159559, 0.0666001, 0.104873, 0.155244, 0.189109, 0.191643,
0.194215, 0.205985, 0.160337, 0.150369, 0.157832, 0.175512,
0.152676, 0.138344, 0.145352, 0.130534, 0.186327, 0.217386,
0.22339, 0.213309, 0.202533, 0.21528, 0.189572, 0.191057,
0.183624, 0.169004, 0.199309, 0.202263, 0.199292, 0.21097,
0.220346, 0.208135, 0.190569, 0.208699, 0.168174, 0.174542,
0.143176, 0.0924724, 0.097471, 0.158424, 0.172896, 0.153786,
0.110786, 0.114384, 0.125148, 0.114482, 0.129828, 0.078657,
0.0876807, 0.120279, 0.118788, 0.129634, 0.127722, 0.115401,
0.0678494, 0.114481, 0.112785, 0.112846, 0.124781, 0.10955,
0.108116, 0.095857, 0.0899168, 0.105333, 0.115297, 0.0930217,
0.091788, 0.093742, 0.128842, 0.112961, 0.10046, 0.103182,
0.0941331, 0.080551, 0.104992, 0.0595455, 0.0761483, 0.103354,
0.10107}, {0.0671633, 0.0946594, 0.099686, 0.0507008, 0.107943,
0.0951296, 0.151634, 0.202146, 0.184634, 0.129606, 0.163317,
0.203578, 0.21008, 0.189084, 0.200455, 0.196277, 0.182145,
0.203084, 0.186591, 0.183329, 0.182996, 0.162116, 0.178732,
0.177338, 0.157747, 0.167212, 0.177293, 0.154323, 0.188891,
0.190068, 0.188783, 0.203069, 0.201686, 0.199171, 0.195365,
0.172322, 0.171009, 0.189778, 0.187717, 0.159268, 0.151701,
0.133355, 0.203856, 0.211321, 0.222473, 0.216189, 0.230283,
0.183177, 0.175672, 0.176943, 0.196468, 0.214085, 0.222726,
0.117186, 0.155483, 0.182497, 0.242739, 0.23247, 0.232528,
0.226927, 0.168148, 0.18779, 0.186632, 0.221265, 0.237137,
0.237893, 0.17935, 0.215597, 0.208627, 0.229634, 0.234188,
0.203469, 0.231612, 0.181171, 0.171371, 0.173191, 0.130523,
0.158338, 0.169475, 0.186404, 0.178679, 0.162447, 0.115637,
0.113119, 0.116086, 0.13146, 0.126952, 0.0956101, 0.12063,
0.126451, 0.147253, 0.148352, 0.114982, 0.107303, 0.108173,
0.116709, 0.121102, 0.134805, 0.119357, 0.0974655, 0.106966,
0.104252, 0.128146, 0.088835, 0.120861, 0.0948904, 0.109941,
0.142822, 0.115455, 0.124009, 0.11838, 0.0950004, 0.0955564,
0.116021, 0.0979662, 0.0868987, 0.1044, 0.100617}, {0.078438,
0.0581054, 0.09623, 0.0474733, 0.100112, 0.115527, 0.193737,
0.12915, 0.136939, 0.153964, 0.118551, 0.168285, 0.16326,
0.14106, 0.157071, 0.162895, 0.155877, 0.161833, 0.144608,
0.135683, 0.167593, 0.150924, 0.148345, 0.162377, 0.149217,
0.160401, 0.170459, 0.137206, 0.169942, 0.162999, 0.138532,
0.153575, 0.159009, 0.141273, 0.156477, 0.161116, 0.126761,
0.180166, 0.144863, 0.221499, 0.234157, 0.230402, 0.194687,
0.259098, 0.236812, 0.258374, 0.260129, 0.2289, 0.255502,
0.254796, 0.232964, 0.244934, 0.260219, 0.244532, 0.24414,
0.247209, 0.242626, 0.25882, 0.245965, 0.258101, 0.266039,
0.249109, 0.259773, 0.266437, 0.245755, 0.24888, 0.2483,
0.276157, 0.23666, 0.259395, 0.236203, 0.267613, 0.260946,
0.264298, 0.266553, 0.262032, 0.253184, 0.260413, 0.256891,
0.25433, 0.252826, 0.248368, 0.254996, 0.256981, 0.255646,
0.248729, 0.254677, 0.254228, 0.25734, 0.251586, 0.256127,
0.254982, 0.252733, 0.25142, 0.251517, 0.252067, 0.254553,
0.252245, 0.253968, 0.255606, 0.255178, 0.258374, 0.249111,
0.253278, 0.252248, 0.250557, 0.261064, 0.258705, 0.241636,
0.225063, 0.191166, 0.182811, 0.157817, 0.113829, 0.113058,
0.0696404, 0.104286, 0.152425}, {0.073577, 0.0603605, 0.0815009,
0.0677506, 0.101041, 0.214957, 0.237053, 0.305946, 0.255683,
0.292285, 0.291076, 0.261192, 0.275461, 0.261706, 0.256156,
0.274758, 0.26839, 0.267985, 0.27692, 0.268382, 0.245571,
0.265097, 0.262619, 0.244462, 0.255334, 0.262729, 0.248112,
0.252406, 0.248293, 0.229915, 0.211983, 0.204265, 0.219829,
0.221455, 0.212352, 0.247882, 0.263626, 0.252997, 0.268545,
0.278545, 0.223825, 0.18972, 0.087676, 0.222886, 0.245599,
0.280467, 0.270503, 0.241586, 0.245165, 0.275929, 0.291987,
0.290336, 0.31465, 0.304549, 0.253948, 0.240643, 0.265541,
0.230864, 0.262369, 0.292327, 0.298105, 0.297953, 0.301572,
0.311393, 0.305154, 0.307575, 0.315079, 0.298465, 0.225864,
0.306578, 0.306787, 0.187796, 0.305581, 0.304746, 0.292997,
0.285258, 0.27006, 0.271582, 0.251253, 0.262579, 0.276156,
0.263056, 0.261001, 0.257418, 0.2431, 0.240094, 0.249835,
0.251679, 0.254032, 0.246522, 0.248666, 0.247746, 0.242836,
0.245583, 0.24961, 0.247826, 0.248899, 0.249179, 0.249271,
0.24868, 0.249452, 0.252053, 0.246178, 0.249886, 0.253153,
0.246946, 0.254316, 0.2524, 0.242268, 0.229854, 0.201392,
0.187574, 0.163113, 0.130728, 0.122272, 0.0852438, 0.112586,
0.138038}, {0.0690623, 0.0779262, 0.0822581, 0.0754606,
0.119312, 0.21962, 0.299297, 0.304395, 0.280591, 0.300293,
0.274345, 0.257754, 0.243398, 0.283836, 0.229152, 0.249603,
0.27899, 0.266742, 0.263098, 0.267747, 0.228832, 0.257348,
0.252142, 0.231747, 0.250733, 0.250325, 0.23889, 0.25492,
0.222804, 0.20655, 0.213822, 0.16881, 0.183793, 0.215826,
0.217666, 0.243272, 0.269696, 0.26326, 0.282344, 0.271656,
0.2529, 0.254364, 0.205039, 0.20617, 0.163445, 0.122511,
0.20596, 0.213865, 0.249176, 0.28239, 0.289366, 0.27016,
0.293723, 0.268492, 0.20282, 0.208824, 0.150776, 0.19295,
0.171895, 0.158454, 0.26106, 0.291208, 0.293663, 0.304838,
0.281709, 0.254586, 0.26018, 0.199779, 0.135499, 0.201194,
0.230224, 0.18692, 0.233677, 0.202488, 0.210031, 0.223553,
0.205375, 0.155438, 0.119024, 0.153317, 0.163031, 0.138585,
0.097967, 0.161307, 0.184806, 0.146643, 0.135696, 0.147032,
0.0935787, 0.135847, 0.133048, 0.11904, 0.149193, 0.151299,
0.111204, 0.147809, 0.126288, 0.101504, 0.129428, 0.106579,
0.133189, 0.145703, 0.0926201, 0.137927, 0.111192, 0.114371,
0.121808, 0.120108, 0.105936, 0.106475, 0.0925847, 0.094645,
0.096419, 0.0806714, 0.0955908, 0.0838692, 0.0718746,
0.0887887}, {0.0729174, 0.0632301, 0.0874856, 0.0621172,
0.0994668, 0.108413, 0.186609, 0.14145, 0.124948, 0.113712,
0.160523, 0.0751676, 0.112076, 0.1502, 0.108911, 0.0868513,
0.142817, 0.129036, 0.13621, 0.0989554, 0.147988, 0.130184,
0.0985557, 0.121084, 0.127708, 0.0839022, 0.124915, 0.125498,
0.0947927, 0.0835565, 0.138205, 0.121453, 0.112545, 0.143018,
0.119477, 0.0984861, 0.136691, 0.135812, 0.138366, 0.10788,
0.135512, 0.128947, 0.110745, 0.133722, 0.0942401, 0.113428,
0.127346, 0.130219, 0.124143, 0.146329, 0.168106, 0.155554,
0.127848, 0.0889197, 0.15019, 0.117297, 0.120675, 0.159865,
0.166227, 0.166602, 0.153328, 0.187332, 0.173428, 0.174969,
0.168184, 0.186408, 0.147451, 0.135881, 0.162958, 0.100231,
0.144644, 0.155505, 0.137448, 0.147542, 0.116857, 0.126358,
0.14937, 0.149974, 0.123865, 0.10568, 0.0856014, 0.0859469,
0.124411, 0.134612, 0.111853, 0.0969776, 0.135638, 0.12197,
0.0719869, 0.0982902, 0.0823303, 0.115373, 0.0881443, 0.102426,
0.129824, 0.115572, 0.100506, 0.104755, 0.0927137, 0.103897,
0.104139, 0.103321, 0.0963735, 0.115726, 0.10537, 0.0963028,
0.108173, 0.11335, 0.0815156, 0.0846488, 0.10347, 0.10674,
0.102156, 0.0913671, 0.0938524, 0.0859436, 0.0746864,
0.0960233}, {0.0572585, 0.0589353, 0.074816, 0.0622699,
0.0814354, 0.125959, 0.10622, 0.123895, 0.188305, 0.160666,
0.103041, 0.151848, 0.11742, 0.132476, 0.155642, 0.118029,
0.157187, 0.157425, 0.107302, 0.154768, 0.153704, 0.095551,
0.167966, 0.136366, 0.126445, 0.166594, 0.123426, 0.140088,
0.17336, 0.107541, 0.161296, 0.167501, 0.12336, 0.157226,
0.156055, 0.123446, 0.169361, 0.140026, 0.115917, 0.166315,
0.118404, 0.144127, 0.168687, 0.131004, 0.145988, 0.162455,
0.139518, 0.130347, 0.14472, 0.127669, 0.14848, 0.149036,
0.139524, 0.162267, 0.121265, 0.0970333, 0.152757, 0.119749,
0.0858062, 0.156116, 0.147109, 0.133428, 0.167386, 0.137137,
0.157493, 0.151853, 0.133405, 0.157281, 0.161851, 0.161303,
0.18589, 0.189296, 0.138042, 0.125218, 0.117381, 0.104076,
0.0875832, 0.0945895, 0.112445, 0.0950912, 0.0921118, 0.104977,
0.0980417, 0.0889084, 0.0704634, 0.0869794, 0.0853337, 0.088045,
0.123279, 0.098338, 0.107455, 0.0856449, 0.100285, 0.099919,
0.102373, 0.0997882, 0.104698, 0.104414, 0.112605, 0.0831165,
0.0887432, 0.100541, 0.105296, 0.0854902, 0.073924, 0.105483,
0.109718, 0.102947, 0.10159, 0.0910654, 0.0753168, 0.0838317,
0.0866741, 0.0863465, 0.073635, 0.0933232, 0.0884256,
0.0510702}, {0.0637062, 0.0520632, 0.0922782, 0.0674252,
0.0853055, 0.141504, 0.141227, 0.159948, 0.155394, 0.0669195,
0.144107, 0.140955, 0.114586, 0.129577, 0.13875, 0.0851927,
0.144574, 0.149484, 0.125744, 0.130429, 0.144798, 0.134162,
0.143974, 0.131432, 0.138828, 0.14542, 0.123662, 0.13603,
0.153966, 0.119997, 0.142208, 0.142041, 0.110753, 0.143058,
0.132911, 0.141618, 0.148055, 0.123887, 0.140578, 0.136217,
0.138801, 0.144626, 0.129629, 0.09692, 0.133308, 0.144453,
0.137577, 0.14537, 0.0918776, 0.149246, 0.146034, 0.105689,
0.156191, 0.128184, 0.136357, 0.135772, 0.09873, 0.127259,
0.163611, 0.15447, 0.156029, 0.169976, 0.0674481, 0.145331,
0.148195, 0.146268, 0.15132, 0.10237, 0.160373, 0.164057,
0.172827, 0.180091, 0.124056, 0.140319, 0.122305, 0.0810894,
0.103064, 0.0897357, 0.0945785, 0.132624, 0.0881607, 0.121031,
0.119873, 0.0872404, 0.0967827, 0.104405, 0.0882699, 0.11067,
0.114159, 0.0908366, 0.109251, 0.0625534, 0.109693, 0.0999738,
0.0558204, 0.106153, 0.0895536, 0.0968452, 0.109874, 0.0704875,
0.0632815, 0.0965661, 0.0736602, 0.0949364, 0.102971, 0.100342,
0.10786, 0.0821954, 0.0646054, 0.0945873, 0.084498, 0.0855638,
0.0698945, 0.0929165, 0.0964458, 0.0772205, 0.0785254,
0.0512464}, {0.0748132, 0.0589078, 0.0618485, 0.088684,
0.0856129, 0.139413, 0.165142, 0.20091, 0.224435, 0.155427,
0.158237, 0.191699, 0.154787, 0.152756, 0.156549, 0.144027,
0.131296, 0.167607, 0.163735, 0.168771, 0.177995, 0.167294,
0.172871, 0.173186, 0.150418, 0.182118, 0.15361, 0.147952,
0.181705, 0.146816, 0.150559, 0.14888, 0.124572, 0.162696,
0.147838, 0.12444, 0.167679, 0.203274, 0.205735, 0.22049,
0.180904, 0.187311, 0.213456, 0.181803, 0.17622, 0.17985,
0.190789, 0.143218, 0.169915, 0.180209, 0.208971, 0.189639,
0.236305, 0.182936, 0.213171, 0.208948, 0.220807, 0.171616,
0.221036, 0.194726, 0.190245, 0.209718, 0.195269, 0.200425,
0.20426, 0.25332, 0.0936302, 0.225935, 0.211085, 0.259669,
0.193738, 0.205278, 0.195519, 0.212109, 0.185117, 0.179722,
0.198981, 0.184637, 0.19152, 0.202321, 0.16767, 0.169525,
0.181452, 0.170418, 0.207114, 0.178135, 0.193277, 0.170153,
0.180252, 0.185052, 0.193691, 0.188421, 0.190548, 0.182112,
0.165235, 0.182512, 0.182222, 0.196202, 0.194762, 0.182774,
0.180982, 0.168642, 0.169554, 0.192098, 0.19091, 0.195506,
0.187602, 0.165377, 0.164429, 0.17426, 0.163468, 0.156377,
0.156861, 0.154497, 0.143653, 0.142377, 0.141638, 0.1305},
{0.0916373, 0.0830755, 0.109415, 0.0953352, 0.0860417, 0.097829,
0.199878, 0.262779, 0.238946, 0.19272, 0.160788, 0.177083,
0.191078, 0.195435, 0.125082, 0.152133, 0.176163, 0.17037,
0.16862, 0.197394, 0.171958, 0.159559, 0.177028, 0.190406,
0.17135, 0.190868, 0.166728, 0.166034, 0.178551, 0.143038,
0.146477, 0.14273, 0.146991, 0.161712, 0.15487, 0.154821,
0.209219, 0.220882, 0.225348, 0.242008, 0.274344, 0.268146,
0.297744, 0.296153, 0.289176, 0.29485, 0.318516, 0.29078,
0.321182, 0.339968, 0.330664, 0.267771, 0.347404, 0.326863,
0.336555, 0.32341, 0.326537, 0.307167, 0.33992, 0.332354,
0.33169, 0.360223, 0.347136, 0.312624, 0.314353, 0.369367,
0.33526, 0.348547, 0.332403, 0.354079, 0.343724, 0.365248,
0.355163, 0.364157, 0.366836, 0.361868, 0.361169, 0.363301,
0.364749, 0.364835, 0.368136, 0.366716, 0.369527, 0.366221,
0.369837, 0.365331, 0.369575, 0.366446, 0.369478, 0.368194,
0.368426, 0.370572, 0.3686, 0.370106, 0.366817, 0.369492,
0.368718, 0.368894, 0.368939, 0.368364, 0.368497, 0.368578,
0.368132, 0.368957, 0.370059, 0.370322, 0.368031, 0.35469,
0.338872, 0.320063, 0.306804, 0.30267, 0.303002, 0.302064,
0.295984, 0.289396, 0.28031, 0.266708}, {0.0936278, 0.0924457,
0.0896628, 0.0783033, 0.0679065, 0.0867195, 0.127723, 0.145275,
0.133222, 0.132397, 0.131902, 0.0872473, 0.138824, 0.145749,
0.131459, 0.125934, 0.147405, 0.0992265, 0.0767044, 0.148001,
0.109358, 0.120856, 0.11709, 0.129946, 0.113246, 0.121356,
0.117914, 0.103664, 0.112329, 0.123252, 0.119998, 0.131917,
0.120388, 0.138113, 0.113784, 0.091903, 0.149102, 0.102869,
0.125614, 0.13895, 0.182336, 0.20161, 0.193143, 0.210437,
0.203688, 0.214382, 0.205687, 0.219986, 0.220278, 0.226992,
0.213404, 0.213079, 0.228953, 0.232818, 0.237603, 0.221505,
0.223547, 0.214532, 0.213832, 0.228035, 0.248792, 0.241876,
0.230023, 0.215011, 0.208952, 0.218746, 0.242152, 0.242713,
0.23213, 0.247583, 0.245967, 0.235996, 0.249496, 0.248507,
0.24938, 0.253504, 0.250889, 0.251601, 0.25426, 0.257649,
0.256551, 0.252941, 0.256232, 0.257508, 0.256754, 0.254524,
0.255201, 0.255954, 0.256102, 0.257041, 0.256467, 0.256858,
0.254478, 0.258594, 0.252353, 0.257733, 0.255415, 0.257241,
0.256713, 0.256124, 0.258279, 0.25525, 0.255728, 0.257482,
0.257115, 0.259491, 0.257484, 0.243695, 0.233723, 0.210588,
0.211796, 0.21123, 0.20926, 0.207192, 0.205347, 0.199239,
0.19614, 0.184857}, {0.0690279, 0.0836969, 0.0660273, 0.0864266,
0.0986487, 0.119931, 0.157341, 0.175502, 0.193357, 0.190933,
0.181395, 0.174312, 0.166452, 0.178391, 0.18469, 0.172193,
0.191268, 0.184082, 0.171006, 0.182719, 0.171384, 0.170523,
0.185281, 0.166491, 0.179475, 0.186685, 0.177761, 0.186012,
0.191645, 0.165217, 0.180153, 0.172876, 0.144807, 0.156465,
0.130075, 0.135311, 0.173391, 0.184113, 0.18493, 0.194661,
0.19926, 0.185793, 0.182711, 0.140356, 0.148219, 0.121989,
0.15372, 0.0914435, 0.0661874, 0.148382, 0.164915, 0.186375,
0.178866, 0.178181, 0.167647, 0.139579, 0.15521, 0.137455,
0.183764, 0.200479, 0.18993, 0.163912, 0.11974, 0.0752645,
0.141559, 0.162511, 0.155718, 0.187431, 0.133783, 0.124498,
0.197861, 0.19486, 0.190942, 0.174939, 0.143243, 0.109044,
0.141012, 0.0992646, 0.130667, 0.117556, 0.131829, 0.147838,
0.125871, 0.12661, 0.131707, 0.109519, 0.0809532, 0.103498,
0.122584, 0.0712142, 0.10661, 0.116803, 0.111539, 0.13205,
0.0727352, 0.12342, 0.077005, 0.103824, 0.0977543, 0.0856476,
0.0860609, 0.100473, 0.0852778, 0.118076, 0.0873153, 0.0878325,
0.107186, 0.0972785, 0.112386, 0.100198, 0.105944, 0.091846,
0.0885026, 0.0872548, 0.100171, 0.0489312, 0.0729886,
0.0924029}, {0.0839609, 0.0631511, 0.0651866, 0.0659865,
0.10616, 0.174198, 0.0874194, 0.0991771, 0.155795, 0.122243,
0.122741, 0.160278, 0.13708, 0.147707, 0.155378, 0.130283,
0.112552, 0.133328, 0.106485, 0.0817991, 0.12892, 0.126242,
0.104405, 0.103011, 0.13635, 0.119505, 0.105034, 0.127604,
0.154823, 0.0704668, 0.129251, 0.155772, 0.110863, 0.135367,
0.138827, 0.130567, 0.125288, 0.125093, 0.13731, 0.133776,
0.146289, 0.151551, 0.166933, 0.134782, 0.138224, 0.160043,
0.128307, 0.131422, 0.132511, 0.117941, 0.137806, 0.124675,
0.143746, 0.142175, 0.0949789, 0.126535, 0.146894, 0.11679,
0.128895, 0.189202, 0.158429, 0.181345, 0.179078, 0.164081,
0.127724, 0.116698, 0.165808, 0.18348, 0.120499, 0.162375,
0.163194, 0.15895, 0.11024, 0.090794, 0.0985395, 0.126093,
0.11506, 0.118415, 0.112037, 0.105372, 0.0888385, 0.113609,
0.102221, 0.0987146, 0.0781656, 0.0890625, 0.107586, 0.101595,
0.102795, 0.101631, 0.054783, 0.105884, 0.107051, 0.0760416,
0.0633028, 0.0659641, 0.0954774, 0.0998515, 0.0996104,
0.0903385, 0.0646586, 0.0608152, 0.0558568, 0.0944449, 0.101845,
0.0718026, 0.0791299, 0.066975, 0.0961402, 0.0770906, 0.0699744,
0.0822434, 0.0792126, 0.0515498, 0.0864787, 0.0436198,
0.0538571, 0.0745807}, {0.0613877, 0.0635534, 0.067636,
0.0937084, 0.0972453, 0.192043, 0.139683, 0.180588, 0.14349,
0.186284, 0.168931, 0.169989, 0.220218, 0.191396, 0.189072,
0.216125, 0.189631, 0.176385, 0.208408, 0.197836, 0.203344,
0.22037, 0.206124, 0.215997, 0.201813, 0.206633, 0.21921,
0.199485, 0.189415, 0.209972, 0.201001, 0.174771, 0.207674,
0.204955, 0.194078, 0.224713, 0.229815, 0.239813, 0.223448,
0.222334, 0.235015, 0.186086, 0.100617, 0.135277, 0.134718,
0.178713, 0.0996281, 0.186878, 0.211521, 0.239349, 0.224256,
0.23541, 0.186574, 0.190284, 0.163953, 0.128844, 0.200153,
0.196877, 0.158422, 0.118627, 0.135268, 0.2112, 0.207955,
0.229239, 0.196117, 0.149227, 0.183341, 0.195499, 0.162206,
0.207, 0.218349, 0.179275, 0.230401, 0.195593, 0.173211,
0.165788, 0.146542, 0.162545, 0.183423, 0.172376, 0.124556,
0.147603, 0.132406, 0.118955, 0.114768, 0.110899, 0.103356,
0.130378, 0.123824, 0.11002, 0.0680479, 0.113335, 0.117773,
0.0923511, 0.100553, 0.0841648, 0.124285, 0.107886, 0.0794699,
0.0867168, 0.0912914, 0.0789684, 0.0720038, 0.102027, 0.073151,
0.0675781, 0.0948259, 0.10576, 0.0815843, 0.0908478, 0.0819919,
0.101765, 0.0964407, 0.0913984, 0.0824469, 0.0802858, 0.0635621,
0.0616274}, {0.0708683, 0.0707338, 0.0762545, 0.0527633,
0.123538, 0.181089, 0.227955, 0.162683, 0.199473, 0.212381,
0.240934, 0.241596, 0.220027, 0.254219, 0.229496, 0.208785,
0.239583, 0.230235, 0.216332, 0.257928, 0.235601, 0.245449,
0.268601, 0.220947, 0.254531, 0.264578, 0.197604, 0.253493,
0.260682, 0.187226, 0.247206, 0.234734, 0.220626, 0.236041,
0.220393, 0.244585, 0.277588, 0.268228, 0.264019, 0.295441,
0.245086, 0.242206, 0.223365, 0.118407, 0.0881054, 0.108149,
0.177588, 0.210179, 0.210628, 0.267619, 0.286936, 0.264205,
0.233153, 0.271358, 0.204923, 0.216006, 0.211875, 0.175943,
0.218762, 0.193351, 0.198337, 0.211148, 0.265099, 0.264035,
0.23566, 0.196905, 0.188368, 0.253123, 0.219871, 0.257446,
0.254488, 0.222028, 0.223908, 0.198105, 0.153711, 0.178575,
0.143108, 0.149869, 0.180305, 0.183149, 0.152212, 0.166711,
0.156345, 0.124561, 0.11894, 0.106369, 0.130606, 0.150765,
0.144596, 0.130211, 0.0630874, 0.10356, 0.0995484, 0.113708,
0.116821, 0.104851, 0.114113, 0.0862986, 0.0707201, 0.0853121,
0.103031, 0.0997152, 0.0908322, 0.11515, 0.0952275, 0.0967238,
0.0895431, 0.100165, 0.0928924, 0.0891754, 0.109307, 0.079477,
0.068479, 0.0939707, 0.0716664, 0.0820147, 0.0610054,
0.0969629}, {0.0676563, 0.0490592, 0.062514, 0.0872749,
0.0309913, 0.124106, 0.157845, 0.148581, 0.0697452, 0.138052,
0.187728, 0.134897, 0.169549, 0.169662, 0.123126, 0.181674,
0.164103, 0.125812, 0.165745, 0.126637, 0.136046, 0.17406,
0.0828628, 0.154488, 0.172895, 0.0963769, 0.154196, 0.169951,
0.0857344, 0.166957, 0.163862, 0.127092, 0.175065, 0.147204,
0.131408, 0.178031, 0.122779, 0.136102, 0.155011, 0.135086,
0.149505, 0.197948, 0.150365, 0.195632, 0.181575, 0.176693,
0.171246, 0.138944, 0.151645, 0.183123, 0.168697, 0.181506,
0.191093, 0.195163, 0.191048, 0.164948, 0.176062, 0.145948,
0.173853, 0.187002, 0.188427, 0.190754, 0.178128, 0.19307,
0.102208, 0.193666, 0.207256, 0.183956, 0.208447, 0.183231,
0.109396, 0.189698, 0.19698, 0.137561, 0.165834, 0.175638,
0.170922, 0.18876, 0.176143, 0.174753, 0.179803, 0.171833,
0.174328, 0.177682, 0.181441, 0.177273, 0.174571, 0.176077,
0.174263, 0.176807, 0.174895, 0.175559, 0.182014, 0.17794,
0.179258, 0.176925, 0.178978, 0.174121, 0.183003, 0.174642,
0.180599, 0.176023, 0.18035, 0.177289, 0.185018, 0.181047,
0.181408, 0.190396, 0.18026, 0.170763, 0.164775, 0.14784,
0.143345, 0.129285, 0.127718, 0.123449, 0.123186, 0.108511},
{0.0798071, 0.0693278, 0.0825816, 0.0714918, 0.0717601,
0.072848, 0.176885, 0.172047, 0.183719, 0.203633, 0.159377,
0.199821, 0.19087, 0.177308, 0.198218, 0.19693, 0.184193,
0.202839, 0.184015, 0.177125, 0.203276, 0.188347, 0.196786,
0.198716, 0.181201, 0.201021, 0.1967, 0.177545, 0.202179,
0.19545, 0.172486, 0.196348, 0.190326, 0.165251, 0.196167,
0.183927, 0.188844, 0.20249, 0.16611, 0.20539, 0.18064,
0.178823, 0.180066, 0.173593, 0.125529, 0.171776, 0.163351,
0.141118, 0.169431, 0.167041, 0.170204, 0.167732, 0.131162,
0.180225, 0.170941, 0.152985, 0.138747, 0.136515, 0.106914,
0.17129, 0.167892, 0.169531, 0.166661, 0.137867, 0.164124,
0.199698, 0.187263, 0.196891, 0.141674, 0.160328, 0.144953,
0.186859, 0.146418, 0.172897, 0.144629, 0.109742, 0.116201,
0.0724484, 0.106895, 0.0975458, 0.11723, 0.0683188, 0.101427,
0.11211, 0.0842043, 0.0957488, 0.0927538, 0.0742093, 0.10732,
0.0880036, 0.102386, 0.0899272, 0.0656953, 0.108192, 0.0911194,
0.0900093, 0.127354, 0.0874451, 0.0707418, 0.104282, 0.0927767,
0.0932158, 0.0702332, 0.0798776, 0.0708333, 0.108666, 0.0808562,
0.0695746, 0.0743276, 0.112583, 0.0887385, 0.103493, 0.0576165,
0.0695386, 0.064625, 0.0815281, 0.0824346, 0.0768962},
{0.0797299, 0.0745599, 0.0590824, 0.0599464, 0.127711, 0.186639,
0.22684, 0.277491, 0.280137, 0.255033, 0.180036, 0.182551,
0.196621, 0.211656, 0.1972, 0.221984, 0.181323, 0.191253,
0.219938, 0.13355, 0.201111, 0.214613, 0.117056, 0.216583,
0.203479, 0.137016, 0.227236, 0.199141, 0.203395, 0.22218,
0.197273, 0.246231, 0.176137, 0.220342, 0.142803, 0.231339,
0.231021, 0.223697, 0.251167, 0.218371, 0.248496, 0.207837,
0.278645, 0.282937, 0.301041, 0.311994, 0.265719, 0.260395,
0.242006, 0.266882, 0.230648, 0.200533, 0.215413, 0.211462,
0.261868, 0.261649, 0.33193, 0.330288, 0.332938, 0.311977,
0.244701, 0.270144, 0.244098, 0.145825, 0.194982, 0.155126,
0.160244, 0.24299, 0.310755, 0.315115, 0.317901, 0.335776,
0.281164, 0.260438, 0.236816, 0.271088, 0.21804, 0.220393,
0.176898, 0.176829, 0.208443, 0.183494, 0.171159, 0.10677,
0.111967, 0.137553, 0.153861, 0.156503, 0.1404, 0.153915,
0.139892, 0.122664, 0.116802, 0.106538, 0.102831, 0.120043,
0.114878, 0.127202, 0.127461, 0.101804, 0.10703, 0.107738,
0.102553, 0.0607853, 0.0945219, 0.0930496, 0.108665, 0.0976848,
0.083146, 0.105595, 0.10096, 0.0744465, 0.0527821, 0.0690073,
0.0615741, 0.091119, 0.0549187, 0.0960411}, {0.0717488,
0.0919959, 0.0515633, 0.0923261, 0.122111, 0.250777, 0.326145,
0.333031, 0.343739, 0.225584, 0.233961, 0.226419, 0.211101,
0.224883, 0.271981, 0.262892, 0.232606, 0.194421, 0.227658,
0.247836, 0.206447, 0.221124, 0.251849, 0.221168, 0.241359,
0.232818, 0.236371, 0.248424, 0.234181, 0.191511, 0.23067,
0.261753, 0.237502, 0.178879, 0.143602, 0.269806, 0.314069,
0.316018, 0.30178, 0.275914, 0.264381, 0.253142, 0.2737,
0.307651, 0.325387, 0.35379, 0.315689, 0.177611, 0.292274,
0.36166, 0.342742, 0.313524, 0.241981, 0.253563, 0.291293,
0.268344, 0.326326, 0.340306, 0.380532, 0.36692, 0.223577,
0.335471, 0.380427, 0.331086, 0.333913, 0.30677, 0.210985,
0.285196, 0.283327, 0.327101, 0.287115, 0.364366, 0.325607,
0.215549, 0.303745, 0.267457, 0.215084, 0.194064, 0.150366,
0.187109, 0.223304, 0.121735, 0.209859, 0.172131, 0.139016,
0.163378, 0.169496, 0.153113, 0.140715, 0.141241, 0.117078,
0.141117, 0.125783, 0.117998, 0.0922533, 0.110599, 0.113722,
0.11825, 0.117605, 0.126693, 0.0504231, 0.0862308, 0.085521,
0.0913354, 0.113107, 0.0801443, 0.109385, 0.0596495, 0.100125,
0.0728991, 0.0733753, 0.0765467, 0.0622276, 0.0720292,
0.0785864, 0.0775627, 0.081731, 0.101794}, {0.0860711, 0.089851,
0.0811183, 0.0880752, 0.045829, 0.111166, 0.131909, 0.155989,
0.179768, 0.127205, 0.146384, 0.160204, 0.123902, 0.15444,
0.156911, 0.134692, 0.164107, 0.128433, 0.132147, 0.155213,
0.0977805, 0.134932, 0.146321, 0.0865138, 0.144495, 0.142696,
0.0837931, 0.141335, 0.143065, 0.118115, 0.154712, 0.133094,
0.144848, 0.165344, 0.124771, 0.1422, 0.151495, 0.139527,
0.112651, 0.138058, 0.138908, 0.0771989, 0.154668, 0.0847577,
0.135356, 0.12961, 0.118082, 0.169191, 0.152152, 0.154669,
0.148068, 0.155568, 0.10278, 0.152914, 0.133656, 0.13214,
0.15908, 0.117428, 0.12969, 0.154675, 0.1167, 0.193145,
0.199805, 0.163148, 0.155172, 0.15948, 0.147225, 0.190795,
0.162401, 0.160252, 0.180113, 0.177694, 0.150996, 0.147131,
0.106851, 0.116829, 0.123018, 0.13464, 0.0888335, 0.121737,
0.136364, 0.140604, 0.0876988, 0.12507, 0.130963, 0.113121,
0.136748, 0.107098, 0.101731, 0.128337, 0.134076, 0.110214,
0.0801368, 0.122991, 0.133488, 0.125817, 0.10575, 0.132064,
0.116412, 0.121768, 0.114233, 0.106593, 0.130058, 0.128244,
0.125654, 0.0891128, 0.0932485, 0.121352, 0.0948236, 0.0765632,
0.11566, 0.0935416, 0.0776858, 0.0871898, 0.0844862, 0.090281,
0.0859621, 0.0908686}, {0.0664754, 0.0560888, 0.0727744,
0.0755602, 0.0819477, 0.12047, 0.160727, 0.143944, 0.147703,
0.126352, 0.157644, 0.138062, 0.0842987, 0.144924, 0.136655,
0.118356, 0.136226, 0.127034, 0.11797, 0.145736, 0.123975,
0.142768, 0.145411, 0.0874767, 0.144189, 0.12547, 0.116234,
0.148634, 0.120395, 0.110818, 0.142656, 0.123394, 0.113971,
0.150305, 0.135124, 0.07292, 0.162929, 0.143861, 0.119518,
0.177999, 0.185367, 0.205449, 0.180807, 0.209296, 0.192758,
0.202276, 0.19773, 0.182778, 0.204408, 0.174241, 0.197772,
0.210064, 0.209128, 0.215473, 0.219813, 0.230379, 0.192827,
0.219235, 0.222885, 0.226292, 0.219387, 0.209105, 0.245077,
0.219113, 0.179086, 0.218668, 0.247157, 0.213292, 0.215046,
0.226625, 0.194859, 0.23262, 0.199823, 0.194964, 0.201715,
0.188151, 0.196034, 0.191197, 0.19643, 0.206723, 0.202487,
0.190763, 0.188088, 0.196228, 0.203748, 0.198394, 0.204796,
0.200573, 0.195155, 0.190527, 0.196328, 0.196671, 0.204987,
0.199193, 0.195235, 0.193491, 0.195533, 0.194073, 0.199738,
0.196533, 0.198859, 0.189394, 0.19214, 0.192099, 0.198677,
0.195978, 0.190747, 0.186726, 0.184437, 0.152079, 0.135835,
0.119602, 0.138662, 0.141903, 0.113647, 0.113328, 0.118146,
0.1164}, {0.0580781, 0.0598694, 0.0793862, 0.0618788, 0.0640657,
0.121147, 0.177865, 0.19682, 0.247708, 0.193762, 0.232698,
0.217642, 0.180147, 0.230231, 0.217411, 0.207726, 0.227196,
0.192922, 0.218002, 0.208305, 0.188652, 0.221835, 0.209453,
0.181231, 0.220578, 0.201973, 0.177902, 0.218193, 0.213879,
0.194808, 0.216796, 0.221378, 0.205804, 0.207171, 0.186518,
0.19895, 0.205929, 0.134561, 0.200326, 0.201502, 0.151112,
0.233982, 0.21777, 0.212922, 0.211396, 0.221032, 0.192538,
0.205965, 0.178182, 0.154291, 0.206064, 0.10579, 0.181359,
0.211613, 0.20135, 0.223268, 0.224536, 0.229655, 0.22452,
0.244002, 0.216796, 0.215786, 0.128428, 0.129823, 0.131276,
0.207446, 0.206961, 0.191123, 0.226108, 0.210525, 0.247859,
0.270819, 0.208779, 0.153653, 0.175791, 0.150766, 0.164527,
0.142677, 0.160946, 0.149263, 0.129265, 0.135263, 0.132935,
0.123784, 0.104692, 0.100591, 0.117193, 0.111629, 0.116851,
0.112694, 0.110875, 0.0957995, 0.104827, 0.0904257, 0.0721452,
0.0850432, 0.057714, 0.0853566, 0.0637486, 0.0831708, 0.0758934,
0.0913625, 0.0994589, 0.0977753, 0.105157, 0.0986019, 0.0997767,
0.0861505, 0.104695, 0.0903034, 0.0909788, 0.0675409, 0.0793319,
0.0753375, 0.0727054, 0.0670542, 0.0728626, 0.080261},
{0.0617547, 0.0682408, 0.0720136, 0.0674485, 0.0648229, 0.15147,
0.229495, 0.275879, 0.304698, 0.317603, 0.313646, 0.303702,
0.300013, 0.307052, 0.311437, 0.309226, 0.298088, 0.294118,
0.289514, 0.283898, 0.292816, 0.295538, 0.288347, 0.286684,
0.290207, 0.286177, 0.289187, 0.295502, 0.293467, 0.28527,
0.281886, 0.283741, 0.275879, 0.2702, 0.284245, 0.287025,
0.288238, 0.290027, 0.292824, 0.288988, 0.28667, 0.291556,
0.281078, 0.246708, 0.218676, 0.255596, 0.276942, 0.282233,
0.286131, 0.277767, 0.267174, 0.254684, 0.248151, 0.260946,
0.268761, 0.273994, 0.268448, 0.182726, 0.275351, 0.312652,
0.296181, 0.249592, 0.20787, 0.191821, 0.221934, 0.262084,
0.290674, 0.280659, 0.219138, 0.272878, 0.143603, 0.273142,
0.295183, 0.246942, 0.192741, 0.172742, 0.160413, 0.109992,
0.177627, 0.194391, 0.153417, 0.156449, 0.172325, 0.153875,
0.105508, 0.122928, 0.144523, 0.0743078, 0.121507, 0.137585,
0.101744, 0.102877, 0.133181, 0.121166, 0.095834, 0.0928359,
0.0919703, 0.0613013, 0.0785701, 0.0785305, 0.115046, 0.0984041,
0.112756, 0.116909, 0.0674847, 0.105198, 0.103062, 0.0915496,
0.100363, 0.092223, 0.0819345, 0.0605993, 0.0835798, 0.0715163,
0.0718403, 0.082467, 0.06572, 0.0842221}, {0.056618, 0.0744,
0.0386642, 0.052179, 0.0854464, 0.12717, 0.120126, 0.199583,
0.128921, 0.180104, 0.144243, 0.178886, 0.168881, 0.170975,
0.169644, 0.111226, 0.17506, 0.18212, 0.11513, 0.170134,
0.191056, 0.0988552, 0.16414, 0.197215, 0.119118, 0.169892,
0.187944, 0.143177, 0.179255, 0.170567, 0.162399, 0.195287,
0.167007, 0.147537, 0.180664, 0.107538, 0.165207, 0.150375,
0.145405, 0.172085, 0.203506, 0.166405, 0.163392, 0.197525,
0.206916, 0.175021, 0.171765, 0.150623, 0.120306, 0.176417,
0.160516, 0.0989338, 0.160963, 0.136443, 0.189419, 0.184824,
0.19121, 0.143346, 0.203016, 0.142979, 0.165512, 0.1417,
0.162845, 0.169075, 0.157056, 0.157428, 0.154692, 0.155938,
0.209033, 0.211875, 0.169306, 0.175341, 0.179001, 0.140544,
0.149902, 0.153975, 0.096417, 0.105711, 0.103585, 0.0390473,
0.108863, 0.105958, 0.113693, 0.0985001, 0.108822, 0.119707,
0.130599, 0.0970039, 0.0828348, 0.114507, 0.114078, 0.111835,
0.0873767, 0.0914219, 0.124201, 0.115464, 0.113547, 0.114128,
0.112185, 0.111251, 0.0891997, 0.0968412, 0.113078, 0.0963089,
0.113669, 0.113588, 0.118822, 0.107784, 0.0815584, 0.0866804,
0.0657711, 0.0577498, 0.0632029, 0.0725981, 0.0778566,
0.0491614, 0.072053, 0.0741775}, {0.0529655, 0.0625437,
0.0713054, 0.0642811, 0.0658064, 0.124364, 0.169647, 0.239176,
0.211943, 0.210846, 0.185355, 0.176681, 0.184633, 0.184033,
0.190211, 0.197486, 0.188602, 0.176076, 0.179551, 0.171173,
0.178536, 0.190306, 0.176828, 0.18921, 0.194015, 0.173316,
0.186914, 0.174579, 0.177408, 0.184659, 0.173793, 0.183168,
0.182514, 0.185712, 0.178788, 0.193682, 0.181525, 0.18713,
0.199715, 0.176977, 0.192864, 0.183357, 0.186741, 0.188648,
0.181104, 0.176703, 0.18564, 0.19844, 0.19412, 0.20871,
0.209389, 0.212119, 0.225075, 0.194678, 0.177218, 0.17481,
0.197188, 0.174704, 0.180512, 0.219519, 0.211304, 0.216911,
0.20211, 0.213454, 0.217018, 0.157181, 0.208763, 0.12855,
0.153872, 0.184416, 0.138053, 0.185156, 0.205155, 0.147302,
0.134468, 0.156174, 0.10217, 0.0861362, 0.12675, 0.093199,
0.112959, 0.136307, 0.126756, 0.128524, 0.0996788, 0.0889692,
0.0922812, 0.0791452, 0.070967, 0.10106, 0.099588, 0.0804043,
0.0850991, 0.103341, 0.0914749, 0.0517297, 0.109163, 0.0852986,
0.0843614, 0.0684906, 0.0781356, 0.0928583, 0.0845924,
0.0839832, 0.106165, 0.0890007, 0.0574171, 0.0569396, 0.0826288,
0.0639186, 0.0584472, 0.0768689, 0.0577216, 0.0565538,
0.0641801, 0.0782592, 0.0702089, 0.0525485}, {0.0618777,
0.0480661, 0.0617351, 0.0512393, 0.104921, 0.129766, 0.256979,
0.329792, 0.379766, 0.360557, 0.283791, 0.299451, 0.301231,
0.301301, 0.318509, 0.28645, 0.276587, 0.3098, 0.284896,
0.272497, 0.288059, 0.272894, 0.285371, 0.292119, 0.277164,
0.29128, 0.291123, 0.273548, 0.282615, 0.264403, 0.255088,
0.29741, 0.284852, 0.300073, 0.305939, 0.290236, 0.312149,
0.329248, 0.323044, 0.317538, 0.307095, 0.257363, 0.260301,
0.241338, 0.276219, 0.343155, 0.329652, 0.308981, 0.315551,
0.346422, 0.34983, 0.355869, 0.335064, 0.288496, 0.244127,
0.268287, 0.263196, 0.273176, 0.313465, 0.338853, 0.336788,
0.278731, 0.357411, 0.334824, 0.361592, 0.353461, 0.319232,
0.209591, 0.258862, 0.315878, 0.166387, 0.310057, 0.29174,
0.319502, 0.233099, 0.26408, 0.201828, 0.133306, 0.234312,
0.155456, 0.225762, 0.167311, 0.232798, 0.0797908, 0.212713,
0.149088, 0.189516, 0.0731729, 0.186386, 0.115187, 0.175227,
0.117612, 0.171631, 0.122696, 0.168707, 0.117155, 0.169728,
0.122946, 0.160264, 0.131905, 0.160214, 0.128921, 0.158423,
0.134631, 0.158588, 0.134623, 0.131298, 0.0936626, 0.109856,
0.134117, 0.125698, 0.133525, 0.109222, 0.121373, 0.110692,
0.105772, 0.0912446, 0.0938259}, {0.068794, 0.0625728,
0.0652917, 0.0579726, 0.0859771, 0.193709, 0.251352, 0.261652,
0.275091, 0.22298, 0.161898, 0.21579, 0.160286, 0.205543,
0.206703, 0.160029, 0.180007, 0.200415, 0.165425, 0.19494,
0.165332, 0.163579, 0.201634, 0.153467, 0.184148, 0.198672,
0.150158, 0.187379, 0.169639, 0.121363, 0.151508, 0.185595,
0.163306, 0.189509, 0.205511, 0.192415, 0.250024, 0.229383,
0.232552, 0.199597, 0.161866, 0.168628, 0.104012, 0.14196,
0.152273, 0.194922, 0.204545, 0.195428, 0.247933, 0.262152,
0.287674, 0.277457, 0.250294, 0.20879, 0.145845, 0.183032,
0.142357, 0.130433, 0.20207, 0.125858, 0.224605, 0.256369,
0.29103, 0.29788, 0.300057, 0.277704, 0.2424, 0.165131,
0.101276, 0.160879, 0.222242, 0.215418, 0.132249, 0.206525,
0.194692, 0.193039, 0.158041, 0.109878, 0.0975422, 0.11104,
0.146482, 0.151054, 0.153077, 0.131026, 0.130341, 0.113089,
0.0998758, 0.072914, 0.103496, 0.0942332, 0.117916, 0.104584,
0.112387, 0.108164, 0.0522145, 0.0931196, 0.0738866, 0.0787649,
0.0766982, 0.101384, 0.0758781, 0.0979525, 0.0905578, 0.0853886,
0.0888181, 0.0507847, 0.0965187, 0.0688485, 0.0799357,
0.0713122, 0.0327285, 0.0522285, 0.0442568, 0.0808931,
0.0593187, 0.0551425, 0.0541439, 0.0560568}, {0.0355298,
0.047452, 0.0303918, 0.0530136, 0.0646777, 0.0625952, 0.140165,
0.183815, 0.178693, 0.145811, 0.160706, 0.14682, 0.144772,
0.161388, 0.154868, 0.147809, 0.13326, 0.127852, 0.14843,
0.139828, 0.144701, 0.152863, 0.142071, 0.143154, 0.143903,
0.153413, 0.154687, 0.156758, 0.144271, 0.14642, 0.145218,
0.139639, 0.145312, 0.13012, 0.0960332, 0.116636, 0.13437,
0.164369, 0.155485, 0.160062, 0.166139, 0.179748, 0.175878,
0.165383, 0.184374, 0.187725, 0.177838, 0.154256, 0.0913362,
0.152237, 0.137124, 0.126389, 0.16059, 0.143886, 0.180293,
0.20548, 0.177978, 0.19177, 0.210505, 0.17034, 0.158089,
0.170774, 0.166595, 0.134869, 0.165531, 0.180111, 0.192885,
0.1623, 0.190067, 0.147322, 0.156703, 0.121785, 0.172784,
0.11645, 0.115685, 0.146711, 0.150481, 0.134335, 0.147299,
0.122397, 0.101521, 0.125877, 0.122179, 0.106008, 0.117429,
0.121275, 0.105457, 0.0978888, 0.0817707, 0.088158, 0.0927868,
0.0907851, 0.0893573, 0.0763583, 0.0833118, 0.0838046,
0.0925501, 0.0820765, 0.0724797, 0.0695331, 0.0646471,
0.0846157, 0.0725961, 0.0678349, 0.0607739, 0.0715111,
0.0924273, 0.081899, 0.0634708, 0.0748231, 0.0575671, 0.0639062,
0.0669077, 0.0555078, 0.052331, 0.0600568, 0.0659549,
0.0371967}, {0.0525674, 0.0483956, 0.0417482, 0.0551031,
0.0762571, 0.114341, 0.101495, 0.129384, 0.138986, 0.121385,
0.108002, 0.13877, 0.127182, 0.0885594, 0.130654, 0.12507,
0.100049, 0.114988, 0.110599, 0.10869, 0.0998035, 0.110347,
0.114701, 0.0801927, 0.10544, 0.121818, 0.107627, 0.0897554,
0.130983, 0.124777, 0.0862638, 0.118947, 0.11499, 0.0890095,
0.0967426, 0.111725, 0.124004, 0.103005, 0.118449, 0.111471,
0.111072, 0.102504, 0.135699, 0.134694, 0.0735709, 0.137053,
0.0982782, 0.100377, 0.0971342, 0.101203, 0.112464, 0.12556,
0.101572, 0.0849006, 0.0899533, 0.128069, 0.124691, 0.14854,
0.105994, 0.11543, 0.122137, 0.178638, 0.134017, 0.130862,
0.149308, 0.169925, 0.167082, 0.157301, 0.132899, 0.160955,
0.182305, 0.158239, 0.0850148, 0.0947296, 0.104587, 0.0646618,
0.0821095, 0.0831857, 0.0842604, 0.0693608, 0.0756681,
0.0877169, 0.098919, 0.089216, 0.0705422, 0.0846458, 0.0804983,
0.071674, 0.080125, 0.0836391, 0.0864377, 0.0799321, 0.0805419,
0.0798996, 0.0580717, 0.0757062, 0.0591865, 0.0796098,
0.0812058, 0.0682764, 0.061947, 0.0654452, 0.0751149, 0.0853768,
0.0654589, 0.0854983, 0.105102, 0.068849, 0.0764024, 0.0737235,
0.0705168, 0.03874, 0.0449909, 0.0665878, 0.0654043, 0.0590702,
0.0685735, 0.0598508}, {0.0537538, 0.035141, 0.0399693,
0.0530934, 0.0605622, 0.0755909, 0.139826, 0.13219, 0.176852,
0.131264, 0.162585, 0.161658, 0.170025, 0.166152, 0.141176,
0.158459, 0.147096, 0.150417, 0.165636, 0.141647, 0.166716,
0.139653, 0.165133, 0.150285, 0.137614, 0.161972, 0.133806,
0.158326, 0.156853, 0.146863, 0.156763, 0.152753, 0.13161,
0.137631, 0.137068, 0.130392, 0.151569, 0.142883, 0.120714,
0.14078, 0.169463, 0.16649, 0.189116, 0.146605, 0.115763,
0.150121, 0.148398, 0.154153, 0.149612, 0.155265, 0.110859,
0.121655, 0.106085, 0.115363, 0.173459, 0.175583, 0.140069,
0.162666, 0.167104, 0.139032, 0.15181, 0.167476, 0.169749,
0.0906489, 0.154807, 0.18203, 0.151527, 0.123748, 0.165425,
0.0966538, 0.200612, 0.158423, 0.130374, 0.0994524, 0.115213,
0.071051, 0.116892, 0.106548, 0.0975433, 0.0815797, 0.102613,
0.0837064, 0.052276, 0.076053, 0.0722588, 0.0638197, 0.0637399,
0.0646475, 0.0572352, 0.0651966, 0.0619277, 0.066375, 0.0746776,
0.0686392, 0.0779952, 0.0543158, 0.0622691, 0.0514247,
0.0527726, 0.0600648, 0.0603268, 0.0601069, 0.0748574,
0.0524191, 0.0591333, 0.063312, 0.0697966, 0.0606605, 0.0671201,
0.0648981, 0.0601121, 0.0695179, 0.0636384, 0.0652676,
0.0622612, 0.0577243, 0.0564386, 0.046154}, {0.0493177,
0.0487281, 0.0437702, 0.0531544, 0.0336288, 0.0507441,
0.0997721, 0.0841284, 0.102894, 0.124189, 0.110512, 0.0772058,
0.124542, 0.105611, 0.0813866, 0.109431, 0.104339, 0.0897927,
0.0987313, 0.104921, 0.0943432, 0.0890675, 0.0896632, 0.103827,
0.0980287, 0.0793181, 0.114729, 0.10071, 0.0704172, 0.101917,
0.0928183, 0.0764551, 0.100854, 0.112625, 0.086423, 0.110045,
0.0916828, 0.0934802, 0.0890199, 0.082587, 0.106869, 0.0971255,
0.0704829, 0.11276, 0.0905496, 0.0644442, 0.123203, 0.070163,
0.0843204, 0.110038, 0.0645528, 0.070535, 0.117517, 0.0843191,
0.115088, 0.111562, 0.117104, 0.104216, 0.110581, 0.152421,
0.126186, 0.159497, 0.148939, 0.108401, 0.0849543, 0.152252,
0.0993839, 0.149133, 0.113272, 0.162684, 0.172332, 0.162747,
0.100568, 0.0962012, 0.102391, 0.080823, 0.0406573, 0.0723997,
0.0763759, 0.0653895, 0.0607194, 0.0558672, 0.0699989,
0.0742054, 0.0704011, 0.0589997, 0.0555167, 0.0452047,
0.0634158, 0.05832, 0.0533088, 0.0418487, 0.053644, 0.0587853,
0.05597, 0.0565848, 0.0507866, 0.0670385, 0.047538, 0.0569752,
0.0328688, 0.0591122, 0.0600718, 0.0576407, 0.0520602,
0.0445605, 0.0601672, 0.0657447, 0.0626624, 0.0545232,
0.0303345, 0.0562146, 0.062421, 0.0489623, 0.0514606, 0.0237069,
0.0303378, 0.0519679}, {0.0532245, 0.0340058, 0.044563,
0.0446119, 0.0433515, 0.0764358, 0.0934311, 0.123369, 0.0987155,
0.125876, 0.100604, 0.115953, 0.130639, 0.0861294, 0.11027,
0.0938115, 0.120532, 0.0826185, 0.107387, 0.124652, 0.110915,
0.1301, 0.0985422, 0.107926, 0.119331, 0.089131, 0.119102,
0.0835378, 0.122646, 0.123074, 0.115654, 0.0803427, 0.119543,
0.114726, 0.103026, 0.129623, 0.10861, 0.0908619, 0.121638,
0.109441, 0.0999017, 0.112468, 0.105916, 0.124997, 0.120831,
0.111434, 0.116242, 0.0619462, 0.0914329, 0.129705, 0.111997,
0.0940722, 0.126825, 0.0940188, 0.111451, 0.110801, 0.118471,
0.125882, 0.115077, 0.135409, 0.105382, 0.157781, 0.153026,
0.103057, 0.106476, 0.160188, 0.178466, 0.162788, 0.126988,
0.177786, 0.139798, 0.170616, 0.11056, 0.0895508, 0.0872534,
0.0571499, 0.0703504, 0.0451574, 0.0789205, 0.0648012,
0.0713942, 0.0441415, 0.0755827, 0.0378804, 0.0479111,
0.0722759, 0.0618669, 0.0583301, 0.0260717, 0.0505564,
0.0489507, 0.0651391, 0.0557906, 0.0390172, 0.0474031,
0.0513734, 0.0359876, 0.0490615, 0.054966, 0.0258591, 0.0335983,
0.0588795, 0.0466873, 0.036485, 0.0590463, 0.0562806, 0.0801237,
0.0480104, 0.0252578, 0.0536416, 0.044275, 0.0501291, 0.0494039,
0.0516618, 0.0523241, 0.0528812, 0.0499144, 0.0438161}},
ColorFunction -> (Blend[{RGBColor[1, 1, 1], RGBColor[0, 0,
1]}, #1] & )], AspectRatio -> Full, ImageSize ->
NCache[{-----}, {1.76717}], PlotRangePadding -> None], {0,
0}, {0, 0}, NCache[{-----, 1}, {1.76717, 1}]], AspectRatio ->
NCache[--, 0.171429], Background -> GrayLevel[1], Frame ->
True, FrameStyle -> GrayLevel[0.75], FrameTicks -> False,
ImagePadding -> None, PlotRange -> NCache[{{0, -----}, {0,
1}}, {{0, 1.76717}, {0, 1}}], PlotRangePadding ->
{Scaled[0.0171429], Scaled[0.1]}], {180, -35}, ImageScaled[{0.5,
0.5}], {350, 60}, Background -> GrayLevel[0.9]],
InsetBox[GraphicsBox[InsetBox[GraphicsBox[{RGBColor[0.325101,
0.364492, 0.820256], LineBox[{{0., 0.477291}, {0.000823045,
0.481608}, {0.00164609, 0.476597}, {0.00246914, 0.482426},
{0.00329218, 0.477183}, {0.00411523, 0.481069}, {0.00493827,
0.478648}, {0.00576132, 0.482071}, {0.00658436, 0.478093},
{0.00740741, 0.481578}, {0.00823045, 0.478941}, {0.0090535,
0.483505}, {0.00987654, 0.478756}, {0.0106996, 0.48426},
{0.0115226, 0.478556}, {0.0123457, 0.483967}, {0.0131687,
0.479558}, {0.0139918, 0.484461}, {0.0148148, 0.479141},
{0.0156379, 0.484738}, {0.0164609, 0.479296}, {0.017284,
0.482888}, {0.018107, 0.478956}, {0.01893, 0.483196},
{0.0197531, 0.48073}, {0.0205761, 0.485494}, {0.0213992,
0.481948}, {0.0222222, 0.485802}, {0.0230453, 0.481716},
{0.0238683, 0.487113}, {0.0246914, 0.480637}, {0.0255144,
0.485108}, {0.0263374, 0.482873}, {0.0271605, 0.486589},
{0.0279835, 0.483381}, {0.0288066, 0.487128}, {0.0296296,
0.480868}, {0.0304527, 0.485185}, {0.0312757, 0.481423},
{0.0320988, 0.485108}, {0.0329218, 0.481485}, {0.0337449,
0.485047}, {0.0345679, 0.483196}, {0.0353909, 0.488161},
{0.036214, 0.483227}, {0.037037, 0.488701}, {0.0378601,
0.48423}, {0.0386831, 0.488084}, {0.0395062, 0.483412},
{0.0403292, 0.488593}, {0.0411523, 0.479249}, {0.0419753,
0.49769}, {0.0427984, 0.469875}, {0.0436214, 0.505553},
{0.0444444, 0.466406}, {0.0452675, 0.52256}, {0.0460905,
0.447626}, {0.0469136, 0.566779}, {0.0477366, 0.416096},
{0.0485597, 0.602504}, {0.0493827, 0.402558}, {0.0502058,
0.658642}, {0.0510288, 0.363504}, {0.0518519, 0.690111},
{0.0526749, 0.361222}, {0.0534979, 0.695307}, {0.054321,
0.345603}, {0.055144, 0.678964}, {0.0559671, 0.319762},
{0.0567901, 0.672719}, {0.0576132, 0.299995}, {0.0584362,
0.624891}, {0.0592593, 0.278194}, {0.0600823, 0.601964},
{0.0609053, 0.278857}, {0.0617284, 0.628021}, {0.0625514,
0.256192}, {0.0633745, 0.624706}, {0.0641975, 0.263623},
{0.0650206, 0.654047}, {0.0658436, 0.268573}, {0.0666667,
0.692609}, {0.0674897, 0.229996}, {0.0683128, 0.709461},
{0.0691358, 0.247018}, {0.0699588, 0.708336}, {0.0707819,
0.214007}, {0.0716049, 0.739311}, {0.072428, 0.228392},
{0.073251, 0.716523}, {0.0740741, 0.205943}, {0.0748971,
0.740807}, {0.0757202, 0.216813}, {0.0765432, 0.709723},
{0.0773663, 0.209366}, {0.0781893, 0.689032}, {0.0790123,
0.224183}, {0.0798354, 0.68362}, {0.0806584, 0.224954},
{0.0814815, 0.673752}, {0.0823045, 0.230505}, {0.0831276,
0.683497}, {0.0839506, 0.229348}, {0.0847737, 0.692069},
{0.0855967, 0.244535}, {0.0864198, 0.680351}, {0.0872428,
0.261619}, {0.0880658, 0.701166}, {0.0888889, 0.25741},
{0.0897119, 0.696309}, {0.090535, 0.269452}, {0.091358,
0.686858}, {0.0921811, 0.263546}, {0.0930041, 0.702214},
{0.0938272, 0.266137}, {0.0946502, 0.684699}, {0.0954733,
0.264718}, {0.0962963, 0.668741}, {0.0971193, 0.290698},
{0.0979424, 0.675016}, {0.0987654, 0.286258}, {0.0995885,
0.656252}, {0.100412, 0.30146}, {0.101235, 0.659953}, {0.102058,
0.302385}, {0.102881, 0.660878}, {0.103704, 0.302031},
{0.104527, 0.64899}, {0.10535, 0.307658}, {0.106173, 0.661417},
{0.106996, 0.310295}, {0.107819, 0.647834}, {0.108642,
0.313918}, {0.109465, 0.638012}, {0.110288, 0.317989},
{0.111111, 0.64236}, {0.111934, 0.32061}, {0.112757, 0.62722},
{0.11358, 0.324511}, {0.114403, 0.647911}, {0.115226, 0.318066},
{0.116049, 0.642515}, {0.116872, 0.314057}, {0.117695,
0.642237}, {0.118519, 0.309663}, {0.119342, 0.633927},
{0.120165, 0.308352}, {0.120988, 0.623504}, {0.121811,
0.321381}, {0.122634, 0.629255}, {0.123457, 0.331264}, {0.12428,
0.623827}, {0.125103, 0.336938}, {0.125926, 0.622286},
{0.126749, 0.356442}, {0.127572, 0.629671}, {0.128395,
0.345109}, {0.129218, 0.624429}, {0.130041, 0.34716}, {0.130864,
0.62244}, {0.131687, 0.342473}, {0.13251, 0.635468}, {0.133333,
0.33114}, {0.134156, 0.641404}, {0.134979, 0.318066}, {0.135802,
0.655589}, {0.136626, 0.324541}, {0.137449, 0.659336},
{0.138272, 0.325374}, {0.139095, 0.655543}, {0.139918,
0.329367}, {0.140741, 0.674631}, {0.141564, 0.335704},
{0.142387, 0.656437}, {0.14321, 0.340391}, {0.144033, 0.651812},
{0.144856, 0.339713}, {0.145679, 0.652274}, {0.146502,
0.340669}, {0.147325, 0.655666}, {0.148148, 0.353898},
{0.148971, 0.649453}, {0.149794, 0.335627}, {0.150617,
0.670314}, {0.15144, 0.354561}, {0.152263, 0.649915}, {0.153086,
0.328365}, {0.153909, 0.67221}, {0.154733, 0.335535}, {0.155556,
0.651318}, {0.156379, 0.3269}, {0.157202, 0.652691}, {0.158025,
0.32374}, {0.158848, 0.654695}, {0.159671, 0.328766}, {0.160494,
0.6571}, {0.161317, 0.332759}, {0.16214, 0.651858}, {0.162963,
0.33481}, {0.163786, 0.65027}, {0.164609, 0.349072}, {0.165432,
0.651704}, {0.166255, 0.342103}, {0.167078, 0.633541},
{0.167901, 0.345094}, {0.168724, 0.635576}, {0.169547,
0.331757}, {0.17037, 0.640233}, {0.171193, 0.333684}, {0.172016,
0.641744}, {0.17284, 0.323431}, {0.173663, 0.647418}, {0.174486,
0.325204}, {0.175309, 0.652382}, {0.176132, 0.32522}, {0.176955,
0.648158}, {0.177778, 0.334702}, {0.178601, 0.652552},
{0.179424, 0.328026}, {0.180247, 0.64051}, {0.18107, 0.331464},
{0.181893, 0.635838}, {0.182716, 0.332266}, {0.183539,
0.633294}, {0.184362, 0.331881}, {0.185185, 0.628993},
{0.186008, 0.329136}, {0.186831, 0.633834}, {0.187654,
0.340314}, {0.188477, 0.641821}, {0.1893, 0.329537}, {0.190123,
0.638845}, {0.190947, 0.341317}, {0.19177, 0.653277}, {0.192593,
0.328257}, {0.193416, 0.649191}, {0.194239, 0.331033},
{0.195062, 0.64623}, {0.195885, 0.333114}, {0.196708, 0.656083},
{0.197531, 0.327671}, {0.198354, 0.656129}, {0.199177,
0.330909}, {0.2, 0.646338}, {0.200823, 0.323539}, {0.201646,
0.642622}, {0.202469, 0.32394}, {0.203292, 0.638475}, {0.204115,
0.334656}, {0.204938, 0.6427}, {0.205761, 0.324618}, {0.206584,
0.630982}, {0.207407, 0.338896}, {0.20823, 0.625971}, {0.209053,
0.331927}, {0.209877, 0.640233}, {0.2107, 0.343491}, {0.211523,
0.647032}, {0.212346, 0.334995}, {0.213169, 0.643686},
{0.213992, 0.336768}, {0.214815, 0.655821}, {0.215638, 0.33353},
{0.216461, 0.646446}, {0.217284, 0.345942}, {0.218107,
0.654047}, {0.21893, 0.332035}, {0.219753, 0.644072}, {0.220576,
0.336043}, {0.221399, 0.643995}, {0.222222, 0.331834},
{0.223045, 0.641004}, {0.223868, 0.326715}, {0.224691,
0.639863}, {0.225514, 0.331233}, {0.226337, 0.645644}, {0.22716,
0.333376}, {0.227984, 0.64344}, {0.228807, 0.328751}, {0.22963,
0.646292}, {0.230453, 0.341085}, {0.231276, 0.650301},
{0.232099, 0.332759}, {0.232922, 0.641821}, {0.233745,
0.332112}, {0.234568, 0.639431}, {0.235391, 0.334656},
{0.236214, 0.651935}, {0.237037, 0.333993}, {0.23786, 0.652552},
{0.238683, 0.327872}, {0.239506, 0.643224}, {0.240329,
0.336229}, {0.241152, 0.64953}, {0.241975, 0.336999}, {0.242798,
0.644565}, {0.243621, 0.343953}, {0.244444, 0.652475},
{0.245267, 0.338017}, {0.246091, 0.638737}, {0.246914,
0.337077}, {0.247737, 0.63923}, {0.24856, 0.337817}, {0.249383,
0.645614}, {0.250206, 0.334085}, {0.251029, 0.651997},
{0.251852, 0.346528}, {0.252675, 0.6394}, {0.253498, 0.341209},
{0.254321, 0.657702}, {0.255144, 0.34881}, {0.255967, 0.646292},
{0.25679, 0.337277}, {0.257613, 0.656129}, {0.258436, 0.339636},
{0.259259, 0.645675}, {0.260082, 0.331927}, {0.260905,
0.648034}, {0.261728, 0.334856}, {0.262551, 0.648065},
{0.263374, 0.325436}, {0.264198, 0.651781}, {0.265021,
0.338618}, {0.265844, 0.646755}, {0.266667, 0.33461}, {0.26749,
0.65801}, {0.268313, 0.352541}, {0.269136, 0.645537}, {0.269959,
0.345418}, {0.270782, 0.652768}, {0.271605, 0.348224},
{0.272428, 0.646061}, {0.273251, 0.344832}, {0.274074,
0.646878}, {0.274897, 0.34144}, {0.27572, 0.650378}, {0.276543,
0.336383}, {0.277366, 0.655235}, {0.278189, 0.339559},
{0.279012, 0.648851}, {0.279835, 0.334687}, {0.280658,
0.672796}, {0.281481, 0.343182}, {0.282305, 0.661417},
{0.283128, 0.332297}, {0.283951, 0.668587}, {0.284774,
0.342473}, {0.285597, 0.661448}, {0.28642, 0.340546}, {0.287243,
0.656021}, {0.288066, 0.339744}, {0.288889, 0.655558},
{0.289712, 0.339096}, {0.290535, 0.647726}, {0.291358,
0.334702}, {0.292181, 0.655512}, {0.293004, 0.34588}, {0.293827,
0.647418}, {0.29465, 0.347237}, {0.295473, 0.663453}, {0.296296,
0.338433}, {0.297119, 0.655389}, {0.297942, 0.341795},
{0.298765, 0.648189}, {0.299588, 0.333114}, {0.300412,
0.653384}, {0.301235, 0.336244}, {0.302058, 0.651457},
{0.302881, 0.32374}, {0.303704, 0.658519}, {0.304527, 0.336892},
{0.30535, 0.650532}, {0.306173, 0.328951}, {0.306996, 0.654171},
{0.307819, 0.34198}, {0.308642, 0.648451}, {0.309465, 0.328257},
{0.310288, 0.645028}, {0.311111, 0.33114}, {0.311934, 0.64623},
{0.312757, 0.332235}, {0.31358, 0.660724}, {0.314403, 0.320687},
{0.315226, 0.64916}, {0.316049, 0.336629}, {0.316872, 0.660477},
{0.317695, 0.320147}, {0.318519, 0.66225}, {0.319342, 0.335396},
{0.320165, 0.665149}, {0.320988, 0.329367}, {0.321811,
0.678563}, {0.322634, 0.339173}, {0.323457, 0.651226}, {0.32428,
0.3232}, {0.325103, 0.644981}, {0.325926, 0.314597}, {0.326749,
0.666475}, {0.327572, 0.301953}, {0.328395, 0.732203},
{0.329218, 0.32633}, {0.330041, 0.650532}, {0.330864, 0.329845},
{0.331687, 0.66666}, {0.33251, 0.265936}, {0.333333, 0.735919},
{0.334156, 0.26054}, {0.334979, 0.79141}, {0.335802, 0.383655},
{0.336626, 0.728595}, {0.337449, 0.219897}, {0.338272,
0.818006}, {0.339095, 0.128003}, {0.339918, 0.877891},
{0.340741, 0.157946}, {0.341564, 0.814152}, {0.342387,
0.407831}, {0.34321, 0.752771}, {0.344033, 0.13303}, {0.344856,
0.841597}, {0.345679, 0.125536}, {0.346502, 0.907726},
{0.347325, 0.186192}, {0.348148, 0.793985}, {0.348971, 0.3374},
{0.349794, 0.836832}, {0.350617, 0.0693519}, {0.35144,
0.918288}, {0.352263, 0.0992481}, {0.353086, 0.936882},
{0.353909, 0.324079}, {0.354733, 0.724078}, {0.355556,
0.280244}, {0.356379, 0.838374}, {0.357202, 0.0648034},
{0.358025, 0.93295}, {0.358848, 0.18536}, {0.359671, 0.879773},
{0.360494, 0.353559}, {0.361317, 0.712051}, {0.36214, 0.177481},
{0.362963, 0.862165}, {0.363786, 0.0858649}, {0.364609,
0.925426}, {0.365432, 0.271348}, {0.366255, 0.860577},
{0.367078, 0.349966}, {0.367901, 0.795018}, {0.368724, 0.10264},
{0.369547, 0.880744}, {0.37037, 0.103997}, {0.371193, 0.939657},
{0.372016, 0.270685}, {0.37284, 0.831806}, {0.373663, 0.28137},
{0.374486, 0.818515}, {0.375309, 0.106063}, {0.376132,
0.877506}, {0.376955, 0.146212}, {0.377778, 0.972822},
{0.378601, 0.284299}, {0.379424, 0.795958}, {0.380247,
0.0489533}, {0.38107, 0.838097}, {0.381893, 0.0728827},
{0.382716, 0.92205}, {0.383539, 0.191512}, {0.384362, 0.973516},
{0.385185, 0.283251}, {0.386008, 0.777055}, {0.386831,
0.0368653}, {0.387654, 0.813813}, {0.388477, 0.0805764},
{0.3893, 0.911396}, {0.390123, 0.197309}, {0.390947, 0.951684},
{0.39177, 0.263084}, {0.392593, 0.775205}, {0.393416,
0.0214624}, {0.394239, 0.859451}, {0.395062, 0.0709554},
{0.395885, 0.954613}, {0.396708, 0.192283}, {0.397531,
0.950774}, {0.398354, 0.153922}, {0.399177, 0.835599}, {0.4,
0.0316848}, {0.400823, 0.879742}, {0.401646, 0.0968582},
{0.402469, 0.975952}, {0.403292, 0.209998}, {0.404115,
0.914911}, {0.404938, 0.113063}, {0.405761, 0.849845},
{0.406584, 0.027013}, {0.407407, 0.903733}, {0.40823, 0.11607},
{0.409053, 0.995642}, {0.409877, 0.223644}, {0.4107, 0.777934},
{0.411523, 0.0709862}, {0.412346, 0.87709}, {0.413169,
0.0296187}, {0.413992, 0.967118}, {0.414815, 0.166148},
{0.415638, 0.97549}, {0.416461, 0.155633}, {0.417284, 0.740529},
{0.418107, 0.000231276}, {0.41893, 0.883134}, {0.419753,
0.0534863}, {0.420576, 0.977062}, {0.421399, 0.175477},
{0.422222, 0.859158}, {0.423045, 0.184034}, {0.423868, 0.73376},
{0.424691, 0.0147554}, {0.425514, 0.8819}, {0.426337,
0.0489996}, {0.42716, 0.994485}, {0.427984, 0.1896}, {0.428807,
0.81335}, {0.42963, 0.202197}, {0.430453, 0.72067}, {0.431276,
0.0000616735}, {0.432099, 0.963772}, {0.432922, 0.0481208},
{0.433745, 1.}, {0.434568, 0.182692}, {0.435391, 0.792674},
{0.436214, 0.23695}, {0.437037, 0.752494}, {0.43786, 0.0137224},
{0.438683, 0.987824}, {0.439506, 0.0471956}, {0.440329,
0.99191}, {0.441152, 0.168153}, {0.441975, 0.785921}, {0.442798,
0.183232}, {0.443621, 0.88907}, {0.444444, 0.}, {0.445267,
0.999805}, {0.446091, 0.0570634}, {0.446914, 0.976646},
{0.447737, 0.24119}, {0.44856, 0.747051}, {0.449383, 0.133091},
{0.450206, 0.931023}, {0.451029, 0.0164514}, {0.451852,
0.997199}, {0.452675, 0.0569401}, {0.453498, 0.940043},
{0.454321, 0.258042}, {0.455144, 0.779106}, {0.455967,
0.117843}, {0.45679, 0.966809}, {0.457613, 0.}, {0.458436,
0.993098}, {0.459259, 0.0946226}, {0.460082, 0.915065},
{0.460905, 0.286643}, {0.461728, 0.871909}, {0.462551,
0.0236364}, {0.463374, 0.950928}, {0.464198, 0.0199205},
{0.465021, 1.}, {0.465844, 0.106695}, {0.466667, 0.86309},
{0.46749, 0.243379}, {0.468313, 0.874114}, {0.469136, 0.},
{0.469959, 0.957204}, {0.470782, 0.}, {0.471605, 1.}, {0.472428,
0.220066}, {0.473251, 0.812641}, {0.474074, 0.199884},
{0.474897, 0.880944}, {0.47572, 0.}, {0.476543, 0.969045},
{0.477366, 0.0563233}, {0.478189, 0.98528}, {0.479012,
0.269328}, {0.479835, 0.791055}, {0.480658, 0.161292},
{0.481481, 0.922081}, {0.482305, 0.}, {0.483128, 1.}, {0.483951,
0.149944}, {0.484774, 0.961305}, {0.485597, 0.275927}, {0.48642,
0.88116}, {0.487243, 0.133138}, {0.488066, 0.944946}, {0.488889,
0.0125968}, {0.489712, 1.}, {0.490535, 0.17119}, {0.491358,
0.911133}, {0.492181, 0.312207}, {0.493004, 0.915666},
{0.493827, 0.0321473}, {0.49465, 0.93901}, {0.495473,
0.0373587}, {0.496296, 1.}, {0.497119, 0.196692}, {0.497942,
0.854486}, {0.498765, 0.23752}, {0.499588, 0.942248}, {0.500412,
0.}, {0.501235, 0.963232}, {0.502058, 0.117642}, {0.502881, 1.},
{0.503704, 0.1931}, {0.504527, 0.838328}, {0.50535, 0.},
{0.506173, 0.916252}, {0.506996, 0.}, {0.507819, 0.97956},
{0.508642, 0.110611}, {0.509465, 1.}, {0.510288, 0.213467},
{0.511111, 0.798101}, {0.511934, 0.}, {0.512757, 0.900526},
{0.51358, 0.0373125}, {0.514403, 1.}, {0.515226, 0.134772},
{0.516049, 0.997692}, {0.516872, 0.186655}, {0.517695,
0.807815}, {0.518519, 0.}, {0.519342, 0.910887}, {0.520165,
0.0678254}, {0.520988, 1.}, {0.521811, 0.131472}, {0.522634,
0.998571}, {0.523457, 0.11055}, {0.52428, 0.840055}, {0.525103,
0.}, {0.525926, 0.898444}, {0.526749, 0.0659752}, {0.527572,
1.}, {0.528395, 0.148186}, {0.529218, 0.961644}, {0.530041,
0.115484}, {0.530864, 0.844989}, {0.531687, 0.}, {0.53251,
0.911935}, {0.533333, 0.0772769}, {0.534156, 1.}, {0.534979,
0.179639}, {0.535802, 0.792674}, {0.536626, 0.090105},
{0.537449, 0.878539}, {0.538272, 0.}, {0.539095, 1.}, {0.539918,
0.0721734}, {0.540741, 0.997924}, {0.541564, 0.182076},
{0.542387, 0.780987}, {0.54321, 0.0660832}, {0.544033,
0.888885}, {0.544856, 0.}, {0.545679, 1.}, {0.546502,
0.0806535}, {0.547325, 0.969615}, {0.548148, 0.163342},
{0.548971, 0.753265}, {0.549794, 0.}, {0.550617, 0.944992},
{0.55144, 0.}, {0.552263, 1.}, {0.553086, 0.0962878}, {0.553909,
0.901836}, {0.554733, 0.206714}, {0.555556, 0.77798}, {0.556379,
0.}, {0.557202, 0.993406}, {0.558025, 0.00661448}, {0.558848,
1.}, {0.559671, 0.125691}, {0.560494, 0.860376}, {0.561317,
0.219249}, {0.56214, 0.783099}, {0.562963, 0.}, {0.563786, 1.},
{0.564609, 0.}, {0.565432, 1.}, {0.566255, 0.135065}, {0.567078,
0.822139}, {0.567901, 0.174829}, {0.568724, 0.93773}, {0.569547,
0.}, {0.57037, 1.}, {0.571193, 0.00299116}, {0.572016,
0.997924}, {0.57284, 0.172886}, {0.573663, 0.761097}, {0.574486,
0.136005}, {0.575309, 0.98875}, {0.576132, 0.}, {0.576955, 1.},
{0.577778, 0.0137994}, {0.578601, 0.96277}, {0.579424,
0.253494}, {0.580247, 0.783408}, {0.58107, 0.0296804},
{0.581893, 1.}, {0.582716, 0.}, {0.583539, 1.}, {0.584362,
0.0731139}, {0.585185, 0.920539}, {0.586008, 0.202782},
{0.586831, 0.937884}, {0.587654, 0.}, {0.588477, 0.998078},
{0.5893, 0.}, {0.590123, 1.}, {0.590947, 0.121836}, {0.59177,
0.879464}, {0.592593, 0.157206}, {0.593416, 0.938655},
{0.594239, 0.}, {0.595062, 1.}, {0.595885, 0.}, {0.596708, 1.},
{0.597531, 0.208611}, {0.598354, 0.830773}, {0.599177,
0.108222}, {0.6, 0.945409}, {0.600823, 0.}, {0.601646, 1.},
{0.602469, 0.0168831}, {0.603292, 1.}, {0.604115, 0.204355},
{0.604938, 0.929944}, {0.605761, 0.0790346}, {0.606584,
0.955585}, {0.607407, 0.0172686}, {0.60823, 0.996952},
{0.609053, 0.130393}, {0.609877, 0.940274}, {0.6107, 0.190587},
{0.611523, 0.916992}, {0.612346, 0.0467331}, {0.613169,
0.971157}, {0.613992, 0.0171607}, {0.614815, 1.}, {0.615638,
0.130362}, {0.616461, 0.892354}, {0.617284, 0.14871}, {0.618107,
0.924856}, {0.61893, 0.0346143}, {0.619753, 0.937221},
{0.620576, 0.0751183}, {0.621399, 1.}, {0.622222, 0.124627},
{0.623045, 0.890411}, {0.623868, 0.103149}, {0.624691,
0.906739}, {0.625514, 0.0379292}, {0.626337, 0.948292},
{0.62716, 0.0988935}, {0.627984, 0.956664}, {0.628807, 0.12031},
{0.62963, 0.899138}, {0.630453, 0.0526692}, {0.631276,
0.919968}, {0.632099, 0.0628453}, {0.632922, 0.941939},
{0.633745, 0.082365}, {0.634568, 0.934754}, {0.635391,
0.101175}, {0.636214, 0.92131}, {0.637037, 0.0828121}, {0.63786,
0.917363}, {0.638683, 0.0697527}, {0.639506, 0.951036},
{0.640329, 0.0719884}, {0.641152, 0.938547}, {0.641975,
0.0811932}, {0.642798, 0.9274}, {0.643621, 0.0869134},
{0.644444, 0.902792}, {0.645267, 0.0722659}, {0.646091,
0.935757}, {0.646914, 0.0564158}, {0.647737, 0.939627},
{0.64856, 0.0793121}, {0.649383, 0.931147}, {0.650206,
0.0799597}, {0.651029, 0.901605}, {0.651852, 0.0747174},
{0.652675, 0.943666}, {0.653498, 0.0629224}, {0.654321,
0.938917}, {0.655144, 0.081517}, {0.655967, 0.939966}, {0.65679,
0.0932812}, {0.657613, 0.920153}, {0.658436, 0.0663607},
{0.659259, 0.940505}, {0.660082, 0.0423697}, {0.660905,
0.945054}, {0.661728, 0.0681646}, {0.662551, 0.920647},
{0.663374, 0.0681955}, {0.664198, 0.922034}, {0.665021,
0.0507881}, {0.665844, 0.946997}, {0.666667, 0.0386693},
{0.66749, 0.937499}, {0.668313, 0.0707858}, {0.669136,
0.919583}, {0.669959, 0.0834442}, {0.670782, 0.942356},
{0.671605, 0.051559}, {0.672428, 0.942433}, {0.673251,
0.0628916}, {0.674074, 0.935495}, {0.674897, 0.077354},
{0.67572, 0.90253}, {0.676543, 0.0612726}, {0.677366, 0.94271},
{0.678189, 0.0546427}, {0.679012, 0.940675}, {0.679835,
0.0729443}, {0.680658, 0.927739}, {0.681481, 0.062722},
{0.682305, 0.92629}, {0.683128, 0.0608872}, {0.683951,
0.926968}, {0.684774, 0.0514357}, {0.685597, 0.925673},
{0.68642, 0.070832}, {0.687243, 0.918735}, {0.688066,
0.0890257}, {0.688889, 0.932072}, {0.689712, 0.0740699},
{0.690535, 0.91784}, {0.691358, 0.0695831}, {0.692181,
0.930376}, {0.693004, 0.0824729}, {0.693827, 0.910933},
{0.69465, 0.0763055}, {0.695473, 0.924594}, {0.696296,
0.0678254}, {0.697119, 0.926706}, {0.697942, 0.0693519},
{0.698765, 0.93534}, {0.699588, 0.0667307}, {0.700412,
0.928248}, {0.701235, 0.0828892}, {0.702058, 0.922435},
{0.702881, 0.0645722}, {0.703704, 0.929219}, {0.704527,
0.0646647}, {0.70535, 0.934986}, {0.706173, 0.0873759},
{0.706996, 0.933922}, {0.707819, 0.0827504}, {0.708642,
0.911673}, {0.709465, 0.0731448}, {0.710288, 0.930684},
{0.711111, 0.0651272}, {0.711934, 0.926243}, {0.712757,
0.0662373}, {0.71358, 0.931563}, {0.714403, 0.0804377},
{0.715226, 0.916992}, {0.716049, 0.0679642}, {0.716872,
0.921957}, {0.717695, 0.0542418}, {0.718519, 0.934955},
{0.719342, 0.0794663}, {0.720165, 0.929975}, {0.720988,
0.0666999}, {0.721811, 0.924393}, {0.722634, 0.0739157},
{0.723457, 0.932565}, {0.72428, 0.0829817}, {0.725103, 0.94012},
{0.725926, 0.078572}, {0.726749, 0.9274}, {0.727572, 0.0727131},
{0.728395, 0.927431}, {0.729218, 0.0786491}, {0.730041,
0.930067}, {0.730864, 0.0649576}, {0.731687, 0.935186},
{0.73251, 0.0690126}, {0.733333, 0.938702}, {0.734156,
0.0785412}, {0.734979, 0.933105}, {0.735802, 0.0625369},
{0.736626, 0.933613}, {0.737449, 0.068288}, {0.738272,
0.934523}, {0.739095, 0.0671162}, {0.739918, 0.929096},
{0.740741, 0.0727285}, {0.741564, 0.935294}, {0.742387,
0.0816557}, {0.74321, 0.937314}, {0.744033, 0.0726822},
{0.744856, 0.920107}, {0.745679, 0.0712637}, {0.746502,
0.935263}, {0.747325, 0.081702}, {0.748148, 0.933213},
{0.748971, 0.0651581}, {0.749794, 0.930376}, {0.750617,
0.059407}, {0.75144, 0.932596}, {0.752263, 0.0681646},
{0.753086, 0.92629}, {0.753909, 0.0642021}, {0.754733,
0.926984}, {0.755556, 0.0695215}, {0.756379, 0.928865},
{0.757202, 0.0668541}, {0.758025, 0.924887}, {0.758848,
0.0745633}, {0.759671, 0.93164}, {0.760494, 0.084246},
{0.761317, 0.925581}, {0.76214, 0.0747637}, {0.762963,
0.918133}, {0.763786, 0.0638783}, {0.764609, 0.931748},
{0.765432, 0.0812703}, {0.766255, 0.927862}, {0.767078,
0.0675479}, {0.767901, 0.919583}, {0.768724, 0.0588674},
{0.769547, 0.932519}, {0.77037, 0.0745633}, {0.771193,
0.927832}, {0.772016, 0.0684268}, {0.77284, 0.931902},
{0.773663, 0.0636933}, {0.774486, 0.929636}, {0.775309,
0.0752571}, {0.776132, 0.928895}, {0.776955, 0.0727902},
{0.777778, 0.930715}, {0.778601, 0.0841689}, {0.779424,
0.922266}, {0.780247, 0.0770765}, {0.78107, 0.922697},
{0.781893, 0.0648959}, {0.782716, 0.926089}, {0.783539,
0.0768452}, {0.784362, 0.932719}, {0.785185, 0.0674246},
{0.786008, 0.917763}, {0.786831, 0.0633541}, {0.787654,
0.933613}, {0.788477, 0.0645722}, {0.7893, 0.922882}, {0.790123,
0.0680875}, {0.790947, 0.928294}, {0.79177, 0.0717109},
{0.792593, 0.930684}, {0.793416, 0.0780787}, {0.794239,
0.925781}, {0.795062, 0.0768143}, {0.795885, 0.927199},
{0.796708, 0.085757}, {0.797531, 0.929204}, {0.798354,
0.076028}, {0.799177, 0.921047}, {0.8, 0.0707549}, {0.800823,
0.926829}, {0.801646, 0.0791271}, {0.802469, 0.930915},
{0.803292, 0.0646647}, {0.804115, 0.926521}, {0.804938,
0.0664686}, {0.805761, 0.931254}, {0.806584, 0.0727285},
{0.807407, 0.932488}, {0.80823, 0.0653122}, {0.809053,
0.927477}, {0.809877, 0.0689047}, {0.8107, 0.934153}, {0.811523,
0.0784179}, {0.812346, 0.927832}, {0.813169, 0.0728672},
{0.813992, 0.933829}, {0.814815, 0.0829663}, {0.815638,
0.927816}, {0.816461, 0.0788187}, {0.817284, 0.924393},
{0.818107, 0.0691977}, {0.81893, 0.929281}, {0.819753,
0.074039}, {0.820576, 0.937468}, {0.821399, 0.0652043},
{0.822222, 0.92521}, {0.823045, 0.0656977}, {0.823868,
0.933906}, {0.824691, 0.0706007}, {0.825514, 0.935417},
{0.826337, 0.0679334}, {0.82716, 0.924933}, {0.827984,
0.0651889}, {0.828807, 0.937576}, {0.82963, 0.0747637},
{0.830453, 0.926197}, {0.831276, 0.0761514}, {0.832099,
0.930915}, {0.832922, 0.0831667}, {0.833745, 0.927477},
{0.834568, 0.0781249}, {0.835391, 0.926197}, {0.836214,
0.0700919}, {0.837037, 0.932025}, {0.83786, 0.0749179},
{0.838683, 0.927292}, {0.839506, 0.0601471}, {0.840329,
0.921896}, {0.841152, 0.0624136}, {0.841975, 0.933675},
{0.842798, 0.0757351}, {0.843621, 0.933598}, {0.844444,
0.0638012}, {0.845267, 0.926968}, {0.846091, 0.0681184},
{0.846914, 0.929404}, {0.847737, 0.079235}, {0.84856, 0.925241},
{0.849383, 0.0709399}, {0.850206, 0.930591}, {0.851029,
0.078387}, {0.851852, 0.930561}, {0.852675, 0.0798518},
{0.853498, 0.920153}, {0.854321, 0.072528}, {0.855144,
0.922343}, {0.855967, 0.0720192}, {0.85679, 0.924979},
{0.857613, 0.0662836}, {0.858436, 0.923807}, {0.859259,
0.061766}, {0.860082, 0.9309}, {0.860905, 0.0685809}, {0.861728,
0.932688}, {0.862551, 0.06744}, {0.863374, 0.922821}, {0.864198,
0.069136}, {0.865021, 0.928988}, {0.865844, 0.0788033},
{0.866667, 0.922188}, {0.86749, 0.0764597}, {0.868313, 0.93184},
{0.869136, 0.0767373}, {0.869959, 0.928973}, {0.870782,
0.0750412}, {0.871605, 0.922158}, {0.872428, 0.0707087},
{0.873251, 0.925658}, {0.874074, 0.0786646}, {0.874897,
0.934616}, {0.87572, 0.0677329}, {0.876543, 0.925519},
{0.877366, 0.0648497}, {0.878189, 0.932534}, {0.879012,
0.0774619}, {0.879835, 0.933259}, {0.880658, 0.0652814},
{0.881481, 0.926429}, {0.882305, 0.069506}, {0.883128,
0.929404}, {0.883951, 0.0797438}, {0.884774, 0.92925},
{0.885597, 0.0738078}, {0.88642, 0.922266}, {0.887243,
0.0810081}, {0.888066, 0.921078}, {0.888889, 0.0839068},
{0.889712, 0.913739}, {0.890535, 0.0770456}, {0.891358,
0.921495}, {0.892181, 0.0759509}, {0.893004, 0.930915},
{0.893827, 0.0763055}, {0.89465, 0.913169}, {0.895473,
0.0727593}, {0.896296, 0.923283}, {0.897119, 0.0806227},
{0.897942, 0.913215}, {0.898765, 0.0874068}, {0.899588,
0.896517}, {0.900412, 0.103904}, {0.901235, 0.888715},
{0.902058, 0.121851}, {0.902881, 0.870244}, {0.903704,
0.128975}, {0.904527, 0.848396}, {0.90535, 0.148679}, {0.906173,
0.845266}, {0.906996, 0.170774}, {0.907819, 0.823372},
{0.908642, 0.181875}, {0.909465, 0.816511}, {0.910288,
0.201241}, {0.911111, 0.79272}, {0.911934, 0.204756}, {0.912757,
0.776284}, {0.91358, 0.225648}, {0.914403, 0.76267}, {0.915226,
0.246324}, {0.916049, 0.745401}, {0.916872, 0.251628},
{0.917695, 0.732219}, {0.918519, 0.279551}, {0.919342,
0.719606}, {0.920165, 0.304775}, {0.920988, 0.707811},
{0.921811, 0.310403}, {0.922634, 0.692331}, {0.923457,
0.320456}, {0.92428, 0.681431}, {0.925103, 0.352742}, {0.925926,
0.670406}, {0.926749, 0.358015}, {0.927572, 0.651226},
{0.928395, 0.370951}, {0.929218, 0.643609}, {0.930041,
0.393076}, {0.930864, 0.634775}, {0.931687, 0.396823}, {0.93251,
0.631691}, {0.933333, 0.405411}, {0.934156, 0.617999},
{0.934979, 0.411131}, {0.935802, 0.614453}, {0.936626,
0.420567}, {0.937449, 0.609319}, {0.938272, 0.428322},
{0.939095, 0.603414}, {0.939918, 0.435292}, {0.940741,
0.602797}, {0.941564, 0.435461}, {0.942387, 0.606004}, {0.94321,
0.442199}, {0.944033, 0.597832}, {0.944856, 0.444866},
{0.945679, 0.596213}, {0.946502, 0.442708}, {0.947325, 0.59959},
{0.948148, 0.449708}, {0.948971, 0.594826}, {0.949794, 0.45017},
{0.950617, 0.591418}, {0.95144, 0.454349}, {0.952263, 0.591202},
{0.953086, 0.449831}, {0.953909, 0.584634}, {0.954733,
0.456168}, {0.955556, 0.580517}, {0.956379, 0.456893},
{0.957202, 0.578205}, {0.958025, 0.45956}, {0.958848, 0.571266},
{0.959671, 0.464093}, {0.960494, 0.571837}, {0.961317,
0.465142}, {0.96214, 0.567982}, {0.962963, 0.466452}, {0.963786,
0.562539}, {0.964609, 0.469798}, {0.965432, 0.558376},
{0.966255, 0.476628}, {0.967078, 0.556634}, {0.967901, 0.47945},
{0.968724, 0.555987}, {0.969547, 0.482611}, {0.97037, 0.54615},
{0.971193, 0.486542}, {0.972016, 0.544885}, {0.97284, 0.488053},
{0.973663, 0.543575}, {0.974486, 0.492062}, {0.975309,
0.536775}, {0.976132, 0.492124}, {0.976955, 0.537222},
{0.977778, 0.496564}, {0.978601, 0.536559}, {0.979424,
0.496179}, {0.980247, 0.529236}, {0.98107, 0.498646}, {0.981893,
0.525258}, {0.982716, 0.50378}, {0.983539, 0.524518}, {0.984362,
0.501976}, {0.985185, 0.527231}, {0.986008, 0.500033},
{0.986831, 0.527725}, {0.987654, 0.500126}, {0.988477,
0.527694}, {0.9893, 0.499586}, {0.990123, 0.528927}, {0.990947,
0.502624}, {0.99177, 0.532582}, {0.992593, 0.50432}, {0.993416,
0.528295}, {0.994239, 0.499154}, {0.995062, 0.527293},
{0.995885, 0.497767}, {0.996708, 0.530037}, {0.997531,
0.502038}, {0.998354, 0.527879}, {0.999177, 0.501745}, {1.,
0.531548}}]}, AspectRatio -> Full, PlotRange ->
{Automatic, {0, 1}}, PlotRangePadding -> None], {0, 0}, {0,
0}, NCache[{-----, 1}, {1.76717, 1}]], AspectRatio ->
NCache[--, 0.171429], Background -> GrayLevel[1], Frame ->
True, FrameStyle -> GrayLevel[0.75], FrameTicks -> False,
ImagePadding -> None, PlotRange -> NCache[{{0, -----}, {0,
1}}, {{0, 1.76717}, {0, 1}}], PlotRangePadding ->
{Scaled[0.0171429], Scaled[0.1]}], {180, -100},
ImageScaled[{0.5, 0.5}], {350, 60}, Background ->
GrayLevel[0.9]]},
InsetBox[StyleBox[TemplateBox[{StyleBox[StringReplace[StringTake[System`Convert`CommonDump`ConvertText["
| ", System`Convert`HTMLDump`htmlsave, HTMLEntities ->
{HTMLBasic}, AltMathOutput -> PlotLabel, WindowSize ->
{2000, Automatic}, MathOutput -> PNG, ConvertClosed ->
False, ConvertReverseClosed -> False, ConvertLinkedNotebooks
-> False, CharacterEncoding -> Automatic,
ConversionStyleEnvironment -> None, ConversionRules ->
Automatic, HeadAttributes -> {}, HeadElements -> {}, CSS
-> Automatic, ConvertLinkedNotebooks -> False, MathOutput
-> GIF, GraphicsOutput -> GIF, Graphics3DOutput ->
Automatic, ManipulateOutput -> CDF, ConvertClosed -> True,
ConvertReverseClosed -> False, FullDocument -> True,
AltMathOutput -> FileName, TableOutput -> {TextForm,
Automatic}, AnimationOutput -> Automatic, FilesDirectory
-> HTMLFiles, LinksDirectory -> HTMLLinks, HTMLEntities
-> {HTML}, AllowBlockMathML -> False, ShowStyles ->
True, DataUri -> False, MathMLOptions ->
{UseUnicodePlane1Characters -> False,
IncludeMarkupAnnotations -> False, Entities -> MathML}],
{2, -2}], {System`Convert`CommonDump`ConvertText[\n,
System`Convert`HTMLDump`htmlsave, HTMLEntities ->
{HTMLBasic}, AltMathOutput -> PlotLabel, WindowSize ->
{2000, Automatic}, MathOutput -> PNG, ConvertClosed ->
False, ConvertReverseClosed -> False, ConvertLinkedNotebooks
-> False, CharacterEncoding -> Automatic,
ConversionStyleEnvironment -> None, ConversionRules ->
Automatic, HeadAttributes -> {}, HeadElements -> {}, CSS
-> Automatic, ConvertLinkedNotebooks -> False, MathOutput
-> GIF, GraphicsOutput -> GIF, Graphics3DOutput ->
Automatic, ManipulateOutput -> CDF, ConvertClosed -> True,
ConvertReverseClosed -> False, FullDocument -> True,
AltMathOutput -> FileName, TableOutput -> {TextForm,
Automatic}, AnimationOutput -> Automatic, FilesDirectory
-> HTMLFiles, LinksDirectory -> HTMLLinks, HTMLEntities
-> {HTML}, AllowBlockMathML -> False, ShowStyles ->
True, DataUri -> False, MathMLOptions ->
{UseUnicodePlane1Characters -> False,
IncludeMarkupAnnotations -> False, Entities -> MathML}]
-> System`Convert`CommonDump`ConvertText[,
System`Convert`HTMLDump`htmlsave, HTMLEntities ->
{HTMLBasic}, AltMathOutput -> PlotLabel, WindowSize ->
{2000, Automatic}, MathOutput -> PNG, ConvertClosed ->
False, ConvertReverseClosed -> False, ConvertLinkedNotebooks
-> False, CharacterEncoding -> Automatic,
ConversionStyleEnvironment -> None, ConversionRules ->
Automatic, HeadAttributes -> {}, HeadElements -> {}, CSS
-> Automatic, ConvertLinkedNotebooks -> False, MathOutput
-> GIF, GraphicsOutput -> GIF, Graphics3DOutput ->
Automatic, ManipulateOutput -> CDF, ConvertClosed -> True,
ConvertReverseClosed -> False, FullDocument -> True,
AltMathOutput -> FileName, TableOutput -> {TextForm,
Automatic}, AnimationOutput -> Automatic, FilesDirectory
-> HTMLFiles, LinksDirectory -> HTMLLinks, HTMLEntities
-> {HTML}, AllowBlockMathML -> False, ShowStyles ->
True, DataUri -> False, MathMLOptions ->
{UseUnicodePlane1Characters -> False,
IncludeMarkupAnnotations -> False, Entities -> MathML}],
System`Convert`CommonDump`ConvertText[\r,
System`Convert`HTMLDump`htmlsave, HTMLEntities ->
{HTMLBasic}, AltMathOutput -> PlotLabel, WindowSize ->
{2000, Automatic}, MathOutput -> PNG, ConvertClosed ->
False, ConvertReverseClosed -> False, ConvertLinkedNotebooks
-> False, CharacterEncoding -> Automatic,
ConversionStyleEnvironment -> None, ConversionRules ->
Automatic, HeadAttributes -> {}, HeadElements -> {}, CSS
-> Automatic, ConvertLinkedNotebooks -> False, MathOutput
-> GIF, GraphicsOutput -> GIF, Graphics3DOutput ->
Automatic, ManipulateOutput -> CDF, ConvertClosed -> True,
ConvertReverseClosed -> False, FullDocument -> True,
AltMathOutput -> FileName, TableOutput -> {TextForm,
Automatic}, AnimationOutput -> Automatic, FilesDirectory
-> HTMLFiles, LinksDirectory -> HTMLLinks, HTMLEntities
-> {HTML}, AllowBlockMathML -> False, ShowStyles ->
True, DataUri -> False, MathMLOptions ->
{UseUnicodePlane1Characters -> False,
IncludeMarkupAnnotations -> False, Entities -> MathML}]
-> System`Convert`CommonDump`ConvertText[<br />,
System`Convert`HTMLDump`htmlsave, HTMLEntities ->
{HTMLBasic}, AltMathOutput -> PlotLabel, WindowSize ->
{2000, Automatic}, MathOutput -> PNG, ConvertClosed ->
False, ConvertReverseClosed -> False, ConvertLinkedNotebooks
-> False, CharacterEncoding -> Automatic,
ConversionStyleEnvironment -> None, ConversionRules ->
Automatic, HeadAttributes -> {}, HeadElements -> {}, CSS
-> Automatic, ConvertLinkedNotebooks -> False, MathOutput
-> GIF, GraphicsOutput -> GIF, Graphics3DOutput ->
Automatic, ManipulateOutput -> CDF, ConvertClosed -> True,
ConvertReverseClosed -> False, FullDocument -> True,
AltMathOutput -> FileName, TableOutput -> {TextForm,
Automatic}, AnimationOutput -> Automatic, FilesDirectory
-> HTMLFiles, LinksDirectory -> HTMLLinks, HTMLEntities
-> {HTML}, AllowBlockMathML -> False, ShowStyles ->
True, DataUri -> False, MathMLOptions ->
{UseUnicodePlane1Characters -> False,
IncludeMarkupAnnotations -> False, Entities -> MathML}],
System`Convert`CommonDump`ConvertText[\t,
System`Convert`HTMLDump`htmlsave, HTMLEntities ->
{HTMLBasic}, AltMathOutput -> PlotLabel, WindowSize ->
{2000, Automatic}, MathOutput -> PNG, ConvertClosed ->
False, ConvertReverseClosed -> False, ConvertLinkedNotebooks
-> False, CharacterEncoding -> Automatic,
ConversionStyleEnvironment -> None, ConversionRules ->
Automatic, HeadAttributes -> {}, HeadElements -> {}, CSS
-> Automatic, ConvertLinkedNotebooks -> False, MathOutput
-> GIF, GraphicsOutput -> GIF, Graphics3DOutput ->
Automatic, ManipulateOutput -> CDF, ConvertClosed -> True,
ConvertReverseClosed -> False, FullDocument -> True,
AltMathOutput -> FileName, TableOutput -> {TextForm,
Automatic}, AnimationOutput -> Automatic, FilesDirectory
-> HTMLFiles, LinksDirectory -> HTMLLinks, HTMLEntities
-> {HTML}, AllowBlockMathML -> False, ShowStyles ->
True, DataUri -> False, MathMLOptions ->
{UseUnicodePlane1Characters -> False,
IncludeMarkupAnnotations -> False, Entities -> MathML}]
->
System`Convert`CommonDump`ConvertText[ ,
System`Convert`HTMLDump`htmlsave, HTMLEntities ->
{HTMLBasic}, AltMathOutput -> PlotLabel, WindowSize ->
{2000, Automatic}, MathOutput -> PNG, ConvertClosed ->
False, ConvertReverseClosed -> False, ConvertLinkedNotebooks
-> False, CharacterEncoding -> Automatic,
ConversionStyleEnvironment -> None, ConversionRules ->
Automatic, HeadAttributes -> {}, HeadElements -> {}, CSS
-> Automatic, ConvertLinkedNotebooks -> False, MathOutput
-> GIF, GraphicsOutput -> GIF, Graphics3DOutput ->
Automatic, ManipulateOutput -> CDF, ConvertClosed -> True,
ConvertReverseClosed -> False, FullDocument -> True,
AltMathOutput -> FileName, TableOutput -> {TextForm,
Automatic}, AnimationOutput -> Automatic, FilesDirectory
-> HTMLFiles, LinksDirectory -> HTMLLinks, HTMLEntities
-> {HTML}, AllowBlockMathML -> False, ShowStyles ->
True, DataUri -> False, MathMLOptions ->
{UseUnicodePlane1Characters -> False,
IncludeMarkupAnnotations -> False, Entities -> MathML}]}],
FontSize -> 14, FontColor -> GrayLevel[0.75], StripOnInput
-> False],
TemplateBox[{StringReplace[StringTake[System`Convert`CommonDump`ConvertText["1.77",
System`Convert`HTMLDump`htmlsave, HTMLEntities ->
{HTMLBasic}, AltMathOutput -> PlotLabel, WindowSize ->
{2000, Automatic}, MathOutput -> PNG, ConvertClosed ->
False, ConvertReverseClosed -> False, ConvertLinkedNotebooks
-> False, CharacterEncoding -> Automatic,
ConversionStyleEnvironment -> None, ConversionRules ->
Automatic, HeadAttributes -> {}, HeadElements -> {}, CSS
-> Automatic, ConvertLinkedNotebooks -> False, MathOutput
-> GIF, GraphicsOutput -> GIF, Graphics3DOutput ->
Automatic, ManipulateOutput -> CDF, ConvertClosed -> True,
ConvertReverseClosed -> False, FullDocument -> True,
AltMathOutput -> FileName, TableOutput -> {TextForm,
Automatic}, AnimationOutput -> Automatic, FilesDirectory
-> HTMLFiles, LinksDirectory -> HTMLLinks, HTMLEntities
-> {HTML}, AllowBlockMathML -> False, ShowStyles ->
True, DataUri -> False, MathMLOptions ->
{UseUnicodePlane1Characters -> False,
IncludeMarkupAnnotations -> False, Entities -> MathML}],
{2, -2}], {System`Convert`CommonDump`ConvertText[\n,
System`Convert`HTMLDump`htmlsave, HTMLEntities ->
{HTMLBasic}, AltMathOutput -> PlotLabel, WindowSize ->
{2000, Automatic}, MathOutput -> PNG, ConvertClosed ->
False, ConvertReverseClosed -> False, ConvertLinkedNotebooks
-> False, CharacterEncoding -> Automatic,
ConversionStyleEnvironment -> None, ConversionRules ->
Automatic, HeadAttributes -> {}, HeadElements -> {}, CSS
-> Automatic, ConvertLinkedNotebooks -> False, MathOutput
-> GIF, GraphicsOutput -> GIF, Graphics3DOutput ->
Automatic, ManipulateOutput -> CDF, ConvertClosed -> True,
ConvertReverseClosed -> False, FullDocument -> True,
AltMathOutput -> FileName, TableOutput -> {TextForm,
Automatic}, AnimationOutput -> Automatic, FilesDirectory
-> HTMLFiles, LinksDirectory -> HTMLLinks, HTMLEntities
-> {HTML}, AllowBlockMathML -> False, ShowStyles ->
True, DataUri -> False, MathMLOptions ->
{UseUnicodePlane1Characters -> False,
IncludeMarkupAnnotations -> False, Entities -> MathML}]
-> System`Convert`CommonDump`ConvertText[,
System`Convert`HTMLDump`htmlsave, HTMLEntities ->
{HTMLBasic}, AltMathOutput -> PlotLabel, WindowSize ->
{2000, Automatic}, MathOutput -> PNG, ConvertClosed ->
False, ConvertReverseClosed -> False, ConvertLinkedNotebooks
-> False, CharacterEncoding -> Automatic,
ConversionStyleEnvironment -> None, ConversionRules ->
Automatic, HeadAttributes -> {}, HeadElements -> {}, CSS
-> Automatic, ConvertLinkedNotebooks -> False, MathOutput
-> GIF, GraphicsOutput -> GIF, Graphics3DOutput ->
Automatic, ManipulateOutput -> CDF, ConvertClosed -> True,
ConvertReverseClosed -> False, FullDocument -> True,
AltMathOutput -> FileName, TableOutput -> {TextForm,
Automatic}, AnimationOutput -> Automatic, FilesDirectory
-> HTMLFiles, LinksDirectory -> HTMLLinks, HTMLEntities
-> {HTML}, AllowBlockMathML -> False, ShowStyles ->
True, DataUri -> False, MathMLOptions ->
{UseUnicodePlane1Characters -> False,
IncludeMarkupAnnotations -> False, Entities -> MathML}],
System`Convert`CommonDump`ConvertText[\r,
System`Convert`HTMLDump`htmlsave, HTMLEntities ->
{HTMLBasic}, AltMathOutput -> PlotLabel, WindowSize ->
{2000, Automatic}, MathOutput -> PNG, ConvertClosed ->
False, ConvertReverseClosed -> False, ConvertLinkedNotebooks
-> False, CharacterEncoding -> Automatic,
ConversionStyleEnvironment -> None, ConversionRules ->
Automatic, HeadAttributes -> {}, HeadElements -> {}, CSS
-> Automatic, ConvertLinkedNotebooks -> False, MathOutput
-> GIF, GraphicsOutput -> GIF, Graphics3DOutput ->
Automatic, ManipulateOutput -> CDF, ConvertClosed -> True,
ConvertReverseClosed -> False, FullDocument -> True,
AltMathOutput -> FileName, TableOutput -> {TextForm,
Automatic}, AnimationOutput -> Automatic, FilesDirectory
-> HTMLFiles, LinksDirectory -> HTMLLinks, HTMLEntities
-> {HTML}, AllowBlockMathML -> False, ShowStyles ->
True, DataUri -> False, MathMLOptions ->
{UseUnicodePlane1Characters -> False,
IncludeMarkupAnnotations -> False, Entities -> MathML}]
-> System`Convert`CommonDump`ConvertText[<br />,
System`Convert`HTMLDump`htmlsave, HTMLEntities ->
{HTMLBasic}, AltMathOutput -> PlotLabel, WindowSize ->
{2000, Automatic}, MathOutput -> PNG, ConvertClosed ->
False, ConvertReverseClosed -> False, ConvertLinkedNotebooks
-> False, CharacterEncoding -> Automatic,
ConversionStyleEnvironment -> None, ConversionRules ->
Automatic, HeadAttributes -> {}, HeadElements -> {}, CSS
-> Automatic, ConvertLinkedNotebooks -> False, MathOutput
-> GIF, GraphicsOutput -> GIF, Graphics3DOutput ->
Automatic, ManipulateOutput -> CDF, ConvertClosed -> True,
ConvertReverseClosed -> False, FullDocument -> True,
AltMathOutput -> FileName, TableOutput -> {TextForm,
Automatic}, AnimationOutput -> Automatic, FilesDirectory
-> HTMLFiles, LinksDirectory -> HTMLLinks, HTMLEntities
-> {HTML}, AllowBlockMathML -> False, ShowStyles ->
True, DataUri -> False, MathMLOptions ->
{UseUnicodePlane1Characters -> False,
IncludeMarkupAnnotations -> False, Entities -> MathML}],
System`Convert`CommonDump`ConvertText[\t,
System`Convert`HTMLDump`htmlsave, HTMLEntities ->
{HTMLBasic}, AltMathOutput -> PlotLabel, WindowSize ->
{2000, Automatic}, MathOutput -> PNG, ConvertClosed ->
False, ConvertReverseClosed -> False, ConvertLinkedNotebooks
-> False, CharacterEncoding -> Automatic,
ConversionStyleEnvironment -> None, ConversionRules ->
Automatic, HeadAttributes -> {}, HeadElements -> {}, CSS
-> Automatic, ConvertLinkedNotebooks -> False, MathOutput
-> GIF, GraphicsOutput -> GIF, Graphics3DOutput ->
Automatic, ManipulateOutput -> CDF, ConvertClosed -> True,
ConvertReverseClosed -> False, FullDocument -> True,
AltMathOutput -> FileName, TableOutput -> {TextForm,
Automatic}, AnimationOutput -> Automatic, FilesDirectory
-> HTMLFiles, LinksDirectory -> HTMLLinks, HTMLEntities
-> {HTML}, AllowBlockMathML -> False, ShowStyles ->
True, DataUri -> False, MathMLOptions ->
{UseUnicodePlane1Characters -> False,
IncludeMarkupAnnotations -> False, Entities -> MathML}]
->
System`Convert`CommonDump`ConvertText[ ,
System`Convert`HTMLDump`htmlsave, HTMLEntities ->
{HTMLBasic}, AltMathOutput -> PlotLabel, WindowSize ->
{2000, Automatic}, MathOutput -> PNG, ConvertClosed ->
False, ConvertReverseClosed -> False, ConvertLinkedNotebooks
-> False, CharacterEncoding -> Automatic,
ConversionStyleEnvironment -> None, ConversionRules ->
Automatic, HeadAttributes -> {}, HeadElements -> {}, CSS
-> Automatic, ConvertLinkedNotebooks -> False, MathOutput
-> GIF, GraphicsOutput -> GIF, Graphics3DOutput ->
Automatic, ManipulateOutput -> CDF, ConvertClosed -> True,
ConvertReverseClosed -> False, FullDocument -> True,
AltMathOutput -> FileName, TableOutput -> {TextForm,
Automatic}, AnimationOutput -> Automatic, FilesDirectory
-> HTMLFiles, LinksDirectory -> HTMLLinks, HTMLEntities
-> {HTML}, AllowBlockMathML -> False, ShowStyles ->
True, DataUri -> False, MathMLOptions ->
{UseUnicodePlane1Characters -> False,
IncludeMarkupAnnotations -> False, Entities -> MathML}]}],
StringReplace[StringTake[System`Convert`CommonDump`ConvertText["
s", System`Convert`HTMLDump`htmlsave, HTMLEntities ->
{HTMLBasic}, AltMathOutput -> PlotLabel, WindowSize ->
{2000, Automatic}, MathOutput -> PNG, ConvertClosed ->
False, ConvertReverseClosed -> False, ConvertLinkedNotebooks
-> False, CharacterEncoding -> Automatic,
ConversionStyleEnvironment -> None, ConversionRules ->
Automatic, HeadAttributes -> {}, HeadElements -> {}, CSS
-> Automatic, ConvertLinkedNotebooks -> False, MathOutput
-> GIF, GraphicsOutput -> GIF, Graphics3DOutput ->
Automatic, ManipulateOutput -> CDF, ConvertClosed -> True,
ConvertReverseClosed -> False, FullDocument -> True,
AltMathOutput -> FileName, TableOutput -> {TextForm,
Automatic}, AnimationOutput -> Automatic, FilesDirectory
-> HTMLFiles, LinksDirectory -> HTMLLinks, HTMLEntities
-> {HTML}, AllowBlockMathML -> False, ShowStyles ->
True, DataUri -> False, MathMLOptions ->
{UseUnicodePlane1Characters -> False,
IncludeMarkupAnnotations -> False, Entities -> MathML}],
{2, -2}], {System`Convert`CommonDump`ConvertText[\n,
System`Convert`HTMLDump`htmlsave, HTMLEntities ->
{HTMLBasic}, AltMathOutput -> PlotLabel, WindowSize ->
{2000, Automatic}, MathOutput -> PNG, ConvertClosed ->
False, ConvertReverseClosed -> False, ConvertLinkedNotebooks
-> False, CharacterEncoding -> Automatic,
ConversionStyleEnvironment -> None, ConversionRules ->
Automatic, HeadAttributes -> {}, HeadElements -> {}, CSS
-> Automatic, ConvertLinkedNotebooks -> False, MathOutput
-> GIF, GraphicsOutput -> GIF, Graphics3DOutput ->
Automatic, ManipulateOutput -> CDF, ConvertClosed -> True,
ConvertReverseClosed -> False, FullDocument -> True,
AltMathOutput -> FileName, TableOutput -> {TextForm,
Automatic}, AnimationOutput -> Automatic, FilesDirectory
-> HTMLFiles, LinksDirectory -> HTMLLinks, HTMLEntities
-> {HTML}, AllowBlockMathML -> False, ShowStyles ->
True, DataUri -> False, MathMLOptions ->
{UseUnicodePlane1Characters -> False,
IncludeMarkupAnnotations -> False, Entities -> MathML}]
-> System`Convert`CommonDump`ConvertText[,
System`Convert`HTMLDump`htmlsave, HTMLEntities ->
{HTMLBasic}, AltMathOutput -> PlotLabel, WindowSize ->
{2000, Automatic}, MathOutput -> PNG, ConvertClosed ->
False, ConvertReverseClosed -> False, ConvertLinkedNotebooks
-> False, CharacterEncoding -> Automatic,
ConversionStyleEnvironment -> None, ConversionRules ->
Automatic, HeadAttributes -> {}, HeadElements -> {}, CSS
-> Automatic, ConvertLinkedNotebooks -> False, MathOutput
-> GIF, GraphicsOutput -> GIF, Graphics3DOutput ->
Automatic, ManipulateOutput -> CDF, ConvertClosed -> True,
ConvertReverseClosed -> False, FullDocument -> True,
AltMathOutput -> FileName, TableOutput -> {TextForm,
Automatic}, AnimationOutput -> Automatic, FilesDirectory
-> HTMLFiles, LinksDirectory -> HTMLLinks, HTMLEntities
-> {HTML}, AllowBlockMathML -> False, ShowStyles ->
True, DataUri -> False, MathMLOptions ->
{UseUnicodePlane1Characters -> False,
IncludeMarkupAnnotations -> False, Entities -> MathML}],
System`Convert`CommonDump`ConvertText[\r,
System`Convert`HTMLDump`htmlsave, HTMLEntities ->
{HTMLBasic}, AltMathOutput -> PlotLabel, WindowSize ->
{2000, Automatic}, MathOutput -> PNG, ConvertClosed ->
False, ConvertReverseClosed -> False, ConvertLinkedNotebooks
-> False, CharacterEncoding -> Automatic,
ConversionStyleEnvironment -> None, ConversionRules ->
Automatic, HeadAttributes -> {}, HeadElements -> {}, CSS
-> Automatic, ConvertLinkedNotebooks -> False, MathOutput
-> GIF, GraphicsOutput -> GIF, Graphics3DOutput ->
Automatic, ManipulateOutput -> CDF, ConvertClosed -> True,
ConvertReverseClosed -> False, FullDocument -> True,
AltMathOutput -> FileName, TableOutput -> {TextForm,
Automatic}, AnimationOutput -> Automatic, FilesDirectory
-> HTMLFiles, LinksDirectory -> HTMLLinks, HTMLEntities
-> {HTML}, AllowBlockMathML -> False, ShowStyles ->
True, DataUri -> False, MathMLOptions ->
{UseUnicodePlane1Characters -> False,
IncludeMarkupAnnotations -> False, Entities -> MathML}]
-> System`Convert`CommonDump`ConvertText[<br />,
System`Convert`HTMLDump`htmlsave, HTMLEntities ->
{HTMLBasic}, AltMathOutput -> PlotLabel, WindowSize ->
{2000, Automatic}, MathOutput -> PNG, ConvertClosed ->
False, ConvertReverseClosed -> False, ConvertLinkedNotebooks
-> False, CharacterEncoding -> Automatic,
ConversionStyleEnvironment -> None, ConversionRules ->
Automatic, HeadAttributes -> {}, HeadElements -> {}, CSS
-> Automatic, ConvertLinkedNotebooks -> False, MathOutput
-> GIF, GraphicsOutput -> GIF, Graphics3DOutput ->
Automatic, ManipulateOutput -> CDF, ConvertClosed -> True,
ConvertReverseClosed -> False, FullDocument -> True,
AltMathOutput -> FileName, TableOutput -> {TextForm,
Automatic}, AnimationOutput -> Automatic, FilesDirectory
-> HTMLFiles, LinksDirectory -> HTMLLinks, HTMLEntities
-> {HTML}, AllowBlockMathML -> False, ShowStyles ->
True, DataUri -> False, MathMLOptions ->
{UseUnicodePlane1Characters -> False,
IncludeMarkupAnnotations -> False, Entities -> MathML}],
System`Convert`CommonDump`ConvertText[\t,
System`Convert`HTMLDump`htmlsave, HTMLEntities ->
{HTMLBasic}, AltMathOutput -> PlotLabel, WindowSize ->
{2000, Automatic}, MathOutput -> PNG, ConvertClosed ->
False, ConvertReverseClosed -> False, ConvertLinkedNotebooks
-> False, CharacterEncoding -> Automatic,
ConversionStyleEnvironment -> None, ConversionRules ->
Automatic, HeadAttributes -> {}, HeadElements -> {}, CSS
-> Automatic, ConvertLinkedNotebooks -> False, MathOutput
-> GIF, GraphicsOutput -> GIF, Graphics3DOutput ->
Automatic, ManipulateOutput -> CDF, ConvertClosed -> True,
ConvertReverseClosed -> False, FullDocument -> True,
AltMathOutput -> FileName, TableOutput -> {TextForm,
Automatic}, AnimationOutput -> Automatic, FilesDirectory
-> HTMLFiles, LinksDirectory -> HTMLLinks, HTMLEntities
-> {HTML}, AllowBlockMathML -> False, ShowStyles ->
True, DataUri -> False, MathMLOptions ->
{UseUnicodePlane1Characters -> False,
IncludeMarkupAnnotations -> False, Entities -> MathML}]
->
System`Convert`CommonDump`ConvertText[ ,
System`Convert`HTMLDump`htmlsave, HTMLEntities ->
{HTMLBasic}, AltMathOutput -> PlotLabel, WindowSize ->
{2000, Automatic}, MathOutput -> PNG, ConvertClosed ->
False, ConvertReverseClosed -> False, ConvertLinkedNotebooks
-> False, CharacterEncoding -> Automatic,
ConversionStyleEnvironment -> None, ConversionRules ->
Automatic, HeadAttributes -> {}, HeadElements -> {}, CSS
-> Automatic, ConvertLinkedNotebooks -> False, MathOutput
-> GIF, GraphicsOutput -> GIF, Graphics3DOutput ->
Automatic, ManipulateOutput -> CDF, ConvertClosed -> True,
ConvertReverseClosed -> False, FullDocument -> True,
AltMathOutput -> FileName, TableOutput -> {TextForm,
Automatic}, AnimationOutput -> Automatic, FilesDirectory
-> HTMLFiles, LinksDirectory -> HTMLLinks, HTMLEntities
-> {HTML}, AllowBlockMathML -> False, ShowStyles ->
True, DataUri -> False, MathMLOptions ->
{UseUnicodePlane1Characters -> False,
IncludeMarkupAnnotations -> False, Entities ->
MathML}]}]}, System`Convert`CommonDump`ConvertText[RowDefault,
System`Convert`HTMLDump`htmlsave, HTMLEntities ->
{HTMLBasic}, AltMathOutput -> PlotLabel, WindowSize ->
{2000, Automatic}, MathOutput -> PNG, ConvertClosed ->
False, ConvertReverseClosed -> False, ConvertLinkedNotebooks
-> False, CharacterEncoding -> Automatic,
ConversionStyleEnvironment -> None, ConversionRules ->
Automatic, HeadAttributes -> {}, HeadElements -> {}, CSS
-> Automatic, ConvertLinkedNotebooks -> False, MathOutput
-> GIF, GraphicsOutput -> GIF, Graphics3DOutput ->
Automatic, ManipulateOutput -> CDF, ConvertClosed -> True,
ConvertReverseClosed -> False, FullDocument -> True,
AltMathOutput -> FileName, TableOutput -> {TextForm,
Automatic}, AnimationOutput -> Automatic, FilesDirectory
-> HTMLFiles, LinksDirectory -> HTMLLinks, HTMLEntities
-> {HTML}, AllowBlockMathML -> False, ShowStyles ->
True, DataUri -> False, MathMLOptions ->
{UseUnicodePlane1Characters -> False,
IncludeMarkupAnnotations -> False, Entities -> MathML}]],
TemplateBox[{System`Convert`CommonDump`ConvertText[11025,
System`Convert`HTMLDump`htmlsave, HTMLEntities ->
{HTMLBasic}, AltMathOutput -> PlotLabel, WindowSize ->
{2000, Automatic}, MathOutput -> PNG, ConvertClosed ->
False, ConvertReverseClosed -> False, ConvertLinkedNotebooks
-> False, CharacterEncoding -> Automatic,
ConversionStyleEnvironment -> None, ConversionRules ->
Automatic, HeadAttributes -> {}, HeadElements -> {}, CSS
-> Automatic, ConvertLinkedNotebooks -> False, MathOutput
-> GIF, GraphicsOutput -> GIF, Graphics3DOutput ->
Automatic, ManipulateOutput -> CDF, ConvertClosed -> True,
ConvertReverseClosed -> False, FullDocument -> True,
AltMathOutput -> FileName, TableOutput -> {TextForm,
Automatic}, AnimationOutput -> Automatic, FilesDirectory
-> HTMLFiles, LinksDirectory -> HTMLLinks, HTMLEntities
-> {HTML}, AllowBlockMathML -> False, ShowStyles ->
True, DataUri -> False, MathMLOptions ->
{UseUnicodePlane1Characters -> False,
IncludeMarkupAnnotations -> False, Entities -> MathML}],
StringReplace[StringTake[System`Convert`CommonDump`ConvertText["
Hz", System`Convert`HTMLDump`htmlsave, HTMLEntities ->
{HTMLBasic}, AltMathOutput -> PlotLabel, WindowSize ->
{2000, Automatic}, MathOutput -> PNG, ConvertClosed ->
False, ConvertReverseClosed -> False, ConvertLinkedNotebooks
-> False, CharacterEncoding -> Automatic,
ConversionStyleEnvironment -> None, ConversionRules ->
Automatic, HeadAttributes -> {}, HeadElements -> {}, CSS
-> Automatic, ConvertLinkedNotebooks -> False, MathOutput
-> GIF, GraphicsOutput -> GIF, Graphics3DOutput ->
Automatic, ManipulateOutput -> CDF, ConvertClosed -> True,
ConvertReverseClosed -> False, FullDocument -> True,
AltMathOutput -> FileName, TableOutput -> {TextForm,
Automatic}, AnimationOutput -> Automatic, FilesDirectory
-> HTMLFiles, LinksDirectory -> HTMLLinks, HTMLEntities
-> {HTML}, AllowBlockMathML -> False, ShowStyles ->
True, DataUri -> False, MathMLOptions ->
{UseUnicodePlane1Characters -> False,
IncludeMarkupAnnotations -> False, Entities -> MathML}],
{2, -2}], {System`Convert`CommonDump`ConvertText[\n,
System`Convert`HTMLDump`htmlsave, HTMLEntities ->
{HTMLBasic}, AltMathOutput -> PlotLabel, WindowSize ->
{2000, Automatic}, MathOutput -> PNG, ConvertClosed ->
False, ConvertReverseClosed -> False, ConvertLinkedNotebooks
-> False, CharacterEncoding -> Automatic,
ConversionStyleEnvironment -> None, ConversionRules ->
Automatic, HeadAttributes -> {}, HeadElements -> {}, CSS
-> Automatic, ConvertLinkedNotebooks -> False, MathOutput
-> GIF, GraphicsOutput -> GIF, Graphics3DOutput ->
Automatic, ManipulateOutput -> CDF, ConvertClosed -> True,
ConvertReverseClosed -> False, FullDocument -> True,
AltMathOutput -> FileName, TableOutput -> {TextForm,
Automatic}, AnimationOutput -> Automatic, FilesDirectory
-> HTMLFiles, LinksDirectory -> HTMLLinks, HTMLEntities
-> {HTML}, AllowBlockMathML -> False, ShowStyles ->
True, DataUri -> False, MathMLOptions ->
{UseUnicodePlane1Characters -> False,
IncludeMarkupAnnotations -> False, Entities -> MathML}]
-> System`Convert`CommonDump`ConvertText[,
System`Convert`HTMLDump`htmlsave, HTMLEntities ->
{HTMLBasic}, AltMathOutput -> PlotLabel, WindowSize ->
{2000, Automatic}, MathOutput -> PNG, ConvertClosed ->
False, ConvertReverseClosed -> False, ConvertLinkedNotebooks
-> False, CharacterEncoding -> Automatic,
ConversionStyleEnvironment -> None, ConversionRules ->
Automatic, HeadAttributes -> {}, HeadElements -> {}, CSS
-> Automatic, ConvertLinkedNotebooks -> False, MathOutput
-> GIF, GraphicsOutput -> GIF, Graphics3DOutput ->
Automatic, ManipulateOutput -> CDF, ConvertClosed -> True,
ConvertReverseClosed -> False, FullDocument -> True,
AltMathOutput -> FileName, TableOutput -> {TextForm,
Automatic}, AnimationOutput -> Automatic, FilesDirectory
-> HTMLFiles, LinksDirectory -> HTMLLinks, HTMLEntities
-> {HTML}, AllowBlockMathML -> False, ShowStyles ->
True, DataUri -> False, MathMLOptions ->
{UseUnicodePlane1Characters -> False,
IncludeMarkupAnnotations -> False, Entities -> MathML}],
System`Convert`CommonDump`ConvertText[\r,
System`Convert`HTMLDump`htmlsave, HTMLEntities ->
{HTMLBasic}, AltMathOutput -> PlotLabel, WindowSize ->
{2000, Automatic}, MathOutput -> PNG, ConvertClosed ->
False, ConvertReverseClosed -> False, ConvertLinkedNotebooks
-> False, CharacterEncoding -> Automatic,
ConversionStyleEnvironment -> None, ConversionRules ->
Automatic, HeadAttributes -> {}, HeadElements -> {}, CSS
-> Automatic, ConvertLinkedNotebooks -> False, MathOutput
-> GIF, GraphicsOutput -> GIF, Graphics3DOutput ->
Automatic, ManipulateOutput -> CDF, ConvertClosed -> True,
ConvertReverseClosed -> False, FullDocument -> True,
AltMathOutput -> FileName, TableOutput -> {TextForm,
Automatic}, AnimationOutput -> Automatic, FilesDirectory
-> HTMLFiles, LinksDirectory -> HTMLLinks, HTMLEntities
-> {HTML}, AllowBlockMathML -> False, ShowStyles ->
True, DataUri -> False, MathMLOptions ->
{UseUnicodePlane1Characters -> False,
IncludeMarkupAnnotations -> False, Entities -> MathML}]
-> System`Convert`CommonDump`ConvertText[<br />,
System`Convert`HTMLDump`htmlsave, HTMLEntities ->
{HTMLBasic}, AltMathOutput -> PlotLabel, WindowSize ->
{2000, Automatic}, MathOutput -> PNG, ConvertClosed ->
False, ConvertReverseClosed -> False, ConvertLinkedNotebooks
-> False, CharacterEncoding -> Automatic,
ConversionStyleEnvironment -> None, ConversionRules ->
Automatic, HeadAttributes -> {}, HeadElements -> {}, CSS
-> Automatic, ConvertLinkedNotebooks -> False, MathOutput
-> GIF, GraphicsOutput -> GIF, Graphics3DOutput ->
Automatic, ManipulateOutput -> CDF, ConvertClosed -> True,
ConvertReverseClosed -> False, FullDocument -> True,
AltMathOutput -> FileName, TableOutput -> {TextForm,
Automatic}, AnimationOutput -> Automatic, FilesDirectory
-> HTMLFiles, LinksDirectory -> HTMLLinks, HTMLEntities
-> {HTML}, AllowBlockMathML -> False, ShowStyles ->
True, DataUri -> False, MathMLOptions ->
{UseUnicodePlane1Characters -> False,
IncludeMarkupAnnotations -> False, Entities -> MathML}],
System`Convert`CommonDump`ConvertText[\t,
System`Convert`HTMLDump`htmlsave, HTMLEntities ->
{HTMLBasic}, AltMathOutput -> PlotLabel, WindowSize ->
{2000, Automatic}, MathOutput -> PNG, ConvertClosed ->
False, ConvertReverseClosed -> False, ConvertLinkedNotebooks
-> False, CharacterEncoding -> Automatic,
ConversionStyleEnvironment -> None, ConversionRules ->
Automatic, HeadAttributes -> {}, HeadElements -> {}, CSS
-> Automatic, ConvertLinkedNotebooks -> False, MathOutput
-> GIF, GraphicsOutput -> GIF, Graphics3DOutput ->
Automatic, ManipulateOutput -> CDF, ConvertClosed -> True,
ConvertReverseClosed -> False, FullDocument -> True,
AltMathOutput -> FileName, TableOutput -> {TextForm,
Automatic}, AnimationOutput -> Automatic, FilesDirectory
-> HTMLFiles, LinksDirectory -> HTMLLinks, HTMLEntities
-> {HTML}, AllowBlockMathML -> False, ShowStyles ->
True, DataUri -> False, MathMLOptions ->
{UseUnicodePlane1Characters -> False,
IncludeMarkupAnnotations -> False, Entities -> MathML}]
->
System`Convert`CommonDump`ConvertText[ ,
System`Convert`HTMLDump`htmlsave, HTMLEntities ->
{HTMLBasic}, AltMathOutput -> PlotLabel, WindowSize ->
{2000, Automatic}, MathOutput -> PNG, ConvertClosed ->
False, ConvertReverseClosed -> False, ConvertLinkedNotebooks
-> False, CharacterEncoding -> Automatic,
ConversionStyleEnvironment -> None, ConversionRules ->
Automatic, HeadAttributes -> {}, HeadElements -> {}, CSS
-> Automatic, ConvertLinkedNotebooks -> False, MathOutput
-> GIF, GraphicsOutput -> GIF, Graphics3DOutput ->
Automatic, ManipulateOutput -> CDF, ConvertClosed -> True,
ConvertReverseClosed -> False, FullDocument -> True,
AltMathOutput -> FileName, TableOutput -> {TextForm,
Automatic}, AnimationOutput -> Automatic, FilesDirectory
-> HTMLFiles, LinksDirectory -> HTMLLinks, HTMLEntities
-> {HTML}, AllowBlockMathML -> False, ShowStyles ->
True, DataUri -> False, MathMLOptions ->
{UseUnicodePlane1Characters -> False,
IncludeMarkupAnnotations -> False, Entities ->
MathML}]}]}, System`Convert`CommonDump`ConvertText[RowDefault,
System`Convert`HTMLDump`htmlsave, HTMLEntities ->
{HTMLBasic}, AltMathOutput -> PlotLabel, WindowSize ->
{2000, Automatic}, MathOutput -> PNG, ConvertClosed ->
False, ConvertReverseClosed -> False, ConvertLinkedNotebooks
-> False, CharacterEncoding -> Automatic,
ConversionStyleEnvironment -> None, ConversionRules ->
Automatic, HeadAttributes -> {}, HeadElements -> {}, CSS
-> Automatic, ConvertLinkedNotebooks -> False, MathOutput
-> GIF, GraphicsOutput -> GIF, Graphics3DOutput ->
Automatic, ManipulateOutput -> CDF, ConvertClosed -> True,
ConvertReverseClosed -> False, FullDocument -> True,
AltMathOutput -> FileName, TableOutput -> {TextForm,
Automatic}, AnimationOutput -> Automatic, FilesDirectory
-> HTMLFiles, LinksDirectory -> HTMLLinks, HTMLEntities
-> {HTML}, AllowBlockMathML -> False, ShowStyles ->
True, DataUri -> False, MathMLOptions ->
{UseUnicodePlane1Characters -> False,
IncludeMarkupAnnotations -> False, Entities -> MathML}]]},
System`Convert`CommonDump`ConvertText[RowWithSeparator,
System`Convert`HTMLDump`htmlsave, HTMLEntities ->
{HTMLBasic}, AltMathOutput -> PlotLabel, WindowSize ->
{2000, Automatic}, MathOutput -> PNG, ConvertClosed ->
False, ConvertReverseClosed -> False, ConvertLinkedNotebooks
-> False, CharacterEncoding -> Automatic,
ConversionStyleEnvironment -> None, ConversionRules ->
Automatic, HeadAttributes -> {}, HeadElements -> {}, CSS
-> Automatic, ConvertLinkedNotebooks -> False, MathOutput
-> GIF, GraphicsOutput -> GIF, Graphics3DOutput ->
Automatic, ManipulateOutput -> CDF, ConvertClosed -> True,
ConvertReverseClosed -> False, FullDocument -> True,
AltMathOutput -> FileName, TableOutput -> {TextForm,
Automatic}, AnimationOutput -> Automatic, FilesDirectory
-> HTMLFiles, LinksDirectory -> HTMLLinks, HTMLEntities
-> {HTML}, AllowBlockMathML -> False, ShowStyles ->
True, DataUri -> False, MathMLOptions ->
{UseUnicodePlane1Characters -> False,
IncludeMarkupAnnotations -> False, Entities -> MathML}]],
System`Convert`CommonDump`ConvertText[DialogStyle,
System`Convert`HTMLDump`htmlsave, HTMLEntities ->
{HTMLBasic}, AltMathOutput -> PlotLabel, WindowSize ->
{2000, Automatic}, MathOutput -> PNG, ConvertClosed ->
False, ConvertReverseClosed -> False, ConvertLinkedNotebooks
-> False, CharacterEncoding -> Automatic,
ConversionStyleEnvironment -> None, ConversionRules ->
Automatic, HeadAttributes -> {}, HeadElements -> {}, CSS
-> Automatic, ConvertLinkedNotebooks -> False, MathOutput
-> GIF, GraphicsOutput -> GIF, Graphics3DOutput ->
Automatic, ManipulateOutput -> CDF, ConvertClosed -> True,
ConvertReverseClosed -> False, FullDocument -> True,
AltMathOutput -> FileName, TableOutput -> {TextForm,
Automatic}, AnimationOutput -> Automatic, FilesDirectory
-> HTMLFiles, LinksDirectory -> HTMLLinks, HTMLEntities
-> {HTML}, AllowBlockMathML -> False, ShowStyles ->
True, DataUri -> False, MathMLOptions ->
{UseUnicodePlane1Characters -> False,
IncludeMarkupAnnotations -> False, Entities -> MathML}],
StripOnInput -> False], {355, -159}, Scaled[{1, 0}]],
TagBox[TooltipBox[TagBox[{{GrayLevel[0.9], RectangleBox[{5,
-158}, {29, -135}]}, {GrayLevel[0.3], PolygonBox[NCache[{{13,
-153}, {13, -140}, {21, -(---)}, {13, -153}}, {{13, -153}, {13,
-140}, {21, -146.5}, {13, -153}}]]}, {GrayLevel[0.5],
StyleBox[LineBox[{{5, -158}, {5, -135}, {29, -135}, {29, -158},
{5, -158}}], Antialiasing -> False]}},
EventHandlerTag[{System`Convert`CommonDump`ConvertText[MouseClicked,
System`Convert`HTMLDump`htmlsave, HTMLEntities ->
{HTMLBasic}, AltMathOutput -> PlotLabel, WindowSize ->
{2000, Automatic}, MathOutput -> PNG, ConvertClosed ->
False, ConvertReverseClosed -> False, ConvertLinkedNotebooks
-> False, CharacterEncoding -> Automatic,
ConversionStyleEnvironment -> None, ConversionRules ->
Automatic, HeadAttributes -> {}, HeadElements -> {}, CSS
-> Automatic, ConvertLinkedNotebooks -> False, MathOutput
-> GIF, GraphicsOutput -> GIF, Graphics3DOutput ->
Automatic, ManipulateOutput -> CDF, ConvertClosed -> True,
ConvertReverseClosed -> False, FullDocument -> True,
AltMathOutput -> FileName, TableOutput -> {TextForm,
Automatic}, AnimationOutput -> Automatic, FilesDirectory
-> HTMLFiles, LinksDirectory -> HTMLLinks, HTMLEntities
-> {HTML}, AllowBlockMathML -> False, ShowStyles ->
True, DataUri -> False, MathMLOptions ->
{UseUnicodePlane1Characters -> False,
IncludeMarkupAnnotations -> False, Entities -> MathML}]
:> FEPrivate`EmitSound[SampledSoundList[{{-0.0428012,
-0.0415677, -0.0421228, -0.0444047, -0.0451139, -0.0454223,
-0.0450523, -0.0453298, -0.0438188, -0.0431712, -0.0442505,
-0.0453298, -0.0450214, -0.0434179, -0.0432637, -0.0428012,
-0.0434179, -0.0428937, -0.0439422, -0.0448056, -0.0427395,
-0.042277, -0.0402726, -0.0373123, -0.0386999, -0.039255,
-0.0367881, -0.037559, -0.0371889, -0.038114, -0.0379599,
-0.0382374, -0.0387308, -0.0370964, -0.0387308, -0.0378057,
-0.0356471, -0.0351537, -0.0361713, -0.0384841, -0.0411669,
-0.040951, -0.0410127, -0.0418144, -0.0402726, -0.0387308,
-0.03981, -0.0417836, -0.0407043, -0.039255, -0.0405501,
-0.0391625, -0.0379599, -0.0404268, -0.0424312, -0.0445897,
-0.0432637, -0.0415677, -0.0421845, -0.0400876, -0.040581,
-0.0425545, -0.0448056, -0.04681, -0.0442505, -0.0406426,
-0.0435721, -0.0421228, -0.0430479, -0.0441272, -0.0438188,
-0.0442505, -0.0419378, -0.0401801, -0.0419378, -0.0434796,
-0.0451139, -0.0435721, -0.0402726, -0.0399334, -0.0401801,
-0.0442505, -0.0441888, -0.0408585, -0.0384224, -0.0384841,
-0.038114, -0.0391625, -0.0394092, -0.0385766, -0.0387924,
-0.0378673, -0.0390083, -0.0421228, -0.0456382, -0.0423386,
-0.0389466, -0.0404268, -0.0397175, -0.0386999, -0.0399334,
-0.0411669, -0.0423386, -0.0427087, -0.0391625, -0.0366956,
-0.0374048, -0.035863, -0.0360171, -0.0382682, -0.0366339,
-0.0376515, -0.0390391, -0.0383916, -0.039625, -0.0411052,
-0.0417836, -0.0416294, -0.0403343, -0.0403959, -0.0385766,
-0.0402418, -0.0399642, -0.0384841, -0.0385766, -0.0404268,
-0.0395634, -0.0393475, -0.0388849, -0.0398717, -0.0434179,
-0.0438188, -0.0425853, -0.0408893, -0.0403343, -0.0407968,
-0.0368497, -0.0387308, -0.0412594, -0.040581, -0.042092,
-0.0425545, -0.0411052, -0.042277, -0.0419686, -0.0390083,
-0.0374048, -0.0374665, -0.0383916, -0.0400259, -0.0423386,
-0.0408585, -0.0411669, -0.0398717, -0.0381757, -0.040581,
-0.0405501, -0.0399642, -0.0394092, -0.0397175, -0.0386383,
-0.0349995, -0.0365414, -0.0401801, -0.0394092, -0.0378673,
-0.0359555, -0.0352462, -0.0391933, -0.0381757, -0.037929,
-0.0374973, -0.0364797, -0.0383299, -0.0373123, -0.0356471,
-0.0372506, -0.0368497, -0.0339511, -0.035092, -0.0368497,
-0.0360788, -0.0378673, -0.0417836, -0.0421228, -0.0396559,
-0.0360171, -0.0329952, -0.0351537, -0.0357705, -0.0339511,
-0.0354929, -0.0391008, -0.0401184, -0.0373123, -0.0377132,
-0.0367881, -0.0363255, -0.0366956, -0.0323784, -0.034722,
-0.0377132, -0.0358013, -0.0362638, -0.0366339, -0.0343211,
-0.033026, -0.0341669, -0.0319467, -0.0324093, -0.0344753,
-0.0324093, -0.0314842, -0.0325326, -0.0343211, -0.0373123,
-0.0397792, -0.0379599, -0.039255, -0.0415677, -0.0385766,
-0.0401801, -0.0424928, -0.0417219, -0.0371581, -0.0355546,
-0.0383916, -0.0362638, -0.0367881, -0.0407043, -0.041321,
-0.0408893, -0.0367881, -0.0340744, -0.035092, -0.039625,
-0.0408585, -0.0411669, -0.0428937, -0.0400259, -0.0377132,
-0.0417219, -0.0411977, -0.0400259, -0.0416294, -0.0391008,
-0.0362638, -0.0337044, -0.0320701, -0.0336427, -0.0367264,
-0.0395017, -0.0397175, -0.0378057, -0.0370039, -0.034537,
-0.0385457, -0.0408893, -0.0357088, -0.0359246, -0.0346295,
-0.0332419, -0.0336427, -0.0310833, -0.0334577, -0.0354621,
-0.0334885, -0.0316075, -0.0310833, -0.032841, -0.0325326,
-0.0324093, -0.0360171, -0.0381757, -0.0377132, -0.0360171,
-0.0352462, -0.0368497, -0.0373123, -0.0354621, -0.0382682,
-0.0404885, -0.0393167, -0.0393167, -0.0386383, -0.0378673,
-0.0374048, -0.0373123, -0.0370964, -0.0341669, -0.0342286,
-0.0354929, -0.0349995, -0.0360788, -0.0350304, -0.0376206,
-0.0368806, -0.0325326, -0.0317, -0.0317617, -0.0308366,
-0.0305282, -0.0308366, -0.0308674, -0.0315458, -0.0321626,
-0.0340128, -0.0361097, -0.0382682, -0.0382682, -0.0381757,
-0.0385457, -0.0387308, -0.0404268, -0.0417219, -0.0404885,
-0.0384224, -0.0393475, -0.0376515, -0.035863, -0.0360788,
-0.0382682, -0.0393475, -0.0377748, -0.035863, -0.0362638,
-0.0363872, -0.0342286, -0.0361097, -0.039625, -0.0414135,
-0.0393167, -0.0393167, -0.039625, -0.0351846, -0.0366956,
-0.0390083, -0.037929, -0.0386383, -0.0393475, -0.0386999,
-0.0381757, -0.0357088, -0.0348762, -0.0384841, -0.0378673,
-0.036418, -0.0371581, -0.0372506, -0.037929, -0.0376206,
-0.0402418, -0.0377748, -0.0354621, -0.0357705, -0.0363872,
-0.0397175, -0.0413519, -0.042092, -0.0402418, -0.0387924,
-0.0393167, -0.0371581, -0.0385457, -0.0411052, -0.041321,
-0.0420303, -0.0417219, -0.0388849, -0.0387924, -0.0394708,
-0.037559, -0.0361097, -0.0374048, -0.0377132, -0.0378673,
-0.038114, -0.0378057, -0.0366339, -0.0370348, -0.0377748,
-0.0370348, -0.035092, -0.0336119, -0.0359246, -0.0351537,
-0.0344136, -0.0366339, -0.0385457, -0.0370348, -0.0347837,
-0.0339511, -0.0346295, -0.0355546, -0.0365722, -0.0370348,
-0.0354929, -0.0343211, -0.0333344, -0.033396, -0.0366956,
-0.0369422, -0.034722, -0.0339203, -0.0322551, -0.0311758,
-0.0334885, -0.0341053, -0.0317925, -0.0293873, -0.0314533,
-0.0307749, -0.0290172, -0.0342286, -0.0339203, -0.0319467,
-0.0302507, -0.0311758, -0.0351846, -0.0352462, -0.0351537,
-0.0321626, -0.0313917, -0.0314842, -0.0329335, -0.0342286,
-0.0333035, -0.0321009, -0.0312991, -0.0354621, -0.0343828,
-0.0307133, -0.0325326, -0.0303124, -0.0284005, -0.0333035,
-0.0357088, -0.0360788, -0.0347837, -0.0336427, -0.033026,
-0.0311758, -0.0297573, -0.0292948, -0.0321626, -0.0357705,
-0.0344753, -0.0361097, -0.0365722, -0.0314842, -0.0269203,
-0.0267662, -0.0291714, -0.0302199, -0.0310833, -0.033026,
-0.0327793, -0.0324093, -0.0320084, -0.0349995, -0.0358013,
-0.0308674, -0.0270129, -0.0257794, -0.0268587, -0.0288322,
-0.0308674, -0.0330877, -0.0354004, -0.034722, -0.0321009,
-0.032841, -0.0357705, -0.0364797, -0.0322551, -0.0310833,
-0.03133, -0.0278454, -0.0297882, -0.0317617, -0.0304049,
-0.0308366, -0.0321009, -0.0318542, -0.0297882, -0.0304049,
-0.0339511, -0.0346295, -0.036233, -0.0340128, -0.0306824,
-0.0324093, -0.036418, -0.0384224, -0.0360171, -0.0346295,
-0.0334577, -0.0334885, -0.0342595, -0.0343211, -0.0380832,
-0.0387308, -0.0339203, -0.0341053, -0.0366339, -0.0322551,
-0.0318542, -0.032841, -0.0336119, -0.0325326, -0.0307749,
-0.034722, -0.0342595, -0.0334577, -0.0336427, -0.0322242,
-0.0318542, -0.028678, -0.0280921, -0.0318542, -0.0337044,
-0.0316075, -0.0315458, -0.0317925, -0.0318542, -0.0324709,
-0.0336427, -0.0329952, -0.0324093, -0.0330877, -0.0316383,
-0.0295415, -0.0322242, -0.0298498, -0.0283697, -0.031145,
-0.0315458, -0.0342595, -0.0339511, -0.0301582, -0.0307133,
-0.0312991, -0.028678, -0.0268278, -0.0260569, -0.0262419,
-0.0274446, -0.0300657, -0.0332419, -0.0321626, -0.0328718,
-0.0325634, -0.0314842, -0.0296956, -0.0280921, -0.0284622,
-0.0262419, -0.0257486, -0.0299423, -0.0312991, -0.0320701,
-0.0314533, -0.0270745, -0.0262419, -0.0272904, -0.0297573,
-0.0314842, -0.0317617, -0.0284005, -0.0264578, -0.0291406,
-0.0290172, -0.030004, -0.0327793, -0.0299423, -0.0289864,
-0.0302199, -0.029634, -0.0314842, -0.0311758, -0.0301582,
-0.0309908, -0.032841, -0.0353387, -0.0344136, -0.0327176,
-0.0350304, -0.0314842, -0.0318542, -0.0336119, -0.0322551,
-0.0333344, -0.0354621, -0.0367264, -0.0337661, -0.0327793,
-0.0351846, -0.0344753, -0.0378057, -0.0376206, -0.0361713,
-0.0380832, -0.0382682, -0.036233, -0.0363872, -0.0354004,
-0.0331493, -0.0359246, -0.0365722, -0.0352462, -0.0349995,
-0.0366339, -0.0371581, -0.0359246, -0.0349379, -0.0344753,
-0.0326868, -0.0313917, -0.0297882, -0.0313917, -0.0345678,
-0.033396, -0.033396, -0.0322551, -0.0310216, -0.033026,
-0.0329952, -0.0327176, -0.0335502, -0.0303124, -0.030004,
-0.0341053, -0.0348762, -0.0346295, -0.0349379, -0.0361097,
-0.036418, -0.0354621, -0.0355546, -0.0364797, -0.0345678,
-0.0316383, -0.0324709, -0.0324709, -0.0317925, -0.0324093,
-0.0326868, -0.0333344, -0.0343828, -0.0340744, -0.035092,
-0.0333035, -0.0299115, -0.0306824, -0.0317925, -0.0321009,
-0.0340744, -0.0333344, -0.0323784, -0.0325634, -0.0328718,
-0.0343828, -0.0370348, -0.0366339, -0.0357705, -0.0334577,
-0.0303124, -0.0306824, -0.0305591, -0.0312991, -0.0348762,
-0.0315458, -0.0297573, -0.0313917, -0.0288322, -0.0302507,
-0.0322551, -0.0336119, -0.0312991, -0.0274754, -0.0309908,
-0.0285239, -0.028678, -0.0308674, -0.0285239, -0.0274754,
-0.0257794, -0.0238367, -0.0276296, -0.030004, -0.0291714,
-0.0300657, -0.0297573, -0.0296031, -0.0283697, -0.027938,
-0.026612, -0.0236825, -0.0240834, -0.025286, -0.0249776,
-0.0264578, -0.0266737, -0.026982, -0.0235283, -0.0226032,
-0.0256869, -0.0244534, -0.0243917, -0.0272287, -0.0257794,
-0.0260878, -0.0264578, -0.0255944, -0.0287705, -0.0295415,
-0.0262419, -0.0273212, -0.026982, -0.0277529, -0.0288631,
-0.0293256, -0.030374, -0.0306824, -0.03133, -0.0275988,
-0.0266737, -0.028308, -0.0275988, -0.0294798, -0.029634,
-0.0284622, -0.0301582, -0.0335502, -0.0296031, -0.0256869,
-0.0276296, -0.0247618, -0.0260878, -0.0257486, -0.0256869,
-0.0238367, -0.0241451, -0.0274754, -0.0297573, -0.0304666,
-0.0273212, -0.0271362, -0.0256252, -0.0243609, -0.0274754,
-0.0260569, -0.026612, -0.0273829, -0.0257794, -0.0267662,
-0.0287089, -0.0290172, -0.0290172, -0.0315458, -0.0284622,
-0.0242992, -0.0251627, -0.0253785, -0.0269203, -0.0299115,
-0.0272287, -0.0279071, -0.0302199, -0.0274446, -0.0284005,
-0.0331802, -0.0329335, -0.0316075, -0.0309291, -0.0276296,
-0.0240834, -0.0228191, -0.0245151, -0.0263653, -0.0253168,
-0.0242992, -0.0263036, -0.0274754, -0.0275371, -0.0291406,
-0.0285547, -0.027938, -0.024916, -0.0239909, -0.026612,
-0.0230658, -0.0231583, -0.0265503, -0.023775, -0.0254402,
-0.0284622, -0.0308366, -0.0316383, -0.0282155, -0.0280921,
-0.0280613, -0.0226649, -0.0199204, -0.0229733, -0.0275988,
-0.0262419, -0.0251318, -0.0324709, -0.0368806, -0.0414752,
-0.0331493, -0.0203522, -0.0230658, -0.020753, -0.0128897,
-0.0135681, -0.00841839, -0.00462549, -0.0141232, -0.0103919,
-0.00826421, -0.0121805, -0.0219248, -0.0415061, -0.0363872,
-0.0242992, -0.0321009, -0.0333035, -0.0282155, -0.025286,
-0.0176077, -0.0151408, -0.0219248, -0.0228499, -0.0200746,
-0.017731, -0.0319159, -0.0482901, -0.0461932, -0.0567085,
-0.0557526, -0.0594838, -0.0455765, -0.0337661, -0.0384224,
-0.0312375, -0.0278454, -0.030004, -0.0151408, -0.0100836,
-0.0225107, -0.0141232, -0.0273212, -0.0323784, -0.044343,
-0.0602547, -0.0346912, -0.025286, -0.025286, -0.0151099,
-0.0088501, -0.00348454, 0.0111012, 0.0110087, 0.0104228,
0.00971353, -0.00302199, -0.00394708, -0.0320701, -0.0358013,
-0.0482593, -0.0589287, -0.058682, -0.0671929, -0.0343211,
-0.036418, -0.0345678, -0.0361713, -0.0399642, -0.0311758,
-0.0161275, -0.0305591, -0.0456382, -0.0263961, -0.0311758,
-0.0377748, -0.0634, -0.0416602, -0.00299115, -0.0125813,
0.00163434, 0.020753, 0.0272904, 0.0368806, 0.0451139,
0.0307749, 0.00986771, 0.00400876, 0.00718493, -0.0126738,
-0.0632459, -0.0693515, -0.0909988, -0.0984304, -0.104197,
-0.0903204, -0.0719726, -0.104752, -0.0970119, -0.0907521,
-0.0826729, -0.0650035, -0.0536248, -0.0711092, -0.0699682,
-0.0585587, -0.0519905, -0.0614573, -0.0514971, 0.0110087,
0.02396, 0.0397175, 0.0724968, 0.0933115, 0.108113, 0.11243,
0.133553, 0.124919, 0.0921706, 0.0630608, 0.0610873,
-0.00792501, -0.0562151, -0.0878535, -0.138826, -0.123069,
-0.126769, -0.110827, -0.132011, -0.167813, -0.14854, -0.137346,
-0.134201, -0.117981, -0.11499, -0.102717, -0.104814, -0.102963,
-0.0835363, -0.108977, -0.0268587, 0.0304357, 0.032841,
0.0950692, 0.142897, 0.181165, 0.204447, 0.205002, 0.2005,
0.181689, 0.123223, 0.119615, 0.0578495, -0.0499553, -0.0817478,
-0.134725, -0.150298, -0.155416, -0.140276, -0.138611,
-0.194209, -0.194887, -0.189892, -0.189553, -0.174998,
-0.188658, -0.19279, -0.149157, -0.182707, -0.155632, -0.142619,
-0.125166, 0.000832588, 0.0369422, 0.0920164, 0.189152,
0.248389, 0.285485, 0.317278, 0.280613, 0.277252, 0.226433,
0.188627, 0.175152, 0.0181319, -0.0467174, -0.088316, -0.131333,
-0.185112, -0.174813, -0.132412, -0.194733, -0.266829,
-0.244997, -0.231521, -0.252798, -0.234821, -0.272996,
-0.221869, -0.222949, -0.243085, -0.188319, -0.203676,
-0.0706466, 0.0202596, 0.0608406, 0.161738, 0.271455, 0.346172,
0.380215, 0.375651, 0.309784, 0.32767, 0.268618, 0.245644,
0.121681, -0.00425545, -0.0132906, -0.0885319, -0.140831,
-0.176509, -0.119985, -0.132659, -0.228962, -0.263375,
-0.224213, -0.244103, -0.254248, -0.26282, -0.263345, -0.210922,
-0.27756, -0.249931, -0.231213, -0.185636, -0.0289247,
0.0147399, 0.124919, 0.22042, 0.312005, 0.372259, 0.390607,
0.348423, 0.305467, 0.266428, 0.214253, 0.181998, 0.00354621,
0.000400876, -0.0324709, -0.117056, -0.144531, -0.12532,
-0.0511271, -0.104505, -0.174535, -0.178698, -0.180764,
-0.229301, -0.241759, -0.259675, -0.205063, -0.264115,
-0.308798, -0.269789, -0.282741, -0.115206, -0.0267662,
0.0269203, 0.137254, 0.242622, 0.325912, 0.35792, 0.340467,
0.249468, 0.247464, 0.179592, 0.171051, 0.0261186, -0.0337044,
0.040951, -0.053594, -0.0960868, -0.107651, 0.0081717,
0.0301582, -0.0572327, -0.0957785, -0.12239, -0.203522,
-0.210151, -0.260199, -0.248111, -0.217151, -0.354621,
-0.323445, -0.36048, -0.258102, -0.0742545, -0.052268,
0.0868359, 0.172962, 0.233587, 0.30408, 0.345432, 0.30115,
0.268988, 0.176848, 0.164482, 0.107496, -0.0508187, 0.0763514,
0.0775849, -0.0440963, -0.0691048, 0.0238059, 0.120941,
0.0764439, -0.0150483, -0.0468716, -0.122946, -0.230689,
-0.198495, -0.260816, -0.191341, -0.283481, -0.378673,
-0.376977, -0.400012, -0.153782, -0.0889327, -0.0380215,
0.053964, 0.150668, 0.198958, 0.234605, 0.249776, 0.187147,
0.182553, 0.0879768, 0.10688, -0.0418761, 0.0117796, 0.156002,
0.016035, -0.0471183, 0.00114095, 0.181597, 0.184403, 0.105554,
0.0330877, 0.000678405, -0.164791, -0.18024, -0.198187,
-0.210367, -0.143298, -0.360449, -0.36455, -0.443615, -0.329242,
-0.0839064, -0.103118, -0.0175152, 0.056431, 0.127263, 0.153998,
0.203922, 0.193931, 0.154707, 0.0487218, 0.0484443, 0.0325326,
-0.0642326, 0.124796, 0.142588, -0.0135989, -0.00360788,
0.150606, 0.256036, 0.236918, 0.108668, 0.043788, -0.056986,
-0.206297, -0.162478, -0.232045, -0.159394, -0.271763,
-0.419008, -0.402818, -0.442289, -0.178051, -0.0954084,
-0.0770298, 0.00407043, 0.0789109, 0.121003, 0.167104, 0.240895,
0.159734, 0.121835, 0.0308366, 0.104043, -0.0373431, 0.0352462,
0.214715, 0.0560609, -0.0126738, 0.0543649, 0.249406, 0.233649,
0.181597, 0.049061, -0.0182861, -0.188412, -0.226279, -0.198372,
-0.273027, -0.180641, -0.375343, -0.417281, -0.487619,
-0.382744, -0.0913072, -0.100188, -0.0214623, 0.0361097,
0.0910605, 0.164328, 0.234204, 0.223504, 0.172808, 0.0729286,
0.105862, 0.0944833, -0.0110395, 0.142958, 0.185544, 0.0181936,
-0.00333035, 0.153011, 0.245552, 0.238274, 0.0869284,
0.00262111, -0.0980912, -0.267384, -0.180147, -0.260138,
-0.180918, -0.28012, -0.448611, -0.406334, -0.472756, -0.194949,
-0.0753338, -0.0498319, 0.0153566, 0.109254, 0.164791, 0.223411,
0.308088, 0.207777, 0.197971, 0.0764131, 0.154399, 0.0431712,
0.0495852, 0.206698, 0.0579111, -0.00903512, 0.0444355,
0.173209, 0.17728, 0.155139, -0.02359, -0.0641093, -0.234852,
-0.294304, -0.204971, -0.310864, -0.192205, -0.412902,
-0.453452, -0.462857, -0.403867, -0.113078, -0.0597613,
-0.0145857, 0.0896112, 0.212618, 0.245305, 0.385211, 0.321811,
0.260138, 0.158099, 0.183755, 0.207314, 0.0475809, 0.131734,
0.164513, 0.0473342, -0.0206914, 0.115606, 0.153844, 0.16957,
0.0607789, -0.100188, -0.147831, -0.352216, -0.234913,
-0.298776, -0.255574, -0.312036, -0.54001, -0.42684, -0.505998,
-0.283049, -0.0982762, -0.0461315, 0.022449, 0.161645, 0.227327,
0.317494, 0.418915, 0.260045, 0.264115, 0.138888, 0.26134,
0.152518, 0.0567393, 0.160659, 0.0724043, 0.0370964, 0.0382374,
0.121311, 0.129483, 0.160196, -0.0853865, -0.136359, -0.268217,
-0.350612, -0.237133, -0.361559, -0.218539, -0.464646,
-0.505967, -0.485707, -0.455241, -0.13565, -0.0786642,
-0.00391625, 0.0988005, 0.237596, 0.265441, 0.416664, 0.362083,
0.295445, 0.219248, 0.182769, 0.25542, 0.118012, 0.113417,
0.13821, 0.065682, -0.00777082, 0.0922323, 0.0994789, 0.16772,
0.0592063, -0.169725, -0.179623, -0.398871, -0.268248,
-0.313331, -0.313639, -0.319375, -0.571988, -0.426316,
-0.510438, -0.284128, -0.103333, -0.0429554, 0.0209072,
0.171051, 0.296926, 0.34133, 0.478615, 0.291807, 0.262666,
0.182707, 0.28049, 0.21268, 0.0659286, 0.166795, 0.119615,
0.0500478, 0.0302199, 0.13158, 0.137192, 0.17398, -0.0758889,
-0.17546, -0.270838, -0.378643, -0.216319, -0.414382, -0.287952,
-0.447624, -0.543217, -0.479694, -0.479232, -0.167104,
-0.097197, -0.00980604, 0.0887477, 0.2676, 0.299516, 0.433038,
0.390237, 0.307102, 0.253353, 0.204231, 0.316723, 0.128619,
0.108884, 0.151469, 0.134509, 0.0312991, 0.104783, 0.134818,
0.19057, 0.124857, -0.186037, -0.18502, -0.404206, -0.303925,
-0.314287, -0.39144, -0.344876, -0.588116, -0.472756, -0.505751,
-0.31922, -0.113386, -0.0494927, 0.0343828, 0.165408, 0.311696,
0.362238, 0.481606, 0.353449, 0.290111, 0.229979, 0.335317,
0.261957, 0.0975362, 0.175214, 0.166055, 0.145117, 0.0307749,
0.153135, 0.145148, 0.18061, -0.0115946, -0.226834, -0.266397,
-0.426254, -0.279503, -0.410805, -0.383299, -0.454161,
-0.566376, -0.533134, -0.5072, -0.193438, -0.120694, -0.035863,
0.0752105, 0.221715, 0.311018, 0.419439, 0.393012, 0.300842,
0.257886, 0.277067, 0.343705, 0.168429, 0.162663, 0.181473,
0.226125, 0.075488, 0.134324, 0.20235, 0.175892, 0.169139,
-0.141293, -0.172592, -0.367541, -0.344938, -0.308273,
-0.445681, -0.371242, -0.58127, -0.532363, -0.550711, -0.389775,
-0.173733, -0.138025, -0.0174227, 0.0767523, 0.22372, 0.293657,
0.378057, 0.309569, 0.244164, 0.249622, 0.331, 0.251565,
0.113664, 0.219495, 0.227112, 0.198125, 0.115452, 0.215455,
0.190786, 0.2079, 0.0718493, -0.172531, -0.205618, -0.38296,
-0.255173, -0.363687, -0.394708, -0.396559, -0.550402,
-0.551636, -0.521817, -0.262666, -0.173055, -0.0870517,
-0.0126738, 0.154861, 0.233186, 0.323568, 0.367233, 0.263807,
0.239354, 0.278701, 0.336026, 0.195658, 0.189799, 0.205218,
0.278701, 0.156095, 0.164205, 0.263036, 0.159086, 0.18576,
-0.0445897, -0.161337, -0.311974, -0.337568, -0.265318,
-0.405871, -0.341546, -0.502421, -0.525116, -0.550094,
-0.410034, -0.211015, -0.170835, -0.0655586, 0.0470566,
0.201887, 0.212711, 0.347498, 0.323044, 0.227882, 0.24216,
0.305066, 0.305159, 0.165747, 0.20087, 0.223349, 0.253477,
0.131117, 0.216935, 0.173456, 0.146042, 0.122637, -0.147676,
-0.197508, -0.359555, -0.286657, -0.326313, -0.388079,
-0.365722, -0.520398, -0.538993, -0.53853, -0.301674, -0.178143,
-0.124333, -0.0263036, 0.128034, 0.217336, 0.254279, 0.366986,
0.2886, 0.284344, 0.308643, 0.323291, 0.252706, 0.237997,
0.203614, 0.269697, 0.178236, 0.136945, 0.237534, 0.0647877,
0.163403, -0.00801752, -0.2009, -0.277961, -0.377039, -0.265041,
-0.393845, -0.355453, -0.448919, -0.508742, -0.541306,
-0.446915, -0.198372, -0.181782, -0.0657128, 0.0270745,
0.198896, 0.22412, 0.317339, 0.384131, 0.245336, 0.266367,
0.350489, 0.336551, 0.20568, 0.196491, 0.234204, 0.252336,
0.108576, 0.166949, 0.150513, 0.0781091, 0.094915, -0.158346,
-0.216411, -0.333405, -0.312406, -0.309353, -0.407968,
-0.340621, -0.457153, -0.496037, -0.510932, -0.313732,
-0.169755, -0.135866, 0.00144932, 0.117857, 0.219248, 0.24623,
0.360696, 0.317339, 0.288106, 0.310555, 0.349594, 0.27941,
0.188473, 0.194271, 0.262759, 0.174967, 0.0909063, 0.166672,
0.0391625, 0.100928, -0.0131056, -0.213605, -0.267754,
-0.374634, -0.283049, -0.368035, -0.379136, -0.415431,
-0.475192, -0.476765, -0.42021, -0.193962, -0.147245,
-0.0632459, 0.0672546, 0.18394, 0.255111, 0.309877, 0.402325,
0.306485, 0.26538, 0.351599, 0.348176, 0.21601, 0.172808,
0.204292, 0.24734, 0.104783, 0.0787258, 0.110272, 0.0255019,
0.0537482, -0.153412, -0.268155, -0.327145, -0.375096,
-0.333004, -0.410188, -0.377502, -0.42462, -0.472602, -0.485183,
-0.324894, -0.132104, -0.122452, 0.0186561, 0.126708, 0.22372,
0.290049, 0.350057, 0.350211, 0.312159, 0.337106, 0.392612,
0.297758, 0.21268, 0.177619, 0.238059, 0.188936, 0.0565235,
0.131857, 0.0284313, 0.0430479, -0.036233, -0.227266, -0.27941,
-0.381603, -0.327762, -0.36677, -0.394153, -0.386136, -0.4611,
-0.443831, -0.40618, -0.202196, -0.116223, -0.0622283, 0.093219,
0.156002, 0.266212, 0.318326, 0.372876, 0.338462, 0.291529,
0.37081, 0.373709, 0.24031, 0.178451, 0.220266, 0.239755,
0.122082, 0.0782016, 0.087761, 0.017176, 0.0111628, -0.171729,
-0.265688, -0.308551, -0.402942, -0.334855, -0.414906,
-0.383885, -0.408122, -0.47291, -0.449937, -0.348731, -0.1622,
-0.126245, -0.0162817, 0.0916155, 0.22301, 0.299824, 0.338092,
0.370964, 0.324278, 0.330599, 0.404422, 0.337877, 0.245552,
0.206914, 0.244164, 0.226587, 0.102933, 0.123932, 0.0707083,
0.0167134, -0.0411977, -0.21746, -0.280336, -0.37448, -0.342009,
-0.362762, -0.41284, -0.376977, -0.46773, -0.452003, -0.432082,
-0.266151, -0.162509, -0.125937, 0.00838755, 0.132258, 0.243362,
0.265349, 0.343951, 0.314194, 0.297141, 0.333529, 0.369392,
0.306547, 0.201671, 0.224583, 0.245459, 0.184619, 0.105184,
0.131487, 0.0638318, 0.0208764, -0.116686, -0.24253, -0.260045,
-0.3557, -0.309877, -0.366493, -0.348053, -0.374665, -0.470566,
-0.433254, -0.383114, -0.189953, -0.156342, -0.0958093,
0.033396, 0.164267, 0.240217, 0.257331, 0.293904, 0.28493,
0.321502, 0.337476, 0.310925, 0.258565, 0.21601, 0.219187,
0.222486, 0.112584, 0.150544, 0.105554, 0.0185945, 0.020198,
-0.189028, -0.239847, -0.298437, -0.315181, -0.296586,
-0.376638, -0.307811, -0.418607, -0.413303, -0.415061,
-0.273798, -0.151377, -0.16735, -0.0246076, 0.0590521, 0.219094,
0.225045, 0.270591, 0.287644, 0.237596, 0.310956, 0.350026,
0.290111, 0.186531, 0.217305, 0.251195, 0.181998, 0.115113,
0.150236, 0.0975362, 0.0461007, -0.0721268, -0.208055,
-0.211292, -0.299978, -0.269851, -0.346819, -0.332943, -0.31256,
-0.427488, -0.406581, -0.396343, -0.196737, -0.201147, -0.1338,
0.0131672, 0.102254, 0.203121, 0.200191, 0.251041, 0.247803,
0.279565, 0.286194, 0.312498, 0.210521, 0.169046, 0.230874,
0.221037, 0.131796, 0.14891, 0.133399, 0.0613957, 0.0530698,
-0.130716, -0.186808, -0.24842, -0.285177, -0.260662, -0.350735,
-0.296371, -0.388849, -0.397083, -0.396466, -0.294119,
-0.159179, -0.201455, -0.0508804, 0.0467174, 0.142989, 0.193623,
0.205618, 0.262728, 0.230041, 0.236578, 0.319899, 0.282802,
0.156372, 0.203306, 0.229578, 0.202196, 0.120941, 0.14743,
0.119153, 0.0472725, -0.0234667, -0.166826, -0.191495,
-0.287829, -0.270159, -0.301366, -0.322983, -0.294983, -0.39255,
-0.391841, -0.395233, -0.219957, -0.182954, -0.144315,
0.0164051, 0.0601314, 0.160412, 0.184372, 0.199975, 0.24253,
0.242221, 0.270159, 0.321749, 0.193315, 0.181998, 0.209442,
0.217491, 0.145765, 0.134633, 0.145271, 0.069259, 0.0597613,
-0.0991088, -0.158346, -0.235314, -0.290512, -0.241173,
-0.339172, -0.277098, -0.350427, -0.395942, -0.382744,
-0.331247, -0.159549, -0.187116, -0.0622591, 0.0518055,
0.0944525, 0.185945, 0.201918, 0.237658, 0.239662, 0.214314,
0.297974, 0.276327, 0.130254, 0.194425, 0.226495, 0.177125,
0.112338, 0.120386, 0.0995405, 0.0623208, -0.0205372, -0.162571,
-0.155386, -0.280181, -0.281261, -0.284498, -0.33137, -0.267292,
-0.371396, -0.384687, -0.377902, -0.22742, -0.150483, -0.111289,
0.0265811, 0.081532, 0.18061, 0.22594, 0.237041, 0.264671,
0.241913, 0.239693, 0.322828, 0.198865, 0.171143, 0.200407,
0.202812, 0.139104, 0.102162, 0.131888, 0.0518363, 0.0195812,
-0.0933732, -0.178544, -0.240926, -0.318511, -0.262111,
-0.342009, -0.288816, -0.31882, -0.379413, -0.372506, -0.335841,
-0.143699, -0.136575, -0.0377132, 0.0700299, 0.143267, 0.203984,
0.217645, 0.269543, 0.243702, 0.227266, 0.253569, 0.295661,
0.145888, 0.15702, 0.202442, 0.173117, 0.0983379, 0.0854482,
0.0946375, 0.0206605, -0.0261494, -0.173147, -0.183324,
-0.271393, -0.306947, -0.281631, -0.319683, -0.246323,
-0.344352, -0.359709, -0.372167, -0.245028, -0.0881618,
-0.0814395, 0.0373123, 0.101113, 0.198649, 0.226741, 0.247957,
0.256653, 0.256653, 0.239662, 0.276018, 0.218878, 0.161337,
0.186407, 0.182059, 0.125721, 0.062845, 0.125937, 0.0300657,
0.0072466, -0.0688581, -0.218786, -0.217491, -0.324524,
-0.270314, -0.311357, -0.301089, -0.281507, -0.364026, -0.33248,
-0.34281, -0.110734, -0.091153, -0.0334577, 0.063215, 0.134016,
0.240217, 0.211292, 0.277375, 0.231675, 0.201764, 0.255358,
0.284714, 0.14928, 0.128034, 0.208147, 0.17583, 0.0871442,
0.0701841, 0.108514, 0.0321626, -0.0166826, -0.165408,
-0.186407, -0.240217, -0.310031, -0.270869, -0.351753,
-0.251041, -0.306238, -0.34463, -0.358784, -0.265318, -0.082272,
-0.114527, 0.0174227, 0.0745937, 0.161954, 0.196953, 0.215147,
0.231521, 0.233649, 0.214376, 0.254433, 0.228283, 0.101082,
0.168214, 0.208394, 0.139505, 0.0792192, 0.127417, 0.0567702,
0.0368497, -0.0257486, -0.178143, -0.17213, -0.297758,
-0.262111, -0.288754, -0.310432, -0.252953, -0.350982,
-0.319652, -0.341577, -0.150174, -0.0813778, -0.0713559,
0.0590521, 0.118135, 0.201826, 0.20127, 0.248265, 0.240433,
0.203275, 0.235283, 0.295815, 0.160258, 0.121095, 0.222178,
0.208363, 0.145271, 0.0805144, 0.123254, 0.0498936, 0.0229733,
-0.102347, -0.164637, -0.196645, -0.310895, -0.264516,
-0.348947, -0.277159, -0.294304, -0.351815, -0.363872,
-0.315428, -0.115606, -0.126029, -0.0237442, 0.0710167,
0.125166, 0.193623, 0.208363, 0.207438, 0.229733, 0.224182,
0.285023, 0.24549, 0.128034, 0.197046, 0.224398, 0.199174,
0.103426, 0.15224, 0.103549, 0.0661445, 0.0205988, -0.132505,
-0.122298, -0.269173, -0.264054, -0.289494, -0.346573,
-0.237843, -0.355669, -0.344784, -0.371889, -0.229208,
-0.109038, -0.114897, 0.0263036, 0.0686423, 0.135804, 0.181751,
0.203522, 0.203367, 0.211693, 0.2396, 0.284468, 0.17583,
0.117395, 0.250486, 0.242592, 0.159487, 0.112739, 0.130963,
0.0755805, 0.066237, -0.0711709, -0.137655, -0.150637,
-0.318203, -0.258133, -0.338462, -0.285269, -0.257362,
-0.368497, -0.380678, -0.349039, -0.171575, -0.133954,
-0.0565543, 0.0243609, 0.0956243, 0.158808, 0.206389, 0.211015,
0.21672, 0.228345, 0.267847, 0.250732, 0.143143, 0.200191,
0.235684, 0.21672, 0.119307, 0.137593, 0.114065, 0.0538407,
0.0399334, -0.113047, -0.128003, -0.252891, -0.286811, -0.27056,
-0.351291, -0.233156, -0.334639, -0.359308, -0.383299,
-0.274631, -0.123408, -0.121928, -0.0115946, 0.0640784,
0.136359, 0.165346, 0.229116, 0.212156, 0.214407, 0.23553,
0.247001, 0.220482, 0.130932, 0.227266, 0.233957, 0.172839,
0.0995714, 0.12384, 0.0736995, 0.0585279, -0.0324093, -0.138055,
-0.121311, -0.289741, -0.247495, -0.292362, -0.261032,
-0.212063, -0.346634, -0.356533, -0.357242, -0.173518,
-0.0897653, -0.059453, 0.0282155, 0.106633, 0.16735, 0.206821,
0.22486, 0.213543, 0.258503, 0.233526, 0.215702, 0.156773,
0.172346, 0.197323, 0.184927, 0.0820562, 0.0885319, 0.0941441,
-0.00138765, 0.0462857, -0.121003, -0.152333, -0.207931,
-0.317833, -0.234512, -0.325388, -0.20716, -0.276481, -0.333559,
-0.337476, -0.265472, -0.0619507, -0.07851, 0.0193654,
0.0598538, 0.160782, 0.203984, 0.235283, 0.247649, 0.195319,
0.23297, 0.237534, 0.198557, 0.0983379, 0.160936, 0.198557,
0.121311, 0.0333344, 0.0695365, 0.0470258, 0.0228191,
-0.0427087, -0.1692, -0.126646, -0.279102, -0.256129, -0.266675,
-0.278177, -0.166333, -0.296771, -0.31256, -0.326128, -0.147522,
-0.0478276, -0.0349995, 0.0721885, 0.103888, 0.179901, 0.219156,
0.244565, 0.213328, 0.241235, 0.198403, 0.203614, 0.130038,
0.0830738, 0.153751, 0.147276, 0.0321009, 0.0226649, 0.0502945,
-0.0180702, 0.0329335, -0.106448, -0.143298, -0.180394,
-0.306855, -0.207746, -0.280551, -0.180548, -0.213328,
-0.293996, -0.274785, -0.235777, -0.0310216, -0.0322551,
0.0238367, 0.100867, 0.15076, 0.217491, 0.237041, 0.259336,
0.223041, 0.192945, 0.205372, 0.193407, 0.0639243, 0.10025,
0.144809, 0.0867742, -0.015665, 0.00191187, 0.0165593,
-0.0187487, -0.0373123, -0.161121, -0.134818, -0.262574,
-0.27349, -0.231429, -0.248728, -0.148694, -0.249653, -0.28712,
-0.300163, -0.14154, -0.00400876, -0.019057, 0.0798976,
0.125536, 0.186561, 0.248851, 0.238429, 0.224737, 0.234759,
0.20161, 0.222486, 0.115915, 0.0828271, 0.129267, 0.131271,
0.0307441, -0.0175769, 0.0471183, -0.0216165, 0.0230349,
-0.0948534, -0.135249, -0.16402, -0.309784, -0.211632,
-0.268926, -0.185729, -0.174504, -0.288816, -0.26686, -0.258133,
-0.0485676, -0.0161275, 0.00595146, 0.112276, 0.136668, 0.20716,
0.244873, 0.233032, 0.228129, 0.207006, 0.208918, 0.206359,
0.0661753, 0.0879768, 0.167042, 0.0966419, -0.014339,
-0.00255944, 0., -0.014524, -0.0285547, -0.160104, -0.122606,
-0.246107, -0.30337, -0.219002, -0.259182, -0.146011, -0.227975,
-0.300009, -0.305683, -0.189707, -0.0321009, -0.0247618,
0.0524222, 0.123562, 0.189244, 0.253353, 0.27093, 0.258873,
0.265811, 0.21857, 0.263684, 0.168738, 0.105184, 0.148077,
0.144994, 0.0652194, -0.0193654, 0.0339511, -0.0222332,
-0.0229116, -0.0814395, -0.149712, -0.18465, -0.315058,
-0.244565, -0.273767, -0.215764, -0.178606, -0.305159, -0.28897,
-0.302846, -0.112769, -0.0391933, -0.0403343, 0.0827654,
0.167258, 0.221777, 0.244226, 0.282802, 0.271609, 0.261649,
0.238922, 0.251349, 0.152672, 0.11536, 0.175275, 0.133183,
0.0301274, 0.00271362, 0.0231274, -0.0353079, -0.0439422,
-0.142311, -0.156187, -0.233834, -0.327855, -0.251349,
-0.275032, -0.181628, -0.247032, -0.337722, -0.326282,
-0.267322, -0.064541, -0.0543958, 0.00129514, 0.122791,
0.196244, 0.250732, 0.273613, 0.288754, 0.311172, 0.298221,
0.278917, 0.229887, 0.174196, 0.172839, 0.172068, 0.106355,
-0.00329952, 0.0508187, -0.0166518, -0.044343, -0.0478276,
-0.177526, -0.18872, -0.314657, -0.306084, -0.27238, -0.276327,
-0.211077, -0.339233, -0.324679, -0.363872, -0.184187,
-0.0581578, -0.0738228, 0.0622283, 0.131271, 0.235684, 0.245922,
0.299608, 0.318665, 0.275463, 0.300996, 0.30152, 0.206914,
0.140276, 0.191927, 0.176848, 0.0631534, 0.00425545, 0.029819,
-0.0202288, -0.0391625, -0.1305, -0.178698, -0.222085, -0.33137,
-0.270684, -0.301089, -0.229363, -0.242067, -0.346665, -0.35092,
-0.32659, -0.108267, -0.105214, -0.0231274, 0.115267, 0.164112,
0.235653, 0.265133, 0.306762, 0.31108, 0.299855, 0.285331,
0.272164, 0.160967, 0.145456, 0.186531, 0.118598, 0.00262111,
0.0336119, 0.00514971, -0.0405501, -0.0428937, -0.157483,
-0.174597, -0.28712, -0.316569, -0.259058, -0.281014, -0.216473,
-0.325696, -0.327392, -0.349255, -0.21083, -0.0621049,
-0.0828271, 0.0565235, 0.140646, 0.218847, 0.253785, 0.29304,
0.349255, 0.293965, 0.277221, 0.318357, 0.230257, 0.131641,
0.184002, 0.16698, 0.0981837, 0.00431712, 0.0265811,
-0.00561226, -0.0518363, -0.0951617, -0.183385, -0.209751,
-0.331709, -0.291498, -0.284098, -0.251935, -0.244164,
-0.334392, -0.341269, -0.338863, -0.119245, -0.0704, -0.0285547,
0.122545, 0.142835, 0.233125, 0.275247, 0.286441, 0.312868,
0.289987, 0.31219, 0.289741, 0.161707, 0.165901, 0.179006,
0.141047, 0.0182861, 0.0171143, 0.0222949, -0.0353079,
-0.0296956, -0.132659, -0.162108, -0.265842, -0.310124,
-0.23405, -0.270005, -0.17654, -0.270838, -0.309815, -0.328595,
-0.245768, -0.0502945, -0.072281, 0.0461007, 0.128959, 0.164575,
0.249468, 0.28049, 0.302908, 0.280181, 0.274076, 0.303617,
0.229363, 0.105554, 0.164328, 0.170496, 0.0732369, -0.0104228,
-0.00638318, -0.0271362, -0.0444047, -0.0798359, -0.17654,
-0.175368, -0.305992, -0.261433, -0.224645, -0.225816, -0.1618,
-0.289802, -0.31922, -0.31845, -0.144377, -0.0534398,
-0.0231274, 0.0867742, 0.125998, 0.216535, 0.279256, 0.303,
0.304542, 0.278393, 0.286719, 0.28049, 0.152857, 0.13821,
0.154831, 0.131241, 0.0185945, -0.0267045, 0.00231274,
-0.0693515, -0.0577569, -0.104505, -0.180394, -0.254587,
-0.304912, -0.213173, -0.244565, -0.159117, -0.22264, -0.296617,
-0.320577, -0.27241, -0.0733603, -0.0610873, 0.0148941,
0.0993864, 0.165808, 0.21638, 0.274076, 0.311326, 0.273089,
0.281384, 0.2676, 0.245089, 0.116377, 0.132258, 0.153011,
0.0872367, -0.0102378, -0.0247001, -0.0217398, -0.0671004,
-0.0462857, -0.156496, -0.177125, -0.267292, -0.249499,
-0.17728, -0.18872, -0.110457, -0.248851, -0.301551, -0.318665,
-0.179685, -0.0228191, -0.0294798, 0.0619816, 0.120232,
0.197817, 0.248543, 0.298776, 0.289062, 0.298899, 0.289741,
0.243362, 0.169879, 0.131395, 0.139351, 0.111814, 0.00262111,
-0.0578495, -0.00333035, -0.0969503, -0.050572, -0.070955,
-0.201116, -0.206698, -0.286133, -0.179469, -0.185575,
-0.144932, -0.161337, -0.278177, -0.290049, -0.292208,
-0.0519905, -0.0370039, 0.0124888, 0.0846156, 0.153165,
0.244103, 0.269666, 0.340621, 0.272688, 0.273151, 0.276635,
0.239045, 0.113201, 0.099263, 0.151469, 0.0728669, -0.0496469,
-0.0574794, -0.0309291, -0.0779858, -0.0440963, -0.16513,
-0.196337, -0.24031, -0.247772, -0.166271, -0.210521, -0.119677,
-0.224429, -0.302754, -0.328749, -0.207993, -0.0408585,
-0.0645718, 0.0588362, 0.103118, 0.179469, 0.224737, 0.299824,
0.297974, 0.290666, 0.27793, 0.237133, 0.189861, 0.0916772,
0.125382, 0.129853, 0.00194271, -0.0696599, -0.0129514,
-0.0792809, -0.0433254, -0.0470258, -0.183879, -0.187086,
-0.275957, -0.189429, -0.170588, -0.164359, -0.148602,
-0.284714, -0.290882, -0.285269, -0.0821487, -0.0356471,
-0.0189028, 0.0852015, 0.149527, 0.220019, 0.261957, 0.344414,
0.308705, 0.267137, 0.265503, 0.266212, 0.138271, 0.101853,
0.151624, 0.0965494, -0.0223565, -0.0718184, -0.0141848,
-0.0633075, -0.0273212, -0.134047, -0.20198, -0.225446,
-0.280027, -0.183786, -0.214561, -0.157945, -0.22483, -0.316754,
-0.343273, -0.242931, -0.0543958, -0.0676555, 0.0356471,
0.108021, 0.157082, 0.241913, 0.296926, 0.29745, 0.295353,
0.286811, 0.30263, 0.22964, 0.131888, 0.160196, 0.155941,
0.0561226, -0.0482593, 0.0194887, -0.0346295, -0.026612,
-0.031145, -0.162941, -0.175368, -0.275648, -0.214068,
-0.192174, -0.210244, -0.166333, -0.311357, -0.319375,
-0.328934, -0.152919, -0.0502945, -0.0499861, 0.0606247,
0.10873, 0.175738, 0.256283, 0.305375, 0.28934, 0.274137,
0.278177, 0.285578, 0.165654, 0.110056, 0.184002, 0.139196,
0.0131981, -0.0231274, 0.00857257, -0.0411052, -0.000709242,
-0.111228, -0.17654, -0.189953, -0.29304, -0.191434, -0.230658,
-0.183724, -0.214839, -0.338031, -0.346202, -0.285516,
-0.104659, -0.071325, -0.00693823, 0.0674088, 0.14006, 0.221962,
0.30115, 0.309384, 0.294767, 0.280089, 0.306608, 0.260723,
0.154399, 0.168029, 0.175676, 0.0995405, -0.0208147, 0.0234975,
-0.0016035, -0.0385766, -0.0253785, -0.143236, -0.181628,
-0.27093, -0.249098, -0.195103, -0.233433, -0.179469, -0.30741,
-0.339233, -0.352524, -0.216473, -0.083598, -0.0753646,
0.00533473, 0.0964569, 0.173363, 0.224552, 0.314194, 0.282926,
0.276234, 0.284622, 0.282617, 0.231984, 0.135959, 0.186777,
0.156619, 0.0582812, 0.00385457, 0.0463474, -0.0167443,
-0.0131364, -0.0643868, -0.17768, -0.174967, -0.275032,
-0.198218, -0.200746, -0.181319, -0.188165, -0.332449,
-0.342471, -0.308798, -0.128774, -0.0563693, -0.0465633,
0.0454223, 0.134417, 0.198588, 0.267045, 0.292763, 0.274692,
0.30371, 0.281785, 0.243362, 0.185451, 0.173918, 0.170341,
0.110981, -0.0141848, 0.0419378, 0.0292023, -0.0638009,
0.00308366, -0.131117, -0.185482, -0.220081, -0.265472,
-0.169725, -0.218878, -0.168059, -0.273459, -0.323815,
-0.334485, -0.235468, -0.0546733, -0.0827346, -0.00333035,
0.0694132, 0.173579, 0.229794, 0.288816, 0.300533, 0.250578,
0.284098, 0.28604, 0.23627, 0.134108, 0.163804, 0.168337,
0.0521138, -0.0150483, 0.0427087, -0.00499553, -0.0216165,
-0.0529773, -0.170804, -0.162941, -0.245922, -0.199605,
-0.192575, -0.193407, -0.161491, -0.304141, -0.330383,
-0.324278, -0.144901, -0.0763514, -0.0666379, 0.0516821,
0.105862, 0.18761, 0.242622, 0.289957, 0.26538, 0.288415,
0.264917, 0.252583, 0.177742, 0.122791, 0.163588, 0.117457,
-0.0101144, 0.0207222, 0.0281538, -0.0438805, 0.0161275,
-0.0811928, -0.154183, -0.183077, -0.236239, -0.152456,
-0.19242, -0.148848, -0.224799, -0.301859, -0.300287, -0.232076,
-0.0574794, -0.0730211, -0.0139073, 0.0797434, 0.147615,
0.217922, 0.268988, 0.303401, 0.263961, 0.244997, 0.261741,
0.233649, 0.113109, 0.139597, 0.152055, 0.0739462, -0.00838755,
0.0191187, 0.0115637, -0.0132906, -0.00678405, -0.138981,
-0.146751, -0.214222, -0.205526, -0.168275, -0.182491, -0.15332,
-0.266706, -0.306701, -0.315798, -0.154337, -0.0506029,
-0.0689506, 0.0541491, 0.100651, 0.1688, 0.249499, 0.267076,
0.263807, 0.259274, 0.258133, 0.271146, 0.166579, 0.135866,
0.152703, 0.12239, 0.0127355, 0.00807919, 0.0589287, -0.0111012,
0.032841, -0.0534398, -0.127787, -0.163341, -0.236671, -0.15554,
-0.192328, -0.151007, -0.205433, -0.309815, -0.30078, -0.27056,
-0.0779858, -0.0663295, -0.0251627, 0.082272, 0.102007,
0.197663, 0.266891, 0.2709, 0.256129, 0.249036, 0.263375,
0.235992, 0.110333, 0.134324, 0.173764, 0.0853865, 0.000370039,
0.0290481, 0.0181319, -0.00209689, 0.00545808, -0.121866,
-0.124549, -0.205125, -0.231151, -0.163033, -0.210984,
-0.154337, -0.264917, -0.336489, -0.333251, -0.21672,
-0.0809769, -0.0759814, 0.0150174, 0.077369, 0.153474, 0.244843,
0.280459, 0.266428, 0.25727, 0.246847, 0.281322, 0.190724,
0.150298, 0.171051, 0.159333, 0.0730211, 0.0181319, 0.0690123,
0.00900429, 0.00838755, -0.0376206, -0.130624, -0.173117,
-0.253261, -0.196059, -0.216689, -0.192112, -0.219649,
-0.332634, -0.322921, -0.320978, -0.142619, -0.0876684,
-0.0621666, 0.0407043, 0.10173, 0.176046, 0.245336, 0.283481,
0.246693, 0.267076, 0.256345, 0.262913, 0.179592, 0.152549,
0.188381, 0.125998, 0.0509112, 0.0495236, 0.0579728,
-0.00718493, 0.00601314, -0.101792, -0.149619, -0.195751,
-0.26353, -0.193561, -0.223812, -0.175306, -0.269604, -0.353141,
-0.346665, -0.272935, -0.0920164, -0.084924, -0.0178236,
0.0717259, 0.146906, 0.224336, 0.271979, 0.264455, 0.282309,
0.294829, 0.2639, 0.216627, 0.190539, 0.187702, 0.168214,
0.092849, 0.0219557, 0.092479, 0.00431712, -0.0105461,
0.0000925098, -0.157544, -0.1655, -0.250393, -0.236609,
-0.207222, -0.225138, -0.198588, -0.330938, -0.317339,
-0.349594, -0.168337, -0.0812853, -0.0831971, 0.0361097,
0.0958401, 0.216689, 0.251318, 0.304758, 0.280027, 0.268926,
0.294058, 0.283728, 0.204508, 0.14561, 0.195011, 0.154553,
0.0522989, 0.0398717, 0.0741312, 0.00453298, 0.00962102,
-0.0827654, -0.159795, -0.17768, -0.256129, -0.201918,
-0.246878, -0.199821, -0.244103, -0.34318, -0.349564, -0.305251,
-0.105985, -0.115915, -0.0275371, 0.0729286, 0.134478, 0.212464,
0.263838, 0.278917, 0.283327, 0.296309, 0.261741, 0.250794,
0.162571, 0.159024, 0.190323, 0.108637, 0.0239909, 0.0800518,
0.0241142, -0.000400876, 0.0234975, -0.118844, -0.140276,
-0.222733, -0.241451, -0.196522, -0.229054, -0.191187,
-0.308397, -0.312591, -0.330599, -0.19094, -0.0744395,
-0.0866817, 0.0351846, 0.103241, 0.186161, 0.236424, 0.289957,
0.305097, 0.272626, 0.264516, 0.28456, 0.209781, 0.121373,
0.175429, 0.155139, 0.0764131, 0.0200438, 0.0629375, 0.0135681,
0.0125505, -0.0407968, -0.15187, -0.159703, -0.259336,
-0.214098, -0.229363, -0.209627, -0.229208, -0.321533,
-0.343951, -0.323908, -0.121373, -0.0969503, -0.0440347,
0.0797434, 0.119924, 0.211015, 0.265349, 0.265071, 0.281014,
0.270468, 0.279719, 0.267353, 0.154676, 0.161707, 0.176354,
0.133183, 0.0329335, 0.0829813, 0.0636776, 0.0184094, 0.0459465,
-0.0856949, -0.10691, -0.196583, -0.229301, -0.181011,
-0.238059, -0.177526, -0.292763, -0.321903, -0.337075,
-0.240525, -0.081902, -0.102748, 0.0125813, 0.0887786, 0.129575,
0.224429, 0.258256, 0.253662, 0.245182, 0.244781, 0.27167,
0.203737, 0.0989546, 0.169293, 0.17398, 0.0789109, 0.0363255,
0.0747171, 0.0229116, 0.0401801, -0.00447131, -0.111906,
-0.101206, -0.234235, -0.193654, -0.197663, -0.209473,
-0.183848, -0.310956, -0.335471, -0.332542, -0.166518,
-0.0944833, -0.0597922, 0.0436338, 0.101884, 0.181843, 0.248851,
0.263684, 0.259737, 0.249869, 0.258041, 0.266582, 0.159271,
0.143575, 0.163897, 0.152055, 0.0518055, 0.0675321, 0.0830738,
0.00965185, 0.0357088, -0.051898, -0.108576, -0.1725, -0.22079,
-0.171667, -0.227574, -0.173918, -0.27093, -0.322273, -0.336242,
-0.279349, -0.108915, -0.104197, -0.0234667, 0.071325, 0.139566,
0.19279, 0.254895, 0.257979, 0.231645, 0.247094, 0.236733,
0.235499, 0.123377, 0.146227, 0.167289, 0.102038, 0.04718,
0.0811311, 0.0469025, 0.0177927, 0.0170218, -0.106201, -0.10799,
-0.210922, -0.208455, -0.184002, -0.205834, -0.168337,
-0.303216, -0.335225, -0.341731, -0.211755, -0.0837522,
-0.0843689, 0.0211231, 0.105184, 0.175306, 0.230288, 0.253878,
0.237812, 0.267662, 0.252737, 0.227944, 0.177064, 0.148509,
0.149218, 0.141355, 0.0458849, 0.0448056, 0.0889019, -0.0222332,
0.0380832, -0.0271362, -0.135496, -0.141602, -0.240988,
-0.176663, -0.214068, -0.186099, -0.230504, -0.319375,
-0.316445, -0.303617, -0.0881618, -0.0878226, -0.0255327,
0.0681489, 0.142681, 0.232292, 0.253878, 0.283635, 0.23812,
0.254803, 0.261032, 0.241389, 0.133245, 0.124302, 0.170896,
0.0978445, 0.020568, 0.0544266, 0.0484135, 0.0111628, 0.0221098,
-0.101792, -0.112893, -0.179592, -0.206975, -0.180086, -0.2322,
-0.161707, -0.273767, -0.324, -0.340929, -0.223442, -0.0818403,
-0.100096, 0.0459465, 0.111043, 0.183385, 0.233032, 0.268309,
0.25471, 0.277684, 0.251472, 0.234882, 0.193345, 0.0988005,
0.1301, 0.134972, 0.0362638, 0.0247618, 0.0696907, -0.014339,
0.0284622, -0.0191187, -0.133646, -0.136822, -0.239909,
-0.18579, -0.207068, -0.198033, -0.210306, -0.31737, -0.297203,
-0.289987, -0.103056, -0.0707392, -0.0323168, 0.0975362,
0.151469, 0.225724, 0.264362, 0.306547, 0.285547, 0.254279,
0.250177, 0.261032, 0.137285, 0.103488, 0.150051, 0.100342,
0.0298498, 0.0189028, 0.0398717, -0.0127972, 0.0103919,
-0.0951001, -0.146751, -0.198341, -0.262142, -0.210306,
-0.254279, -0.199883, -0.2713, -0.326313, -0.343489, -0.250085,
-0.0730211, -0.0810694, 0.0509729, 0.132628, 0.177835, 0.265996,
0.283172, 0.277992, 0.298375, 0.266922, 0.285269, 0.218231,
0.126923, 0.145919, 0.142033, 0.070955, 0.0197971, 0.0766598,
0.0065682, 0.0253785, -0.00940516, -0.120602, -0.135804,
-0.249314, -0.210213, -0.232847, -0.234235, -0.211601,
-0.337938, -0.312714, -0.330322, -0.158654, -0.0716643,
-0.0499553, 0.0963335, 0.126461, 0.199112, 0.281076, 0.292454,
0.283419, 0.274908, 0.267662, 0.273212, 0.149989, 0.100096,
0.172654, 0.121558, 0.0365414, 0.0395634, 0.0444972,
-0.00514971, 0.0255019, -0.0804527, -0.124487, -0.165716,
-0.268001, -0.198434, -0.252028, -0.198804, -0.244072,
-0.331833, -0.333775, -0.282864, -0.109069, -0.0751179,
0.0236825, 0.112492, 0.171359, 0.259027, 0.312159, 0.301767,
0.302137, 0.265904, 0.293749, 0.250948, 0.145456, 0.158007,
0.159086, 0.107651, 0.0319467, 0.0749638, 0.0285855, 0.00672238,
0.0037929, -0.102748, -0.142311, -0.244688, -0.227913,
-0.222887, -0.245644, -0.206759, -0.325234, -0.316569,
-0.344661, -0.208455, -0.0866817, -0.0648494, 0.0521138,
0.130778, 0.199328, 0.255944, 0.312251, 0.282001, 0.28712,
0.267816, 0.277314, 0.219156, 0.118474, 0.170742, 0.138672,
0.0767215, 0.0477967, 0.0738845, 0.0146474, 0.0310525,
-0.0290789, -0.121835, -0.138734, -0.253045, -0.201733,
-0.229671, -0.194486, -0.217645, -0.337229, -0.338185,
-0.325511, -0.140461, -0.0731136, -0.0271362, 0.0876684,
0.155447, 0.225045, 0.277776, 0.277622, 0.282648, 0.29267,
0.259798, 0.234605, 0.1618, 0.147676, 0.146042, 0.112122,
0.0319467, 0.0824571, 0.0433254, -0.0189028, 0.0510346,
-0.0935274, -0.133122, -0.190323, -0.250023, -0.196337,
-0.24586, -0.186623, -0.303, -0.318419, -0.352925, -0.250085,
-0.0801443, -0.0958093, 0.0234975, 0.0895495, 0.190323,
0.242684, 0.282186, 0.285239, 0.254402, 0.270776, 0.272626,
0.210676, 0.0982454, 0.138981, 0.148232, 0.0734219, 0.0255944,
0.0663912, 0.0234358, 0.0316383, -0.00576644, -0.117395,
-0.116439, -0.222949, -0.200438, -0.229208, -0.218015,
-0.193284, -0.321348, -0.336705, -0.352123, -0.169725,
-0.104752, -0.0616424, 0.0734219, 0.12017, 0.197478, 0.244873,
0.267908, 0.257054, 0.276943, 0.232446, 0.243085, 0.145765,
0.0921706, 0.151223, 0.12495, 0.0359555, 0.0609948, 0.0523605,
0.00684572, 0.076043, -0.0436338, -0.101483, -0.156619,
-0.235314, -0.177927, -0.226433, -0.168892, -0.262666,
-0.312406, -0.330692, -0.268371, -0.0868359, -0.0890561,
0.0113479, 0.105276, 0.1655, 0.21672, 0.256807, 0.285393,
0.256869, 0.233741, 0.244997, 0.215486, 0.0794967, 0.117857,
0.140646, 0.105338, 0.0383299, 0.0534398, 0.0509112, 0.0348762,
0.0382682, -0.0872059, -0.0992013, -0.203306, -0.211539,
-0.211847, -0.21601, -0.184958, -0.291807, -0.322921, -0.350766,
-0.177742, -0.0783558, -0.0629375, 0.0837522, 0.117672, 0.18061,
0.248235, 0.252706, 0.257732, 0.261957, 0.239508, 0.256129,
0.13713, 0.100867, 0.142989, 0.139721, 0.0588979, 0.0491844,
0.0782633, 0.0271362, 0.0848932, -0.0129514, -0.0747479,
-0.138734, -0.2359, -0.178451, -0.234235, -0.169817, -0.239385,
-0.31626, -0.322212, -0.299454, -0.102254, -0.0852015,
-0.000215856, 0.104783, 0.124179, 0.20198, 0.25064, 0.251935,
0.241389, 0.227019, 0.238922, 0.216411, 0.0642326, 0.109131,
0.160474, 0.099633, 0.0371889, 0.050202, 0.0465016, 0.0431712,
0.0472725, -0.0863733, -0.0858491, -0.199574, -0.226741,
-0.187702, -0.226217, -0.16217, -0.271331, -0.31882, -0.33615,
-0.208363, -0.0722501, -0.0515896, 0.0630608, 0.113972,
0.173363, 0.252891, 0.280459, 0.271146, 0.25619, 0.22964,
0.267384, 0.155386, 0.105955, 0.14561, 0.154861, 0.0791884,
0.0310525, 0.0734836, 0.0179469, 0.0391008, -0.00872676,
-0.0957785, -0.157174, -0.250393, -0.194795, -0.234358,
-0.190416, -0.224675, -0.305837, -0.308551, -0.313022,
-0.120386, -0.0664837, -0.00955935, 0.0984613, 0.157174,
0.21083, 0.269358, 0.294058, 0.260908, 0.2643, 0.235129,
0.251657, 0.128712, 0.121003, 0.170064, 0.126307, 0.0619816,
0.0531315, 0.0655586, 0.0161275, 0.0417219, -0.0772765,
-0.114928, -0.188473, -0.24364, -0.193962, -0.223874, -0.16217,
-0.257732, -0.319652, -0.330013, -0.239323, -0.05492, -0.040581,
0.044343, 0.131426, 0.192482, 0.252644, 0.287366, 0.269234,
0.285855, 0.267538, 0.244781, 0.191403, 0.1408, 0.146906,
0.146135, 0.0767215, 0.017176, 0.0862191, -0.000308366,
0.0147399, 0.0116562, -0.14154, -0.150452, -0.247186, -0.222239,
-0.215548, -0.211447, -0.199112, -0.305221, -0.29893, -0.326467,
-0.115668, -0.0411669, -0.0107928, 0.0922323, 0.149773,
0.246323, 0.270745, 0.311635, 0.269358, 0.257486, 0.261494,
0.259737, 0.154615, 0.10432, 0.165346, 0.119862, 0.0247618,
0.0185636, 0.0542107, -0.0016035, 0.0212773, -0.0923248,
-0.15039, -0.185235, -0.25434, -0.20127, -0.251349, -0.178451,
-0.237935, -0.316569, -0.332943, -0.261433, -0.0577569,
-0.0647877, 0.0391008, 0.12162, 0.183324, 0.247001, 0.292886,
0.288446, 0.285979, 0.265287, 0.233125, 0.216843, 0.107805,
0.118474, 0.157637, 0.0794351, 0.00730827, 0.0664529,
0.00918931, 0.0114712, 0.0173302, -0.125844, -0.139813,
-0.238367, -0.232693, -0.206975, -0.221499, -0.183416,
-0.294613, -0.290142, -0.308119, -0.141047, -0.0326868,
-0.0246076, 0.0929107, 0.156064, 0.225416, 0.265071, 0.308088,
0.293965, 0.255512, 0.236979, 0.264578, 0.170526, 0.0961793,
0.157914, 0.131549, 0.0630608, 0.010577, 0.05492, 0.00792501,
0.0281538, -0.0532856, -0.155016, -0.171266, -0.273089,
-0.217768, -0.246939, -0.196491, -0.228653, -0.315582,
-0.335934, -0.29415, -0.0779858, -0.0584662, 0.0172685,
0.128496, 0.154676, 0.236918, 0.288137, 0.27423, 0.283697,
0.259953, 0.267816, 0.239847, 0.128496, 0.14413, 0.16698,
0.124765, 0.0306207, 0.0798051, 0.0459774, 0.033026, 0.0373123,
-0.0985846, -0.121558, -0.232909, -0.242622, -0.21638,
-0.246539, -0.177125, -0.305375, -0.308736, -0.327916,
-0.205588, -0.0491227, -0.0529773, 0.0700299, 0.130315,
0.171205, 0.260199, 0.287983, 0.263345, 0.251041, 0.247495,
0.270622, 0.182707, 0.0939283, 0.182244, 0.171205, 0.0858182,
0.047365, 0.0755188, 0.0333344, 0.0598538, -0.021894, -0.122298,
-0.131734, -0.269481, -0.209936, -0.24179, -0.210984, -0.203121,
-0.327053, -0.336335, -0.317679, -0.13195, -0.065867,
-0.0138148, 0.0810694, 0.131641, 0.205526, 0.282001, 0.275926,
0.268217, 0.255882, 0.266829, 0.267292, 0.156619, 0.164359,
0.197724, 0.176077, 0.0759814, 0.0965494, 0.0849857, 0.0354929,
0.0452065, -0.0631534, -0.12162, -0.221715, -0.247464,
-0.209165, -0.255358, -0.182954, -0.299917, -0.327454,
-0.346573, -0.262265, -0.0897653, -0.0816553, 0.00872676,
0.0923864, 0.148972, 0.207623, 0.279719, 0.260199, 0.249869,
0.256252, 0.253323, 0.240988, 0.134972, 0.190539, 0.205279,
0.14891, 0.0901354, 0.111721, 0.0696907, 0.056431, 0.0243609,
-0.106756, -0.116593, -0.244843, -0.221037, -0.220636,
-0.211447, -0.183169, -0.323137, -0.331555, -0.337537,
-0.175614, -0.057942, -0.0506645, 0.0557526, 0.125258, 0.18761,
0.253816, 0.26612, 0.250424, 0.291282, 0.26575, 0.243362,
0.190478, 0.178081, 0.191002, 0.18098, 0.0839064, 0.0938666,
0.109562, 0.00934349, 0.0698757, -0.0454223, -0.144531,
-0.177927, -0.268248, -0.205588, -0.255019, -0.189953,
-0.264609, -0.327145, -0.333251, -0.295538, -0.0731136,
-0.0777391, -0.000308366, 0.0830738, 0.157791, 0.228407,
0.267816, 0.286873, 0.244164, 0.272626, 0.282463, 0.254279,
0.150668, 0.175923, 0.220327, 0.146443, 0.0626908, 0.0916155,
0.067563, 0.0368806, 0.0234358, -0.115298, -0.12495, -0.22264,
-0.225755, -0.222733, -0.242869, -0.162478, -0.292053, -0.32252,
-0.342502, -0.190046, -0.0624749, -0.0739462, 0.0673163,
0.119245, 0.181782, 0.235037, 0.277005, 0.260045, 0.292578,
0.255728, 0.251966, 0.199482, 0.126307, 0.182306, 0.188257,
0.0795893, 0.0661445, 0.094915, 0.0124271, 0.0651577,
-0.0276913, -0.131888, -0.157236, -0.265534, -0.206544,
-0.241296, -0.1902, -0.225878, -0.317833, -0.307811, -0.287027,
-0.0831355, -0.0567085, -0.00585895, 0.109871, 0.157082,
0.218477, 0.267076, 0.300595, 0.27238, 0.253878, 0.255049,
0.254741, 0.134818, 0.141108, 0.188257, 0.145425, 0.0601314,
0.0522064, 0.0637084, 0.0120263, 0.0233433, -0.112276,
-0.145765, -0.226834, -0.268679, -0.234759, -0.260138,
-0.185636, -0.281785, -0.318758, -0.334485, -0.204848,
-0.0434179, -0.0571402, 0.0695365, 0.131549, 0.174535, 0.257177,
0.281631, 0.266829, 0.283635, 0.255666, 0.277992, 0.201733,
0.135249, 0.171575, 0.18283, 0.0972278, 0.0415677, 0.0933732,
0.0184403, 0.0523605, -0.0205988, -0.122606, -0.156187,
-0.275093, -0.226988, -0.263375, -0.216103, -0.21638, -0.33578,
-0.305992, -0.305714, -0.112677, -0.0479817, -0.0166826,
0.111505, 0.133862, 0.195011, 0.264763, 0.278855, 0.258719,
0.254186, 0.258256, 0.259675, 0.134478, 0.12239, 0.2042,
0.152394, 0.0575103, 0.0555984, 0.0567393, 0.0156342, 0.0366956,
-0.0999414, -0.128465, -0.202751, -0.286441, -0.215301,
-0.262358, -0.181874, -0.255019, -0.330692, -0.321132,
-0.234512, -0.067933, -0.0456382, 0.0415061, 0.116778, 0.167566,
0.241759, 0.303864, 0.285578, 0.274785, 0.248111, 0.282556,
0.223812, 0.151469, 0.178143, 0.197878, 0.13713, 0.0493386,
0.0937124, 0.0322551, 0.0226032, -0.00878843, -0.124796,
-0.172993, -0.283172, -0.251411, -0.257208, -0.234204,
-0.208918, -0.332018, -0.31256, -0.319436, -0.157853,
-0.0543958, -0.0322551, 0.0718493, 0.134263, 0.183694, 0.248019,
0.305097, 0.261525, 0.267384, 0.250239, 0.263745, 0.202504,
0.142342, 0.203275, 0.18539, 0.104259, 0.0677172, 0.0799901,
0.0122421, 0.0321009, -0.0696599, -0.154769, -0.194579,
-0.293842, -0.231521, -0.25727, -0.197601, -0.245028, -0.34426,
-0.32215, -0.28086, -0.0931574, -0.039255, 0.000986771,
0.0943908, 0.155293, 0.219002, 0.28049, 0.268587, 0.272287,
0.286441, 0.259891, 0.226587, 0.195504, 0.186253, 0.191403,
0.154831, 0.0464399, 0.107281, 0.0432637, 0.00601314, 0.0448981,
-0.133122, -0.171359, -0.246076, -0.27056, -0.225107, -0.247186,
-0.186191, -0.312036, -0.3063, -0.327546, -0.190169, -0.0418761,
-0.0505103, 0.0495852, 0.102038, 0.197354, 0.248882, 0.299053,
0.281723, 0.248481, 0.285979, 0.28308, 0.22594, 0.157606,
0.19942, 0.210244, 0.104351, 0.0550742, 0.0889944, 0.0254402,
0.036418, -0.0411977, -0.157236, -0.169663, -0.267754,
-0.222548, -0.252583, -0.222548, -0.207746, -0.325049,
-0.326005, -0.304696, -0.116007, -0.0730211, -0.0228499,
0.0810694, 0.128311, 0.207376, 0.262265, 0.278547, 0.269697,
0.289124, 0.249807, 0.253415, 0.189337, 0.156866, 0.203275,
0.174196, 0.0624749, 0.0926948, 0.0616732, 0.0216473, 0.0706158,
-0.0922323, -0.152487, -0.210552, -0.269389, -0.201918,
-0.237442, -0.184187, -0.280736, -0.312097, -0.309044,
-0.210706, -0.0545191, -0.0576028, 0.0335502, 0.102809, 0.16772,
0.23297, 0.279626, 0.304943, 0.25656, 0.252089, 0.270776,
0.235129, 0.14854, 0.17065, 0.196552, 0.1371, 0.0474267,
0.0718801, 0.0448056, 0.0353387, 0.00524222, -0.146011,
-0.156496, -0.256807, -0.247649, -0.2289, -0.231891, -0.21194,
-0.309322, -0.323969, -0.311203, -0.136051, -0.0548275,
-0.0312991, 0.0867433, 0.122452, 0.198804, 0.269543, 0.275679,
0.277468, 0.274477, 0.270437, 0.272996, 0.190694, 0.173918,
0.18431, 0.188103, 0.0831971, 0.0836597, 0.0852324, 0.0297573,
0.0803602, -0.0595455, -0.134972, -0.192482, -0.269389,
-0.204447, -0.253631, -0.192729, -0.261063, -0.32585, -0.306855,
-0.252798, -0.0782016, -0.068889, 0.0131056, 0.100003, 0.12202,
0.225107, 0.274168, 0.278454, 0.253168, 0.250856, 0.276543,
0.236455, 0.1371, 0.159394, 0.204693, 0.13821, 0.053594,
0.0741929, 0.0455148, 0.0486601, 0.0296031, -0.121835,
-0.123716, -0.234975, -0.254803, -0.209288, -0.238459,
-0.183262, -0.288661, -0.32437, -0.305406, -0.180857,
-0.0702458, -0.0284005, 0.059453, 0.103395, 0.186407, 0.261803,
0.291221, 0.279071, 0.260816, 0.259336, 0.274754, 0.196861,
0.168954, 0.166795, 0.192729, 0.108267, 0.0549817, 0.0824571,
0.0198896, 0.0440347, -0.0353387, -0.142743, -0.193037,
-0.272935, -0.222949, -0.244843, -0.204354, -0.236763,
-0.321595, -0.306608, -0.274014, -0.114774, -0.0650961,
-0.00163434, 0.0789725, 0.135804, 0.208764, 0.268463, 0.303987,
0.253107, 0.263684, 0.254803, 0.254556, 0.181165, 0.148232,
0.191094, 0.166363, 0.0769681, 0.0696907, 0.0599155, 0.0198896,
0.0363872, -0.101514, -0.147461, -0.210306, -0.273798,
-0.203121, -0.2326, -0.189337, -0.268217, -0.331833, -0.305313,
-0.226063, -0.0699682, -0.0393475, 0.0344753, 0.10395, 0.179993,
0.242283, 0.275309, 0.270684, 0.275463, 0.278794, 0.244565,
0.209134, 0.192544, 0.154861, 0.172284, 0.113725, 0.0403343,
0.0938358, -0.00780166, 0.0270437, 0.00826421, -0.168645,
-0.168491, -0.264578, -0.245243, -0.214098, -0.221962,
-0.198372, -0.306947, -0.292454, -0.292824, -0.124025,
-0.0502945, -0.0100219, 0.0778932, 0.125721, 0.241512, 0.257732,
0.315397, 0.276327, 0.251966, 0.290512, 0.256283, 0.203429,
0.144069, 0.179222, 0.178143, 0.0643868, 0.0470566, 0.0517438,
0.00360788, 0.0322242, -0.0838139, -0.167751, -0.179068,
-0.268371, -0.204909, -0.234204, -0.197909, -0.209689,
-0.317586, -0.303617, -0.236702, -0.0899195, -0.064541,
0.030374, 0.0940208, 0.16587, 0.235499, 0.278146, 0.292578,
0.277252, 0.280551, 0.249314, 0.239199, 0.174443, 0.139258,
0.177619, 0.130809, 0.0381757, 0.0741929, 0.0106386, 0.0216473,
0.0453298, -0.136822, -0.156033, -0.226433, -0.252336,
-0.187579, -0.228592, -0.1902, -0.281261, -0.302384, -0.274631,
-0.148447, -0.0534398, -0.0280921, 0.0729286, 0.116624,
0.209627, 0.249036, 0.297388, 0.312251, 0.244997, 0.260508,
0.261895, 0.211786, 0.1408, 0.150976, 0.179839, 0.101237,
0.028123, 0.0482901, 0.0119338, 0.0307441, -0.0317617,
-0.164667, -0.164513, -0.265133, -0.233063, -0.219002, -0.22264,
-0.209319, -0.308397, -0.325449, -0.260662, -0.110457,
-0.0643868, 0.0156342, 0.100466, 0.143668, 0.233063, 0.271917,
0.291344, 0.288353, 0.27386, 0.281415, 0.24879, 0.194271,
0.170187, 0.166117, 0.170218, 0.0635234, 0.0737303, 0.0486601,
0.025286, 0.0695674, -0.0870517, -0.142311, -0.200222,
-0.254248, -0.191865, -0.239693, -0.184773, -0.268309,
-0.320731, -0.298622, -0.213482, -0.080761, -0.064541,
0.0470566, 0.0926331, 0.149434, 0.244103, 0.270468, 0.296062,
0.245243, 0.270221, 0.282186, 0.216781, 0.152302, 0.159734,
0.204601, 0.130655, 0.0554442, 0.0639859, 0.0228191, 0.053224,
0.00755497, -0.122637, -0.12384, -0.243609, -0.234081,
-0.199204, -0.231675, -0.192636, -0.298159, -0.33615, -0.293349,
-0.167258, -0.0944525, -0.01622, 0.0542107, 0.104474, 0.212402,
0.2569, 0.296124, 0.283882, 0.265996, 0.289895, 0.265966,
0.212402, 0.18246, 0.175676, 0.200253, 0.109038, 0.0648494,
0.0686114, 0.0254402, 0.0626908, -0.0328718, -0.140584,
-0.190971, -0.268463, -0.216535, -0.239446, -0.20938, -0.255049,
-0.330291, -0.32215, -0.25582, -0.128465, -0.0876993,
0.00918931, 0.0713867, 0.138888, 0.212557, 0.258411, 0.303555,
0.250578, 0.277221, 0.268124, 0.258966, 0.196707, 0.170341,
0.209997, 0.174196, 0.0853865, 0.0806685, 0.0517438, 0.0280613,
0.0507262, -0.0982454, -0.130809, -0.207623, -0.26282,
-0.184094, -0.235931, -0.184156, -0.285578, -0.349132,
-0.308181, -0.219341, -0.0935582, -0.056616, 0.0324709,
0.0855407, 0.187548, 0.227204, 0.263653, 0.279472, 0.284036,
0.293503, 0.241821, 0.224891, 0.207314, 0.166363, 0.18502,
0.118937, 0.0577569, 0.0813469, -0.0138765, 0.0561226,
0.00215856, -0.16698, -0.145086, -0.268833, -0.216565,
-0.207777, -0.215178, -0.199266, -0.322767, -0.313485,
-0.289278, -0.127633, -0.0916155, -0.0131364, 0.054735,
0.111721, 0.237534, 0.225477, 0.316013, 0.261032, 0.26538,
0.294921, 0.245182, 0.20161, 0.154553, 0.19279, 0.167597,
0.0666996, 0.0395634, 0.0418144, 0.0121805, 0.0430171,
-0.0800518, -0.143452, -0.165438, -0.258904, -0.175152,
-0.230442, -0.17768, -0.213143, -0.330784, -0.309784, -0.231675,
-0.107836, -0.082272, 0.0410127, 0.0671621, 0.17028, 0.215301,
0.251195, 0.291067, 0.271516, 0.274322, 0.230719, 0.218416,
0.151531, 0.130346, 0.163866, 0.114219, 0.0417219, 0.0455765,
-0.00625983, 0.0337044, 0.0418761, -0.139289, -0.129082,
-0.224645, -0.221006, -0.169447, -0.205279, -0.167258, -0.27904,
-0.294921, -0.262512, -0.132659, -0.0774307, -0.0198279,
0.0779858, 0.102809, 0.221715, 0.222486, 0.302846, 0.305529,
0.239662, 0.263653, 0.240834, 0.185945, 0.116038, 0.145364,
0.152055, 0.0827654, 0.00795584, 0.0248851, 0.00255944,
0.0337969, -0.0268278, -0.146782, -0.148756, -0.263745,
-0.206204, -0.196984, -0.199112, -0.1935, -0.302476, -0.309168,
-0.240248, -0.104444, -0.0670388, 0.0388541, 0.0843073,
0.147738, 0.231028, 0.240525, 0.292115, 0.282772, 0.265441,
0.261124, 0.215486, 0.166178, 0.141447, 0.140646, 0.132813,
0.0432637, 0.0398717, 0.0184403, 0.018502, 0.0610565,
-0.0863116, -0.117672, -0.198125, -0.236856, -0.170496,
-0.212402, -0.155108, -0.260446, -0.303555, -0.285979,
-0.172747, -0.0715101, -0.0472725, 0.0775232, 0.0867433,
0.176694, 0.236116, 0.258657, 0.293749, 0.238213, 0.264208,
0.248728, 0.179839, 0.117857, 0.156064, 0.167104, 0.0879151,
0.0305282, 0.0343828, 0.00638318, 0.0328718, -0.0119029,
-0.119368, -0.125104, -0.259891, -0.208209, -0.182028,
-0.199975, -0.171914, -0.295137, -0.31034, -0.266243, -0.127108,
-0.0783558, 0.0140307, 0.0625983, 0.124148, 0.236424, 0.244072,
0.300749, 0.289895, 0.267353, 0.279842, 0.243455, 0.191773,
0.166518, 0.160258, 0.162108, 0.075673, 0.0412594, 0.0482901,
0.00447131, 0.0456382, -0.0573869, -0.14043, -0.193746,
-0.263745, -0.186161, -0.217768, -0.179901, -0.251102,
-0.317124, -0.313331, -0.219402, -0.102563, -0.0700299,
0.0393167, 0.0764131, 0.173456, 0.221253, 0.26282, 0.310463,
0.261741, 0.276851, 0.254864, 0.245953, 0.1622, 0.165562,
0.17435, 0.132011, 0.0572019, 0.0544574, 0.0220482, 0.0034537,
0.0205063, -0.119677, -0.130932, -0.240865, -0.243301, -0.17728,
-0.219156, -0.17398, -0.300904, -0.327238, -0.301921, -0.170187,
-0.0764439, -0.0329952, 0.0500478, 0.102933, 0.221777, 0.225416,
0.281631, 0.297697, 0.296463, 0.285023, 0.242684, 0.223565,
0.195658, 0.16217, 0.150236, 0.0823029, 0.0431096, 0.0501403,
-0.0340744, 0.0437263, -0.0448981, -0.158716, -0.163742,
-0.28567, -0.186006, -0.217768, -0.186315, -0.226957, -0.320886,
-0.318881, -0.264578, -0.0952234, -0.0902279, 0.0208147,
0.0545191, 0.168214, 0.256961, 0.242777, 0.345586, 0.281076,
0.29745, 0.297141, 0.262974, 0.188227, 0.170434, 0.18872,
0.13895, 0.0604397, 0.0393167, 0.0351846, 0.00237442, 0.0212156,
-0.109963, -0.139967, -0.2079, -0.250732, -0.179839, -0.232076,
-0.167412, -0.267137, -0.33063, -0.3203, -0.202751, -0.0993555,
-0.0611798, 0.0578495, 0.0813469, 0.216997, 0.224244, 0.281168,
0.322828, 0.310494, 0.293503, 0.272935, 0.240741, 0.164174,
0.170989, 0.1622, 0.107651, 0.0494311, 0.0446514, -0.00622899,
0.0457923, 0.00178852, -0.136329, -0.138765, -0.264671,
-0.197447, -0.196182, -0.196121, -0.213143, -0.313639,
-0.309014, -0.273243, -0.109285, -0.087761, -0.000524222,
0.0845848, 0.137901, 0.243794, 0.233741, 0.337167, 0.314502,
0.265596, 0.282617, 0.27275, 0.177526, 0.144038, 0.166826,
0.145456, 0.0791884, 0.0147091, 0.0421845, 0.00154183,
0.0193345, -0.0727127, -0.149928, -0.198033, -0.277653,
-0.200222, -0.225878, -0.204077, -0.261587, -0.33541, -0.330938,
-0.229455, -0.0904746, -0.0748713, 0.0528848, 0.0868359,
0.186839, 0.251041, 0.264362, 0.32289, 0.306762, 0.282864,
0.294613, 0.236609, 0.179284, 0.178976, 0.160165, 0.133122,
0.0514971, 0.0580036, 0.0269203, 0.0357088, 0.0242067,
-0.101514, -0.134787, -0.250116, -0.216781, -0.19757, -0.206389,
-0.197416, -0.315058, -0.31256, -0.29967, -0.141201, -0.0865892,
-0.0369422, 0.0942983, 0.0955318, 0.211909, 0.246107, 0.291344,
0.312036, 0.269203, 0.284498, 0.276481, 0.175923, 0.141047,
0.193315, 0.152549, 0.0863116, 0.0432637, 0.0464091, 0.0232816,
0.0351537, -0.0403959, -0.103056, -0.157883, -0.264578,
-0.177989, -0.204077, -0.177989, -0.221191, -0.318912,
-0.318758, -0.249191, -0.0960252, -0.0748713, 0.0303124,
0.0707083, 0.159425, 0.245552, 0.259891, 0.31111, 0.292053,
0.261371, 0.287027, 0.241975, 0.1762, 0.176139, 0.167412,
0.140954, 0.0667612, 0.0588362, 0.0464091, 0.0180394, 0.0270745,
-0.0863116, -0.139536, -0.23994, -0.237226, -0.188504,
-0.206759, -0.186006, -0.291745, -0.31111, -0.320516, -0.172346,
-0.0883777, -0.0572327, 0.0535015, 0.0901662, 0.200438,
0.228962, 0.285424, 0.295445, 0.270745, 0.253415, 0.264671,
0.218786, 0.148602, 0.191495, 0.153289, 0.119523, 0.0603164,
0.0643868, 0.021894, 0.0241142, -0.0148324, -0.114465,
-0.150637, -0.260292, -0.191279, -0.189491, -0.172192,
-0.206081, -0.321811, -0.321749, -0.293071, -0.109038,
-0.0744395, -0.0063215, 0.0617657, 0.136884, 0.231645, 0.237688,
0.284961, 0.296, 0.286595, 0.254032, 0.234266, 0.187456,
0.181905, 0.153782, 0.119831, 0.0630608, 0.0612106, 0.0373431,
-0.00709242, 0.0530389, -0.0845231, -0.127417, -0.207777,
-0.244843, -0.157853, -0.205927, -0.151839, -0.271023,
-0.295908, -0.330599, -0.188412, -0.0580036, -0.0778316,
0.051898, 0.0715717, 0.210706, 0.241821, 0.271609, 0.311018,
0.262204, 0.265503, 0.270159, 0.222332, 0.136205, 0.179777,
0.14854, 0.095871, 0.0353387, 0.0481051, 0.0264578, 0.0136298,
-0.0183478, -0.124179, -0.14191, -0.241235, -0.189398,
-0.194332, -0.176601, -0.167104, -0.302384, -0.30778, -0.308243,
-0.110272, -0.0825187, -0.0219248, 0.0801135, 0.114126,
0.228283, 0.236979, 0.280952, 0.294829, 0.282309, 0.236147,
0.25064, 0.16109, 0.131241, 0.161337, 0.109593, 0.0590829,
0.0370348, 0.0254402, -0.00508804, 0.0451756, -0.0691973,
-0.122298, -0.189645, -0.246569, -0.162725, -0.206235,
-0.147985, -0.259675, -0.289525, -0.305529, -0.208918,
-0.0444972, -0.0809769, 0.0457923, 0.1058, 0.183169, 0.253353,
0.268124, 0.326899, 0.286904, 0.238521, 0.265287, 0.231645,
0.107496, 0.155632, 0.135403, 0.101082, 0.0272904, 0.0236517,
0.0334577, 0.00962102, 0.000154183, -0.107897, -0.141756,
-0.239446, -0.223195, -0.202442, -0.193099, -0.186777,
-0.300533, -0.312282, -0.323137, -0.128928, -0.05529,
-0.0346295, 0.10725, 0.121311, 0.227112, 0.267353, 0.275772,
0.310771, 0.282648, 0.254864, 0.285269, 0.169755, 0.149897,
0.168183, 0.12091, 0.0710784, 0.0388541, 0.0595146, 0.0225724,
0.0474267, -0.0465016, -0.103981, -0.183385, -0.251195,
-0.178297, -0.218323, -0.152919, -0.259274, -0.310864,
-0.316414, -0.254248, -0.0488143, -0.0759505, 0.0292023,
0.116316, 0.141972, 0.256653, 0.276327, 0.293904, 0.296371,
0.25212, 0.265133, 0.251102, 0.0958401, 0.1692, 0.176077,
0.0972586, 0.0550742, 0.0410435, 0.0412594, 0.0289247,
0.0018502, -0.0975053, -0.11058, -0.23553, -0.228653, -0.199605,
-0.20605, -0.167042, -0.296926, -0.313577, -0.333775, -0.162324,
-0.0552283, -0.0475192, 0.0804527, 0.111814, 0.216935, 0.288199,
0.292578, 0.306762, 0.290573, 0.250424, 0.302908, 0.188998,
0.149311, 0.191927, 0.145148, 0.0912455, 0.050757, 0.0793426,
0.0343828, 0.0242992, -0.0337969, -0.110919, -0.183539,
-0.271177, -0.199729, -0.24068, -0.176663, -0.260292, -0.316877,
-0.327515, -0.301459, -0.0722501, -0.0782633, -0.00595146,
0.0994172, 0.156311, 0.242622, 0.286904, 0.298745, 0.290758,
0.275679, 0.239076, 0.289216, 0.139443, 0.174844, 0.185174,
0.119091, 0.091708, 0.0672546, 0.0753338, 0.0247618, 0.0179469,
-0.0942366, -0.114928, -0.228438, -0.240464, -0.203984,
-0.202812, -0.158038, -0.312745, -0.318881, -0.352524,
-0.204848, -0.0359246, -0.0663295, 0.0585895, 0.113417, 0.20531,
0.275309, 0.283789, 0.284714, 0.317031, 0.260569, 0.268124,
0.211015, 0.155756, 0.202134, 0.138179, 0.080576, 0.0546116,
0.0931574, 0.0134139, 0.0195196, -0.020198, -0.136822,
-0.157544, -0.273089, -0.2005, -0.2252, -0.176663, -0.233896,
-0.311326, -0.30445, -0.32622, -0.0466558, -0.061149,
-0.0158808, 0.0885319, 0.152394, 0.261895, 0.281538, 0.301058,
0.279225, 0.275001, 0.249314, 0.291838, 0.141108, 0.157328,
0.197169, 0.109439, 0.0641401, 0.0490302, 0.0757347, 0.0136298,
0.00841839, -0.102593, -0.120324, -0.208209, -0.22375,
-0.201671, -0.227667, -0.137963, -0.286256, -0.290727,
-0.342101, -0.21453, -0.0176077, -0.0858491, 0.061704, 0.11647,
0.193253, 0.272904, 0.288661, 0.269974, 0.308335, 0.237442,
0.258719, 0.232138, 0.0970736, 0.182368, 0.148817, 0.0650961,
0.0485985, 0.091153, 0.0347837, 0.0442505, -0.00493386,
-0.102871, -0.122791, -0.249314, -0.177434, -0.207068,
-0.158963, -0.21009, -0.311881, -0.272842, -0.316044,
-0.0582503, -0.0265503, -0.030004, 0.107897, 0.156403, 0.229486,
0.288661, 0.296895, 0.292763, 0.26427, 0.20605, 0.291529,
0.119245, 0.119214, 0.178143, 0.101329, 0.065682, 0.0360788,
0.0873601, 0.0162509, 0.0263653, -0.0778932, -0.106602,
-0.193037, -0.231151, -0.197909, -0.228746, -0.150328,
-0.286595, -0.290203, -0.343489, -0.243794, -0.0144932,
-0.0718801, 0.0464399, 0.132721, 0.169139, 0.271239, 0.290049,
0.248574, 0.288754, 0.232415, 0.275062, 0.227975, 0.08699,
0.177588, 0.147923, 0.0750254, 0.0385766, 0.102563, 0.062845,
0.0541182, 0.00101761, -0.07851, -0.104289, -0.248882,
-0.182861, -0.223257, -0.168892, -0.198649, -0.317956,
-0.273151, -0.337722, -0.097197, -0.0198279, -0.0448056,
0.0981837, 0.141417, 0.189953, 0.292454, 0.274014, 0.252182,
0.278331, 0.207592, 0.291899, 0.119769, 0.0979987, 0.208301,
0.107805, 0.0677172, 0.0550742, 0.0895495, 0.0395017, 0.0494927,
-0.0732678, -0.0884394, -0.164945, -0.240865, -0.175522,
-0.232539, -0.138148, -0.264578, -0.303216, -0.335533,
-0.266613, -0.0274446, -0.0495236, 0.0250393, 0.119307,
0.163187, 0.254864, 0.321441, 0.252398, 0.282001, 0.221561,
0.264979, 0.239909, 0.0880076, 0.182553, 0.17876, 0.0997872,
0.0434179, 0.113355, 0.0794351, 0.0357088, 0.00687656,
-0.0885319, -0.119615, -0.259182, -0.210306, -0.236239,
-0.200037, -0.203152, -0.333313, -0.274168, -0.35863, -0.141386,
-0.0194579, -0.0576028, 0.0603781, 0.152086, 0.187857, 0.276543,
0.298313, 0.23149, 0.282957, 0.205927, 0.281014, 0.175275,
0.110333, 0.207931, 0.128188, 0.102501, 0.0699374, 0.121558,
0.0464399, 0.0465016, -0.0647877, -0.104968, -0.164729,
-0.249345, -0.186962, -0.241081, -0.133276, -0.271239,
-0.315674, -0.326745, -0.304326, -0.0390391, -0.0408893,
-0.00175769, 0.112369, 0.169447, 0.236301, 0.320947, 0.254279,
0.279935, 0.271917, 0.250331, 0.249036, 0.133954, 0.187394,
0.182368, 0.108637, 0.0395017, 0.118628, 0.0838139, 0.0154183,
0.0241451, -0.115298, -0.134571, -0.236301, -0.222979,
-0.223349, -0.202041, -0.187271, -0.326436, -0.256252,
-0.359709, -0.157544, -0.00317617, -0.0476734, 0.0504487,
0.141602, 0.217182, 0.284868, 0.324494, 0.241697, 0.277684,
0.24031, 0.307688, 0.209905, 0.11499, 0.219711, 0.157791,
0.0919856, 0.0580653, 0.125536, 0.0519905, 0.0500478,
-0.0619199, -0.121003, -0.164359, -0.250702, -0.194271,
-0.272719, -0.152179, -0.256406, -0.318665, -0.319529,
-0.329212, -0.0487218, -0.0616115, -0.0337969, 0.104104,
0.171266, 0.227975, 0.330291, 0.274908, 0.278701, 0.291838,
0.252028, 0.2886, 0.117611, 0.148602, 0.213944, 0.134108,
0.0251935, 0.0930032, 0.0735453, 0.0196737, 0.0152641,
-0.134941, -0.130871, -0.247556, -0.225755, -0.215024,
-0.234759, -0.204046, -0.341269, -0.261032, -0.323075,
-0.169601, 0.0152024, -0.026612, 0.0546116, 0.180702, 0.216319,
0.282247, 0.357119, 0.290111, 0.310648, 0.220327, 0.277869,
0.19609, 0.0683031, 0.16991, 0.117302, 0.0698757, 0.00144932,
0.102162, 0.0348454, 0.0117179, -0.0748096, -0.155848,
-0.127849, -0.228067, -0.162632, -0.228838, -0.135897,
-0.195905, -0.276327, -0.286503, -0.321657, -0.0391625,
0.0173302, 0.0114095, 0.118443, 0.148694, 0.191557, 0.302445,
0.239909, 0.212711, 0.219094, 0.221931, 0.273151, 0.083043,
0.0840606, 0.132659, 0.106479, 0.0287705, 0.118289, 0.141293,
0.0869284, 0.104012, -0.0424312, -0.0465941, -0.18542,
-0.190817, -0.149928, -0.164637, -0.109223, -0.298992,
-0.287736, -0.353603, -0.242468, -0.0419686, -0.0794351,
-0.0182861, 0.111505, 0.154214, 0.205618, 0.251349, 0.149681,
0.199636, 0.21268, 0.289957, 0.245459, 0.11351, 0.244873,
0.237195, 0.152148, 0.0675321, 0.140584, 0.127324, 0.162416,
0.0656203, -0.0926948, -0.110148, -0.263745, -0.198341,
-0.264424, -0.231583, -0.252028, -0.342872, -0.319282, -0.37081,
-0.194641, -0.132196, -0.110765, 0.0304666, 0.147831, 0.197878,
0.329921, 0.332943, 0.308643, 0.296062, 0.254957, 0.315643,
0.21046, 0.261494, 0.31811, 0.263129, 0.0889327, 0.0942983,
0.122298, 0.0312375, 0.00918931, -0.135095, -0.129113,
-0.214623, -0.264763, -0.288661, -0.381603, -0.295846,
-0.396096, -0.333991, -0.341793, -0.271917, -0.044343,
0.0104844, 0.0255944, 0.107188, 0.178544, 0.271362, 0.464399,
0.396559, 0.370224, 0.311851, 0.284036, 0.268741, 0.115606,
0.14891, 0.129884, 0.124302, 0.0735761, 0.0980912, -0.00996022,
-0.0899195, -0.136483, -0.240525, -0.175121, -0.243147,
-0.194024, -0.229363, -0.150606, -0.163742, -0.343242,
-0.347343, -0.308335, -0.0363255, 0.136051, 0.106325, 0.114743,
0.190385, 0.2009, 0.298591, 0.301058, 0.191495, 0.263961,
0.281384, 0.27423, 0.104104, 0.0000925098, 0.00755497,
0.0761972, 0.0138148, 0.0750563, 0.160474, 0.043973, 0.126492,
-0.0105461, -0.141077, -0.209473, -0.192883, -0.0694132,
-0.0891486, -0.037559, -0.229918, -0.29045, -0.340313,
-0.323846, -0.103333, -0.111135, -0.0752721, 0.0672238,
0.173918, 0.143267, 0.160319, 0.102963, 0.123778, 0.226803,
0.326652, 0.333313, 0.19424, 0.260107, 0.314256, 0.228283,
0.0590521, 0.166795, 0.233433, 0.217244, 0.161892, -0.0967036,
-0.151932, -0.27719, -0.265226, -0.336181, -0.36785, -0.29782,
-0.392766, -0.362145, -0.46813, -0.387215, -0.235931, -0.179592,
0.0148016, 0.213019, 0.285701, 0.364519, 0.471831, 0.418144,
0.43825, 0.358753, 0.390669, 0.396065, 0.327207, 0.342872,
0.267292, 0.029449, -0.0419378, 0.0101144, -0.145395, -0.156002,
-0.282402, -0.315366, -0.297203, -0.401955, -0.427796,
-0.478923, -0.3026, -0.261124, -0.215548, -0.164667, -0.1375,
0.139751, 0.240279, 0.240155, 0.300009, 0.399026, 0.478121,
0.582812, 0.521848, 0.338, 0.237658, 0.184403, 0.145919,
-0.0799901, -0.174535, -0.131025, -0.117827, -0.196429,
-0.180795, -0.221715, -0.272256, -0.126091, -0.158192,
-0.0650961, -0.0543032, -0.036418, 0.0404268, 0.0672238,
0.146289, -0.0110395, -0.0470566, -0.0386383, 0.0921706,
0.213852, 0.0548891, 0.0317617, 0.0919239, 0.0623208, 0.0407043,
-0.00240525, -0.109285, -0.0683956, -0.0296956, 0.00616732,
-0.151099, -0.232693, -0.0399642, 0.171451, 0.161707, 0.1622,
0.32767, 0.330908, 0.457183, 0.367696, 0.230288, 0.197478,
0.130192, 0.168429, 0.0168985, -0.0895186, -0.237781, -0.38962,
-0.435659, -0.560208, -0.484844, -0.432483, -0.406519,
-0.254803, -0.17583, -0.201147, -0.102717, 0.0789109, 0.199328,
0.322797, 0.413149, 0.481359, 0.438712, 0.522557, 0.636005,
0.575226, 0.439329, 0.491535, 0.48176, 0.327207, 0.194116,
-0.128465, -0.201887, -0.323198, -0.510222, -0.588825,
-0.713127, -0.605076, -0.63363, -0.682815, -0.743995, -0.64026,
-0.289957, -0.0791884, 0.0883777, 0.276388, 0.403158, 0.552006,
0.755774, 0.750347, 0.704154, 0.671714, 0.748743, 0.658207,
0.454901, 0.313577, 0.219618, 0.0753646, -0.107188, -0.146011,
-0.354775, -0.413765, -0.464183, -0.537451, -0.544759, -0.68411,
-0.609794, -0.48395, -0.270529, -0.152703, -0.173733,
-0.0865275, -0.0195812, 0.243609, 0.424003, 0.430171, 0.481452,
0.628296, 0.625027, 0.592217, 0.52231, 0.266151, 0.221623,
0.149002, 0.0351537, -0.186253, -0.333251, -0.277005, -0.229455,
-0.309322, -0.380369, -0.316815, -0.21564, -0.00746246,
-0.0257486, 0.0158192, 0.0698757, 0.0746554, 0.21894, 0.218878,
0.281939, 0.186376, 0.11243, 0.0825804, 0.0260569, 0.0913997,
-0.00900429, -0.0740387, -0.0286164, -0.0646952, -0.168059,
-0.126307, -0.178606, -0.184341, -0.11351, -0.150544, -0.179531,
-0.0909063, 0.0813778, 0.237503, 0.328934, 0.2639, 0.435659,
0.484751, 0.498504, 0.505535, 0.299146, 0.296, 0.189799,
0.0795276, -0.0491844, -0.222949, -0.285794, -0.492491,
-0.593204, -0.733942, -0.648124, -0.501496, -0.477289, -0.35792,
-0.270869, -0.184804, -0.0256252, 0.255111, 0.310864, 0.406704,
0.560578, 0.624564, 0.652903, 0.620124, 0.664128, 0.683185,
0.551636, 0.460884, 0.426933, 0.229979, 0.0822104, -0.160104,
-0.347128, -0.455086, -0.678868, -0.676493, -0.748928,
-0.677634, -0.628912, -0.732277, -0.724753, -0.594745,
-0.196676, -0.0203522, 0.150698, 0.379136, 0.526874, 0.663696,
0.794721, 0.815443, 0.739184, 0.757532, 0.696784, 0.608252,
0.393999, 0.179376, 0.109963, -0.015665, -0.305868, -0.374418,
-0.453298, -0.500046, -0.453791, -0.575072, -0.562675,
-0.627617, -0.54701, -0.304851, -0.197971, -0.0171143,
0.0116562, 0.0808844, 0.168368, 0.319344, 0.480126, 0.460175,
0.526011, 0.587961, 0.578402, 0.496007, 0.408955, 0.244781,
0.0784175, -0.0385457, -0.181998, -0.296586, -0.4261, -0.383206,
-0.265472, -0.331216, -0.429554, -0.262574, -0.0777391,
0.0695674, 0.146659, 0.139505, 0.25949, 0.268063, 0.341084,
0.327423, 0.288877, 0.285424, 0.14521, 0.0459465, -0.0704,
-0.0540874, -0.114435, -0.19057, -0.211323, -0.303555,
-0.325203, -0.256345, -0.222085, -0.195134, -0.168491,
-0.172037, -0.0679639, 0.0365722, 0.166518, 0.324185, 0.487681,
0.435875, 0.573592, 0.673656, 0.615498, 0.607851, 0.416078,
0.348577, 0.190632, 0.00394708, -0.101052, -0.316569, -0.36711,
-0.585433, -0.810355, -0.861297, -0.818928, -0.616362,
-0.511147, -0.40436, -0.332326, -0.186654, 0.0899812, 0.320886,
0.457769, 0.53927, 0.645564, 0.80095, 0.836566, 0.724321,
0.686731, 0.703691, 0.603596, 0.408862, 0.331062, 0.131857,
-0.0259336, -0.170681, -0.47621, -0.619446, -0.81276, -0.801505,
-0.750069, -0.717753, -0.603904, -0.720466, -0.662678,
-0.423602, -0.138364, 0.08662, 0.285701, 0.449659, 0.652102,
0.805884, 0.862099, 0.873755, 0.778285, 0.722902, 0.638996,
0.549169, 0.30815, 0.106417, -0.00841839, -0.107219, -0.400506,
-0.542539, -0.486478, -0.526566, -0.426223, -0.494742,
-0.568935, -0.52194, -0.37303, -0.156002, -0.0927565, 0.0976903,
0.154615, 0.179623, 0.281846, 0.305251, 0.394708, 0.413673,
0.448148, 0.422215, 0.400629, 0.30778, 0.236517, 0.162786,
-0.0537482, -0.205896, -0.295692, -0.287644, -0.351846,
-0.334084, -0.23368, -0.234852, -0.279256, -0.0530698, 0.118752,
0.176509, 0.325819, 0.276697, 0.363533, 0.386198, 0.318357,
0.325449, 0.250177, 0.244997, 0.0394708, -0.125536, -0.218015,
-0.283512, -0.259983, -0.319375, -0.438373, -0.439514,
-0.335225, -0.280798, -0.147769, -0.133646, -0.117364,
-0.0269203, 0.138117, 0.27275, 0.359524, 0.428567, 0.576213,
0.616331, 0.592124, 0.67674, 0.51639, 0.519103, 0.416387,
0.134047, 0.030374, -0.176046, -0.287798, -0.401647, -0.531284,
-0.677048, -0.870394, -0.820654, -0.784791, -0.598908,
-0.461007, -0.370409, -0.236517, 0.0350304, 0.307318, 0.419686,
0.620648, 0.650128, 0.717691, 0.865892, 0.830245, 0.737118,
0.623423, 0.589102, 0.510592, 0.241913, 0.120232, -0.00641401,
-0.180363, -0.267168, -0.56616, -0.721977, -0.698264, -0.753554,
-0.645502, -0.629282, -0.567455, -0.498504, -0.421475,
-0.235992, -0.0749021, 0.156218, 0.321441, 0.490949, 0.622406,
0.741404, 0.745506, 0.759536, 0.726233, 0.587715, 0.482069,
0.352339, 0.18061, 0.0179469, -0.148848, -0.269173, -0.391008,
-0.505905, -0.426624, -0.458879, -0.388079, -0.351229,
-0.452681, -0.267939, -0.13232, -0.0606247, 0.0801443, 0.15298,
0.270838, 0.270684, 0.251935, 0.253508, 0.309229, 0.332233,
0.306701, 0.259737, 0.195319, 0.180764, 0.0996947, 0.0678405,
-0.0976595, -0.292886, -0.225755, -0.230658, -0.259274,
-0.270375, -0.25727, -0.125875, -0.0411669, 0.0767215, 0.197971,
0.260138, 0.392211, 0.424096, 0.377656, 0.394554, 0.287675,
0.261494, 0.224336, 0.10688, -0.0197354, -0.219156, -0.379568,
-0.403281, -0.390854, -0.490579, -0.503284, -0.439144,
-0.329705, -0.254186, -0.157328, -0.0900737, -0.0452681,
0.13047, 0.356194, 0.390391, 0.435104, 0.513306, 0.571464,
0.724321, 0.61371, 0.60523, 0.538284, 0.459404, 0.423294,
0.116285, -0.0595455, -0.228499, -0.380277, -0.433254, -0.64504,
-0.718585, -0.778069, -0.828271, -0.766937, -0.637238,
-0.509297, -0.388664, -0.0978754, 0.148972, 0.300133, 0.45154,
0.618952, 0.74344, 0.771562, 0.850843, 0.844923, 0.706035,
0.634, 0.507355, 0.415122, 0.246939, 0.00169601, -0.0719726,
-0.234913, -0.373894, -0.528138, -0.672793, -0.648833,
-0.725986, -0.686608, -0.617503, -0.576614, -0.355669,
-0.237133, -0.206667, -0.0589904, 0.144192, 0.296278, 0.532826,
0.621018, 0.672423, 0.721145, 0.708625, 0.696753, 0.529495,
0.383607, 0.300318, 0.135866, -0.0037929, -0.189645, -0.402633,
-0.343026, -0.415616, -0.457307, -0.400937, -0.449166,
-0.322212, -0.242006, -0.117549, -0.0617657, -0.0564618,
0.0941441, 0.198557, 0.323044, 0.335934, 0.225508, 0.18394,
0.217922, 0.208918, 0.162416, 0.161399, 0.0634617, 0.0484443,
-0.000215856, -0.106664, -0.191896, -0.300071, -0.234667,
-0.216165, -0.219341, -0.20861, -0.235283, -0.0448056, 0.207839,
0.17691, 0.252428, 0.344044, 0.422708, 0.590027, 0.503747,
0.421475, 0.333004, 0.203367, 0.225416, 0.0484135, -0.0644177,
-0.228283, -0.45006, -0.48139, -0.597274, -0.687594, -0.583552,
-0.495883, -0.425329, -0.272071, -0.229918, -0.127417,
0.0565852, 0.261834, 0.419439, 0.424312, 0.521724, 0.672485,
0.678744, 0.761479, 0.722995, 0.566067, 0.565605, 0.374572,
0.302754, 0.173764, -0.135743, -0.241605, -0.446206, -0.61112,
-0.732277, -0.794721, -0.693238, -0.792007, -0.782941,
-0.675661, -0.579636, -0.358167, -0.00641401, 0.160659,
0.283573, 0.534583, 0.644331, 0.859508, 0.879306, 0.833667,
0.8592, 0.716828, 0.663912, 0.475284, 0.304789, 0.237226,
-0.00709242, -0.156249, -0.33763, -0.580715, -0.552777,
-0.567085, -0.661476, -0.631688, -0.722316, -0.61078, -0.469888,
-0.251565, -0.05492, -0.165808, -0.0202905, 0.19094, 0.340159,
0.509236, 0.605292, 0.58386, 0.663604, 0.640476, 0.543464,
0.499738, 0.319961, 0.239354, 0.0855099, -0.137809, -0.320886,
-0.458633, -0.395233, -0.337414, -0.425607, -0.42277, -0.452373,
-0.298622, 0.0383916, 0.0101761, 0.00848006, 0.110426, 0.181227,
0.369854, 0.392365, 0.396867, 0.305313, 0.174196, 0.19094,
0.13232, 0.0327176, 0.0339203, 0.00934349, -0.0691665,
-0.112214, -0.325604, -0.291591, -0.198125, -0.276018, -0.17876,
-0.239292, -0.224675, -0.131395, 0.032841, 0.268371, 0.272472,
0.301058, 0.422461, 0.510284, 0.619045, 0.637022, 0.41281,
0.359986, 0.239199, 0.0749021, 0.00222023, -0.176971, -0.229733,
-0.437263, -0.662709, -0.779611, -0.781523, -0.632767,
-0.482069, -0.41947, -0.320053, -0.224799, -0.106201, 0.239076,
0.379136, 0.433933, 0.551112, 0.615313, 0.743594, 0.755003,
0.694378, 0.732616, 0.610164, 0.485985, 0.355114, 0.135804,
0.147923, -0.0620741, -0.307256, -0.457091, -0.787875,
-0.785994, -0.738043, -0.698171, -0.670696, -0.786087,
-0.707577, -0.532918, -0.241019, 0.0256869, 0.198187, 0.341731,
0.557032, 0.720744, 0.830553, 0.945635, 0.801566, 0.808135,
0.739184, 0.542323, 0.373339, 0.178513, 0.125382, 0.00178852,
-0.276697, -0.494187, -0.620987, -0.570477, -0.437294,
-0.559869, -0.586975, -0.635172, -0.605322, -0.234852,
-0.127633, -0.0149866, 0.0255019, 0.0674705, 0.240155, 0.378889,
0.460236, 0.563045, 0.57908, 0.575534, 0.591908, 0.393753,
0.398008, 0.293842, 0.134201, 0.0225724, -0.283481, -0.378057,
-0.392642, -0.420858, -0.319344, -0.320053, -0.431404,
-0.296679, -0.133276, 0.132505, 0.212526, 0.137038, 0.282648,
0.26982, 0.371951, 0.42903, 0.355669, 0.35274, 0.168337,
0.0327176, -0.0536248, -0.126862, -0.140276, -0.0948534,
-0.211632, -0.348515, -0.399087, -0.354898, -0.162786,
-0.248543, -0.187024, -0.166271, -0.131796, 0.0957168, 0.206852,
0.300472, 0.440902, 0.489932, 0.543156, 0.630701, 0.568195,
0.676185, 0.544451, 0.356286, 0.231984, -0.105029, -0.0724043,
-0.241451, -0.320361, -0.460483, -0.834592, -0.902094,
-0.814055, -0.675722, -0.540689, -0.428012, -0.374726,
-0.149773, 0.0305282, 0.323106, 0.497394, 0.535046, 0.719664,
0.723673, 0.802214, 0.84409, 0.729409, 0.695766, 0.68152,
0.427704, 0.247402, 0.0374973, -0.0481976, -0.0332419,
-0.385211, -0.595886, -0.853094, -0.854235, -0.678343,
-0.750008, -0.622375, -0.71066, -0.692621, -0.411915, -0.128619,
0.042277, 0.254094, 0.448734, 0.594591, 0.816522, 0.79802,
0.947023, 0.886799, 0.783435, 0.711524, 0.452157, 0.335564,
0.137285, 0.0034537, -0.0823029, -0.35459, -0.60856, -0.576151,
-0.594961, -0.482223, -0.45154, -0.616979, -0.509205, -0.466712,
-0.124086, -0.0238367, 0.0181011, 0.240525, 0.153011, 0.249869,
0.34796, 0.430109, 0.495112, 0.554103, 0.464893, 0.422153,
0.299238, 0.216226, 0.251195, 0.0533473, -0.111659, -0.367171,
-0.380277, -0.352061, -0.433501, -0.382991, -0.299824,
-0.341392, -0.205896, 0.0272904, 0.107866, 0.364519, 0.322427,
0.348669, 0.389682, 0.339634, 0.485615, 0.379907, 0.355515,
0.190077, -0.0836905, -0.172284, -0.208702, -0.235222,
-0.247618, -0.335996, -0.489007, -0.36711, -0.35385, -0.223411,
-0.133122, -0.215394, -0.116778, -0.00730827, 0.235746,
0.268525, 0.309168, 0.51787, 0.59897, 0.548491, 0.60856,
0.597274, 0.592649, 0.627617, 0.293133, 0.123716, -0.148478,
-0.251812, -0.252583, -0.473588, -0.58016, -0.874927, -0.92627,
-0.826359, -0.718924, -0.574239, -0.432853, -0.337383,
-0.0832896, 0.225261, 0.341546, 0.571155, 0.683185, 0.766012,
0.796879, 0.820839, 0.822782, 0.723396, 0.637639, 0.608221,
0.365475, 0.103888, 0.0334885, -0.157328, -0.12276, -0.404792,
-0.730642, -0.75414, -0.838848, -0.68152, -0.690616, -0.642388,
-0.609023, -0.585556, -0.287829, -0.105276, 0.084924, 0.304481,
0.533134, 0.621419, 0.766259, 0.825311, 0.839989, 0.903358,
0.707885, 0.559345, 0.367449, 0.216103, 0.0359555, -0.114743,
-0.250331, -0.463659, -0.605384, -0.557495, -0.537297,
-0.524284, -0.37266, -0.496037, -0.382035, -0.226896, -0.118474,
0.104937, 0.14265, 0.314934, 0.287675, 0.279842, 0.306238,
0.377132, 0.443739, 0.46147, 0.332912, 0.219772, 0.251503,
0.0971661, 0.110179, -0.0574794, -0.320207, -0.379876,
-0.363378, -0.352431, -0.391131, -0.377563, -0.274939,
-0.159487, -0.0444972, 0.17728, 0.209134, 0.434426, 0.550402,
0.446884, 0.487773, 0.35789, 0.423787, 0.38666, 0.26797,
0.0898578, -0.209072, -0.310956, -0.39107, -0.388603, -0.473835,
-0.570755, -0.602547, -0.449906, -0.363163, -0.324987,
-0.135804, -0.170496, -0.0436338, 0.170372, 0.348885, 0.385612,
0.488791, 0.635388, 0.718894, 0.704092, 0.666841, 0.668537,
0.5636, 0.5949, 0.288908, 0.00555059, -0.157328, -0.376176,
-0.354158, -0.592803, -0.776435, -0.93367, -0.957075, -0.902526,
-0.805144, -0.599309, -0.471954, -0.290419, -0.0143699, 0.32952,
0.383823, 0.625212, 0.848469, 0.870301, 0.909217, 0.881464,
0.853156, 0.78106, 0.654445, 0.472417, 0.297697, 0.0618582,
-0.0495236, -0.245182, -0.361775, -0.521632, -0.813685,
-0.769496, -0.85809, -0.768479, -0.656295, -0.641401, -0.489932,
-0.402633, -0.204693, -0.0906904, 0.199636, 0.417466, 0.586481,
0.689352, 0.788153, 0.901539, 0.807518, 0.880847, 0.674705,
0.437972, 0.323137, 0.172222, -0.00462549, -0.224737, -0.439977,
-0.564741, -0.578649, -0.615437, -0.53816, -0.52598, -0.395233,
-0.351136, -0.265041, -0.0671004, -0.0633384, 0.1935, 0.305683,
0.418391, 0.41651, 0.32252, 0.330599, 0.342255, 0.431959,
0.312498, 0.22557, 0.121835, 0.131641, 0.0279996, -0.0888402,
-0.204385, -0.390916, -0.389898, -0.38629, -0.375343, -0.383145,
-0.33763, -0.2326, -0.0100836, 0.105646, 0.193315, 0.338555,
0.524345, 0.671189, 0.542632, 0.535971, 0.426563, 0.398162,
0.407351, 0.199359, -0.000616732, -0.255975, -0.361405,
-0.463567, -0.473588, -0.610935, -0.692158, -0.560733,
-0.497425, -0.341885, -0.301459, -0.142989, -0.0126738,
0.0872367, 0.292732, 0.412655, 0.490949, 0.606217, 0.702766,
0.746492, 0.759475, 0.640322, 0.643005, 0.577446, 0.434025,
0.197786, -0.0967961, -0.228345, -0.446298, -0.513923,
-0.721237, -0.876777, -0.885103, -0.936631, -0.894415,
-0.796509, -0.540134, -0.412995, -0.114157, 0.151531, 0.336181,
0.561134, 0.726233, 0.911006, 0.951895, 0.899689, 0.903512,
0.849795, 0.711739, 0.554473, 0.305837, 0.188473, 0.00400876,
-0.161121, -0.276388, -0.494403, -0.614943, -0.726788,
-0.734404, -0.806284, -0.757069, -0.617441, -0.559283,
-0.347498, -0.252089, -0.159549, -0.0252243, 0.287428, 0.505535,
0.576398, 0.749113, 0.747356, 0.829813, 0.813377, 0.705541,
0.555336, 0.335255, 0.18098, 0.0825187, -0.123624, -0.409448,
-0.522495, -0.580006, -0.540843, -0.578957, -0.515249,
-0.408647, -0.324617, -0.160875, -0.0405501, 0.0374973,
0.0377748, 0.284005, 0.404946, 0.457183, 0.460853, 0.323106,
0.293503, 0.264054, 0.331401, 0.159579, 0.0719418, 0.0361097,
-0.0154491, -0.0322242, -0.227759, -0.35644, -0.366616,
-0.419624, -0.390761, -0.311727, -0.353665, -0.244873,
-0.0835055, 0.136051, 0.215486, 0.281322, 0.532363, 0.623053,
0.699682, 0.655524, 0.560116, 0.416202, 0.354683, 0.292269,
0.0238984, -0.116007, -0.340498, -0.480249, -0.648586, -0.69848,
-0.739677, -0.773875, -0.586882, -0.530729, -0.357612,
-0.234451, -0.122606, 0.0997872, 0.291344, 0.345555, 0.499985,
0.663295, 0.684141, 0.807456, 0.771501, 0.77884, 0.690431,
0.639397, 0.538746, 0.299978, 0.103179, -0.110518, -0.296,
-0.521046, -0.649604, -0.853094, -0.856795, -0.844923,
-0.945974, -0.889574, -0.807518, -0.495976, -0.305375,
-0.030004, 0.207623, 0.369607, 0.68118, 0.810077, 0.91153,
0.991273, 0.933362, 0.844614, 0.831324, 0.627926, 0.451694,
0.240772, 0.058682, -0.0786025, -0.249715, -0.389682, -0.635481,
-0.651978, -0.677819, -0.720312, -0.767862, -0.701193,
-0.548799, -0.440963, -0.140368, -0.142003, -0.0449598,
0.0876993, 0.352524, 0.597737, 0.57831, 0.714823, 0.702951,
0.78547, 0.747572, 0.55586, 0.404391, 0.259798, 0.056431,
-0.0297882, -0.213543, -0.552715, -0.530914, -0.549786,
-0.538068, -0.547103, -0.446976, -0.32252, -0.202751,
0.00462549, 0.0666379, 0.126091, 0.20198, 0.399951, 0.42684,
0.513614, 0.483549, 0.293842, 0.276635, 0.140738, 0.188227,
0.0279688, -0.0852015, -0.0710167, -0.164051, -0.198125,
-0.378797, -0.444818, -0.357149, -0.358784, -0.405409,
-0.220266, -0.271177, -0.146381, 0.128465, 0.225107, 0.317124,
0.450584, 0.640569, 0.684757, 0.754171, 0.642851, 0.552623,
0.404237, 0.288353, 0.15554, -0.118474, -0.160782, -0.465355,
-0.569552, -0.743347, -0.858028, -0.708872, -0.736748,
-0.582812, -0.46921, -0.315212, -0.143544, 0.0119338, 0.256283,
0.455487, 0.417743, 0.619476, 0.804527, 0.687656, 0.850874,
0.766721, 0.716211, 0.618582, 0.54661, 0.404885, 0.137562,
-0.0209689, -0.254094, -0.420303, -0.675044, -0.81424,
-0.940763, -0.838509, -0.801135, -0.900151, -0.777082,
-0.741898, -0.369947, -0.061704, 0.112184, 0.348269, 0.528416,
0.785131, 0.918098, 0.934226, 0.95097, 0.898609, 0.742638,
0.792161, 0.466126, 0.229116, 0.14891, -0.0823646, -0.222548,
-0.372414, -0.511055, -0.660366, -0.59638, -0.644485, -0.62034,
-0.667705, -0.627309, -0.424836, -0.26575, 0.0372506,
-0.0598538, 0.0966419, 0.239816, 0.36785, 0.658978, 0.580838,
0.643498, 0.694841, 0.679053, 0.604089, 0.432175, 0.230257,
0.142588, -0.0640784, -0.224028, -0.343026, -0.688735,
-0.487157, -0.480095, -0.531839, -0.443615, -0.345802,
-0.178667, 0.0053964, 0.183139, 0.184372, 0.31293, 0.3273,
0.457923, 0.451602, 0.481051, 0.449536, 0.232446, 0.221623,
-0.00940516, 0.00740078, -0.0321626, -0.191187, -0.183324,
-0.249499, -0.356286, -0.387894, -0.364951, -0.351506,
-0.317278, -0.360079, -0.135866, -0.167104, 0.000462549,
0.322335, 0.321903, 0.426008, 0.602516, 0.766259, 0.733171,
0.734651, 0.621419, 0.521786, 0.364149, 0.12162, -0.0228499,
-0.251966, -0.289679, -0.585032, -0.699035, -0.903235,
-0.999537, -0.665145, -0.669863, -0.575873, -0.398162,
-0.228499, -0.045669, 0.217552, 0.382065, 0.506769, 0.590274,
0.702489, 0.885812, 0.715995, 0.841901, 0.77551, 0.660427,
0.621635, 0.474575, 0.261433, 0.0576953, -0.0846773, -0.342564,
-0.463659, -0.798483, -0.873447, -0.893028, -0.788183,
-0.756915, -0.871226, -0.700114, -0.690216, -0.251873,
0.0912455, 0.148694, 0.399026, 0.639181, 0.820716, 0.942706,
0.954115, 0.891671, 0.888125, 0.718308, 0.65426, 0.332326,
0.134725, 0.0970119, -0.168029, -0.318604, -0.489315, -0.581732,
-0.649049, -0.574455, -0.630238, -0.637639, -0.600296,
-0.580776, -0.31219, -0.143544, 0.0603164, 0.0163434, 0.210059,
0.283388, 0.343643, 0.664066, 0.588794, 0.606926, 0.641093,
0.616269, 0.456628, 0.387308, 0.195967, 0.0467483, -0.0967344,
-0.316198, -0.407968, -0.631934, -0.467945, -0.474452,
-0.499121, -0.412039, -0.286287, -0.07851, 0.091523, 0.201733,
0.183015, 0.385457, 0.366246, 0.467514, 0.446976, 0.465108,
0.437201, 0.197786, 0.166826, -0.157945, -0.0922323, -0.0672546,
-0.259336, -0.249006, -0.338617, -0.461408, -0.387524,
-0.313423, -0.385766, -0.278547, -0.28789, -0.114126,
-0.0410435, 0.102162, 0.350335, 0.364859, 0.495544, 0.618798,
0.763792, 0.712449, 0.71507, 0.56283, 0.466095, 0.302754,
-0.020383, -0.103179, -0.278732, -0.319683, -0.608622,
-0.768417, -0.942336, -0.970489, -0.625582, -0.627124, -0.56616,
-0.364612, -0.182799, 0.00703074, 0.347189, 0.423386, 0.512011,
0.653119, 0.748281, 0.886645, 0.718431, 0.83413, 0.758179,
0.654969, 0.515218, 0.341084, 0.196182, -0.0247618, -0.142989,
-0.428875, -0.575072, -0.889266, -0.902001, -0.842826,
-0.820469, -0.751087, -0.813839, -0.65315, -0.593111, -0.144839,
0.163897, 0.206143, 0.481452, 0.701378, 0.804218, 0.943723,
0.98896, 0.85439, 0.825465, 0.678251, 0.567763, 0.267076,
0.0726202, 0.0529773, -0.159024, -0.380986, -0.585032,
-0.535909, -0.570477, -0.557402, -0.620802, -0.578094,
-0.550711, -0.515465, -0.197447, -0.102748, 0.0620124,
0.0795276, 0.229887, 0.290296, 0.342101, 0.626692, 0.603441,
0.57023, 0.599679, 0.497117, 0.325665, 0.342317, 0.124857,
-0.0302507, -0.18465, -0.416202, -0.428104, -0.595609,
-0.451078, -0.433193, -0.41321, -0.351969, -0.181535, 0.103333,
0.18576, 0.268371, 0.269974, 0.424219, 0.385457, 0.437818,
0.441333, 0.408862, 0.381819, 0.146998, 0.0197971, -0.262142,
-0.17213, -0.122298, -0.278269, -0.336797, -0.427765, -0.48176,
-0.343273, -0.258719, -0.366863, -0.277807, -0.252336,
-0.0168985, 0.106047, 0.203152, 0.392612, 0.504579, 0.595455,
0.656141, 0.827161, 0.758149, 0.709242, 0.577323, 0.430479,
0.170434, -0.132659, -0.168954, -0.379198, -0.4294, -0.721299,
-0.916865, -0.999877, -0.964168, -0.664775, -0.602054,
-0.525826, -0.348484, -0.0974745, 0.134324, 0.463782, 0.482315,
0.581332, 0.744827, 0.783527, 0.927534, 0.75784, 0.815782,
0.739492, 0.642542, 0.456073, 0.25397, 0.170434, -0.0433254,
-0.172377, -0.483394, -0.685189, -0.903759, -0.822566, -0.81606,
-0.804218, -0.698942, -0.796972, -0.622653, -0.475531,
-0.0927873, 0.170064, 0.308027, 0.523636, 0.724012, 0.839002,
0.935767, 0.99999, 0.829659, 0.799655, 0.599124, 0.443584,
0.246014, 0.0518055, -0.0289247, -0.2252, -0.469117, -0.634617,
-0.487249, -0.528909, -0.537081, -0.55472, -0.582812, -0.514385,
-0.351075, -0.0625675, -0.0660828, 0.157174, 0.177465, 0.267662,
0.337877, 0.327423, 0.580252, 0.58534, 0.541552, 0.456844,
0.409047, 0.276789, 0.296741, 0.110796, -0.116439, -0.291036,
-0.44491, -0.33393, -0.503438, -0.453946, -0.403127, -0.345185,
-0.294613, -0.0810386, 0.210676, 0.225354, 0.345493, 0.357982,
0.458787, 0.419994, 0.50498, 0.449844, 0.38003, 0.38777,
0.0619199, -0.0802985, -0.296062, -0.274261, -0.209535,
-0.358167, -0.50498, -0.526103, -0.450214, -0.352771, -0.243917,
-0.321194, -0.222856, -0.155416, 0.111197, 0.273829, 0.263992,
0.450893, 0.618243, 0.673009, 0.655339, 0.811311, 0.74566,
0.680749, 0.529711, 0.303, 0.0513738, -0.169601, -0.193407,
-0.429708, -0.487927, -0.806377, -0.972555, -0.928521,
-0.919825, -0.66863, -0.554473, -0.475346, -0.340467, 0.0185945,
0.251349, 0.476148, 0.595763, 0.685744, 0.804743, 0.838355,
0.975639, 0.791452, 0.765734, 0.720374, 0.585587, 0.307626,
0.136945, 0.0885319, -0.151223, -0.278547, -0.644022, -0.843998,
-0.905609, -0.814364, -0.817725, -0.829443, -0.672084, -0.71396,
-0.487311, -0.314564, -0.0707083, 0.264424, 0.4368, 0.592587,
0.776836, 0.883654, 0.93401, 0.983811, 0.821179, 0.685343,
0.472725, 0.402233, 0.209781, -0.0657745, -0.149157, -0.328749,
-0.562429, -0.663696, -0.485152, -0.532425, -0.50828, -0.527182,
-0.546239, -0.395387, -0.220482, -0.00823337, -0.00132597,
0.245799, 0.283882, 0.318881, 0.385427, 0.345277, 0.532363,
0.571834, 0.495729, 0.3273, 0.292208, 0.207592, 0.145456,
0.0327793, -0.262265, -0.451232, -0.465047, -0.340405,
-0.514077, -0.474144, -0.348669, -0.285516, -0.156958,
0.0751179, 0.281785, 0.30963, 0.502914, 0.469518, 0.48617,
0.473218, 0.479386, 0.454439, 0.327886, 0.280706, -0.0410435,
-0.20901, -0.355978, -0.379259, -0.324679, -0.460175, -0.633538,
-0.561349, -0.411884, -0.371118, -0.232138, -0.252398,
-0.215394, -0.0694132, 0.279256, 0.373863, 0.34574, 0.565574,
0.73203, 0.778131, 0.732955, 0.846557, 0.761232, 0.675784,
0.508989, 0.163804, -0.0748713, -0.275648, -0.331401, -0.550032,
-0.709118, -0.954886, -1., -0.947331, -0.955225, -0.743193,
-0.550772, -0.420673, -0.238614, 0.185297, 0.392149, 0.520306,
0.768325, 0.794382, 0.866663, 0.915415, 0.999599, 0.837676,
0.734004, 0.663295, 0.469426, 0.24808, 0.0858182, -0.00638318,
-0.213143, -0.37451, -0.749391, -0.885874, -0.858028, -0.838601,
-0.792007, -0.784545, -0.635141, -0.577076, -0.340806, -0.1972,
-0.0330877, 0.31882, 0.547689, 0.644855, 0.788769, 0.936322,
0.905517, 0.953283, 0.824478, 0.564587, 0.385149, 0.294921,
0.116686, -0.0955318, -0.299824, -0.504055, -0.569213,
-0.637146, -0.512319, -0.517623, -0.486077, -0.429554,
-0.445836, -0.221191, -0.0926948, 0.0609023, 0.156835, 0.316013,
0.383761, 0.357149, 0.410404, 0.330291, 0.442197, 0.494095,
0.353572, 0.167874, 0.19279, 0.14854, 0.0317925, -0.0354004,
-0.383823, -0.51568, -0.409294, -0.339881, -0.424373, -0.443831,
-0.339233, -0.139998, 0.0402418, 0.161954, 0.347128, 0.444571,
0.603472, 0.556786, 0.514786, 0.518302, 0.477813, 0.452435,
0.277252, 0.130655, -0.142218, -0.3063, -0.44528, -0.543248,
-0.516235, -0.661753, -0.733818, -0.582472, -0.415523,
-0.390977, -0.23183, -0.147861, -0.0947609, 0.179469, 0.401801,
0.473958, 0.537759, 0.643159, 0.783835, 0.862037, 0.726788,
0.777761, 0.711678, 0.596842, 0.396065, -0.00391625, -0.143668,
-0.332789, -0.422831, -0.600358, -0.862685, -0.958741,
-0.967097, -0.908631, -0.908384, -0.724598, -0.509297,
-0.340498, -0.0642326, 0.268217, 0.446884, 0.621018, 0.869839,
0.908138, 0.91264, 0.967375, 0.994388, 0.869808, 0.693083,
0.515465, 0.355762, 0.157297, -0.0776774, -0.144901, -0.352678,
-0.577415, -0.803293, -0.88612, -0.826205, -0.848253, -0.740294,
-0.70844, -0.598045, -0.336643, -0.169663, -0.112369, 0.0592988,
0.397761, 0.583182, 0.677172, 0.803509, 0.880076, 0.869284,
0.869685, 0.72244, 0.437479, 0.2993, 0.226433, 0.0747171,
-0.175306, -0.470412, -0.588825, -0.489408, -0.60708, -0.547997,
-0.480157, -0.438188, -0.32289, -0.269789, -0.0491227,
-0.00622899, 0.12569, 0.31589, 0.356656, 0.440717, 0.423787,
0.383885, 0.331771, 0.348053, 0.337075, 0.176694, 0.0835055,
0.0516513, -0.00792501, -0.0987388, -0.253724, -0.42832,
-0.483919, -0.394308, -0.332604, -0.329859, -0.35385, -0.268772,
0.0399642, 0.238675, 0.242684, 0.417589, 0.558204, 0.68892,
0.661137, 0.525394, 0.530482, 0.415893, 0.369546, 0.196892,
-0.07851, -0.179685, -0.367017, -0.528971, -0.625829, -0.723704,
-0.764316, -0.678498, -0.558636, -0.444294, -0.337846,
-0.213543, -0.0601005, 0.0910605, 0.307009, 0.463967, 0.60486,
0.711184, 0.742175, 0.803879, 0.933609, 0.809368, 0.729871,
0.70292, 0.508681, 0.274384, -0.0428937, -0.23775, -0.417743,
-0.583737, -0.762404, -1., -0.950291, -0.893275, -0.937772,
-0.855561, -0.714114, -0.518178, -0.215702, 0.102162, 0.303833,
0.527552, 0.724999, 0.891424, 0.986185, 0.92445, 0.95689,
0.931913, 0.863209, 0.646643, 0.341484, 0.265226, 0.150298,
-0.114743, -0.238706, -0.457245, -0.659533, -0.702118,
-0.810756, -0.792871, -0.779302, -0.722532, -0.621912,
-0.492245, -0.147399, -0.0962719, -0.0371581, 0.191464,
0.363317, 0.584415, 0.691233, 0.752043, 0.803756, 0.830121,
0.732955, 0.57979, 0.368466, 0.218847, 0.111814, -0.0452681,
-0.277252, -0.543248, -0.609023, -0.441611, -0.504148,
-0.549323, -0.397268, -0.403805, -0.174042, -0.0101761,
-0.00363872, 0.119245, 0.235437, 0.379136, 0.403034, 0.446822,
0.461346, 0.324833, 0.295846, 0.205834, 0.109439, 0.0324709,
-0.0164976, -0.0929415, -0.12017, -0.234697, -0.426717,
-0.389682, -0.426378, -0.398162, -0.290419, -0.239693,
-0.232446, -0.173888, 0.181843, 0.387678, 0.330383, 0.520553,
0.668013, 0.706466, 0.74381, 0.574362, 0.495112, 0.44858,
0.270622, 0.0839681, -0.204447, -0.261217, -0.417774, -0.643467,
-0.786087, -0.952727, -0.857473, -0.706651, -0.588023,
-0.485553, -0.298591, -0.209936, 0.0174844, 0.303062, 0.443276,
0.553856, 0.716581, 0.841777, 0.801752, 0.800271, 0.901847,
0.834099, 0.638009, 0.597983, 0.310864, 0.142681, -0.0267045,
-0.360233, -0.455241, -0.683031, -0.911345, -0.960159,
-0.924759, -0.828888, -0.867989, -0.813377, -0.690771,
-0.473496, -0.109963, 0.155632, 0.338092, 0.572759, 0.814857,
0.891887, 0.99999, 0.99999, 0.929847, 0.930124, 0.829258,
0.564125, 0.253477, 0.151007, 0.064911, -0.183879, -0.420364,
-0.631626, -0.741435, -0.64541, -0.706281, -0.786611, -0.66715,
-0.681951, -0.504888, -0.269018, -0.0599463, 0.0686114,
0.123932, 0.275463, 0.390823, 0.544143, 0.636313, 0.710198,
0.704709, 0.726171, 0.5632, 0.400228, 0.318018, 0.15554,
0.0337969, -0.117148, -0.371026, -0.553579, -0.528447, -0.46332,
-0.385303, -0.473064, -0.39107, -0.279318, -0.0242992, 0.21046,
0.111289, 0.263807, 0.387832, 0.421937, 0.487927, 0.440562,
0.485091, 0.358599, 0.23368, 0.0752105, -0.104351, -0.129329,
-0.167134, -0.18872, -0.325542, -0.458386, -0.513244, -0.390083,
-0.321595, -0.365691, -0.235746, -0.134478, -0.0901662,
0.0839064, 0.290357, 0.46443, 0.556816, 0.590058, 0.700176,
0.698141, 0.748219, 0.662, 0.442752, 0.414536, 0.115144,
-0.110611, -0.240834, -0.36677, -0.432545, -0.693238, -0.937926,
-1., -0.868698, -0.747818, -0.561658, -0.488174, -0.303617,
-0.123778, 0.127478, 0.456536, 0.502359, 0.652749, 0.845169,
0.914398, 0.905702, 0.896975, 0.840513, 0.861019, 0.687995,
0.424836, 0.199112, -0.0137531, -0.0634926, -0.351075,
-0.573098, -0.812143, -1., -0.926301, -0.895834, -0.804342,
-0.756483, -0.76925, -0.626045, -0.324679, -0.042277, 0.157945,
0.440347, 0.608869, 0.79139, 0.862253, 0.960375, 0.99999,
0.86472, 0.833822, 0.67711, 0.402541, 0.223473, 0.0487218,
-0.050757, -0.153628, -0.538129, -0.678251, -0.684603,
-0.641555, -0.566283, -0.676432, -0.585124, -0.559869,
-0.397484, -0.0833513, -0.0256252, 0.177927, 0.280551, 0.281384,
0.390391, 0.464738, 0.519412, 0.625274, 0.586512, 0.502421,
0.368251, 0.195319, 0.199019, 0.0583737, -0.0918622, -0.255173,
-0.478461, -0.500725, -0.409294, -0.47658, -0.347744, -0.278084,
-0.33137, -0.0578495, 0.0623824, 0.277067, 0.345277, 0.355053,
0.495482, 0.416757, 0.472571, 0.448981, 0.408862, 0.388664,
0.101853, -0.137655, -0.235129, -0.289833, -0.332388, -0.297049,
-0.497117, -0.600234, -0.499275, -0.424219, -0.270714,
-0.300163, -0.219927, -0.033026, 0.0701533, 0.302168, 0.386198,
0.477844, 0.76188, 0.704925, 0.703629, 0.750748, 0.677634,
0.716581, 0.527182, 0.297542, 0.0343211, -0.260138, -0.300163,
-0.456227, -0.558019, -0.715378, -1., -1., -0.872398, -0.82087,
-0.595146, -0.417682, -0.318049, 0.0170218, 0.25582, 0.464091,
0.655124, 0.777576, 0.925067, 0.93808, 0.904437, 0.911684,
0.79284, 0.727559, 0.673101, 0.24731, 0.0556601, -0.118628,
-0.216874, -0.263345, -0.639243, -0.844984, -0.942305,
-0.887354, -0.815227, -0.773043, -0.620525, -0.617657,
-0.516328, -0.183478, 0.00857257, 0.148047, 0.495267, 0.674951,
0.751303, 0.905517, 0.894724, 0.970551, 0.940855, 0.733942,
0.574393, 0.300472, 0.144069, 0.00699991, -0.217244, -0.312591,
-0.580036, -0.749915, -0.666626, -0.690832, -0.560794, -0.46921,
-0.518548, -0.36563, -0.189707, -0.037559, 0.101422, 0.276296,
0.439884, 0.394462, 0.367696, 0.444664, 0.452681, 0.49835,
0.536341, 0.314317, 0.220543, 0.141047, 0.0562768, 0.0524531,
-0.178914, -0.372814, -0.434426, -0.461346, -0.416818,
-0.417065, -0.409973, -0.206297, -0.174073, 0.0153566, 0.176848,
0.227882, 0.560517, 0.582102, 0.551636, 0.531654, 0.453298,
0.470289, 0.407814, 0.352431, 0.0734836, -0.260261, -0.347097,
-0.413673, -0.480064, -0.53446, -0.626692, -0.677418, -0.533967,
-0.454686, -0.340159, -0.168214, -0.166209, 0.0514354, 0.289062,
0.353912, 0.463042, 0.565296, 0.759875, 0.844152, 0.701317,
0.716519, 0.630053, 0.586635, 0.602455, 0.238829, -0.0514971,
-0.251195, -0.432483, -0.458725, -0.647908, -0.82232, -0.958987,
-1., -0.917204, -0.822813, -0.682044, -0.428382, -0.241851,
0.0555059, 0.351291, 0.418514, 0.751611, 0.919085, 0.939838,
0.99999, 0.927287, 0.91449, 0.850227, 0.661908, 0.527645,
0.266212, -0.0353387, -0.152703, -0.363224, -0.423849,
-0.627432, -0.863425, -0.843936, -0.911098, -0.853249,
-0.700114, -0.607388, -0.444355, -0.33541, -0.182337,
0.000770915, 0.191187, 0.442289, 0.680286, 0.740171, 0.803663,
0.839434, 0.824694, 0.9226, 0.640075, 0.424373, 0.305159,
0.0779549, -0.00391625, -0.238305, -0.495791, -0.532733,
-0.612353, -0.633939, -0.621974, -0.614573, -0.37303, -0.293503,
-0.21638, -0.0300657, -0.0737303, 0.217398, 0.407968, 0.469981,
0.521015, 0.364458, 0.383515, 0.391316, 0.365599, 0.333374,
0.190015, 0.0564618, 0.0522989, -0.0767215, -0.146782,
-0.247926, -0.448148, -0.354775, -0.403559, -0.423757,
-0.274415, -0.288446, -0.178081, 0.120139, 0.160782, 0.233587,
0.327269, 0.52857, 0.762312, 0.611551, 0.549231, 0.443646,
0.338648, 0.416911, 0.185544, -0.0136606, -0.238151, -0.470289,
-0.495328, -0.617287, -0.733726, -0.718616, -0.638842,
-0.568164, -0.434241, -0.374264, -0.132721, 0.011317, 0.157174,
0.44121, 0.423171, 0.6023, 0.763391, 0.7571, 0.889883, 0.849332,
0.685436, 0.642727, 0.521879, 0.436122, 0.246076, -0.142157,
-0.269543, -0.509359, -0.616269, -0.724598, -0.974807,
-0.824571, -0.92553, -0.962904, -0.789694, -0.686114, -0.435906,
-0.0772765, 0.148447, 0.351815, 0.529495, 0.733726, 0.99999,
0.986031, 0.99999, 0.947855, 0.829042, 0.833421, 0.562213,
0.277221, 0.233032, -0.0259027, -0.266243, -0.391131, -0.670018,
-0.609393, -0.684912, -0.813284, -0.788646, -0.84224, -0.609701,
-0.522403, -0.338617, -0.0680872, -0.149311, 0.0519905,
0.306608, 0.4438, 0.649326, 0.752937, 0.755404, 0.822258,
0.754695, 0.735885, 0.615406, 0.322797, 0.239508, 0.0167443,
-0.112615, -0.33985, -0.657621, -0.565821, -0.488729, -0.634247,
-0.602825, -0.524716, -0.402418, -0.0197354, -0.00662987,
0.0313917, 0.114126, 0.230565, 0.523883, 0.458108, 0.520923,
0.451355, 0.286873, 0.293503, 0.205927, 0.0740387, 0.0617657,
-0.0386383, -0.0883777, -0.129853, -0.362176, -0.340097,
-0.37559, -0.360326, -0.364304, -0.372629, -0.245151, -0.233125,
-0.125567, 0.22116, 0.30815, 0.248944, 0.52416, 0.550711,
0.791791, 0.831324, 0.533196, 0.539733, 0.339388, 0.301674,
0.0976903, -0.180949, -0.221314, -0.544235, -0.660458,
-0.785716, -0.935706, -0.79802, -0.618644, -0.591446, -0.458232,
-0.318604, -0.159795, 0.192266, 0.325511, 0.462703, 0.562028,
0.701625, 0.827099, 0.764963, 0.833051, 0.87801, 0.669247,
0.591662, 0.491165, 0.181381, 0.214469, -0.0601622, -0.34389,
-0.463351, -0.807302, -0.79062, -0.911345, -0.843011, -0.812298,
-0.925283, -0.812236, -0.662216, -0.410836, -0.00468716,
0.189614, 0.307842, 0.676432, 0.768633, 0.982423, 0.99999,
0.994696, 0.977705, 0.83043, 0.772179, 0.48691, 0.184156,
0.109408, -0.0056431, -0.345555, -0.490425, -0.750902,
-0.730457, -0.519566, -0.771408, -0.719233, -0.740448,
-0.640322, -0.329612, -0.196275, 0.0279996, -0.00468716,
0.126954, 0.346665, 0.425483, 0.580468, 0.697555, 0.678128,
0.708964, 0.695458, 0.467791, 0.48506, 0.290604, 0.0998489,
-0.0154183, -0.259058, -0.422523, -0.606618, -0.577014,
-0.486016, -0.5315, -0.5389, -0.402356, -0.330599, 0.106109,
0.235684, 0.0992322, 0.359894, 0.330784, 0.564834, 0.593111,
0.500139, 0.520183, 0.303679, 0.232508, 0.0275988, -0.0999414,
-0.076814, -0.173672, -0.280736, -0.299516, -0.524962,
-0.504456, -0.321132, -0.388079, -0.328749, -0.303309,
-0.211847, -0.0440347, 0.114496, 0.259737, 0.430325, 0.463813,
0.606618, 0.681489, 0.674273, 0.884486, 0.613186, 0.49209,
0.378211, 0.0576953, 0.030374, -0.230288, -0.314965, -0.519967,
-0.807518, -0.941719, -1., -0.809584, -0.691542, -0.624287,
-0.488698, -0.257886, -0.137192, 0.268525, 0.500817, 0.479047,
0.716427, 0.828178, 0.926455, 0.897808, 0.828734, 0.8555,
0.759259, 0.560671, 0.381572, 0.0963335, 0.0327176, -0.0687039,
-0.467976, -0.57538, -0.919331, -0.948719, -0.809121, -0.913719,
-0.773999, -0.838293, -0.762157, -0.589133, -0.264979,
0.0765981, 0.215548, 0.44121, 0.727682, 0.855654, 0.921953,
0.99999, 0.98967, 0.932684, 0.801721, 0.589966, 0.383977,
0.1128, -0.0625675, -0.139135, -0.376484, -0.686361, -0.764717,
-0.758241, -0.542632, -0.666996, -0.725369, -0.604243,
-0.598199, -0.16402, -0.031145, 0.0453298, 0.195658, 0.261278,
0.423695, 0.488791, 0.61704, 0.661198, 0.676647, 0.657344,
0.584261, 0.369453, 0.301058, 0.261032, -0.0197354, -0.166641,
-0.421074, -0.522649, -0.557557, -0.613802, -0.540473, -0.46002,
-0.467329, -0.363934, -0.0684264, 0.158068, 0.33985, 0.281322,
0.448148, 0.481976, 0.494619, 0.643005, 0.477597, 0.475377,
0.313547, 0.10173, -0.135095, -0.210367, -0.176971, -0.280243,
-0.350458, -0.494712, -0.542447, -0.506738, -0.348793,
-0.345493, -0.336181, -0.254248, -0.128342, 0.1091, 0.233649,
0.278239, 0.494187, 0.678189, 0.652903, 0.780813, 0.769897,
0.832496, 0.720836, 0.485615, 0.337846, -0.0660212, -0.109192,
-0.274569, -0.467051, -0.610318, -0.973265, -1., -1., -0.80869,
-0.719664, -0.578926, -0.413519, -0.216843, 0.114188, 0.358753,
0.57868, 0.64063, 0.801443, 0.915415, 0.959111, 0.898887,
0.803108, 0.785377, 0.699837, 0.476302, 0.199204, 0.0854482,
-0.0844306, -0.156619, -0.43273, -0.712603, -0.914891,
-0.974344, -0.760862, -0.869623, -0.760492, -0.744765,
-0.698726, -0.448395, -0.14632, 0.119091, 0.28749, 0.57097,
0.738814, 0.943569, 0.972956, 0.99999, 0.99999, 0.870764,
0.699374, 0.461192, 0.281168, 0.0486601, -0.145055, -0.27608,
-0.496192, -0.778778, -0.715502, -0.627926, -0.630701,
-0.545222, -0.591045, -0.519412, -0.393629, -0.0607789,
0.0495236, 0.130192, 0.339018, 0.305714, 0.412748, 0.423633,
0.551266, 0.580314, 0.569305, 0.522804, 0.365475, 0.300009,
0.154461, 0.141818, -0.0543958, -0.33985, -0.533689, -0.491813,
-0.497363, -0.573067, -0.509051, -0.428629, -0.324216,
-0.204817, 0.141355, 0.234111, 0.371951, 0.531191, 0.526257,
0.577446, 0.527337, 0.596195, 0.50498, 0.464862, 0.226741,
-0.0909988, -0.239323, -0.341114, -0.307256, -0.427919,
-0.548306, -0.681119, -0.553949, -0.455302, -0.414752,
-0.285732, -0.250578, -0.179376, 0.0354004, 0.286349, 0.35237,
0.439884, 0.596688, 0.74344, 0.74088, 0.792316, 0.801042,
0.705788, 0.676555, 0.415369, 0.110734, -0.136329, -0.228746,
-0.361713, -0.519072, -0.718832, -1., -1., -0.977119, -0.798051,
-0.685652, -0.572235, -0.369484, -0.121003, 0.312036, 0.411175,
0.601468, 0.824632, 0.863116, 0.926516, 0.99999, 0.93586,
0.814364, 0.762712, 0.602455, 0.347652, 0.0825804, 0.0257486,
-0.150328, -0.321996, -0.549107, -0.859601, -0.925375,
-0.885627, -0.821271, -0.813685, -0.652194, -0.669463,
-0.543464, -0.254186, -0.0776774, 0.222887, 0.390145, 0.638379,
0.769651, 0.930309, 0.995375, 0.934688, 0.958833, 0.821487,
0.50165, 0.338956, 0.223349, -0.0551358, -0.188257, -0.406827,
-0.639767, -0.730457, -0.661013, -0.598137, -0.585433,
-0.497055, -0.500293, -0.382991, -0.182799, 0.0116562, 0.103703,
0.312097, 0.43532, 0.37118, 0.476765, 0.436554, 0.571063,
0.587036, 0.479447, 0.385457, 0.238922, 0.226341, 0.0858182,
-0.0158192, -0.17065, -0.493016, -0.626692, -0.433162,
-0.531993, -0.559098, -0.425021, -0.399426, -0.188103,
-0.0111937, 0.255204, 0.353295, 0.473527, 0.615622, 0.602763,
0.569274, 0.536896, 0.519227, 0.43347, 0.388294, 0.0202905,
-0.222023, -0.331987, -0.450245, -0.338555, -0.540535,
-0.676802, -0.661784, -0.530297, -0.404268, -0.387585,
-0.276943, -0.162632, -0.140615, 0.195782, 0.403774, 0.327269,
0.582935, 0.681335, 0.760461, 0.788245, 0.805359, 0.821764,
0.720929, 0.601067, 0.31293, 0.0155108, -0.230442, -0.319745,
-0.508125, -0.639335, -0.897838, -1., -0.972401, -0.999784,
-0.763884, -0.58349, -0.512319, -0.226741, 0.0913997, 0.396929,
0.530883, 0.686885, 0.87838, 0.949181, 0.85772, 0.99999,
0.846711, 0.719048, 0.75414, 0.385427, 0.205002, 0.0364797,
-0.0539024, -0.194116, -0.408061, -0.668938, -0.820315,
-0.848777, -0.86435, -0.802214, -0.768355, -0.587036, -0.604952,
-0.376422, -0.162509, -0.0601622, 0.364519, 0.487866, 0.652965,
0.826575, 0.917728, 0.997132, 0.960992, 0.845632, 0.706158,
0.327731, 0.217706, 0.148848, -0.217305, -0.267939, -0.554195,
-0.737056, -0.666564, -0.584415, -0.517623, -0.500416,
-0.438527, -0.359863, -0.144469, -0.0663912, 0.0782633,
0.187178, 0.395634, 0.475192, 0.359431, 0.472756, 0.317124,
0.502822, 0.529279, 0.288045, 0.204539, 0.147985, 0.115606,
0.01548, -0.122853, -0.388973, -0.482099, -0.599001, -0.421475,
-0.490549, -0.521817, -0.305097, -0.329088, -0.00693823,
0.192636, 0.328071, 0.474298, 0.627062, 0.64171, 0.680101,
0.597675, 0.507077, 0.507755, 0.363903, 0.298375, -0.167659,
-0.311419, -0.443924, -0.576243, -0.425237, -0.705973,
-0.778902, -0.63215, -0.484381, -0.391378, -0.282864, -0.23223,
-0.0614573, 0.0913997, 0.297141, 0.470597, 0.425329, 0.739893,
0.755003, 0.734189, 0.796879, 0.79284, 0.786364, 0.64026,
0.445188, 0.115421, -0.0784483, -0.336088, -0.409263, -0.598538,
-0.784545, -0.946344, -1., -0.90231, -1., -0.684357, -0.497888,
-0.437725, -0.0902896, 0.235129, 0.46813, 0.626816, 0.849764,
0.883777, 0.99999, 0.878473, 0.996608, 0.841284, 0.679423,
0.667458, 0.234204, 0.111289, -0.044343, -0.122144, -0.313978,
-0.567239, -0.802677, -0.810972, -0.820716, -0.86805, -0.732893,
-0.728946, -0.498443, -0.451294, -0.188566, -0.0965494,
0.0395634, 0.527337, 0.567363, 0.707577, 0.843782, 0.905054,
0.923279, 0.922508, 0.696753, 0.493324, 0.264054, 0.100188,
0.0470258, -0.325758, -0.415986, -0.626445, -0.703629, -0.61997,
-0.562922, -0.472139, -0.448611, -0.374325, -0.243486,
0.0302199, -0.0209997, 0.145456, 0.330291, 0.476425, 0.529249,
0.374048, 0.476826, 0.334793, 0.501742, 0.47954, 0.172592,
0.122915, 0.0984613, 0.0195812, -0.0648494, -0.229363,
-0.524561, -0.47661, -0.550927, -0.419624, -0.480773, -0.460082,
-0.220266, -0.167905, 0.143298, 0.237812, 0.459959, 0.590737,
0.689969, 0.682414, 0.663049, 0.582257, 0.439329, 0.459558,
0.24916, 0.0846156, -0.262759, -0.368189, -0.509914, -0.617719,
-0.529372, -0.769034, -0.72614, -0.552777, -0.459188, -0.369022,
-0.191742, -0.16991, -0.00755497, 0.241451, 0.363378, 0.515064,
0.54183, 0.777206, 0.82087, 0.787012, 0.77736, 0.823861,
0.796324, 0.582627, 0.299978, 0.0168985, -0.110673, -0.441457,
-0.535447, -0.739893, -0.926424, -0.98637, -1., -0.925992,
-0.956613, -0.621512, -0.425453, -0.254248, 0.11058, 0.351136,
0.521416, 0.772488, 0.944032, 0.895495, 0.99999, 0.883623,
0.911992, 0.734805, 0.586481, 0.48839, 0.133707, 0.0295106,
-0.120294, -0.168337, -0.426871, -0.677203, -0.784606, -0.76817,
-0.801906, -0.845447, -0.696691, -0.658361, -0.431188,
-0.317494, -0.128311, -0.075488, 0.195473, 0.611089, 0.64319,
0.767122, 0.841469, 0.906442, 0.890098, 0.89753, 0.58534,
0.322828, 0.169509, 0.030004, -0.0920164, -0.442999, -0.553178,
-0.637485, -0.640723, -0.629221, -0.479694, -0.365321, -0.39625,
-0.240094, -0.0661753, 0.0870825, 0.0318542, 0.246169, 0.405255,
0.503654, 0.468655, 0.367295, 0.404885, 0.27238, 0.420673,
0.297388, 0.0870825, 0.0430479, 0.0240525, -0.060008, -0.167751,
-0.369854, -0.578865, -0.466095, -0.540319, -0.413611,
-0.450615, -0.367079, -0.149249, 0.00749329, 0.257424, 0.335841,
0.621327, 0.689445, 0.757069, 0.714761, 0.659132, 0.55435,
0.435413, 0.401863, 0.116994, -0.0495236, -0.374572, -0.471492,
-0.633168, -0.735329, -0.70474, -0.819791, -0.67196, -0.566129,
-0.439607, -0.3203, -0.112122, -0.0527306, 0.178667, 0.352123,
0.461932, 0.638379, 0.692467, 0.875081, 0.832866, 0.812205,
0.765426, 0.789016, 0.72099, 0.391902, 0.14228, -0.111382,
-0.282432, -0.527583, -0.622529, -0.894724, -0.958586,
-0.978507, -1., -0.908878, -0.917204, -0.566222, -0.359061,
-0.0569244, 0.196028, 0.414197, 0.646273, 0.900521, 0.99999,
0.951031, 0.995837, 0.889574, 0.963674, 0.720836, 0.530513,
0.328595, 0.073792, -0.0331802, -0.20861, -0.275093, -0.609578,
-0.738197, -0.788923, -0.800364, -0.855654, -0.767276,
-0.628512, -0.587961, -0.233772, -0.209627, -0.0598538,
0.0671004, 0.309168, 0.642018, 0.692744, 0.778963, 0.819544,
0.885257, 0.82972, 0.773598, 0.443029, 0.262913, 0.0865892,
-0.00931265, -0.16735, -0.56616, -0.609948, -0.635851,
-0.597983, -0.612785, -0.473342, -0.351229, -0.315212,
-0.117241, 0.0264578, 0.0996947, 0.129853, 0.423016, 0.445836,
0.561966, 0.489469, 0.356903, 0.444047, 0.282093, 0.335564,
0.1762, 0.0608406, -0.042647, -0.0477351, -0.151408, -0.311326,
-0.423386, -0.513676, -0.453791, -0.533596, -0.305375,
-0.384995, -0.254402, 0.0107928, 0.171729, 0.320947, 0.4051,
0.729563, 0.738722, 0.777761, 0.677819, 0.581023, 0.453761,
0.398563, 0.258719, -0.0889327, -0.167289, -0.461254, -0.532671,
-0.710814, -0.867834, -0.776311, -0.735576, -0.624534,
-0.548953, -0.388202, -0.264979, -0.03133, 0.110179, 0.31,
0.391131, 0.598754, 0.806655, 0.736409, 0.882081, 0.867125,
0.836905, 0.744272, 0.764254, 0.614543, 0.277375, 0.0424928,
-0.190724, -0.382343, -0.655925, -0.755466, -1., -0.946252,
-0.951494, -1., -0.840667, -0.855037, -0.498504, -0.191958,
0.113818, 0.268309, 0.501835, 0.776065, 0.94141, 0.99999,
0.967159, 0.966326, 0.844368, 0.939221, 0.609177, 0.353202,
0.248574, 0.00206605, -0.0905979, -0.282402, -0.424466,
-0.682876, -0.691757, -0.745691, -0.808351, -0.838694,
-0.717043, -0.573006, -0.480989, -0.109655, -0.162632,
0.0116254, 0.182769, 0.370163, 0.6727, 0.724012, 0.77588,
0.800364, 0.865892, 0.755466, 0.637454, 0.37411, 0.181751,
-0.0227574, -0.0791884, -0.278424, -0.673317, -0.604151,
-0.566222, -0.573067, -0.546024, -0.382836, -0.281723,
-0.140461, 0.072466, 0.0915539, 0.153535, 0.238367, 0.498905,
0.469179, 0.506522, 0.436739, 0.295692, 0.354991, 0.142188,
0.127941, 0.028308, -0.0334885, -0.14521, -0.16328, -0.267322,
-0.445219, -0.408647, -0.473804, -0.473218, -0.483086,
-0.229208, -0.284498, -0.141848, 0.19094, 0.250177, 0.435968,
0.604551, 0.786457, 0.809276, 0.842703, 0.677511, 0.573006,
0.430109, 0.330846, 0.116223, -0.214623, -0.244534, -0.560794,
-0.643005, -0.87946, -1., -0.825033, -0.710352, -0.63437,
-0.560363, -0.302229, -0.192328, 0.0859724, 0.321903, 0.416202,
0.480527, 0.744735, 0.889975, 0.824077, 0.910019, 0.860094,
0.834253, 0.732184, 0.676555, 0.424373, 0.159394, -0.0197663,
-0.31219, -0.500293, -0.793025, -0.871442, -1., -0.935151,
-0.943569, -1., -0.7991, -0.81313, -0.424527, -0.053594,
0.183231, 0.290573, 0.622128, 0.906164, 0.968485, 0.99999,
0.998612, 0.939314, 0.880169, 0.906226, 0.541213, 0.242592,
0.14706, -0.0597922, -0.175614, -0.42903, -0.599679, -0.72244,
-0.657621, -0.770113, -0.807425, -0.783003, -0.655771,
-0.419686, -0.301058, -0.00394708, -0.0596997, 0.167566,
0.305375, 0.398409, 0.671559, 0.703167, 0.734466, 0.735268,
0.803663, 0.58571, 0.446514, 0.298005, 0.0896728, -0.0934041,
-0.19757, -0.42055, -0.682907, -0.586574, -0.575072, -0.522958,
-0.52009, -0.379413, -0.201517, 0.0369422, 0.174134, 0.12239,
0.29267, 0.366246, 0.555953, 0.53742, 0.519689, 0.463042,
0.312344, 0.341392, 0.015665, -0.0326251, -0.0491227, -0.147861,
-0.23775, -0.307102, -0.419624, -0.518332, -0.371797, -0.423849,
-0.468901, -0.364859, -0.160412, -0.1305, 0.0528848, 0.274292,
0.370533, 0.562367, 0.655586, 0.844399, 0.826082, 0.831786,
0.667767, 0.515927, 0.39292, 0.145672, -0.0151408, -0.288754,
-0.373493, -0.601314, -0.746276, -1., -1., -0.791113, -0.71322,
-0.633014, -0.487866, -0.262419, -0.0892103, 0.226556, 0.435351,
0.480989, 0.614789, 0.894292, 0.986802, 0.897808, 0.906133,
0.863733, 0.873292, 0.67526, 0.537821, 0.275864, 0.0843689,
-0.0863733, -0.416387, -0.59419, -0.941534, -0.986771,
-0.951833, -0.94141, -0.922045, -0.923063, -0.737272, -0.671097,
-0.248389, 0.0735453, 0.23112, 0.480681, 0.737026, 0.923186,
0.99999, 0.99999, 0.99999, 0.894755, 0.823152, 0.732338,
0.379753, 0.157236, 0.0273829, -0.128959, -0.279565, -0.589719,
-0.675321, -0.694163, -0.615591, -0.71029, -0.74862, -0.688365,
-0.612785, -0.250424, -0.107342, -0.00462549, 0.114188,
0.313947, 0.370224, 0.473588, 0.654661, 0.688766, 0.720744,
0.698541, 0.654137, 0.431003, 0.353295, 0.21416, 0.0207222,
-0.212618, -0.373585, -0.503839, -0.591569, -0.551482,
-0.584724, -0.408739, -0.413981, -0.278886, -0.0170526,
0.187641, 0.278023, 0.252336, 0.424219, 0.428783, 0.545469,
0.566191, 0.475038, 0.431558, 0.283111, 0.158315, -0.141694,
-0.169817, -0.203367, -0.266675, -0.337568, -0.490857,
-0.561504, -0.509976, -0.386198, -0.411514, -0.408739,
-0.316908, -0.11243, 0.0672546, 0.256345, 0.314472, 0.484443,
0.756761, 0.765488, 0.891424, 0.871134, 0.863641, 0.70955,
0.484905, 0.302075, -0.0365722, -0.139597, -0.337476, -0.512227,
-0.668167, -0.928737, -1., -1., -0.871381, -0.739986, -0.604551,
-0.456073, -0.206852, 0.0610565, 0.379814, 0.535508, 0.631595,
0.802738, 0.951556, 0.99999, 0.99999, 0.941996, 0.795276,
0.855777, 0.596688, 0.311542, 0.158161, -0.0447439, -0.150945,
-0.494095, -0.781091, -1., -1., -0.881341, -0.960128, -0.868143,
-0.816152, -0.710444, -0.494434, -0.149989, 0.0920781, 0.299917,
0.591045, 0.779888, 0.964322, 0.99999, 0.99999, 0.99999,
0.887662, 0.762497, 0.569922, 0.352185, 0.163249, -0.118382,
-0.204077, -0.367541, -0.729871, -0.700793, -0.646828,
-0.623208, -0.632212, -0.711955, -0.620679, -0.432082,
-0.117302, -0.0037929, 0.0430171, 0.293965, 0.391933, 0.412131,
0.488082, 0.561966, 0.625212, 0.644269, 0.587715, 0.444109,
0.320731, 0.231274, 0.123531, -0.0563693, -0.28604, -0.49943,
-0.524654, -0.470967, -0.564464, -0.57831, -0.344198, -0.331216,
-0.213081, 0.123932, 0.217706, 0.396867, 0.443214, 0.463875,
0.545407, 0.558482, 0.5916, 0.484011, 0.409942, 0.286595,
0.00440963, -0.204601, -0.271393, -0.346357, -0.386968, -0.4965,
-0.650344, -0.619137, -0.465571, -0.409818, -0.345092,
-0.292578, -0.216226, 0.0310833, 0.297666, 0.413118, 0.383268,
0.645657, 0.875451, 0.794227, 0.846526, 0.828703, 0.77628,
0.702242, 0.406858, 0.097937, -0.118906, -0.275463, -0.397946,
-0.608468, -0.789479, -0.981406, -1., -1., -0.914798, -0.772981,
-0.585402, -0.407136, -0.155016, 0.202843, 0.437109, 0.55805,
0.769897, 0.914706, 0.995775, 0.99999, 0.99999, 0.928613,
0.773104, 0.782232, 0.522033, 0.171266, 0.0636159, -0.171914,
-0.244873, -0.524592, -0.936168, -0.994018, -0.952296,
-0.903389, -0.894292, -0.842548, -0.674643, -0.575318,
-0.307718, -0.0568318, 0.0737303, 0.36492, 0.636683, 0.797804,
0.887169, 0.993123, 0.995837, 0.960067, 0.866817, 0.595115,
0.430541, 0.295384, 0.0882852, -0.175738, -0.337075, -0.475531,
-0.705171, -0.664714, -0.654229, -0.640322, -0.507663,
-0.574918, -0.522033, -0.220112, -0.0624749, 0.0478892,
0.186623, 0.380832, 0.49209, 0.456227, 0.480681, 0.490086,
0.497795, 0.522187, 0.431311, 0.226957, 0.194702, 0.0929415,
-0.0293873, -0.147522, -0.436831, -0.542847, -0.461408,
-0.427087, -0.469672, -0.455457, -0.299454, -0.0889944,
0.0535015, 0.243794, 0.293441, 0.486077, 0.675568, 0.565913,
0.567363, 0.556477, 0.48802, 0.424928, 0.308181, 0.134047,
-0.15076, -0.327978, -0.416078, -0.51161, -0.612353, -0.701779,
-0.72799, -0.635296, -0.490024, -0.462086, -0.307934, -0.184249,
-0.0926331, 0.198896, 0.426316, 0.522464, 0.617935, 0.750439,
0.949243, 0.977489, 0.878627, 0.836258, 0.731413, 0.691202,
0.412902, -0.0514971, -0.16109, -0.365414, -0.545253, -0.689753,
-0.965, -1., -1., -1., -0.929816, -0.794967, -0.589873,
-0.321595, -0.0255944, 0.308613, 0.485923, 0.619045, 0.908446,
0.989423, 0.99999, 0.99999, 0.99999, 0.935613, 0.814703,
0.579636, 0.413149, 0.171297, -0.0532856, -0.227728, -0.455611,
-0.579173, -0.902618, -0.972401, -0.875143, -0.941164,
-0.828425, -0.769496, -0.606001, -0.323815, -0.184403,
-0.0614573, 0.163033, 0.403096, 0.600851, 0.826236, 0.849641,
0.92553, 0.920102, 0.871504, 0.811588, 0.463104, 0.320331,
0.232415, 0.0128589, -0.194641, -0.493016, -0.610965, -0.5282,
-0.628604, -0.653983, -0.590367, -0.493016, -0.355608,
-0.283018, -0.0356471, 0.0618274, 0.108113, 0.377748, 0.430695,
0.549261, 0.566807, 0.419686, 0.394092, 0.403867, 0.259521,
0.186531, 0.105955, -0.0056431, -0.0219865, -0.221468,
-0.321287, -0.488421, -0.488791, -0.409417, -0.430078,
-0.386383, -0.336766, -0.24771, 0.0241451, 0.329366, 0.269759,
0.389775, 0.564803, 0.753862, 0.794012, 0.594499, 0.616639,
0.481853, 0.411946, 0.25471, -0.0452065, -0.143606, -0.367788,
-0.56175, -0.622529, -0.801289, -0.94064, -0.713035, -0.623516,
-0.590829, -0.422708, -0.316291, -0.0678713, 0.121928, 0.365445,
0.53079, 0.58864, 0.773197, 0.869993, 0.884394, 0.99999,
0.910235, 0.721977, 0.667396, 0.450276, 0.27938, 0., -0.253261,
-0.403959, -0.669463, -0.824201, -1., -0.993401, -0.868698,
-0.993617, -0.939005, -0.745691, -0.631595, -0.298683, 0.151377,
0.250732, 0.509236, 0.703321, 0.905054, 0.99999, 0.99999,
0.99999, 0.99999, 0.896605, 0.767955, 0.47806, 0.227019,
0.196892, -0.133553, -0.364458, -0.594838, -0.830121, -0.699343,
-0.829258, -0.839681, -0.853773, -0.786703, -0.630824,
-0.473989, -0.0557834, -0.0158808, -0.00447131, 0.262913,
0.442104, 0.528262, 0.74603, 0.841068, 0.748034, 0.79987,
0.679515, 0.563446, 0.399642, 0.217645, 0.140276, -0.0766598,
-0.341084, -0.54516, -0.624996, -0.507509, -0.485553, -0.646551,
-0.517161, -0.493663, -0.24734, 0.0947609, 0.0916772, 0.180147,
0.24771, 0.430109, 0.514077, 0.573468, 0.63471, 0.450924,
0.331709, 0.276296, 0.0644793, -0.0938358, 0.00777082,
-0.175275, -0.24808, -0.361929, -0.594437, -0.444756, -0.436369,
-0.387123, -0.342009, -0.339388, -0.209134, -0.0200438,
0.182676, 0.426069, 0.473897, 0.507601, 0.679114, 0.658269,
0.875759, 0.774677, 0.60523, 0.498597, 0.272133, 0.0847698,
-0.163496, -0.192266, -0.349656, -0.664868, -0.830275,
-0.978877, -1., -0.830491, -0.630208, -0.634216, -0.478862,
-0.338648, -0.0731136, 0.344969, 0.444417, 0.582719, 0.76632,
0.849086, 0.968855, 0.987974, 0.946406, 0.996145, 0.766629,
0.623115, 0.320824, 0.0515896, 0.0848315, -0.20824, -0.45817,
-0.739369, -1., -1., -0.935243, -0.831293, -0.849178, -0.89753,
-0.736409, -0.519473, -0.219464, 0.167104, 0.325974, 0.520398,
0.786857, 0.861636, 0.99999, 0.99999, 0.99999, 0.99999, 0.82639,
0.548491, 0.423016, 0.186931, -0.00123346, -0.0916155,
-0.451602, -0.725832, -0.922353, -0.734867, -0.616424,
-0.746215, -0.723396, -0.756329, -0.574455, -0.24179, 0.014339,
0.143914, 0.195936, 0.308397, 0.484782, 0.538037, 0.637022,
0.758919, 0.729378, 0.666595, 0.506984, 0.335009, 0.338154,
0.196552, -0.00370039, -0.147831, -0.490117, -0.595115,
-0.490888, -0.570909, -0.471738, -0.450245, -0.498042,
-0.378211, -0.142527, 0.220482, 0.313176, 0.331863, 0.436554,
0.456721, 0.546764, 0.629437, 0.56875, 0.55549, 0.340189,
0.0626908, -0.0972586, -0.224583, -0.215548, -0.254895,
-0.400783, -0.581732, -0.68559, -0.543711, -0.35092, -0.378797,
-0.305529, -0.250948, -0.188412, 0.144963, 0.320731, 0.336951,
0.626538, 0.714515, 0.658454, 0.701409, 0.752906, 0.877301,
0.754757, 0.507139, 0.217491, -0.0876684, -0.17654, -0.258812,
-0.445003, -0.620432, -1., -1., -0.979093, -0.89164, -0.71766,
-0.548614, -0.433162, -0.251719, 0.0570785, 0.429615, 0.630917,
0.71211, 0.914182, 0.938789, 0.967313, 0.99999, 0.858583,
0.842302, 0.811928, 0.445897, 0.118012, -0.0777391, -0.139536,
-0.153474, -0.463505, -0.829042, -1., -1., -0.833452, -0.861204,
-0.758395, -0.708594, -0.718585, -0.405655, -0.103118,
0.0856024, 0.383206, 0.645657, 0.791791, 0.909063, 0.955904,
0.99999, 0.99999, 0.962965, 0.744642, 0.404021, 0.307626,
0.120078, -0.168275, -0.248481, -0.497579, -0.866231, -0.821117,
-0.812914, -0.637608, -0.482099, -0.620432, -0.558821,
-0.401708, -0.0739462, 0.120078, 0.192235, 0.463042, 0.413981,
0.429307, 0.547165, 0.545469, 0.594345, 0.661538, 0.528663,
0.310802, 0.180826, 0.147831, 0.16109, -0.0808844, -0.328626,
-0.536988, -0.571525, -0.487342, -0.582781, -0.529187, -0.34648,
-0.373092, -0.229517, 0.0607789, 0.119769, 0.485707, 0.640784,
0.554164, 0.610102, 0.513984, 0.657991, 0.585433, 0.497949,
0.368528, -0.0702458, -0.263375, -0.316599, -0.433778,
-0.444695, -0.566993, -0.783558, -0.64541, -0.580961, -0.417157,
-0.252798, -0.25212, -0.11206, 0.0210614, 0.333374, 0.438712,
0.454624, 0.703105, 0.890808, 0.743501, 0.771439, 0.72099,
0.690061, 0.844707, 0.452157, 0.113201, -0.148139, -0.324123,
-0.313978, -0.563662, -0.719387, -0.99926, -1., -0.970613,
-0.944802, -0.810694, -0.56064, -0.417003, -0.165438, 0.183324,
0.340004, 0.676555, 0.881002, 0.92738, 0.99999, 0.99999,
0.99999, 0.904684, 0.775109, 0.71214, 0.406272, 0.0671621,
-0.0368806, -0.329982, -0.308643, -0.428999, -0.929754,
-0.907706, -0.966234, -0.854174, -0.721854, -0.739215, -0.53705,
-0.475038, -0.267908, -0.0387308, 0.0867433, 0.425853, 0.67748,
0.732092, 0.898517, 0.902001, 0.920041, 0.99999, 0.834716,
0.576089, 0.335163, 0.188103, 0.0391008, -0.190632, -0.454161,
-0.589102, -0.749669, -0.749453, -0.712819, -0.768417,
-0.388973, -0.426563, -0.40473, -0.092849, -0.0680255, 0.213913,
0.370008, 0.510006, 0.61556, 0.480773, 0.525178, 0.502051,
0.506676, 0.522927, 0.305251, 0.137809, 0.0824571, -0.070955,
-0.0758272, -0.195566, -0.540936, -0.591292, -0.530451,
-0.493016, -0.501187, -0.490086, -0.327084, -0.108452,
0.0251935, 0.214561, 0.252644, 0.528878, 0.859879, 0.669802,
0.695519, 0.641401, 0.560825, 0.655648, 0.398779, 0.197478,
-0.0365414, -0.315181, -0.41947, -0.551852, -0.633785,
-0.766259, -0.841932, -0.664529, -0.619353, -0.571926,
-0.307225, -0.242468, -0.0738845, 0.190879, 0.34759, 0.477813,
0.599309, 0.711184, 0.886583, 0.91116, 0.789232, 0.773505,
0.61778, 0.722532, 0.46039, -0.00222023, -0.0944833, -0.375251,
-0.414074, -0.586204, -0.928459, -0.940239, -0.965463,
-0.955349, -0.902217, -0.758179, -0.543834, -0.336088,
-0.00154183, 0.266459, 0.37081, 0.66015, 0.94249, 0.946468,
0.978723, 0.993894, 0.954732, 0.866971, 0.653057, 0.460267,
0.291529, 0.0446514, -0.152919, -0.330846, -0.51013, -0.584939,
-0.836042, -0.846095, -0.821487, -0.87283, -0.634525, -0.633692,
-0.51383, -0.165654, -0.0537482, -0.00863425, 0.207592, 0.51787,
0.679114, 0.755157, 0.867187, 0.880539, 0.814086, 0.860403,
0.661137, 0.384964, 0.22449, 0.0524222, -0.0688581, -0.340097,
-0.667304, -0.739215, -0.622128, -0.717136, -0.676432,
-0.628049, -0.441364, -0.206359, -0.128804, 0.121311, 0.112893,
0.331524, 0.601684, 0.560054, 0.666379, 0.605754, 0.534028,
0.466188, 0.421629, 0.324216, 0.0947917, 0.0228191, -0.072281,
-0.196337, -0.299608, -0.455457, -0.618829, -0.594745,
-0.523945, -0.518147, -0.451787, -0.466434, -0.299608,
0.0490302, 0.21194, 0.268309, 0.446915, 0.615344, 0.817386,
0.833976, 0.738197, 0.709396, 0.548768, 0.590891, 0.34944,
-0.00946684, -0.100867, -0.319991, -0.509359, -0.695859,
-0.812236, -0.906534, -0.827716, -0.698572, -0.6303, -0.508465,
-0.352462, -0.138734, 0.0825804, 0.335101, 0.439329, 0.613926,
0.777761, 0.782756, 0.85587, 0.942305, 0.826853, 0.730858,
0.678282, 0.449073, 0.262974, 0.00246693, -0.19094, -0.382528,
-0.570909, -0.719387, -0.965679, -0.892904, -0.882173,
-0.902371, -0.824971, -0.71692, -0.478615, -0.221777, 0.108175,
0.271208, 0.489716, 0.726171, 0.897437, 0.99999, 0.966635,
0.988806, 0.920257, 0.877394, 0.600358, 0.277406, 0.146381,
0.00317617, -0.218015, -0.398563, -0.658454, -0.834192,
-0.740109, -0.793271, -0.78217, -0.750594, -0.604089, -0.43973,
-0.280551, 0.0192729, 0.0579728, 0.21601, 0.385889, 0.576089,
0.709334, 0.731876, 0.783465, 0.777206, 0.784699, 0.59419,
0.42129, 0.244164, 0.0967652, -0.0450214, -0.221037, -0.447316,
-0.725462, -0.739277, -0.637547, -0.64134, -0.637238, -0.501033,
-0.444664, -0.152024, 0.124919, 0.128558, 0.302939, 0.47476,
0.662216, 0.699467, 0.717136, 0.641648, 0.56727, 0.529341,
0.33726, 0.168584, -0.0342286, -0.0954701, -0.229979, -0.301397,
-0.499275, -0.702581, -0.585248, -0.595825, -0.561565,
-0.477135, -0.356163, -0.305005, -0.134324, 0.160504, 0.30926,
0.403466, 0.591446, 0.744735, 0.741867, 0.849702, 0.742268,
0.646859, 0.602393, 0.418391, 0.210922, -0.0304049, -0.180949,
-0.38296, -0.503531, -0.773259, -0.930772, -0.862191, -0.808813,
-0.707422, -0.639705, -0.427611, -0.365013, -0.0845848,
0.240217, 0.341731, 0.503747, 0.717444, 0.866508, 0.844244,
0.860249, 0.874433, 0.845694, 0.714823, 0.586481, 0.296833,
0.0712325, -0.037559, -0.325388, -0.436739, -0.695766,
-0.879614, -0.877702, -0.827963, -0.84776, -0.808751, -0.652749,
-0.580869, -0.275093, -0.00610565, 0.201826, 0.353418, 0.627617,
0.83413, 0.836042, 0.99999, 0.94656, 0.856733, 0.862438,
0.730457, 0.41321, 0.158778, -0.000215856, -0.148478, -0.294119,
-0.565204, -0.740294, -0.849764, -0.737889, -0.736285,
-0.769589, -0.623516, -0.560332, -0.312714, -0.0243609,
0.113725, 0.167196, 0.428475, 0.557865, 0.650652, 0.780813,
0.732338, 0.773289, 0.727466, 0.699158, 0.412439, 0.207068,
0.141355, -0.113232, -0.211385, -0.381202, -0.645472, -0.750748,
-0.692837, -0.689537, -0.601468, -0.52968, -0.435968, -0.229054,
0.00638318, 0.23738, 0.268463, 0.464029, 0.625305, 0.682445,
0.76925, 0.736655, 0.640723, 0.56838, 0.509081, 0.229578,
0.0663295, -0.0856024, -0.224737, -0.304018, -0.487342,
-0.673101, -0.793703, -0.633754, -0.610626, -0.647353,
-0.460545, -0.343489, -0.219927, 0.0533781, 0.213852, 0.323815,
0.563816, 0.695088, 0.80869, 0.809214, 0.813469, 0.782448,
0.658423, 0.594961, 0.293904, 0.0751796, -0.0518055, -0.251627,
-0.436214, -0.613032, -0.858583, -0.924142, -0.796633,
-0.800796, -0.694317, -0.569829, -0.407197, -0.227605,
0.0414752, 0.337383, 0.368312, 0.568534, 0.847636, 0.861482,
0.896574, 0.87801, 0.786518, 0.773289, 0.667211, 0.413827,
0.175429, -0.0326251, -0.155694, -0.330692, -0.563354,
-0.787567, -0.900675, -0.800426, -0.771285, -0.791545, -0.68781,
-0.589503, -0.423171, -0.0759814, 0.119985, 0.225354, 0.482161,
0.71251, 0.838355, 0.85439, 0.909217, 0.913318, 0.774831,
0.738413, 0.554874, 0.249468, 0.0929415, -0.11906, -0.271485,
-0.410805, -0.711493, -0.802214, -0.753246, -0.744365,
-0.690092, -0.631071, -0.524808, -0.380431, -0.116007, 0.162632,
0.217336, 0.366092, 0.58864, 0.648555, 0.744889, 0.784082,
0.705171, 0.689352, 0.655432, 0.477351, 0.221253, 0.0532856,
-0.0424312, -0.213759, -0.419902, -0.590644, -0.759382,
-0.702026, -0.66385, -0.709889, -0.567825, -0.486386, -0.352154,
-0.0678097, 0.133707, 0.241821, 0.419779, 0.597212, 0.705881,
0.765704, 0.798267, 0.786672, 0.660767, 0.62552, 0.409202,
0.12569, 0.0391008, -0.162046, -0.331555, -0.453452, -0.676709,
-0.797712, -0.75192, -0.710753, -0.62367, -0.592371, -0.469179,
-0.25249, -0.0339203, 0.236455, 0.268278, 0.444818, 0.694378,
0.752845, 0.839927, 0.835271, 0.766567, 0.704709, 0.639613,
0.425021, 0.183601, 0.00262111, -0.121095, -0.29045, -0.485306,
-0.680965, -0.894662, -0.797743, -0.715964, -0.77921, -0.664467,
-0.527953, -0.356286, -0.0892411, 0.146597, 0.283728, 0.471677,
0.636992, 0.81791, 0.883869, 0.871812, 0.851306, 0.724845,
0.716427, 0.507509, 0.222486, 0.0674088, -0.121219, -0.287644,
-0.440655, -0.69848, -0.87431, -0.797434, -0.748219, -0.713744,
-0.689198, -0.540627, -0.412902, -0.20568, 0.158685, 0.224799,
0.348053, 0.596133, 0.75084, 0.816306, 0.8695, 0.805298,
0.785747, 0.730087, 0.505042, 0.334546, 0.101699, -0.021894,
-0.224367, -0.41281, -0.587653, -0.835271, -0.780752, -0.735638,
-0.738444, -0.657313, -0.556724, -0.471892, -0.186962,
0.0919856, 0.1935, 0.361312, 0.549693, 0.727004, 0.750439,
0.807425, 0.84261, 0.705788, 0.656419, 0.5562, 0.291128,
0.115576, -0.0459465, -0.240834, -0.335626, -0.620679, -0.79765,
-0.738567, -0.718678, -0.686053, -0.670172, -0.526566,
-0.405501, -0.176509, 0.118536, 0.218724, 0.347251, 0.589257,
0.706497, 0.742638, 0.841068, 0.788091, 0.737087, 0.663758,
0.517315, 0.285115, 0.0372506, -0.0374973, -0.212618, -0.399241,
-0.603164, -0.775818, -0.791637, -0.700268, -0.721145,
-0.658516, -0.490487, -0.456628, -0.154245, 0.122915, 0.243239,
0.369546, 0.553548, 0.741558, 0.788399, 0.834716, 0.798514,
0.741281, 0.678405, 0.554935, 0.259274, 0.0745629, -0.0408893,
-0.256746, -0.377193, -0.611582, -0.809368, -0.834377,
-0.737334, -0.684202, -0.676586, -0.582318, -0.428228,
-0.197293, 0.105585, 0.28123, 0.333559, 0.606833, 0.744426,
0.787135, 0.902063, 0.842363, 0.788214, 0.710136, 0.567208,
0.316106, 0.101792, -0.0519597, -0.221006, -0.37374, -0.567239,
-0.795738, -0.860495, -0.723242, -0.725153, -0.699004,
-0.580931, -0.480773, -0.245552, 0.0286164, 0.226279, 0.33615,
0.535262, 0.690431, 0.804434, 0.873909, 0.877085, 0.808443,
0.718832, 0.671313, 0.34981, 0.149064, 0.0358013, -0.198187,
-0.336304, -0.563076, -0.792346, -0.856024, -0.774523,
-0.753924, -0.701563, -0.60193, -0.467051, -0.267477, 0.0391008,
0.252644, 0.307688, 0.536187, 0.706405, 0.788708, 0.846557,
0.846403, 0.793611, 0.733479, 0.602516, 0.356841, 0.163804,
0.0270437, -0.124395, -0.325357, -0.498566, -0.724228,
-0.837614, -0.712295, -0.714885, -0.71214, -0.598693, -0.505443,
-0.327546, -0.0226957, 0.167967, 0.2643, 0.479139, 0.680872,
0.767646, 0.823152, 0.85479, 0.792562, 0.717506, 0.640476,
0.392766, 0.155293, 0.0191804, -0.144778, -0.283635, -0.482562,
-0.761109, -0.815165, -0.707823, -0.692097, -0.665947,
-0.589904, -0.450615, -0.289124, 0.00178852, 0.248111, 0.281877,
0.482531, 0.685128, 0.74421, 0.796016, 0.805575, 0.749669,
0.696321, 0.602054, 0.38777, 0.141602, -0.00117179, -0.129236,
-0.316137, -0.503438, -0.734127, -0.826174, -0.748589,
-0.713374, -0.692621, -0.583182, -0.512597, -0.350735,
-0.0133522, 0.209997, 0.314348, 0.484628, 0.674489, 0.796879,
0.831262, 0.871504, 0.81939, 0.703691, 0.659441, 0.426162,
0.127263, -0.00317617, -0.181628, -0.342718, -0.523205,
-0.762558, -0.855469, -0.78954, -0.717506, -0.69407, -0.624349,
-0.505134, -0.321502, -0.0339203, 0.206914, 0.29708, 0.48324,
0.689846, 0.758549, 0.842147, 0.879244, 0.813377, 0.765704,
0.674489, 0.446976, 0.201147, 0.0295415, -0.10873, -0.314348,
-0.509451, -0.713682, -0.887169, -0.828949, -0.766814,
-0.773104, -0.67048, -0.552499, -0.381418, -0.0758272, 0.168738,
0.279719, 0.446884, 0.64726, 0.766875, 0.849456, 0.867989,
0.833791, 0.765333, 0.710753, 0.483826, 0.19535, 0.0767215,
-0.0913688, -0.254741, -0.426008, -0.706744, -0.841377,
-0.778932, -0.741528, -0.736964, -0.689136, -0.547473,
-0.390761, -0.16513, 0.12162, 0.21857, 0.374017, 0.618181,
0.728021, 0.820624, 0.862284, 0.82272, 0.763175, 0.692775,
0.487465, 0.241851, 0.0775232, -0.0732678, -0.232385, -0.394801,
-0.635326, -0.830491, -0.763884, -0.693299, -0.709889,
-0.629282, -0.533072, -0.424157, -0.132505, 0.125073, 0.217645,
0.361898, 0.568072, 0.730611, 0.783373, 0.803201, 0.790681,
0.712418, 0.66678, 0.504733, 0.22486, 0.0884394, -0.0506645,
-0.249006, -0.412224, -0.664837, -0.840081, -0.772118,
-0.714361, -0.69333, -0.616115, -0.51309, -0.374048, -0.121866,
0.168121, 0.284406, 0.417127, 0.643036, 0.742576, 0.79543,
0.858553, 0.80021, 0.717814, 0.643251, 0.472417, 0.23149,
0.0212773, -0.116285, -0.277714, -0.448765, -0.654137,
-0.850566, -0.801721, -0.695489, -0.705202, -0.656665,
-0.538623, -0.426316, -0.152086, 0.149619, 0.267199, 0.406951,
0.636066, 0.771192, 0.830121, 0.887323, 0.865429, 0.790373,
0.724382, 0.565512, 0.258442, 0.0781091, -0.0580961, -0.270221,
-0.43788, -0.693145, -0.874156, -0.833914, -0.789016, -0.787104,
-0.70844, -0.58164, -0.46002, -0.206605, 0.130778, 0.292979,
0.37966, 0.595362, 0.750748, 0.811373, 0.877825, 0.866508,
0.788214, 0.737581, 0.599988, 0.315798, 0.121712, -0.0107928,
-0.18542, -0.344568, -0.576768, -0.818557, -0.836967, -0.737981,
-0.755003, -0.72762, -0.618798, -0.528447, -0.262111, 0.0407968,
0.156403, 0.287829, 0.515619, 0.680039, 0.767338, 0.848315,
0.879922, 0.825095, 0.724783, 0.599278, 0.329458, 0.132567,
0.00872676, -0.186407, -0.341577, -0.557865, -0.775294,
-0.811989, -0.698418, -0.694409, -0.662833, -0.548614, -0.43788,
-0.22264, 0.0711092, 0.246693, 0.312159, 0.524931, 0.664683,
0.74273, 0.840297, 0.789448, 0.710722, 0.669, 0.557742,
0.291128, 0.0936816, 0.00206605, -0.139906, -0.32952, -0.563508,
-0.785007, -0.813439, -0.707977, -0.695859, -0.672392,
-0.561874, -0.435043, -0.240834, 0.0738536, 0.260138, 0.339696,
0.578618, 0.737118, 0.800056, 0.855777, 0.851768, 0.783681,
0.684665, 0.575534, 0.282772, 0.0880693, -0.0326251, -0.255327,
-0.401647, -0.602547, -0.828024, -0.867279, -0.745351,
-0.694934, -0.640476, -0.564741, -0.462271, -0.246847,
0.0659903, 0.27645, 0.337322, 0.548306, 0.732338, 0.81754,
0.857165, 0.881002, 0.824077, 0.73681, 0.648586, 0.374942,
0.147368, -0.000986771, -0.152456, -0.341793, -0.570693,
-0.823707, -0.915261, -0.768355, -0.771748, -0.775047,
-0.647908, -0.539209, -0.349101, -0.0249776, 0.219772, 0.341639,
0.538993, 0.699929, 0.788553, 0.871966, 0.890098, 0.835795,
0.76225, 0.67233, 0.432329, 0.176046, 0.0391933, -0.12054,
-0.309199, -0.492183, -0.739492, -0.863671, -0.760646,
-0.729779, -0.704955, -0.640846, -0.544914, -0.362947,
-0.0470258, 0.207931, 0.236918, 0.433624, 0.649326, 0.741404,
0.80758, 0.841284, 0.811681, 0.768726, 0.66678, 0.388541,
0.162355, 0.0477967, -0.0997872, -0.286287, -0.47769, -0.71877,
-0.816707, -0.738351, -0.710907, -0.67896, -0.608807, -0.488082,
-0.337537, -0.0459774, 0.200345, 0.287027, 0.476425, 0.636005,
0.724444, 0.787998, 0.844059, 0.797959, 0.676339, 0.612415,
0.38592, 0.134108, -0.00894261, -0.137593, -0.265534, -0.456721,
-0.726325, -0.86361, -0.74236, -0.688273, -0.69185, -0.593666,
-0.488698, -0.314872, -0.0176077, 0.216781, 0.319806, 0.484597,
0.688458, 0.79765, 0.825958, 0.865275, 0.829011, 0.747972,
0.652256, 0.391471, 0.14521, 0.00477967, -0.128157, -0.327053,
-0.526812, -0.759721, -0.898424, -0.813439, -0.747387,
-0.706806, -0.614882, -0.503192, -0.38666, -0.10395, 0.195658,
0.297542, 0.465633, 0.66678, 0.776897, 0.871442, 0.893984,
0.842363, 0.795276, 0.709858, 0.505227, 0.228715, 0.0481976,
-0.0917697, -0.272565, -0.449443, -0.743285, -0.922662,
-0.850628, -0.756483, -0.733572, -0.699559, -0.581332,
-0.419624, -0.125104, 0.148293, 0.270437, 0.471584, 0.679669,
0.772673, 0.815597, 0.874988, 0.868759, 0.770884, 0.706004,
0.487773, 0.219557, 0.0984613, -0.0731752, -0.237288, -0.39662,
-0.669401, -0.824571, -0.788862, -0.736193, -0.713343,
-0.648802, -0.556631, -0.46443, -0.187116, 0.113756, 0.233371,
0.375806, 0.579019, 0.70107, 0.770977, 0.839156, 0.81461,
0.754602, 0.714977, 0.533504, 0.22409, 0.0363872, -0.0574486,
-0.225138, -0.407907, -0.661229, -0.858429, -0.770977,
-0.693793, -0.72062, -0.616516, -0.50498, -0.395109, -0.122329,
0.153381, 0.276789, 0.415986, 0.640877, 0.729933, 0.762466,
0.81902, 0.814364, 0.743871, 0.648956, 0.465355, 0.190786,
0.0330877, -0.0926331, -0.258102, -0.384902, -0.622498,
-0.833112, -0.823121, -0.730704, -0.684418, -0.648648,
-0.544914, -0.430849, -0.180702, 0.151161, 0.254587, 0.388819,
0.642388, 0.74973, 0.825095, 0.884702, 0.846927, 0.800056,
0.733387, 0.556169, 0.240741, 0.0388849, -0.0721885, -0.25397,
-0.428166, -0.677264, -0.896882, -0.888248, -0.770637,
-0.746215, -0.666379, -0.536002, -0.420519, -0.166178, 0.112831,
0.288045, 0.421475, 0.623208, 0.759845, 0.802368, 0.884856,
0.874773, 0.771254, 0.726541, 0.585587, 0.286595, 0.1128,
-0.0251627, -0.202041, -0.349564, -0.58642, -0.825742,
-0.874218, -0.77699, -0.742114, -0.699035, -0.600851, -0.513923,
-0.289525, 0.0407351, 0.224706, 0.335626, 0.597829, 0.747202,
0.810077, 0.87098, 0.853495, 0.834808, 0.747664, 0.595208,
0.306146, 0.0934657, -0.00231274, -0.188812, -0.362022,
-0.563385, -0.813377, -0.837738, -0.70659, -0.728391, -0.667088,
-0.534275, -0.447902, -0.249653, 0.0309908, 0.22927, 0.338339,
0.532826, 0.684048, 0.749453, 0.789139, 0.805051, 0.761541,
0.709643, 0.60745, 0.304604, 0.122298, -0.0191187, -0.168121,
-0.289186, -0.544328, -0.782016, -0.845293, -0.724321,
-0.684418, -0.682445, -0.578155, -0.451849, -0.275402,
0.0505103, 0.240587, 0.323137, 0.570693, 0.722224, 0.79139,
0.82639, 0.818403, 0.788307, 0.722162, 0.593975, 0.301551,
0.0676863, -0.0665454, -0.207684, -0.366555, -0.550094,
-0.802492, -0.877455, -0.743995, -0.724475, -0.652071,
-0.551081, -0.466712, -0.264979, 0.0524222, 0.276296, 0.364211,
0.557495, 0.732616, 0.79802, 0.843998, 0.885411, 0.801721,
0.737581, 0.655586, 0.357766, 0.108329, -0.0383916, -0.184156,
-0.329057, -0.551112, -0.820562, -0.890715, -0.805668,
-0.777082, -0.724783, -0.615869, -0.491042, -0.343088,
0.000215856, 0.227358, 0.313238, 0.566437, 0.714453, 0.789787,
0.851152, 0.881341, 0.848407, 0.764933, 0.653828, 0.399858,
0.129421, 0.00965185, -0.129945, -0.331216, -0.500416,
-0.763422, -0.872244, -0.777144, -0.757316, -0.707021,
-0.602825, -0.519319, -0.357396, -0.053224, 0.163095, 0.268772,
0.482439, 0.687749, 0.755867, 0.802183, 0.855469, 0.812236,
0.764624, 0.682907, 0.410497, 0.144346, 0.0275062, -0.109963,
-0.265041, -0.469487, -0.738598, -0.854112, -0.782232,
-0.712202, -0.706281, -0.62145, -0.493632, -0.352832,
-0.0598538, 0.175429, 0.278331, 0.485676, 0.675013, 0.732184,
0.805606, 0.831355, 0.773968, 0.740017, 0.668568, 0.429091,
0.143452, 0.00962102, -0.118628, -0.277869, -0.438651,
-0.726757, -0.874557, -0.783404, -0.709273, -0.679577,
-0.584261, -0.492738, -0.340775, -0.050202, 0.202658, 0.318573,
0.474359, 0.700793, 0.794567, 0.821919, 0.85257, 0.809615,
0.755928, 0.683123, 0.423757, 0.146289, 0.00101761, -0.159949,
-0.312868, -0.465663, -0.707577, -0.878226, -0.814672,
-0.735977, -0.703044, -0.593728, -0.495421, -0.366709,
-0.0981221, 0.189398, 0.308304, 0.479047, 0.68744, 0.7748,
0.834099, 0.853927, 0.842147, 0.78291, 0.706929, 0.493016,
0.194024, 0.0258102, -0.113448, -0.269759, -0.435444, -0.69885,
-0.897129, -0.818465, -0.745536, -0.756915, -0.652071,
-0.514231, -0.382991, -0.121465, 0.15298, 0.284468, 0.47991,
0.695828, 0.775263, 0.816985, 0.851337, 0.845539, 0.782355,
0.720281, 0.500755, 0.198495, 0.0461315, -0.0937741, -0.236239,
-0.403651, -0.650436, -0.834901, -0.805822, -0.733479,
-0.715964, -0.640723, -0.526442, -0.422862, -0.174196, 0.116902,
0.216935, 0.383206, 0.62515, 0.74936, 0.790219, 0.83746,
0.822104, 0.785747, 0.764408, 0.548398, 0.251195, 0.0516821,
-0.0774307, -0.22412, -0.394493, -0.648216, -0.858337,
-0.833575, -0.757008, -0.719079, -0.636406, -0.519473,
-0.397885, -0.133893, 0.148201, 0.266212, 0.423448, 0.644639,
0.760184, 0.779272, 0.827192, 0.807981, 0.725678, 0.663758,
0.520152, 0.226495, 0.0275371, -0.0799593, -0.251966, -0.35829,
-0.589657, -0.821949, -0.802492, -0.741281, -0.708656, -0.63437,
-0.525826, -0.420241, -0.197817, 0.107496, 0.231583, 0.378118,
0.632613, 0.752999, 0.810139, 0.864134, 0.828949, 0.78069,
0.734959, 0.566437, 0.260261, 0.0524531, -0.0785716, -0.264424,
-0.417898, -0.640569, -0.843843, -0.851861, -0.753862,
-0.742669, -0.6583, -0.478615, -0.395233, -0.167566, 0.119461,
0.256961, 0.403312, 0.630208, 0.765426, 0.800518, 0.835672,
0.801289, 0.759259, 0.719757, 0.582966, 0.278023, 0.0821179,
-0.0417219, -0.224737, -0.353079, -0.577323, -0.814518,
-0.854945, -0.766259, -0.752845, -0.690986, -0.584107,
-0.465201, -0.23405, 0.0353387, 0.221499, 0.326128, 0.609023,
0.778069, 0.801042, 0.860742, 0.841068, 0.81091, 0.7678,
0.626692, 0.333837, 0.0898578, -0.0553209, -0.220389, -0.367541,
-0.571525, -0.813007, -0.860834, -0.74458, -0.7361, -0.679484,
-0.54001, -0.439267, -0.230349, 0.0649419, 0.225971, 0.327361,
0.55509, 0.710444, 0.795584, 0.821857, 0.81569, 0.771809,
0.715594, 0.648339, 0.339696, 0.11206, -0.0175152, -0.18502,
-0.31441, -0.524099, -0.774153, -0.835055, -0.75121, -0.755404,
-0.701409, -0.584415, -0.469025, -0.284961, 0.0293564, 0.225971,
0.30815, 0.566037, 0.733078, 0.805452, 0.849178, 0.836196,
0.774831, 0.724938, 0.609609, 0.325573, 0.115206, -0.0492769,
-0.19683, -0.36677, -0.536125, -0.747757, -0.84739, -0.736594,
-0.727836, -0.677973, -0.543156, -0.438805, -0.268001,
0.0323168, 0.217028, 0.302137, 0.521324, 0.704339, 0.776897,
0.816399, 0.841839, 0.770422, 0.723858, 0.640229, 0.3664,
0.131271, -0.012643, -0.171297, -0.331, -0.530821, -0.792007,
-0.855346, -0.774153, -0.759937, -0.714916, -0.610935,
-0.458232, -0.297758, -0.00410127, 0.209473, 0.290419, 0.530328,
0.716673, 0.785223, 0.833513, 0.853403, 0.785624, 0.722686,
0.640075, 0.393074, 0.131025, -0.00530389, -0.151685, -0.334238,
-0.507817, -0.764408, -0.86435, -0.778162, -0.740356, -0.71103,
-0.606803, -0.498659, -0.335225, 0.0018502, 0.19609, 0.292917,
0.50313, 0.711184, 0.822412, 0.848685, 0.870671, 0.797897,
0.737796, 0.676401, 0.416448, 0.143606, 0.00194271, -0.156187,
-0.331154, -0.503808, -0.744272, -0.861297, -0.787258,
-0.737673, -0.722316, -0.626846, -0.50683, -0.351383,
-0.0585587, 0.182769, 0.270375, 0.467822, 0.677326, 0.757624,
0.837429, 0.853464, 0.798668, 0.743748, 0.672423, 0.454686,
0.174689, 0.0265811, -0.12865, -0.318295, -0.477135, -0.722625,
-0.866539, -0.782479, -0.737519, -0.731876, -0.63471, -0.509081,
-0.355083, -0.0723427, 0.18283, 0.285948, 0.454285, 0.672238,
0.768726, 0.827778, 0.856486, 0.813932, 0.752937, 0.680872,
0.452897, 0.171051, 0.0424003, -0.123254, -0.2886, -0.439422,
-0.687995, -0.834222, -0.769096, -0.713898, -0.719541,
-0.635943, -0.507447, -0.373955, -0.103734, 0.15298, 0.240279,
0.417528, 0.645965, 0.757624, 0.808967, 0.844861, 0.830707,
0.768109, 0.696321, 0.493725, 0.224891, 0.0599772, -0.0926023,
-0.263745, -0.431003, -0.692097, -0.870856, -0.79765, -0.73388,
-0.733109, -0.640538, -0.512473, -0.366647, -0.083043, 0.186407,
0.292732, 0.441796, 0.667551, 0.787382, 0.831786, 0.858429,
0.801967, 0.732246, 0.664683, 0.462796, 0.196028, 0.0228191,
-0.103056, -0.259058, -0.430325, -0.664066, -0.842517,
-0.799439, -0.724444, -0.716427, -0.643159, -0.528293, -0.40914,
-0.146227, 0.142804, 0.246724, 0.401616, 0.64541, 0.770021,
0.832496, 0.869962, 0.838755, 0.770206, 0.712264, 0.53113,
0.235992, 0.0574486, -0.0963335, -0.281476, -0.438126,
-0.688735, -0.870671, -0.84039, -0.761849, -0.738968, -0.657313,
-0.527953, -0.40803, -0.141077, 0.14706, 0.268525, 0.408893,
0.643652, 0.766875, 0.806747, 0.855469, 0.830121, 0.762774,
0.707176, 0.542693, 0.256807, 0.0768756, -0.0621049, -0.226896,
-0.384224, -0.62589, -0.825249, -0.807765, -0.730951, -0.747664,
-0.677973, -0.570785, -0.463628, -0.212464, 0.0751796, 0.223812,
0.37007, 0.615005, 0.742946, 0.808597, 0.867834, 0.8629,
0.798483, 0.738876, 0.596503, 0.281723, 0.0807302, -0.0494311,
-0.230349, -0.386352, -0.622221, -0.8345, -0.83083, -0.743069,
-0.729255, -0.663018, -0.552468, -0.428259, -0.181998, 0.118906,
0.243856, 0.350643, 0.596904, 0.717907, 0.779673, 0.823337,
0.80095, 0.755003, 0.70403, 0.568442, 0.273212, 0.0873909,
-0.025286, -0.201301, -0.355392, -0.560023, -0.791884,
-0.832434, -0.736255, -0.731105, -0.678251, -0.570292,
-0.448858, -0.224336, 0.081532, 0.238737, 0.34318, 0.592063,
0.728638, 0.806963, 0.861359, 0.846927, 0.768047, 0.709797,
0.587036, 0.271146, 0.0641401, -0.0778932, -0.240248, -0.378057,
-0.58497, -0.8312, -0.853711, -0.735052, -0.732184, -0.677326,
-0.546332, -0.421999, -0.237596, 0.0654044, 0.24731, 0.343581,
0.568133, 0.728021, 0.801721, 0.852478, 0.850227, 0.786703,
0.738105, 0.613309, 0.323291, 0.112584, -0.0175152, -0.193654,
-0.365722, -0.562614, -0.818928, -0.869746, -0.769712,
-0.762867, -0.703722, -0.58719, -0.475593, -0.291498, 0.0262728,
0.225169, 0.31811, 0.552808, 0.740263, 0.812976, 0.845848,
0.863116, 0.80684, 0.749977, 0.639859, 0.369854, 0.138364,
-0.0088501, -0.1688, -0.339233, -0.531068, -0.795399, -0.867526,
-0.758241, -0.734559, -0.714206, -0.60671, -0.479756, -0.302014,
0.0111937, 0.195566, 0.297234, 0.530359, 0.717691, 0.782355,
0.827315, 0.85772, 0.789479, 0.72907, 0.65241, 0.395541,
0.141417, 0.00687656, -0.149557, -0.317339, -0.509852,
-0.754294, -0.835764, -0.755312, -0.727158, -0.701409, -0.59382,
-0.481143, -0.318295, -0.000400876, 0.214777, 0.295846,
0.501742, 0.6937, 0.775263, 0.826082, 0.833976, 0.778069,
0.73092, 0.665145, 0.394061, 0.126245, -0.00422461, -0.152086,
-0.31882, -0.507848, -0.745968, -0.839125, -0.760153, -0.730303,
-0.707052, -0.585433, -0.474205, -0.314811, -0.00918931,
0.210706, 0.31293, 0.506738, 0.709488, 0.790527, 0.821549,
0.843905, 0.794628, 0.729933, 0.651947, 0.401708, 0.137963,
-0.00144932, -0.169108, -0.325912, -0.485861, -0.729162,
-0.864072, -0.793703, -0.739585, -0.721206, -0.630393,
-0.506676, -0.334639, -0.0476425, 0.187949, 0.273212, 0.47806,
0.689907, 0.771439, 0.838694, 0.859169, 0.821764, 0.759105,
0.688149, 0.458725, 0.172346, 0.0218323, -0.1305, -0.310586,
-0.491011, -0.745506, -0.891517, -0.810077, -0.760554,
-0.745444, -0.643097, -0.505381, -0.350304, -0.0668846,
0.182306, 0.289062, 0.477813, 0.68707, 0.792223, 0.848716,
0.8699, 0.807734, 0.742669, 0.686268, 0.455364, 0.180548,
0.0325634, -0.11391, -0.277098, -0.44158, -0.688766, -0.841068,
-0.78769, -0.729224, -0.722131, -0.642573, -0.521786, -0.390916,
-0.114743, 0.150544, 0.233988, 0.415153, 0.662432, 0.782695,
0.837923, 0.85994, 0.828271, 0.771748, 0.705171, 0.491566,
0.216843, 0.0518363, -0.099263, -0.285948, -0.44306, -0.681581,
-0.866601, -0.793641, -0.724938, -0.716118, -0.622498,
-0.506984, -0.368621, -0.094915, 0.170496, 0.285485, 0.428012,
0.648555, 0.768479, 0.807055, 0.848777, 0.803293, 0.73388,
0.683123, 0.503592, 0.223103, 0.0495852, -0.0839681, -0.25286,
-0.412995, -0.661137, -0.839064, -0.789941, -0.718894,
-0.723766, -0.661692, -0.529588, -0.404823, -0.145302, 0.143452,
0.249036, 0.416972, 0.650806, 0.753554, 0.822535, 0.865121,
0.836134, 0.772888, 0.699312, 0.530821, 0.235437, 0.0515896,
-0.0893028, -0.283357, -0.447131, -0.669771, -0.852169,
-0.824971, -0.742977, -0.731382, -0.649419, -0.530297,
-0.403651, -0.123377, 0.161183, 0.272596, 0.400937, 0.634617,
0.772518, 0.811989, 0.860495, 0.831015, 0.756329, 0.71914,
0.536526, 0.244072, 0.0720035, -0.0749638, -0.241543, -0.407351,
-0.642635, -0.834037, -0.831663, -0.747818, -0.745228, -0.69,
-0.568133, -0.430109, -0.179469, 0.114373, 0.248944, 0.377563,
0.629591, 0.752444, 0.824262, 0.880231, 0.853156, 0.786672,
0.71322, 0.567918, 0.270591, 0.0719418, -0.0635542, -0.246323,
-0.391748, -0.613032, -0.842857, -0.831509, -0.73388, -0.741034,
-0.675938, -0.554319, -0.432422, -0.194887, 0.106479, 0.249561,
0.352987, 0.578525, 0.740325, 0.813685, 0.85479, 0.846526,
0.772179, 0.720836, 0.580715, 0.281692, 0.104166, -0.030004,
-0.206204, -0.362546, -0.591446, -0.812359, -0.832835, -0.74751,
-0.737951, -0.694101, -0.565142, -0.457029, -0.249653,
0.0765673, 0.222702, 0.331, 0.57353, 0.719202, 0.803047,
0.854852, 0.852324, 0.782078, 0.710568, 0.595732, 0.317093,
0.108637, -0.0273212, -0.205433, -0.370317, -0.577169, -0.8205,
-0.854575, -0.734096, -0.718986, -0.675476, -0.566592,
-0.443739, -0.228746, 0.0792192, 0.247402, 0.337383, 0.573314,
0.739277, 0.791175, 0.847606, 0.848716, 0.768664, 0.71877,
0.595917, 0.315428, 0.103241, -0.0252243, -0.198526, -0.362916,
-0.559962, -0.802368, -0.842703, -0.745752, -0.726171,
-0.692251, -0.589657, -0.468439, -0.278578, 0.0448056, 0.238829,
0.322828, 0.559808, 0.732092, 0.808998, 0.860125, 0.857504,
0.798976, 0.731074, 0.641, 0.354837, 0.105184, -0.0129822,
-0.188782, -0.364612, -0.550557, -0.807425, -0.870085,
-0.757408, -0.74529, -0.70659, -0.592988, -0.481544, -0.282895,
0.0337044, 0.236455, 0.333467, 0.529958, 0.713806, 0.790311,
0.836597, 0.870363, 0.800672, 0.741034, 0.650097, 0.379722,
0.146597, 0.0112554, -0.148293, -0.318758, -0.506059, -0.747849,
-0.853804, -0.763576, -0.726603, -0.719048, -0.618027,
-0.501126, -0.330692, -0.0124888, 0.199019, 0.286873, 0.503747,
0.691665, 0.773752, 0.84483, 0.877394, 0.828178, 0.761726,
0.666379, 0.415739, 0.15776, 0.0164976, -0.140985, -0.322057,
-0.507601, -0.75599, -0.861975, -0.770422, -0.730396, -0.708347,
-0.607635, -0.482223, -0.304758, -0.00601314, 0.218631,
0.308397, 0.494927, 0.698757, 0.781276, 0.829967, 0.8662,
0.796324, 0.726079, 0.648956, 0.39992, 0.153135, 0.0276913,
-0.125628, -0.285269, -0.470906, -0.730858, -0.842918,
-0.767739, -0.71359, -0.707792, -0.624534, -0.502667, -0.353757,
-0.0548583, 0.188843, 0.281076, 0.4718, 0.686423, 0.790465,
0.851614, 0.867218, 0.819236, 0.747356, 0.671714, 0.441179,
0.153443, 0.0169601, -0.135804, -0.311511, -0.480773, -0.744056,
-0.874927, -0.777298, -0.717968, -0.707484, -0.60523, -0.496408,
-0.355145, -0.0574794, 0.194486, 0.289371, 0.45447, 0.668537,
0.772518, 0.822258, 0.853249, 0.814765, 0.744796, 0.672947,
0.459928, 0.188843, 0.0402418, -0.106571, -0.276018, -0.455148,
-0.710506, -0.863425, -0.800426, -0.725215, -0.724999,
-0.649665, -0.534121, -0.39773, -0.109192, 0.16328, 0.262574,
0.444818, 0.671559, 0.755527, 0.823923, 0.869037, 0.833328,
0.761417, 0.684757, 0.491319, 0.205156, 0.0450523, -0.107959,
-0.284128, -0.452219, -0.700392, -0.865768, -0.806284,
-0.729532, -0.72429, -0.642265, -0.532733, -0.387369, -0.109192,
0.171822, 0.281785, 0.427488, 0.655339, 0.757532, 0.816676,
0.858182, 0.818681, 0.750439, 0.693392, 0.501187, 0.205125,
0.0538099, -0.0782016, -0.260261, -0.427241, -0.665762,
-0.843535, -0.798668, -0.731259, -0.732493, -0.662709, -0.54957,
-0.410343, -0.147769, 0.146536, 0.26612, 0.400105, 0.632304,
0.74714, 0.820377, 0.870579, 0.843936, 0.772488, 0.710599,
0.526627, 0.229733, 0.0650035, -0.0761972, -0.257208, -0.417219,
-0.640723, -0.854544, -0.828024, -0.722841, -0.725924,
-0.653736, -0.536896, -0.409911, -0.139536, 0.148817, 0.260138,
0.389929, 0.621882, 0.748281, 0.808813, 0.852416, 0.837275,
0.75895, 0.698171, 0.533442, 0.244072, 0.0678713, -0.0609331,
-0.223103, -0.391933, -0.624965, -0.836689, -0.819945,
-0.731475, -0.728607, -0.666256, -0.556631, -0.438527, -0.20901,
0.102655, 0.247464, 0.363625, 0.598754, 0.731876, 0.80684,
0.874618, 0.853865, 0.780228, 0.723766, 0.564741, 0.277067,
0.0879151, -0.0496778, -0.218385, -0.389065, -0.6303, -0.854636,
-0.852077, -0.741281, -0.726233, -0.671929, -0.555891,
-0.436492, -0.207376, 0.110734, 0.260415, 0.371581, 0.605322,
0.750501, 0.799285, 0.829874, 0.840205, 0.768201, 0.7007,
0.566222, 0.270745, 0.0892411, -0.0326868, -0.215609, -0.370933,
-0.585433, -0.815998, -0.831262, -0.73203, -0.716303, -0.675414,
-0.570138, -0.459619, -0.245182, 0.0778316, 0.243362, 0.351414,
0.583891, 0.734497, 0.806223, 0.867218, 0.870517, 0.795708,
0.739092, 0.612939, 0.316168, 0.097567, -0.0368806, -0.197663,
-0.369577, -0.587746, -0.832126, -0.857473, -0.727096,
-0.726171, -0.689136, -0.563354, -0.455395, -0.244534, 0.080576,
0.251164, 0.357211, 0.571834, 0.716828, 0.786827, 0.837429,
0.857627, 0.79543, 0.728638, 0.61186, 0.33322, 0.112985,
-0.00530389, -0.163588, -0.327392, -0.531284, -0.788461,
-0.836597, -0.75047, -0.728391, -0.682599, -0.594036, -0.48361,
-0.303771, 0.0307749, 0.231799, 0.307318, 0.538839, 0.709704,
0.781369, 0.849764, 0.866416, 0.808967, 0.746986, 0.634309,
0.353912, 0.11351, -0.014339, -0.178914, -0.338956, -0.541521,
-0.802738, -0.869685, -0.761849, -0.72099, -0.698264, -0.590027,
-0.464245, -0.282895, 0.0340744, 0.228037, 0.327916, 0.529557,
0.695674, 0.76925, 0.820839, 0.860742, 0.78806, 0.717043,
0.62845, 0.360912, 0.119368, 0.00499553, -0.151007, -0.318511,
-0.501064, -0.77221, -0.864812, -0.769188, -0.73055, -0.703629,
-0.615807, -0.504456, -0.329921, -0.0222332, 0.204693, 0.303987,
0.512011, 0.712911, 0.780382, 0.843535, 0.865182, 0.804527,
0.757254, 0.65241, 0.386691, 0.12017, -0.00672238, -0.146998,
-0.335163, -0.523975, -0.771439, -0.881187, -0.777082,
-0.725061, -0.708718, -0.592032, -0.481637, -0.328841,
-0.027167, 0.204046, 0.303155, 0.491258, 0.691048, 0.767492,
0.824632, 0.85257, 0.810077, 0.746647, 0.66015, 0.423911,
0.154923, 0.0305899, -0.116223, -0.280428, -0.456258, -0.728946,
-0.863671, -0.780906, -0.718061, -0.709273, -0.629529,
-0.519319, -0.370933, -0.074347, 0.182059, 0.282309, 0.470443,
0.691542, 0.763267, 0.808351, 0.853958, 0.822936, 0.76632,
0.687995, 0.451448, 0.176385, 0.029449, -0.130192, -0.286441,
-0.465263, -0.722471, -0.871596, -0.803509, -0.72833, -0.720004,
-0.612569, -0.50276, -0.364766, -0.075488, 0.183324, 0.29967,
0.459249, 0.662154, 0.755527, 0.807888, 0.849764, 0.809923,
0.736717, 0.674242, 0.455395, 0.166209, 0.0204138, -0.113355,
-0.278239, -0.443924, -0.692621, -0.855191, -0.784915,
-0.727096, -0.718924, -0.629221, -0.529372, -0.388233,
-0.111382, 0.163897, 0.271239, 0.446668, 0.668938, 0.756329,
0.822998, 0.85772, 0.8345, 0.771717, 0.696845, 0.482747,
0.184927, 0.0290481, -0.110148, -0.274384, -0.445126, -0.688674,
-0.860958, -0.810447, -0.732585, -0.723396, -0.628141,
-0.513213, -0.390299, -0.111043, 0.173733, 0.272688, 0.429492,
0.659441, 0.760862, 0.81498, 0.849764, 0.829504, 0.761726,
0.707947, 0.511918, 0.213451, 0.0555984, -0.0728977, -0.238244,
-0.406673, -0.658855, -0.866293, -0.823861, -0.739523,
-0.731167, -0.660767, -0.549878, -0.419779, -0.169262, 0.123408,
0.251657, 0.403805, 0.638873, 0.747448, 0.809615, 0.863271,
0.838663, 0.775047, 0.72099, 0.541861, 0.244534, 0.0681797,
-0.0678713, -0.23775, -0.392365, -0.635234, -0.850874,
-0.833267, -0.737673, -0.722378, -0.655833, -0.542323,
-0.422461, -0.173826, 0.124487, 0.251719, 0.386506, 0.625613,
0.743039, 0.798668, 0.840667, 0.816676, 0.758241, 0.703845,
0.538499, 0.239292, 0.0586204, -0.0568318, -0.235376, -0.391779,
-0.608314, -0.831509, -0.820315, -0.733664, -0.724136,
-0.653057, -0.540596, -0.426686, -0.202812, 0.100157, 0.249345,
0.373277, 0.618644, 0.74751, 0.797804, 0.851152, 0.84298,
0.782756, 0.730087, 0.577446, 0.276234, 0.0734219, -0.0656511,
-0.232045, -0.389281, -0.613093, -0.837738, -0.840451,
-0.734867, -0.729625, -0.672423, -0.539517, -0.425298,
-0.206975, 0.108051, 0.259953, 0.372784, 0.604243, 0.747602,
0.796879, 0.83228, 0.836258, 0.778686, 0.723303, 0.580684,
0.287829, 0.0806685, -0.0491227, -0.204046, -0.363779,
-0.575257, -0.82528, -0.850473, -0.747232, -0.739739, -0.680039,
-0.579728, -0.466558, -0.259644, 0.0496469, 0.224799, 0.335255,
0.563755, 0.731567, 0.794937, 0.840821, 0.863486, 0.799408,
0.754294, 0.628851, 0.333097, 0.109809, -0.0371889, -0.198218,
-0.352678, -0.573561, -0.823954, -0.872244, -0.773444,
-0.745043, -0.695088, -0.573777, -0.459465, -0.262142,
0.0622283, 0.230596, 0.336396, 0.56838, 0.72577, 0.793333,
0.839773, 0.84961, 0.779765, 0.722532, 0.614789, 0.332172,
0.100651, -0.0138148, -0.176447, -0.338709, -0.519011,
-0.771501, -0.83746, -0.751827, -0.727836, -0.681828, -0.580036,
-0.477227, -0.294613, 0.013969, 0.195257, 0.300626, 0.536958,
0.717136, 0.781985, 0.836967, 0.855716, 0.792562, 0.742792,
0.63841, 0.353357, 0.106417, -0.0225107, -0.186037, -0.34648,
-0.544636, -0.796879, -0.864905, -0.768726, -0.725523,
-0.704585, -0.579173, -0.455487, -0.289371, 0.0214314, 0.218385,
0.320269, 0.53705, 0.717198, 0.783897, 0.830121, 0.839156,
0.78069, 0.727219, 0.635943, 0.373277, 0.117765, -0.00191187,
-0.160659, -0.320824, -0.501033, -0.767739, -0.863918,
-0.767646, -0.728175, -0.706127, -0.607388, -0.498443,
-0.333374, -0.0334577, 0.19424, 0.293225, 0.497888, 0.711123,
0.78399, 0.838385, 0.865028, 0.816306, 0.76817, 0.679793,
0.420611, 0.149928, 0.0100836, -0.160504, -0.327084, -0.500663,
-0.761325, -0.882266, -0.790558, -0.733263, -0.715193,
-0.601437, -0.492275, -0.330137, -0.0226649, 0.209072, 0.297604,
0.492553, 0.697215, 0.76851, 0.82972, 0.855654, 0.806963,
0.742946, 0.66607, 0.434642, 0.161275, 0.0275371, -0.118289,
-0.282957, -0.457708, -0.713374, -0.850874, -0.778686,
-0.732801, -0.724321, -0.62589, -0.512165, -0.366863,
-0.0735144, 0.184249, 0.277622, 0.470196, 0.687348, 0.769712,
0.825496, 0.863795, 0.825496, 0.754171, 0.685528, 0.447439,
0.164729, 0.0166518, -0.131703, -0.293379, -0.467668, -0.711832,
-0.863147, -0.784329, -0.717506, -0.713806, -0.602455,
-0.483795, -0.352524, -0.0711709, 0.189398, 0.281322, 0.440963,
0.664066, 0.760245, 0.80428, 0.843597, 0.811681, 0.750131,
0.685898, 0.462703, 0.186099, 0.0354621, -0.102038, -0.263221,
-0.438527, -0.686361, -0.866508, -0.800796, -0.736409, -0.72762,
-0.637454, -0.529526, -0.38592, -0.115298, 0.15409, 0.256406,
0.428875, 0.661661, 0.765272, 0.818372, 0.859262, 0.828888,
0.751149, 0.689229, 0.489223, 0.191341, 0.0282155, -0.110765,
-0.275648, -0.438373, -0.69, -0.872614, -0.824879, -0.739955,
-0.72022, -0.639952, -0.524716, -0.393228, -0.121095, 0.155694,
0.2639, 0.430787, 0.658361, 0.763545, 0.820223, 0.857782,
0.823553, 0.75158, 0.6974, 0.509667, 0.208147, 0.0424928,
-0.0919856, -0.262728, -0.424712, -0.66052, -0.849487,
-0.820469, -0.739277, -0.730704, -0.651824, -0.536218,
-0.419378, -0.159734, 0.136668, 0.257948, 0.40988, 0.641648,
0.757933, 0.822227, 0.86142, 0.830029, 0.764809, 0.716581,
0.534645, 0.231274, 0.0572944, -0.0795893, -0.255635, -0.409448,
-0.645965, -0.85442, -0.821734, -0.738043, -0.736717, -0.65682,
-0.542138, -0.416078, -0.172901, 0.118443, 0.256746, 0.38959,
0.628234, 0.745444, 0.802985, 0.844059, 0.826267, 0.769342,
0.711986, 0.549323, 0.249869, 0.0661753, -0.066422, -0.236702,
-0.385735, -0.606309, -0.831663, -0.826729, -0.732092,
-0.727528, -0.670418, -0.550557, -0.433038, -0.207129, 0.102871,
0.235499, 0.358044, 0.599124, 0.732616, 0.803818, 0.843535,
0.844522, 0.785932, 0.728545, 0.587591, 0.28123, 0.0785716,
-0.0509112, -0.220574, -0.376638, -0.602239, -0.836659,
-0.845848, -0.75229, -0.735052, -0.672392, -0.551112, -0.430726,
-0.211539, 0.10395, 0.253353, 0.365229, 0.600851, 0.744426,
0.795183, 0.845385, 0.836134, 0.757008, 0.705726, 0.564649,
0.28123, 0.0713867, -0.055475, -0.212063, -0.372044, -0.571525,
-0.815381, -0.843843, -0.74384, -0.733017, -0.677665, -0.560023,
-0.444602, -0.243177, 0.0762589, 0.237843, 0.339542, 0.577138,
0.742884, 0.806809, 0.84739, 0.852169, 0.785161, 0.732308,
0.606155, 0.31148, 0.0909988, -0.0396559, -0.215239, -0.378581,
-0.581023, -0.834901, -0.870209, -0.765858, -0.747541,
-0.694471, -0.565081, -0.443523, -0.251102, 0.0602855, 0.241975,
0.349718, 0.571988, 0.738814, 0.796725, 0.842394, 0.852015,
0.787382, 0.733788, 0.622283, 0.343026, 0.11428, -0.00940516,
-0.170372, -0.327454, -0.529649, -0.780937, -0.84631, -0.74862,
-0.723858, -0.703938, -0.593358, -0.491011, -0.304851,
0.0111937, 0.195967, 0.313392, 0.546085, 0.730766, 0.797188,
0.839896, 0.865429, 0.809461, 0.754942, 0.661075, 0.384532,
0.128034, -0.00755497, -0.17546, -0.338617, -0.535817,
-0.783712, -0.865152, -0.77443, -0.725092, -0.697709, -0.583644,
-0.466558, -0.287274, 0.0261494, 0.227266, 0.314657, 0.525733,
0.711894, 0.771285, 0.826883, 0.835518, 0.77406, 0.728607,
0.640784, 0.381665, 0.127941, 0.00530389, -0.155786, -0.312591,
-0.483179, -0.736563, -0.845539, -0.767708, -0.729779,
-0.708872, -0.601005, -0.490271, -0.322736, -0.0148016,
0.207993, 0.296895, 0.509667, 0.70881, 0.785439, 0.848839,
0.867218, 0.814518, 0.745906, 0.663542, 0.39992, 0.129421,
-0.00314533, -0.171822, -0.331, -0.50498, -0.758303, -0.873292,
-0.779981, -0.732863, -0.716427, -0.598384, -0.477906,
-0.318295, -0.0276913, 0.206513, 0.298591, 0.484443, 0.689846,
0.77073, 0.822381, 0.845755, 0.807425, 0.744272, 0.669493,
0.429307, 0.157174, 0.0259027, -0.12347, -0.290203, -0.469734,
-0.726541, -0.870856, -0.791575, -0.745752, -0.736347,
-0.632304, -0.513399, -0.366647, -0.0827346, 0.172654, 0.269358,
0.461655, 0.685652, 0.777421, 0.83043, 0.856579, 0.817447,
0.752074, 0.686268, 0.463042, 0.179469, 0.0288322, -0.121774,
-0.2886, -0.462703, -0.711585, -0.863826, -0.791329, -0.722162,
-0.713374, -0.62182, -0.502421, -0.360603, -0.0730211, 0.18761,
0.275309, 0.44491, 0.683339, 0.776897, 0.816985, 0.848469,
0.804218, 0.741127, 0.681365, 0.471738, 0.195319, 0.0394092,
-0.107342, -0.277344, -0.44121, -0.682876, -0.856579, -0.799346,
-0.734867, -0.723519, -0.635758, -0.52379, -0.383731, -0.115051,
0.162324, 0.272225, 0.438959, 0.668938, 0.77295, 0.830707,
0.861359, 0.821857, 0.751735, 0.700022, 0.498104, 0.197508,
0.0354621, -0.107527, -0.276635, -0.441426, -0.678405,
-0.852077, -0.799963, -0.727219, -0.730087, -0.637084,
-0.518857, -0.391008, -0.124025, 0.153782, 0.27386, 0.421752,
0.644084, 0.761232, 0.814086, 0.851553, 0.832403, 0.764624,
0.705233, 0.516606, 0.221314, 0.0528848, -0.0871442, -0.255975,
-0.414752, -0.64874, -0.843843, -0.816399, -0.737642, -0.728453,
-0.653828, -0.541244, -0.417682, -0.162632, 0.129329, 0.241512,
0.392087, 0.629776, 0.751303, 0.809892, 0.848561, 0.840143,
0.775047, 0.72355, 0.549477, 0.253045, 0.0703074, -0.0740387,
-0.241235, -0.403127, -0.636467, -0.846372, -0.835425, -0.74384,
-0.733418, -0.667859, -0.545006, -0.411977, -0.161275, 0.133276,
0.257424, 0.390515, 0.621974, 0.746122, 0.807672, 0.85439,
0.830029, 0.74899, 0.698942, 0.544328, 0.246261, 0.0599155,
-0.0651886, -0.231891, -0.38114, -0.603842, -0.828487,
-0.819328, -0.732431, -0.716735, -0.656357, -0.54701, -0.425144,
-0.203059, 0.104721, 0.240279, 0.359277, 0.604366, 0.746955,
0.818928, 0.858398, 0.848839, 0.785069, 0.731382, 0.582627,
0.280767, 0.0828271, -0.0511271, -0.232076, -0.393074,
-0.608005, -0.841993, -0.847945, -0.753307, -0.744056,
-0.674088, -0.542477, -0.433655, -0.214253, 0.10173, 0.248882,
0.360387, 0.593728, 0.745968, 0.79913, 0.842086, 0.837522,
0.76447, 0.711678, 0.583336, 0.303771, 0.0981529, -0.0313917,
-0.197354, -0.353295, -0.560949, -0.810047, -0.834284, -0.73203,
-0.729841, -0.693793, -0.581085, -0.461408, -0.262574,
0.0453606, 0.211323, 0.322828, 0.566838, 0.727466, 0.78362,
0.843998, 0.85365, 0.791945, 0.74088, 0.615159, 0.33578,
0.102563, -0.0357088, -0.206359, -0.372105, -0.574486,
-0.813624, -0.858491, -0.757408, -0.726449, -0.68852, -0.567825,
-0.45595, -0.259428, 0.0576028, 0.237349, 0.33507, 0.549878,
0.720682, 0.78362, 0.833267, 0.833945, 0.762096, 0.717383,
0.616886, 0.332542, 0.0922939, -0.022449, -0.182337, -0.347559,
-0.534676, -0.775355, -0.841747, -0.752536, -0.728299,
-0.700237, -0.593358, -0.479941, -0.291498, 0.0216781, 0.217151,
0.31111, 0.534953, 0.725308, 0.797249, 0.85146, 0.861821,
0.7958, 0.734713, 0.634555, 0.357828, 0.111289, -0.0263036,
-0.195041, -0.352524, -0.533689, -0.780382, -0.870671,
-0.765704, -0.72799, -0.710136, -0.586173, -0.469179, -0.290265,
0.0219865, 0.219464, 0.311573, 0.516914, 0.709889, 0.787906,
0.834562, 0.853033, 0.796633, 0.735114, 0.650282, 0.393629,
0.139412, 0.0138148, -0.142373, -0.306146, -0.497888, -0.757871,
-0.858984, -0.774893, -0.74014, -0.724938, -0.615344, -0.493324,
-0.334608, -0.034537, 0.193006, 0.285886, 0.494465, 0.695365,
0.780536, 0.838601, 0.8625, 0.813747, 0.745876, 0.666996,
0.421012, 0.155632, 0.0141848, -0.151685, -0.312961, -0.496716,
-0.750316, -0.867063, -0.783404, -0.723827, -0.710568,
-0.608807, -0.487311, -0.330846, -0.0286164, 0.197632, 0.282186,
0.482531, 0.696475, 0.776342, 0.820099, 0.840821, 0.796818,
0.732801, 0.660582, 0.430232, 0.160628, 0.0299115, -0.128928,
-0.303155, -0.469518, -0.717383, -0.854544, -0.778162, -0.72833,
-0.717537, -0.622745, -0.511672, -0.356533, -0.068118, 0.186407,
0.278239, 0.460545, 0.681797, 0.769034, 0.83783, 0.864967,
0.816676, 0.746276, 0.683956, 0.462426, 0.169262, 0.0182861,
-0.135249, -0.3026, -0.469518, -0.721761, -0.869376, -0.790805,
-0.728145, -0.723704, -0.619446, -0.499337, -0.361528,
-0.0695057, 0.19131, 0.286194, 0.456536, 0.674181, 0.76925,
0.825773, 0.854945, 0.817848, 0.746832, 0.682106, 0.479232,
0.190478, 0.0414752, -0.101668, -0.277869, -0.441518, -0.682198,
-0.851337, -0.797804, -0.737118, -0.728946, -0.64504, -0.535755,
-0.394338, -0.120633, 0.161553, 0.266428, 0.420519, 0.654568,
0.760461, 0.81902, 0.868297, 0.839927, 0.770267, 0.712726,
0.505659, 0.218231, 0.0582195, -0.0913997, -0.262111, -0.432175,
-0.677973, -0.862191, -0.812822, -0.731876, -0.724382,
-0.652348, -0.529495, -0.383268, -0.115298, 0.163557, 0.267507,
0.417281, 0.647939, 0.761232, 0.811218, 0.855654, 0.827808,
0.745444, 0.692127, 0.510623, 0.217953, 0.0501403, -0.0780474,
-0.250331, -0.411206, -0.639644, -0.843165, -0.808196, -0.72907,
-0.727836, -0.659225, -0.547781, -0.417312, -0.164112, 0.135743,
0.252182, 0.38814, 0.628203, 0.760862, 0.83009, 0.867649,
0.843905, 0.768633, 0.715039, 0.538438, 0.23775, 0.0633692,
-0.0742854, -0.246539, -0.416602, -0.648432, -0.854266,
-0.83006, -0.733171, -0.733109, -0.658084, -0.524345, -0.411669,
-0.170989, 0.136575, 0.262111, 0.390083, 0.611706, 0.745043,
0.808351, 0.85072, 0.839218, 0.762651, 0.708625, 0.555398,
0.270838, 0.0865892, -0.0467483, -0.21746, -0.377286, -0.606309,
-0.834068, -0.826729, -0.737488, -0.72907, -0.670634, -0.563138,
-0.44269, -0.209473, 0.0946375, 0.233649, 0.362823, 0.604706,
0.744056, 0.80428, 0.854174, 0.855623, 0.787474, 0.730611,
0.586666, 0.292208, 0.0910913, -0.0461315, -0.222733, -0.383206,
-0.608098, -0.832958, -0.842363, -0.746585, -0.728453,
-0.682753, -0.558512, -0.438897, -0.216689, 0.101422, 0.245706,
0.356286, 0.586728, 0.733479, 0.798051, 0.848777, 0.838663,
0.764871, 0.713898, 0.586728, 0.299454, 0.085294, -0.0289864,
-0.201517, -0.363687, -0.56616, -0.808906, -0.82898, -0.734744,
-0.725308, -0.68337, -0.580499, -0.462086, -0.249098, 0.0670079,
0.238614, 0.333467, 0.566345, 0.732184, 0.799593, 0.856795,
0.858553, 0.796016, 0.741805, 0.617009, 0.32622, 0.0989238,
-0.029634, -0.203213, -0.367387, -0.567517, -0.816306,
-0.861605, -0.75414, -0.73055, -0.691079, -0.564279, -0.451294,
-0.25912, 0.0638626, 0.244103, 0.331216, 0.547627, 0.717999,
0.780197, 0.836196, 0.846372, 0.784391, 0.728145, 0.614851,
0.343951, 0.112677, -0.00730827, -0.172284, -0.335996,
-0.526412, -0.782695, -0.851923, -0.753554, -0.730766,
-0.701563, -0.593574, -0.478923, -0.295353, 0.00662987,
0.211077, 0.313331, 0.526257, 0.714731, 0.781831, 0.846835,
0.874927, 0.809831, 0.750439, 0.647476, 0.377347, 0.138487,
0.00647569, -0.16072, -0.330291, -0.531345, -0.78106, -0.869592,
-0.76925, -0.722902, -0.701348, -0.591816, -0.477536, -0.296895,
0.0181936, 0.227204, 0.317093, 0.518394, 0.709581, 0.780844,
0.831509, 0.850412, 0.791791, 0.729532, 0.635696, 0.382127,
0.1268, 0.00579728, -0.142928, -0.317216, -0.50461, -0.751765,
-0.852015, -0.760924, -0.723057, -0.701872, -0.603688,
-0.500293, -0.329088, -0.0205372, 0.213913, 0.298529, 0.494958,
0.702088, 0.787628, 0.84702, 0.867804, 0.815782, 0.746832,
0.671868, 0.420149, 0.154553, 0.0165593, -0.148756, -0.308428,
-0.499059, -0.751673, -0.868605, -0.776126, -0.717043,
-0.710599, -0.605076, -0.492029, -0.33911, -0.0322242, 0.211323,
0.302476, 0.48617, 0.687132, 0.770021, 0.82565, 0.848376,
0.802954, 0.735237, 0.664683, 0.435166, 0.164513, 0.0296648,
-0.116994, -0.288045, -0.464954, -0.716272, -0.858799,
-0.777761, -0.727836, -0.718308, -0.628666, -0.523266,
-0.371118, -0.0819637, 0.178143, 0.272472, 0.454377, 0.672176,
0.76558, 0.832588, 0.870825, 0.833883, 0.762157, 0.697,
0.468655, 0.182213, 0.0391625, -0.117364, -0.289278, -0.464738,
-0.715378, -0.864134, -0.795553, -0.731259, -0.721237,
-0.632767, -0.510993, -0.359863, -0.0715101, 0.192698, 0.279225,
0.452219, 0.667767, 0.758765, 0.81569, 0.849857, 0.816399,
0.74566, 0.677172, 0.473218, 0.194548, 0.0416602, -0.0934041,
-0.27201, -0.433624, -0.675198, -0.857165, -0.794967, -0.729841,
-0.724999, -0.644238, -0.533504, -0.39036, -0.113448, 0.167751,
0.269142, 0.426994, 0.664128, 0.773413, 0.831355, 0.875143,
0.842086, 0.769496, 0.70881, 0.502112, 0.203614, 0.0424312,
-0.0959327, -0.272071, -0.436338, -0.679885, -0.869623,
-0.809923, -0.727404, -0.722471, -0.638842, -0.510315,
-0.392211, -0.13821, 0.157544, 0.271763, 0.412563, 0.639243,
0.75562, 0.807919, 0.852385, 0.826421, 0.757686, 0.702026,
0.51972, 0.232446, 0.0590829, -0.0652502, -0.241142, -0.404484,
-0.636313, -0.850473, -0.815936, -0.7324, -0.723211, -0.653458,
-0.546918, -0.421999, -0.172993, 0.124457, 0.252428, 0.394708,
0.631595, 0.755466, 0.810694, 0.861821, 0.853557, 0.785593,
0.726017, 0.554473, 0.257208, 0.079065, -0.0582195, -0.240217,
-0.406056, -0.639304, -0.847698, -0.830985, -0.736039, -0.72062,
-0.654507, -0.538746, -0.420303, -0.171667, 0.13343, 0.265657,
0.39292, 0.619014, 0.748589, 0.798174, 0.848222, 0.836412,
0.764933, 0.714761, 0.55472, 0.259644, 0.0630608, -0.0599155,
-0.220389, -0.384687, -0.60338, -0.824971, -0.823553, -0.725462,
-0.722933, -0.666533, -0.551173, -0.436646, -0.204138, 0.103796,
0.251873, 0.371334, 0.606155, 0.750439, 0.809923, 0.854945,
0.853927, 0.790249, 0.733233, 0.587283, 0.282247, 0.0774924,
-0.0495236, -0.222949, -0.385673, -0.607882, -0.833667,
-0.841839, -0.746061, -0.72725, -0.674427, -0.552931, -0.43788,
-0.223349, 0.0966111, 0.255265, 0.362299, 0.588825, 0.739246,
0.802646, 0.850412, 0.852385, 0.785747, 0.734189, 0.597151,
0.305992, 0.0967961, -0.0249776, -0.186099, -0.348361, -0.56175,
-0.806809, -0.843751, -0.747818, -0.726911, -0.683277,
-0.572081, -0.462487, -0.260261, 0.0513738, 0.218539, 0.332758,
0.564341, 0.723519, 0.788553, 0.847698, 0.864041, 0.798822,
0.737488, 0.622128, 0.341022, 0.11465, -0.0186561, -0.192636,
-0.347868, -0.559962, -0.812606, -0.859817, -0.758796,
-0.726233, -0.68963, -0.574147, -0.458879, -0.266089, 0.0518363,
0.23368, 0.330445, 0.557649, 0.726233, 0.781985, 0.834346,
0.837614, 0.777576, 0.718739, 0.601776, 0.331925, 0.0999414,
-0.00996022, -0.1692, -0.339418, -0.526134, -0.77662, -0.850165,
-0.750131, -0.723858, -0.69996, -0.587591, -0.480095, -0.299238,
0.0140307, 0.218724, 0.314472, 0.532178, 0.718154, 0.783681,
0.841993, 0.854575, 0.79728, 0.74236, 0.643036, 0.361682,
0.108946, -0.0189953, -0.186808, -0.347744, -0.539455,
-0.796324, -0.879706, -0.770977, -0.723704, -0.701779,
-0.583706, -0.467421, -0.295538, 0.0115637, 0.229178, 0.320022,
0.518949, 0.713898, 0.779302, 0.824632, 0.843782, 0.792716,
0.738259, 0.64541, 0.390761, 0.137593, 0.00561226, -0.142064,
-0.308428, -0.492954, -0.744519, -0.862962, -0.768571,
-0.733973, -0.712295, -0.606247, -0.506522, -0.340097,
-0.0404268, 0.196552, 0.298622, 0.493077, 0.69555, 0.776126,
0.829474, 0.867341, 0.823399, 0.753924, 0.681026, 0.428567,
0.157174, 0.018502, -0.137254, -0.303155, -0.490425, -0.742669,
-0.875173, -0.789787, -0.730704, -0.711493, -0.608622,
-0.491474, -0.33248, -0.0370039, 0.207623, 0.296, 0.48987,
0.696167, 0.769496, 0.822535, 0.854112, 0.811373, 0.743902,
0.669463, 0.430325, 0.156403, 0.0191804, -0.119307, -0.281723,
-0.459712, -0.705572, -0.848531, -0.77699, -0.721854, -0.708594,
-0.611551, -0.502606, -0.360326, -0.0672546, 0.188535, 0.28234,
0.470412, 0.686978, 0.780505, 0.835209, 0.867187, 0.82565,
0.756329, 0.692467, 0.454223, 0.166333, 0.0209072, -0.122699,
-0.285208, -0.461315, -0.715902, -0.872398, -0.796509,
-0.725832, -0.713035, -0.618027, -0.501588, -0.361837,
-0.0838139, 0.184218, 0.287952, 0.458571, 0.67526, 0.768479,
0.821703, 0.853927, 0.817694, 0.751827, 0.691079, 0.478214,
0.191649, 0.0399334, -0.0994172, -0.265287, -0.425638,
-0.682445, -0.863764, -0.798945, -0.729224, -0.722933,
-0.644331, -0.532733, -0.408431, -0.13713, 0.14928, 0.258719,
0.428783, 0.652287, 0.756761, 0.818064, 0.858799, 0.84261,
0.772888, 0.713281, 0.520799, 0.217953, 0.0539024, -0.0884394,
-0.263067, -0.422862, -0.672392, -0.861914, -0.815535,
-0.735669, -0.723057, -0.645873, -0.524438, -0.393012,
-0.135188, 0.158377, 0.270992, 0.418237, 0.64911, 0.756175,
0.808844, 0.850473, 0.827778, 0.759783, 0.702303, 0.521169,
0.225107, 0.0504178, -0.0720343, -0.243239, -0.405193,
-0.632921, -0.841531, -0.810139, -0.73018, -0.726171, -0.656511,
-0.543773, -0.415153, -0.164945, 0.134509, 0.260353, 0.395603,
0.637392, 0.761849, 0.816553, 0.861174, 0.846156, 0.777761,
0.71951, 0.546301, 0.235807, 0.0508187, -0.0773382, -0.249006,
-0.406488, -0.637392, -0.858121, -0.832187, -0.73866, -0.735114,
-0.660767, -0.535909, -0.416078, -0.178914, 0.125937, 0.259644,
0.376731, 0.61149, 0.749422, 0.79987, 0.848253, 0.837029,
0.766104, 0.717537, 0.563138, 0.268155, 0.071325, -0.0479509,
-0.207993, -0.370964, -0.594745, -0.8275, -0.833112, -0.743501,
-0.731413, -0.671775, -0.556046, -0.448518, -0.223596,
0.0866817, 0.232446, 0.360079, 0.597521, 0.746585, 0.804033,
0.854544, 0.861112, 0.79139, 0.735021, 0.595671, 0.3063,
0.0959943, -0.0399334, -0.209936, -0.369638, -0.586975,
-0.81939, -0.843227, -0.745136, -0.724012, -0.671189, -0.551852,
-0.436985, -0.220112, 0.0895186, 0.243948, 0.356841, 0.586327,
0.739122, 0.791452, 0.840297, 0.839619, 0.766968, 0.715039,
0.584724, 0.302538, 0.0918622, -0.0303124, -0.192575, -0.355207,
-0.560363, -0.795492, -0.840297, -0.746462, -0.727096,
-0.688766, -0.570292, -0.461655, -0.263036, 0.0496778, 0.225323,
0.335255, 0.564341, 0.729409, 0.795553, 0.844676, 0.84298,
0.783126, 0.73203, 0.618335, 0.32437, 0.0932499, -0.0318542,
-0.203059, -0.357674, -0.564464, -0.806994, -0.854945,
-0.751673, -0.728545, -0.693854, -0.56875, -0.459157, -0.264979,
0.0474884, 0.239076, 0.332449, 0.547627, 0.726387, 0.787135,
0.83598, 0.844676, 0.785932, 0.729008, 0.625582, 0.352987,
0.11869, -0.00946684, -0.171976, -0.32659, -0.522804, -0.779364,
-0.855962, -0.755373, -0.726541, -0.700793, -0.593604,
-0.485491, -0.307873, 0.00339203, 0.205433, 0.298622, 0.523729,
0.704339, 0.772734, 0.832187, 0.849949, 0.803139, 0.74051,
0.651176, 0.386537, 0.129853, -0.00194271, -0.17213, -0.329242,
-0.514139, -0.773814, -0.867433, -0.771717, -0.731413,
-0.707885, -0.597367, -0.475439, -0.300225, 0.00360788,
0.218477, 0.301613, 0.511918, 0.707237, 0.773197, 0.829936,
0.847606, 0.784976, 0.720775, 0.638626, 0.384378, 0.127417,
0.00225107, -0.146011, -0.314132, -0.488945, -0.733356,
-0.851491, -0.762034, -0.72355, -0.702889, -0.597767, -0.489161,
-0.327855, -0.0325326, 0.2042, 0.293133, 0.493324, 0.705788,
0.787937, 0.843073, 0.86179, 0.814148, 0.750378, 0.667859,
0.415677, 0.142064, 0.00770915, -0.146844, -0.319961, -0.497487,
-0.74751, -0.876469, -0.786179, -0.734744, -0.713436, -0.602917,
-0.486571, -0.331401, -0.0425853, 0.205218, 0.298467, 0.479663,
0.691542, 0.776435, 0.828086, 0.85772, 0.81313, 0.746276,
0.671775, 0.440902, 0.168337, 0.0255019, -0.11536, -0.28049,
-0.45632, -0.708286, -0.862839, -0.784946, -0.722532, -0.714761,
-0.629899, -0.514786, -0.374634, -0.0920781, 0.166795, 0.269697,
0.45965, 0.67304, 0.771501, 0.827623, 0.865367, 0.833174,
0.765549, 0.707083, 0.484289, 0.19609, 0.0400259, -0.113386,
-0.282032, -0.454377, -0.699004, -0.865121, -0.8065, -0.731167,
-0.718154, -0.622653, -0.506584, -0.370163, -0.0869284,
0.183169, 0.28675, 0.453144, 0.670881, 0.765549, 0.812051,
0.845632, 0.808227, 0.741188, 0.687286, 0.479694, 0.190848,
0.0387308, -0.099263, -0.267754, -0.430232, -0.673101,
-0.850998, -0.80095, -0.733325, -0.72762, -0.648833, -0.533905,
-0.398933, -0.133276, 0.147368, 0.25619, 0.421382, 0.65426,
0.762466, 0.822474, 0.857967, 0.836042, 0.769404, 0.708255,
0.510161, 0.206975, 0.0410435, -0.100805, -0.272565, -0.432113,
-0.67563, -0.861729, -0.810386, -0.72833, -0.724012, -0.64211,
-0.51531, -0.390977, -0.132351, 0.156681, 0.268217, 0.412655,
0.637485, 0.754078, 0.806809, 0.844368, 0.827161, 0.7604,
0.712048, 0.528663, 0.227512, 0.0620124, -0.0693207, -0.235592,
-0.391625, -0.630978, -0.842394, -0.818496, -0.740973,
-0.731937, -0.662771, -0.546147, -0.424373, -0.184002, 0.116223,
0.238459, 0.383206, 0.626353, 0.749977, 0.811434, 0.863671,
0.846249, 0.774122, 0.719603, 0.556662, 0.263067, 0.069629,
-0.0651886, -0.239631, -0.395788, -0.62589, -0.847081,
-0.831416, -0.737118, -0.717753, -0.654846, -0.538438, -0.41651,
-0.182183, 0.12091, 0.253014, 0.379105, 0.61849, 0.74714,
0.798329, 0.848068, 0.834253, 0.762805, 0.711431, 0.5599,
0.267662, 0.074347, -0.0469641, -0.22372, -0.385211, -0.597582,
-0.823646, -0.832588, -0.744611, -0.729532, -0.674335,
-0.559098, -0.444664, -0.221037, 0.0922323, 0.244843, 0.361682,
0.602763, 0.753554, 0.809985, 0.857936, 0.850628, 0.779056,
0.726171, 0.588979, 0.286965, 0.0782016, -0.0513429, -0.225416,
-0.380585, -0.592741, -0.829042, -0.846526, -0.740294,
-0.729471, -0.679022, -0.550341, -0.441518, -0.227297,
0.0778932, 0.240217, 0.347713, 0.571988, 0.737642, 0.793796,
0.841839, 0.844306, 0.782509, 0.732092, 0.60301, 0.314472,
0.0947917, -0.028308, -0.191033, -0.358013, -0.563138,
-0.803201, -0.849918, -0.751087, -0.738567, -0.697863,
-0.582318, -0.474729, -0.269851, 0.0441272, 0.220543, 0.325449,
0.554658, 0.722594, 0.784668, 0.838601, 0.851306, 0.793302,
0.738197, 0.6266, 0.34611, 0.109902, -0.0208455, -0.185544,
-0.345401, -0.553794, -0.797434, -0.858583, -0.762774,
-0.727312, -0.692775, -0.574702, -0.457461, -0.262913,
0.0492152, 0.231984, 0.335564, 0.559098, 0.730642, 0.79284,
0.835055, 0.845755, 0.782232, 0.722008, 0.620401, 0.343427,
0.110272, -0.0148324, -0.176601, -0.32767, -0.512843, -0.75932,
-0.842672, -0.748743, -0.722841, -0.695951, -0.583891,
-0.473958, -0.2956, 0.0100219, 0.21746, 0.312776, 0.530174,
0.720775, 0.798976, 0.8555, 0.869222, 0.811373, 0.748743,
0.658608, 0.380215, 0.12276, -0.00363872, -0.17028, -0.332604,
-0.523328, -0.776311, -0.864535, -0.768941, -0.733017,
-0.708748, -0.585032, -0.467575, -0.305683, 0.000986771,
0.221407, 0.310648, 0.519381, 0.711986, 0.786395, 0.842147,
0.851028, 0.79728, 0.7361, 0.652657, 0.402325, 0.145672,
0.0150174, -0.140522, -0.303, -0.476148, -0.73351, -0.852169,
-0.759166, -0.721145, -0.707885, -0.612322, -0.504579,
-0.344106, -0.0455765, 0.189028, 0.279472, 0.486694, 0.699158,
0.778285, 0.833482, 0.865059, 0.823954, 0.759074, 0.684665,
0.441272, 0.16365, 0.0228808, -0.139042, -0.309044, -0.481082,
-0.739677, -0.870301, -0.784175, -0.72725, -0.704863, -0.606864,
-0.485337, -0.334916, -0.0411052, 0.207746, 0.295908, 0.486231,
0.698696, 0.776805, 0.824262, 0.85109, 0.800117, 0.73425,
0.675106, 0.449998, 0.167967, 0.0249776, -0.115822, -0.289062,
-0.454871, -0.696691, -0.845077, -0.770637, -0.725061,
-0.715224, -0.622437, -0.511394, -0.362392, -0.0799593,
0.181843, 0.277714, 0.455487, 0.681273, 0.776959, 0.831663,
0.866508, 0.830121, 0.759567, 0.694008, 0.46813, 0.178051,
0.0249776, -0.122606, -0.294366, -0.462333, -0.701193,
-0.869438, -0.800364, -0.730951, -0.728175, -0.624657,
-0.503222, -0.364704, -0.0844614, 0.179531, 0.276635, 0.438496,
0.662308, 0.764038, 0.814672, 0.852848, 0.818866, 0.747572,
0.691973, 0.488236, 0.204385, 0.0477351, -0.0884394, -0.252737,
-0.423325, -0.668784, -0.855716, -0.80576, -0.738752, -0.739215,
-0.65793, -0.541244, -0.405964, -0.141232, 0.137716, 0.251041,
0.413611, 0.644855, 0.759629, 0.813284, 0.858799, 0.83891,
0.760646, 0.708255, 0.519227, 0.224028, 0.0511271, -0.0956551,
-0.262111, -0.427457, -0.669771, -0.860989, -0.824571,
-0.737118, -0.727404, -0.65537, -0.527429, -0.395849, -0.134941,
0.149989, 0.255173, 0.402633, 0.63252, 0.75084, 0.805976,
0.841377, 0.813994, 0.745043, 0.696229, 0.524253, 0.233896,
0.0604706, -0.0694132, -0.250547, -0.410065, -0.63437,
-0.840513, -0.815906, -0.732863, -0.725986, -0.657683,
-0.545777, -0.425483, -0.175584, 0.124395, 0.248851, 0.388911,
0.626661, 0.755558, 0.81717, 0.858491, 0.838817, 0.767739,
0.714885, 0.552098, 0.24879, 0.0602855, -0.072096, -0.250331,
-0.404946, -0.632859, -0.852385, -0.831571, -0.734744,
-0.728021, -0.662987, -0.529958, -0.412902, -0.180055, 0.119399,
0.252552, 0.374264, 0.60893, 0.743655, 0.79432, 0.844522,
0.833976, 0.767091, 0.71251, 0.560887, 0.267292, 0.0741312,
-0.044343, -0.21709, -0.37448, -0.586358, -0.819421, -0.826945,
-0.739369, -0.733726, -0.680101, -0.560208, -0.444386,
-0.225878, 0.0843689, 0.229825, 0.343026, 0.578556, 0.726849,
0.786919, 0.840205, 0.842147, 0.780073, 0.730241, 0.594745,
0.296525, 0.0887786, -0.0387308, -0.210306, -0.36563, -0.580499,
-0.813469, -0.837985, -0.740726, -0.727065, -0.686207,
-0.560671, -0.439761, -0.225601, 0.0825187, 0.237688, 0.341947,
0.57205, 0.72429, 0.773197, 0.827469, 0.826482, 0.759228,
0.708347, 0.579944, 0.298282, 0.0820562, -0.0329952, -0.190169,
-0.353141, -0.547165, -0.784791, -0.832187, -0.731537,
-0.720466, -0.680965, -0.565759, -0.447747, -0.243702, 0.053964,
0.227112, 0.323507, 0.549477, 0.720528, 0.786703, 0.838755,
0.84298, 0.780968, 0.722378, 0.603688, 0.309939, 0.0835363,
-0.032841, -0.191711, -0.354282, -0.559098, -0.793333, -0.84591,
-0.74344, -0.721761, -0.687502, -0.549539, -0.426223, -0.244318,
0.0603781, 0.242221, 0.329397, 0.542847, 0.721916, 0.773906,
0.818835, 0.831663, 0.773289, 0.716211, 0.600666, 0.32952,
0.111289, 0.00114095, -0.157883, -0.325758, -0.510777,
-0.761109, -0.848099, -0.74566, -0.724012, -0.696845, -0.583891,
-0.457646, -0.276018, 0.0208764, 0.207376, 0.29452, 0.510161,
0.705079, 0.781307, 0.831416, 0.861821, 0.809738, 0.736162,
0.625613, 0.352678, 0.0984613, -0.0231274, -0.175738, -0.328595,
-0.511086, -0.761849, -0.84739, -0.763391, -0.731629, -0.711832,
-0.581794, -0.441118, -0.254279, 0.040951, 0.235437, 0.306392,
0.506522, 0.696136, 0.753677, 0.800117, 0.826328, 0.780505,
0.724444, 0.624194, 0.358075, 0.0963952, -0.0264578, -0.159888,
-0.317956, -0.48654, -0.72762, -0.830491, -0.744889, -0.718894,
-0.712418, -0.597922, -0.458787, -0.286349, 0.00487218,
0.217861, 0.294829, 0.489099, 0.696167, 0.769342, 0.817231,
0.846557, 0.813069, 0.746585, 0.648401, 0.375898, 0.0959943,
-0.0211231, -0.160628, -0.319529, -0.490888, -0.741373,
-0.854482, -0.764717, -0.72062, -0.710568, -0.58497, -0.439607,
-0.279102, 0.0063215, 0.22964, 0.298282, 0.465478, 0.674581,
0.747263, 0.78547, 0.826421, 0.801875, 0.739955, 0.643036,
0.386537, 0.104783, -0.016991, -0.124148, -0.276388, -0.442752,
-0.690709, -0.838755, -0.755558, -0.715378, -0.717691,
-0.612877, -0.469826, -0.302785, -0.035863, 0.190539, 0.263437,
0.423695, 0.64248, 0.734713, 0.778532, 0.822381, 0.813531,
0.752937, 0.653643, 0.410651, 0.126029, -0.00900429, -0.120386,
-0.266367, -0.427179, -0.671251, -0.825187, -0.747849,
-0.685066, -0.693176, -0.599063, -0.445897, -0.281261,
-0.0107003, 0.222486, 0.283851, 0.415122, 0.634155, 0.725986,
0.755312, 0.793025, 0.771717, 0.722131, 0.633785, 0.39514,
0.106047, -0.0291406, -0.113078, -0.254556, -0.40803, -0.629467,
-0.78954, -0.725308, -0.664159, -0.677017, -0.592525, -0.447377,
-0.290512, -0.0351537, 0.199204, 0.265349, 0.388603, 0.609763,
0.715687, 0.743964, 0.777421, 0.768201, 0.71914, 0.637238,
0.407814, 0.109963, -0.0337661, -0.122329, -0.260754, -0.410589,
-0.631071, -0.792192, -0.726849, -0.641309, -0.656079,
-0.581393, -0.417219, -0.261803, -0.0202288, 0.209319, 0.276481,
0.379259, 0.587437, 0.692158, 0.70255, 0.73425, 0.740479,
0.694533, 0.61408, 0.400999, 0.112184, -0.0333344, -0.104043,
-0.228962, -0.368806, -0.579235, -0.756298, -0.701163,
-0.622529, -0.642542, -0.578032, -0.425792, -0.271239,
-0.0465633, 0.181011, 0.251719, 0.351722, 0.558636, 0.675352,
0.69848, 0.721145, 0.73277, 0.696784, 0.614882, 0.407876,
0.109747, -0.0420303, -0.101052, -0.226341, -0.363718,
-0.567979, -0.742052, -0.695489, -0.605785, -0.612631,
-0.562768, -0.40951, -0.24401, -0.018502, 0.207376, 0.2713,
0.351815, 0.552653, 0.663357, 0.674119, 0.691295, 0.692282,
0.653674, 0.576058, 0.38259, 0.094545, -0.0610873, -0.099633,
-0.20531, -0.334454, -0.519165, -0.696414, -0.6657, -0.574948,
-0.58534, -0.550803, -0.408801, -0.246014, -0.0380215, 0.186839,
0.255728, 0.315952, 0.518764, 0.652441, 0.671405, 0.682106,
0.690524, 0.655339, 0.577292, 0.391286, 0.0955318, -0.0705541,
-0.111197, -0.216473, -0.340929, -0.518764, -0.702643,
-0.663141, -0.554504, -0.563693, -0.531037, -0.380061,
-0.213482, -0.0234358, 0.18872, 0.266767, 0.31148, 0.489253,
0.624749, 0.63067, 0.637701, 0.646736, 0.619168, 0.553116,
0.384964, 0.106325, -0.0708008, -0.100496, -0.186253, -0.305375,
-0.466095, -0.658454, -0.643097, -0.528108, -0.538006,
-0.528046, -0.386753, -0.221561, -0.0396559, 0.167196, 0.244997,
0.283234, 0.459342, 0.603534, 0.614851, 0.616855, 0.633014,
0.611151, 0.548706, 0.397545, 0.119985, -0.0683956, -0.0967036,
-0.177465, -0.294921, -0.453175, -0.636252, -0.633137,
-0.522403, -0.506738, -0.496099, -0.370625, -0.196522,
-0.00918931, 0.196953, 0.278485, 0.295199, 0.448611, 0.592279,
0.593111, 0.581301, 0.590027, 0.564341, 0.509236, 0.362823,
0.0923248, -0.099263, -0.119769, -0.168275, -0.26945, -0.412964,
-0.588362, -0.597521, -0.48139, -0.466589, -0.47291, -0.36085,
-0.195196, -0.0178852, 0.175676, 0.259737, 0.271547, 0.414906,
0.5702, 0.585433, 0.564741, 0.575226, 0.559808, 0.505905,
0.372259, 0.102501, -0.105338, -0.135342, -0.175769, -0.271609,
-0.406827, -0.579265, -0.59049, -0.470751, -0.448241, -0.454778,
-0.345586, -0.174689, -0.00841839, 0.176077, 0.263992, 0.264917,
0.38666, 0.537112, 0.552561, 0.529804, 0.535107, 0.521169,
0.475809, 0.35311, 0.097567, -0.109223, -0.131796, -0.15887,
-0.244719, -0.363008, -0.534768, -0.560363, -0.445774,
-0.418206, -0.436739, -0.344568, -0.17583, -0.015665, 0.165963,
0.244688, 0.236578, 0.350365, 0.499337, 0.525332, 0.496099,
0.50976, 0.506892, 0.464183, 0.354806, 0.110025, -0.104968,
-0.138518, -0.154861, -0.235314, -0.352894, -0.512936,
-0.548706, -0.439607, -0.391316, -0.408338, -0.326991,
-0.151716, 0.0153258, 0.191804, 0.270221, 0.250856, 0.343242,
0.488236, 0.507046, 0.460082, 0.462549, 0.452835, 0.414135,
0.313176, 0.0816861, -0.132813, -0.1622, -0.147399, -0.213698,
-0.316569, -0.467822, -0.507355, -0.391594, -0.346202,
-0.375096, -0.312745, -0.152302, 0.0072466, 0.169755, 0.254957,
0.233803, 0.305622, 0.458324, 0.490795, 0.443029, 0.435814,
0.4368, 0.405964, 0.314163, 0.0933732, -0.139227, -0.17876,
-0.16143, -0.22557, -0.311419, -0.454161, -0.496747, -0.378427,
-0.325295, -0.351753, -0.291282, -0.12939, 0.0279688, 0.18687,
0.268741, 0.235345, 0.282802, 0.428567, 0.46443, 0.408092,
0.400783, 0.401647, 0.377748, 0.296525, 0.0921706, -0.126245,
-0.166487, -0.142218, -0.191896, -0.270468, -0.402202,
-0.454007, -0.351537, -0.291067, -0.326683, -0.2886, -0.139443,
0.0136298, 0.166826, 0.246477, 0.216226, 0.256715, 0.395233,
0.439206, 0.381418, 0.374572, 0.385519, 0.366215, 0.297697,
0.106109, -0.117827, -0.172654, -0.147461, -0.188782, -0.261957,
-0.380524, -0.440902, -0.33985, -0.264578, -0.291683, -0.25875,
-0.111289, 0.0485676, 0.191033, 0.265441, 0.230041, 0.247957,
0.37451, 0.415616, 0.347436, 0.32915, 0.32915, 0.309538,
0.251472, 0.0781091, -0.13232, -0.192575, -0.141694, -0.162632,
-0.231768, -0.334176, -0.390453, -0.307102, -0.230997,
-0.252891, -0.239292, -0.107897, 0.0417219, 0.176694, 0.255111,
0.218847, 0.224275, 0.345339, 0.404576, 0.344784, 0.310494,
0.313423, 0.301058, 0.25027, 0.0929107, -0.121928, -0.200345,
-0.15187, -0.164667, -0.2289, -0.321657, -0.379198, -0.296124,
-0.208548, -0.231059, -0.226433, -0.0991088, 0.0475809,
0.173363, 0.248635, 0.217151, 0.208825, 0.319282, 0.384656,
0.316507, 0.281723, 0.288045, 0.268833, 0.228252, 0.0920781,
-0.114219, -0.193345, -0.144315, -0.149249, -0.201147,
-0.290049, -0.359092, -0.279349, -0.187178, -0.206544,
-0.216689, -0.10395, 0.0366339, 0.160659, 0.236825, 0.198279,
0.19094, 0.296741, 0.362854, 0.302014, 0.25949, 0.264578,
0.256715, 0.228962, 0.106109, -0.0976595, -0.187641, -0.144315,
-0.146381, -0.197416, -0.272873, -0.332141, -0.257732,
-0.162879, -0.174967, -0.186962, -0.0840606, 0.0595146,
0.181751, 0.251164, 0.212865, 0.183632, 0.274322, 0.340806,
0.27901, 0.226341, 0.223473, 0.210552, 0.185945, 0.0793426,
-0.107435, -0.192205, -0.141447, -0.133399, -0.172839,
-0.237226, -0.29452, -0.230966, -0.135095, -0.142157, -0.169509,
-0.0833513, 0.0542107, 0.167443, 0.239076, 0.208455, 0.172222,
0.25471, 0.326128, 0.274384, 0.216319, 0.21268, 0.206081,
0.179901, 0.0890561, -0.0909063, -0.191249, -0.144469,
-0.129175, -0.168183, -0.221715, -0.283974, -0.233125, -0.1301,
-0.128866, -0.154245, -0.0776774, 0.0522064, 0.157544, 0.228283,
0.206359, 0.164174, 0.227266, 0.302445, 0.253878, 0.19387,
0.19094, 0.18246, 0.16143, 0.0863116, -0.0775232, -0.186469,
-0.140738, -0.112615, -0.149064, -0.195812, -0.258102,
-0.219248, -0.115206, -0.104567, -0.134571, -0.0697832,
0.0516513, 0.145826, 0.210306, 0.189306, 0.144654, 0.210151,
0.287212, 0.24401, 0.182306, 0.177526, 0.169755, 0.154368,
0.0907521, -0.0629375, -0.1762, -0.141818, -0.111999, -0.15187,
-0.193716, -0.241913, -0.209596, -0.109285, -0.0828888,
-0.108915, -0.0526072, 0.0630608, 0.161275, 0.226125, 0.201826,
0.150359, 0.196244, 0.269543, 0.227821, 0.150544, 0.1408,
0.1305, 0.120232, 0.0734219, -0.0677172, -0.172685, -0.140738,
-0.103179, -0.128249, -0.168584, -0.213852, -0.182799,
-0.0903821, -0.0666996, -0.101422, -0.061149, 0.0503562,
0.137346, 0.202843, 0.18946, 0.138981, 0.182152, 0.263375,
0.235376, 0.158963, 0.147676, 0.142897, 0.130408, 0.0883777,
-0.0427395, -0.159949, -0.143236, -0.106972, -0.132258,
-0.165438, -0.206359, -0.188812, -0.097197, -0.0597922,
-0.0936199, -0.0564001, 0.0542724, 0.138179, 0.202843, 0.194332,
0.143267, 0.175152, 0.248882, 0.227266, 0.152302, 0.135403,
0.126245, 0.115051, 0.0841531, -0.0367264, -0.156712, -0.141386,
-0.102038, -0.130038, -0.156095, -0.189183, -0.178513,
-0.0935274, -0.0539332, -0.0879151, -0.0587746, 0.042277,
0.123316, 0.189244, 0.184557, 0.134478, 0.15924, 0.235992,
0.22412, 0.146196, 0.128712, 0.127725, 0.114219, 0.0913072,
-0.0165284, -0.141694, -0.138672, -0.100897, -0.120694,
-0.146165, -0.177742, -0.168645, -0.0913688, -0.0448672,
-0.0715101, -0.0585587, 0.0393475, 0.124857, 0.188165, 0.189707,
0.135804, 0.152826, 0.2289, 0.216997, 0.135804, 0.118752,
0.11536, 0.100342, 0.0846156, -0.0111012, -0.129884, -0.129791,
-0.0856949, -0.100867, -0.12162, -0.148386, -0.147707,
-0.0764439, -0.0344753, -0.065867, -0.0579111, 0.035092,
0.112369, 0.169663, 0.179993, 0.13158, 0.137747, 0.214869,
0.218631, 0.14191, 0.121249, 0.122236, 0.107435, 0.0922939,
0.00533473, -0.119769, -0.135866, -0.0906288, -0.104814,
-0.129113, -0.151161, -0.15887, -0.0952542, -0.0430171,
-0.0699374, -0.061704, 0.0303124, 0.104629, 0.162355, 0.181227,
0.134509, 0.135743, 0.206821, 0.206698, 0.128311, 0.107558,
0.110518, 0.096241, 0.085294, 0.00838755, -0.114465, -0.13232,
-0.0836597, -0.0973511, -0.120324, -0.135342, -0.143359,
-0.0901354, -0.0367881, -0.0582503, -0.0629375, 0.0204447,
0.0929107, 0.145055, 0.161861, 0.122175, 0.126461, 0.196491,
0.204971, 0.127417, 0.104721, 0.113664, 0.0994172, 0.0875143,
0.0179469, -0.100188, -0.125412, -0.0853865, -0.0966419,
-0.114681, -0.124549, -0.129421, -0.0796818, -0.0263961,
-0.0481359, -0.0587746, 0.025286, 0.0995714, 0.149743, 0.168738,
0.13417, 0.131703, 0.190231, 0.205588, 0.13232, 0.0983996,
0.104937, 0.0875451, 0.077369, 0.02322, -0.0895495, -0.123562,
-0.0824571, -0.0943291, -0.118598, -0.121928, -0.12569,
-0.0850473, -0.0339203, -0.0559993, -0.0719726, 0.00703074,
0.0839989, 0.133584, 0.158007, 0.130562, 0.125012, 0.186685,
0.212002, 0.141108, 0.105646, 0.117919, 0.101637, 0.0909371,
0.042092, -0.0702766, -0.113695, -0.083598, -0.0961177,
-0.120016, -0.123778, -0.129082, -0.0947609, -0.0393167,
-0.0554442, -0.0736378, 0.00323784, 0.0802985, 0.125844,
0.158932, 0.13343, 0.118998, 0.171297, 0.195658, 0.133183,
0.0984613, 0.11058, 0.0963952, 0.0839989, 0.0410435, -0.0663912,
-0.109655, -0.0710167, -0.0769681, -0.102285, -0.107188,
-0.115606, -0.0893028, -0.035863, -0.0454223, -0.0695057,
-0.00194271, 0.0711092, 0.106016, 0.134941, 0.121157, 0.110827,
0.163403, 0.195011, 0.1338, 0.0955318, 0.113448, 0.10062,
0.0864658, 0.0529156, -0.0506645, -0.10321, -0.0699682,
-0.077184, -0.110272, -0.107897, -0.109439, -0.0903821,
-0.0406426, -0.0465016, -0.0698757, -0.00900429, 0.0660828,
0.105122, 0.134633, 0.121774, 0.107496, 0.156527, 0.19242,
0.133492, 0.089827, 0.105739, 0.0950692, 0.0801443, 0.0518363,
-0.0390391, -0.0920781, -0.0596997, -0.0698141, -0.108298,
-0.105646, -0.106664, -0.0914613, -0.0421228, -0.0411669,
-0.0712634, -0.0180394, 0.0600697, 0.0930032, 0.12754, 0.127725,
0.116131, 0.161491, 0.199174, 0.142342, 0.0938666, 0.111906,
0.102809, 0.0815011, 0.0541182, -0.0382374, -0.0985846,
-0.0710167, -0.0746554, -0.10984, -0.113294, -0.114589,
-0.0995714, -0.0519597, -0.0444047, -0.0704308, -0.0194579,
0.0572944, 0.0863116, 0.11684, 0.118628, 0.106016, 0.144994,
0.189645, 0.143452, 0.0893953, 0.107959, 0.101792, 0.0811311,
0.0672238, -0.0141848, -0.0802677, -0.0536865, -0.0519597,
-0.0944525, -0.0991088, -0.100589, -0.0933115, -0.0533165,
-0.0433563, -0.071325, -0.0276296, 0.0488143, 0.0793734,
0.111289, 0.12017, 0.110117, 0.139967, 0.182398, 0.145425,
0.0942366, 0.111598, 0.105893, 0.0837522, 0.0684881,
-0.00786333, -0.0794967, -0.0586204, -0.0543032, -0.0958093,
-0.0996639, -0.0956243, -0.0947609, -0.0565235, -0.0376206,
-0.0654044, -0.0287089, 0.0486601, 0.081902, 0.109439, 0.120386,
0.108822, 0.138826, 0.18283, 0.143359, 0.0887477, 0.105122,
0.104505, 0.07888, 0.0637084, -0.00391625, -0.074347,
-0.0560918, -0.0479817, -0.0863116, -0.0913072, -0.0880693,
-0.0909371, -0.0546116, -0.0339203, -0.0585587, -0.0234358,
0.053224, 0.0802677, 0.106325, 0.119924, 0.107558, 0.132813,
0.182398, 0.158562, 0.100466, 0.104505, 0.102933, 0.0790342,
0.0671621, 0.00447131, -0.0684264, -0.060008, -0.0537482,
-0.0910605, -0.100342, -0.0938666, -0.0997256, -0.0685806,
-0.0389466, -0.0634, -0.0342286, 0.0481051, 0.0776466,
0.0986154, 0.112184, 0.101946, 0.12347, 0.169262, 0.150452,
0.0938666, 0.101637, 0.103488, 0.0774307, 0.0643868, 0.00669154,
-0.0643251, -0.0528848, -0.0376515, -0.0784175, -0.0882235,
-0.0801135, -0.0889327, -0.0650344, -0.0293256, -0.0498936,
-0.0383916, 0.0374048, 0.0657128, 0.0801443, 0.102007,
0.0964569, 0.113448, 0.161029, 0.150544, 0.0908446, 0.0952542,
0.102778, 0.0765673, 0.065682, 0.0174227, -0.0548275,
-0.0475809, -0.0306824, -0.0736378, -0.0876684, -0.07888,
-0.0851398, -0.0652502, -0.0349379, -0.0530389, -0.0374665,
0.0387924, 0.0703074, 0.0872059, 0.108668, 0.104721, 0.115206,
0.160474, 0.149681, 0.0889327, 0.0901662, 0.100496, 0.0742545,
0.0609948, 0.0215856, -0.0524222, -0.0540874, -0.0316075,
-0.0708008, -0.0862191, -0.0724043, -0.0779858, -0.0568627,
-0.0172068, -0.0348762, -0.0290172, 0.0436338, 0.0756422,
0.08699, 0.1058, 0.104043, 0.1128, 0.156403, 0.152302,
0.0918622, 0.0887477, 0.102007, 0.074347, 0.060008, 0.0262728,
-0.0472725, -0.0559993, -0.0339511, -0.0678097, -0.0808844,
-0.0637701, -0.0693207, -0.0539024, -0.0192112, -0.0311758,
-0.0291406, 0.0370964, 0.0758272, 0.083598, 0.105708, 0.106016,
0.101637, 0.140584, 0.142527, 0.086435, 0.0854482, 0.0948534,
0.0692282, 0.0547658, 0.0242992, -0.0450214, -0.0542107,
-0.0222949, -0.0514971, -0.0727127, -0.0577569, -0.0691665,
-0.0617657, -0.0213081, -0.027938, -0.0297573, 0.0319159,
0.0723118, 0.0815011, 0.101175, 0.103395, 0.104629, 0.13713,
0.143668, 0.0923864, 0.0827346, 0.100311, 0.0764439, 0.0550742,
0.0285239, -0.0408893, -0.0615498, -0.0312375, -0.0527614,
-0.0718184, -0.0539949, -0.0580036, -0.0547658, -0.0161275,
-0.0141848, -0.0197354, 0.0390083, 0.0768756, 0.0812236,
0.0979987, 0.100805, 0.094545, 0.125474, 0.13565, 0.0835055,
0.0687964, 0.0855407, 0.0685498, 0.0529773, 0.0317617,
-0.0300965, -0.053779, -0.0260878, -0.0469641, -0.0697215,
-0.0527306, -0.0533781, -0.0516513, -0.0188103, -0.0169601,
-0.0231274, 0.0367881, 0.075488, 0.0749021, 0.0941441, 0.101884,
0.0983996, 0.124302, 0.135959, 0.0844614, 0.069629, 0.0913072,
0.0686423, 0.0487218, 0.0314533, -0.0314842, -0.0601622,
-0.0314533, -0.0447439, -0.0671004, -0.0474267, -0.0477967,
-0.0543032, -0.0166518, -0.0108853, -0.0263653, 0.02359,
0.0644793, 0.0659903, 0.0833513, 0.0918622, 0.0855099, 0.108946,
0.125073, 0.0796818, 0.0593604, 0.0806685, 0.0651577, 0.0464091,
0.0332419, -0.0215239, -0.0516821, -0.0237442, -0.0360171,
-0.0604089, -0.0428629, -0.0446514, -0.0547041, -0.0230658,
-0.00730827, -0.0216165, 0.0184094, 0.0621357, 0.0604706,
0.0770607, 0.0910913, 0.0855099, 0.101422, 0.116747, 0.0802985,
0.0536865, 0.073977, 0.0657745, 0.0455765, 0.0383299,
-0.0112862, -0.0493386, -0.0208147, -0.0253785, -0.0490302,
-0.0327793, -0.0309291, -0.0432637, -0.0193654, -0.00123346,
-0.0141848, 0.0200438, 0.0633075, 0.062845, 0.0786642,
0.0986154, 0.0853557, 0.0935582, 0.113263, 0.0750254, 0.0537482,
0.0799901, 0.0690123, 0.0430479, 0.0325326, -0.0105461,
-0.0467483, -0.0222023, -0.0213081, -0.0458232, -0.0304049,
-0.0213698, -0.0327793, -0.00468716, 0.0187178, 0.00400876,
0.0301582, 0.0694132, 0.0647877, 0.0778007, 0.0989546, 0.087761,
0.0907521, 0.111968, 0.0808844, 0.0517438, 0.0753646, 0.0689198,
0.0455765, 0.0399334, -0.0000925098, -0.040951, -0.0194579,
-0.014524, -0.0411052, -0.0234667, -0.018687, -0.0338586,
-0.0081717, 0.0151099, 0.000246693, 0.0229733, 0.0644793,
0.0629992, 0.0720343, 0.0944833, 0.0844306, 0.0845848, 0.103888,
0.0775232, 0.0476734, 0.0717876, 0.0702458, 0.0424928, 0.042277,
0.0110087, -0.0329952, -0.0148016, -0.00477967, -0.03133,
-0.022079, -0.0120571, -0.0290172, -0.0129822, 0.0146474,
0.00431712, 0.0247618, 0.0626291, 0.0580653, 0.0656203,
0.0848932, 0.0750254, 0.0710784, 0.0922939, 0.0764439,
0.0429554, 0.0578495, 0.0596071, 0.0355546, 0.0338586,
0.00715409, -0.0347837, -0.0202288, -0.00854174, -0.0302199,
-0.0185328, -0.00795584, -0.0230658, -0.00718493, 0.02359,
0.0138765, 0.0238367, 0.0607789, 0.056616, 0.0606247, 0.0844306,
0.0812236, 0.0724043, 0.0897653, 0.0733911, 0.0368806,
0.0508804, 0.0537482, 0.0305899, 0.0340128, 0.017731,
-0.0269203, -0.0189953, -0.00363872, -0.0198279, -0.00622899,
0.00625983, -0.0081717, 0.00283697, 0.0302199, 0.0167443,
0.0169601, 0.0566777, 0.0570785, 0.0587746, 0.0871442, 0.081532,
0.0685498, 0.0842764, 0.0715409, 0.037929, 0.0525147, 0.0622899,
0.0390083, 0.0359555, 0.0189028, -0.0238984, -0.0188103,
0.00255944, -0.0132906, -0.00709242, 0.0090968, -0.00872676,
0.000555059, 0.0347837, 0.0255327, 0.0289864, 0.061704,
0.0579111, 0.0556909, 0.0794351, 0.0811928, 0.0678713,
0.0826112, 0.0732369, 0.0379599, 0.0489685, 0.0577569, 0.035092,
0.0419378, 0.0305899, -0.0150483, -0.0130439, 0.00508804,
-0.00703074, -0.00360788, 0.0111628, -0.00400876, -0.00585895,
0.0258102, 0.0223565, 0.0193345, 0.0533781, 0.0558142,
0.0493694, 0.0735453, 0.0708008, 0.0524222, 0.0691048,
0.0661445, 0.030374, 0.0415677, 0.0553825, 0.0325326, 0.0293873,
0.0226649, -0.0158808, -0.0157575, 0.00678405, -0.00641401,
0.000215856, 0.0170526, 0.00222023, 0.00123346, 0.0355546,
0.0334885, 0.0213698, 0.0461932, 0.0485676, 0.0432637,
0.0719418, 0.0744395, 0.0486601, 0.0573869, 0.0587746,
0.0287397, 0.0351846, 0.0529156, 0.0302815, 0.0275062,
0.0289864, -0.00903512, -0.0122113, 0.0160967, 0.0081717,
0.00854174, 0.0267662, 0.0134139, 0.00854174, 0.0349995,
0.0353387, 0.02322, 0.0482593, 0.0492152, 0.035863, 0.0629067,
0.0731136, 0.050757, 0.0542724, 0.0565852, 0.0271362, 0.0285855,
0.0493386, 0.0323784, 0.0275988, 0.0342595, 0.00117179,
-0.00687656, 0.0167443, 0.00940516, 0.0104228, 0.0303124,
0.0192112, 0.0088501, 0.0363255, 0.0378673, 0.0229116,
0.0417836, 0.0456382, 0.0331493, 0.0498936, 0.0584662,
0.0359246, 0.0385766, 0.0472725, 0.0201055, 0.0219865,
0.0452681, 0.0317617, 0.0288939, 0.034537, 0.00107928,
-0.00764748, 0.0188103, 0.012273, 0.00733911, 0.0250393,
0.0182553, 0.00715409, 0.0336119, 0.0384224, 0.0204447,
0.0376515, 0.0425545, 0.0316075, 0.0482901, 0.058127, 0.0364797,
0.0341669, 0.0440963, 0.0192729, 0.0187487, 0.045484, 0.0332419,
0.0259644, 0.0366339, 0.0107311, -0.00271362, 0.0233741,
0.0251318, 0.0234975, 0.0374973, 0.0295415, 0.0170218,
0.0360171, 0.0415677, 0.0238984, 0.0356471, 0.0383916,
0.0223565, 0.0376515, 0.0505103, 0.0258411, 0.0233741,
0.0342595, 0.0138148, 0.0115637, 0.0382374, 0.0313917,
0.0217398, 0.0331493, 0.0108545, -0.000400876, 0.0246076,
0.025656, 0.0242067, 0.0402418, 0.0325634, 0.0133522, 0.0326868,
0.0419686, 0.0201363, 0.0306824, 0.034537, 0.0194887, 0.0351537,
0.0490302, 0.0299732, 0.0231891, 0.0341669, 0.013784,
0.00925098, 0.0403959, 0.0388849, 0.0316075, 0.0441272,
0.0248235, 0.00755497, 0.0284313, 0.0317, 0.0262728, 0.0442814,
0.0383916, 0.0145857, 0.028678, 0.0395017, 0.0216473, 0.0274446,
0.0308983, 0.0158192, 0.0275062, 0.0399642, 0.0220482,
0.0141232, 0.026427, 0.0107003, 0.00394708, 0.0385457,
0.0408585, 0.0270437, 0.043788, 0.0313608, 0.0100836, 0.0349995,
0.0462549, 0.0436646, 0.0544574, 0.0510346, 0.029819, 0.0354621,
0.0485676, 0.0285239, 0.0285855, 0.0305899, 0.00786333,
0.0217398, 0.0416602, 0.0239909, 0.0138765, 0.0239909,
0.0121805, 0.00425545, 0.0330877, 0.0408585, 0.0298498,
0.0427395, 0.0336119, 0.00838755, 0.028678, 0.0488143,
0.0438188, 0.0554442, 0.0527614, 0.028308, 0.034537, 0.0487218,
0.0321626, 0.0305282, 0.0320701, 0.0097752, 0.0149557,
0.0388541, 0.0224182, 0.00453298, 0.0212156, 0.0120879,
0.0000616732, 0.0267662, 0.0353079, 0.0279996, 0.0431096,
0.0376515, 0.0164359, 0.0301582, 0.0428012, 0.0422461,
0.0553825, 0.0535015, 0.0309291, 0.0353387, 0.0527614,
0.0322551, 0.02396, 0.0304357, 0.010947, 0.0181319, 0.0401184,
0.0241451, 0.00422461, 0.0168985, 0.0113479, 0.000246693,
0.0278454, 0.0399334, 0.0303124, 0.0414135, 0.0372506,
0.0138148, 0.0239909, 0.040581, 0.0377748, 0.0488143, 0.0522064,
0.0301582, 0.0334577, 0.0504487, 0.0354929, 0.0263036,
0.0255944, 0.00764748, 0.0113479, 0.0368497, 0.0299115,
0.00755497, 0.0166518, 0.0125813, -0.000832588, 0.02322,
0.0399642, 0.0309908, 0.043788, 0.0461932, 0.0185945, 0.0254402,
0.0455765, 0.0436646, 0.0544266, 0.0578495, 0.0323168,
0.0314533, 0.0493694, 0.0332419, 0.0193654, 0.0231891,
0.00996022, 0.00918931, 0.0349995, 0.0307749, 0.00931265,
0.0190262, 0.0210614, 0.00524222, 0.0201363, 0.0401184,
0.0344753, 0.0482901, 0.0540566, 0.0307749, 0.0377748,
0.0562151, 0.0557526, 0.0640168, 0.0651577, 0.0380215,
0.0289864, 0.0513738, 0.0411052, 0.0226032, 0.0299732,
0.0155725, 0.00770915, 0.0324709, 0.0296956, 0.0088501,
0.0167443, 0.020568, 0.00715409, 0.0222949, 0.0444972,
0.0382682, 0.0475809, 0.0553825, 0.029449, 0.0330877, 0.0534398,
0.0508187, 0.0544266, 0.0565852, 0.0355546, 0.0274446,
0.0484135, 0.0407043, 0.0240525, 0.0275988, 0.0150483,
0.00863425, 0.0309908, 0.0305899, 0.0113479, 0.0200438,
0.0275988, 0.0139381, 0.0250393, 0.0475192, 0.0342595, 0.03981,
0.0552283, 0.0331802, 0.0333035, 0.0528231, 0.0486601,
0.0481359, 0.0529773, 0.0344753, 0.0286164, 0.0462549,
0.0382682, 0.0193654, 0.0222023, 0.00792501, -0.00169601,
0.0244226, 0.0312375, 0.00807919, 0.0111012, 0.0205063,
0.00869592, 0.0205988, 0.0434179, 0.036233, 0.0424312,
0.0545808, 0.0295415, 0.0270437, 0.0461007, 0.0427395,
0.0444047, 0.0525147, 0.0325634, 0.0218323, 0.0425545,
0.0368497, 0.016035, 0.0176385, 0.00848006, -0.00447131,
0.0213698, 0.0336119, 0.0149557, 0.0202905, 0.0288939,
0.0170218, 0.028123, 0.0486601, 0.0416602, 0.0479817, 0.0600697,
0.0407968, 0.0302815, 0.0465941, 0.0509729, 0.0487218,
0.0536865, 0.035092, 0.0198279, 0.0407043, 0.0376206, 0.0174227,
0.0185945, 0.00826421, -0.00144932, 0.0198279, 0.0276913,
0.00848006, 0.0115637, 0.0254402, 0.0159425, 0.0190262,
0.0410127, 0.0356471, 0.0366956, 0.052268, 0.0354929, 0.0226649,
0.0422461, 0.048506, 0.0447439, 0.0470258, 0.0305282, 0.0148016,
0.0360788, 0.0433254, 0.0216781, 0.0194887, 0.0160967,
0.00407043, 0.0221098, 0.0385766, 0.0194271, 0.0226032,
0.0395634, 0.0304357, 0.0343828, 0.0557526, 0.0531315,
0.0496469, 0.0630917, 0.0446514, 0.0266737, 0.0447131,
0.0509112, 0.0462857, 0.0515896, 0.0381757, 0.0198279,
0.0321009, 0.0377132, 0.0216781, 0.020568, 0.0167134,
0.00348454, 0.0197971, 0.0338586, 0.0162509, 0.0171143,
0.0347837, 0.0312066, 0.031515, 0.0492769, 0.04718, 0.0411977,
0.0565852, 0.0463474, 0.0296956, 0.0439422, 0.0492769,
0.0424312, 0.0432021, 0.0307749, 0.013969, 0.0316075, 0.0408893,
0.0203522, 0.0171143, 0.0152024, 0.00237442, 0.0167134,
0.0378057, 0.022449, 0.0148632, 0.0362638, 0.032841, 0.0285239,
0.0496469, 0.0487218, 0.0448672, 0.0610565, 0.0499553,
0.0272287, 0.0365414, 0.0482593, 0.0444972, 0.0461007,
0.0357088}}, 11025],
System`Convert`CommonDump`ConvertText[Preemptive,
System`Convert`HTMLDump`htmlsave, HTMLEntities ->
{HTMLBasic}, AltMathOutput -> PlotLabel, WindowSize ->
{2000, Automatic}, MathOutput -> PNG, ConvertClosed ->
False, ConvertReverseClosed -> False, ConvertLinkedNotebooks
-> False, CharacterEncoding -> Automatic,
ConversionStyleEnvironment -> None, ConversionRules ->
Automatic, HeadAttributes -> {}, HeadElements -> {}, CSS
-> Automatic, ConvertLinkedNotebooks -> False, MathOutput
-> GIF, GraphicsOutput -> GIF, Graphics3DOutput ->
Automatic, ManipulateOutput -> CDF, ConvertClosed -> True,
ConvertReverseClosed -> False, FullDocument -> True,
AltMathOutput -> FileName, TableOutput -> {TextForm,
Automatic}, AnimationOutput -> Automatic, FilesDirectory
-> HTMLFiles, LinksDirectory -> HTMLLinks, HTMLEntities
-> {HTML}, AllowBlockMathML -> False, ShowStyles ->
True, DataUri -> False, MathMLOptions ->
{UseUnicodePlane1Characters -> False,
IncludeMarkupAnnotations -> False, Entities -> MathML}]],
PassEventsDown -> Automatic, PassEventsUp -> True}]],
DynamicBox[ToBoxes[FEPrivate`FrontEndResource[System`Convert`CommonDump`ConvertText[FEStrings,
System`Convert`HTMLDump`htmlsave, HTMLEntities ->
{HTMLBasic}, AltMathOutput -> PlotLabel, WindowSize ->
{2000, Automatic}, MathOutput -> PNG, ConvertClosed ->
False, ConvertReverseClosed -> False, ConvertLinkedNotebooks
-> False, CharacterEncoding -> Automatic,
ConversionStyleEnvironment -> None, ConversionRules ->
Automatic, HeadAttributes -> {}, HeadElements -> {}, CSS
-> Automatic, ConvertLinkedNotebooks -> False, MathOutput
-> GIF, GraphicsOutput -> GIF, Graphics3DOutput ->
Automatic, ManipulateOutput -> CDF, ConvertClosed -> True,
ConvertReverseClosed -> False, FullDocument -> True,
AltMathOutput -> FileName, TableOutput -> {TextForm,
Automatic}, AnimationOutput -> Automatic, FilesDirectory
-> HTMLFiles, LinksDirectory -> HTMLLinks, HTMLEntities
-> {HTML}, AllowBlockMathML -> False, ShowStyles ->
True, DataUri -> False, MathMLOptions ->
{UseUnicodePlane1Characters -> False,
IncludeMarkupAnnotations -> False, Entities -> MathML}],
System`Convert`CommonDump`ConvertText[playText,
System`Convert`HTMLDump`htmlsave, HTMLEntities ->
{HTMLBasic}, AltMathOutput -> PlotLabel, WindowSize ->
{2000, Automatic}, MathOutput -> PNG, ConvertClosed ->
False, ConvertReverseClosed -> False, ConvertLinkedNotebooks
-> False, CharacterEncoding -> Automatic,
ConversionStyleEnvironment -> None, ConversionRules ->
Automatic, HeadAttributes -> {}, HeadElements -> {}, CSS
-> Automatic, ConvertLinkedNotebooks -> False, MathOutput
-> GIF, GraphicsOutput -> GIF, Graphics3DOutput ->
Automatic, ManipulateOutput -> CDF, ConvertClosed -> True,
ConvertReverseClosed -> False, FullDocument -> True,
AltMathOutput -> FileName, TableOutput -> {TextForm,
Automatic}, AnimationOutput -> Automatic, FilesDirectory
-> HTMLFiles, LinksDirectory -> HTMLLinks, HTMLEntities
-> {HTML}, AllowBlockMathML -> False, ShowStyles ->
True, DataUri -> False, MathMLOptions ->
{UseUnicodePlane1Characters -> False,
IncludeMarkupAnnotations -> False, Entities -> MathML}]],
StandardForm]]], Annotation[#1,
Dynamic[FEPrivate`FrontEndResource[System`Convert`CommonDump`ConvertText[FEStrings,
System`Convert`HTMLDump`htmlsave, HTMLEntities ->
{HTMLBasic}, AltMathOutput -> PlotLabel, WindowSize ->
{2000, Automatic}, MathOutput -> PNG, ConvertClosed ->
False, ConvertReverseClosed -> False, ConvertLinkedNotebooks
-> False, CharacterEncoding -> Automatic,
ConversionStyleEnvironment -> None, ConversionRules ->
Automatic, HeadAttributes -> {}, HeadElements -> {}, CSS
-> Automatic, ConvertLinkedNotebooks -> False, MathOutput
-> GIF, GraphicsOutput -> GIF, Graphics3DOutput ->
Automatic, ManipulateOutput -> CDF, ConvertClosed -> True,
ConvertReverseClosed -> False, FullDocument -> True,
AltMathOutput -> FileName, TableOutput -> {TextForm,
Automatic}, AnimationOutput -> Automatic, FilesDirectory
-> HTMLFiles, LinksDirectory -> HTMLLinks, HTMLEntities
-> {HTML}, AllowBlockMathML -> False, ShowStyles ->
True, DataUri -> False, MathMLOptions ->
{UseUnicodePlane1Characters -> False,
IncludeMarkupAnnotations -> False, Entities -> MathML}],
System`Convert`CommonDump`ConvertText[playText,
System`Convert`HTMLDump`htmlsave, HTMLEntities ->
{HTMLBasic}, AltMathOutput -> PlotLabel, WindowSize ->
{2000, Automatic}, MathOutput -> PNG, ConvertClosed ->
False, ConvertReverseClosed -> False, ConvertLinkedNotebooks
-> False, CharacterEncoding -> Automatic,
ConversionStyleEnvironment -> None, ConversionRules ->
Automatic, HeadAttributes -> {}, HeadElements -> {}, CSS
-> Automatic, ConvertLinkedNotebooks -> False, MathOutput
-> GIF, GraphicsOutput -> GIF, Graphics3DOutput ->
Automatic, ManipulateOutput -> CDF, ConvertClosed -> True,
ConvertReverseClosed -> False, FullDocument -> True,
AltMathOutput -> FileName, TableOutput -> {TextForm,
Automatic}, AnimationOutput -> Automatic, FilesDirectory
-> HTMLFiles, LinksDirectory -> HTMLLinks, HTMLEntities
-> {HTML}, AllowBlockMathML -> False, ShowStyles ->
True, DataUri -> False, MathMLOptions ->
{UseUnicodePlane1Characters -> False,
IncludeMarkupAnnotations -> False, Entities -> MathML}]]],
System`Convert`CommonDump`ConvertText[Tooltip,
System`Convert`HTMLDump`htmlsave, HTMLEntities ->
{HTMLBasic}, AltMathOutput -> PlotLabel, WindowSize ->
{2000, Automatic}, MathOutput -> PNG, ConvertClosed ->
False, ConvertReverseClosed -> False, ConvertLinkedNotebooks
-> False, CharacterEncoding -> Automatic,
ConversionStyleEnvironment -> None, ConversionRules ->
Automatic, HeadAttributes -> {}, HeadElements -> {}, CSS
-> Automatic, ConvertLinkedNotebooks -> False, MathOutput
-> GIF, GraphicsOutput -> GIF, Graphics3DOutput ->
Automatic, ManipulateOutput -> CDF, ConvertClosed -> True,
ConvertReverseClosed -> False, FullDocument -> True,
AltMathOutput -> FileName, TableOutput -> {TextForm,
Automatic}, AnimationOutput -> Automatic, FilesDirectory
-> HTMLFiles, LinksDirectory -> HTMLLinks, HTMLEntities
-> {HTML}, AllowBlockMathML -> False, ShowStyles ->
True, DataUri -> False, MathMLOptions ->
{UseUnicodePlane1Characters -> False,
IncludeMarkupAnnotations -> False, Entities -> MathML}]]
& ], TagBox[TooltipBox[TagBox[{{GrayLevel[0.9],
RectangleBox[{34, -158}, {58, -135}]}, {GrayLevel[0.3],
RectangleBox[{42, -150}, {50, -143}]}, {GrayLevel[0.5],
StyleBox[LineBox[{{34, -158}, {34, -135}, {58, -135}, {58,
-158}, {34, -158}}], Antialiasing -> False]}},
EventHandlerTag[{System`Convert`CommonDump`ConvertText[MouseClicked,
System`Convert`HTMLDump`htmlsave, HTMLEntities ->
{HTMLBasic}, AltMathOutput -> PlotLabel, WindowSize ->
{2000, Automatic}, MathOutput -> PNG, ConvertClosed ->
False, ConvertReverseClosed -> False, ConvertLinkedNotebooks
-> False, CharacterEncoding -> Automatic,
ConversionStyleEnvironment -> None, ConversionRules ->
Automatic, HeadAttributes -> {}, HeadElements -> {}, CSS
-> Automatic, ConvertLinkedNotebooks -> False, MathOutput
-> GIF, GraphicsOutput -> GIF, Graphics3DOutput ->
Automatic, ManipulateOutput -> CDF, ConvertClosed -> True,
ConvertReverseClosed -> False, FullDocument -> True,
AltMathOutput -> FileName, TableOutput -> {TextForm,
Automatic}, AnimationOutput -> Automatic, FilesDirectory
-> HTMLFiles, LinksDirectory -> HTMLLinks, HTMLEntities
-> {HTML}, AllowBlockMathML -> False, ShowStyles ->
True, DataUri -> False, MathMLOptions ->
{UseUnicodePlane1Characters -> False,
IncludeMarkupAnnotations -> False, Entities -> MathML}]
:> FEPrivate`EmitSound[SampledSoundList[{{0.}}, 8000],
System`Convert`CommonDump`ConvertText[Preemptive,
System`Convert`HTMLDump`htmlsave, HTMLEntities ->
{HTMLBasic}, AltMathOutput -> PlotLabel, WindowSize ->
{2000, Automatic}, MathOutput -> PNG, ConvertClosed ->
False, ConvertReverseClosed -> False, ConvertLinkedNotebooks
-> False, CharacterEncoding -> Automatic,
ConversionStyleEnvironment -> None, ConversionRules ->
Automatic, HeadAttributes -> {}, HeadElements -> {}, CSS
-> Automatic, ConvertLinkedNotebooks -> False, MathOutput
-> GIF, GraphicsOutput -> GIF, Graphics3DOutput ->
Automatic, ManipulateOutput -> CDF, ConvertClosed -> True,
ConvertReverseClosed -> False, FullDocument -> True,
AltMathOutput -> FileName, TableOutput -> {TextForm,
Automatic}, AnimationOutput -> Automatic, FilesDirectory
-> HTMLFiles, LinksDirectory -> HTMLLinks, HTMLEntities
-> {HTML}, AllowBlockMathML -> False, ShowStyles ->
True, DataUri -> False, MathMLOptions ->
{UseUnicodePlane1Characters -> False,
IncludeMarkupAnnotations -> False, Entities -> MathML}]],
PassEventsDown -> Automatic, PassEventsUp -> True}]],
DynamicBox[ToBoxes[FEPrivate`FrontEndResource[System`Convert`CommonDump`ConvertText[FEStrings,
System`Convert`HTMLDump`htmlsave, HTMLEntities ->
{HTMLBasic}, AltMathOutput -> PlotLabel, WindowSize ->
{2000, Automatic}, MathOutput -> PNG, ConvertClosed ->
False, ConvertReverseClosed -> False, ConvertLinkedNotebooks
-> False, CharacterEncoding -> Automatic,
ConversionStyleEnvironment -> None, ConversionRules ->
Automatic, HeadAttributes -> {}, HeadElements -> {}, CSS
-> Automatic, ConvertLinkedNotebooks -> False, MathOutput
-> GIF, GraphicsOutput -> GIF, Graphics3DOutput ->
Automatic, ManipulateOutput -> CDF, ConvertClosed -> True,
ConvertReverseClosed -> False, FullDocument -> True,
AltMathOutput -> FileName, TableOutput -> {TextForm,
Automatic}, AnimationOutput -> Automatic, FilesDirectory
-> HTMLFiles, LinksDirectory -> HTMLLinks, HTMLEntities
-> {HTML}, AllowBlockMathML -> False, ShowStyles ->
True, DataUri -> False, MathMLOptions ->
{UseUnicodePlane1Characters -> False,
IncludeMarkupAnnotations -> False, Entities -> MathML}],
System`Convert`CommonDump`ConvertText[stopText,
System`Convert`HTMLDump`htmlsave, HTMLEntities ->
{HTMLBasic}, AltMathOutput -> PlotLabel, WindowSize ->
{2000, Automatic}, MathOutput -> PNG, ConvertClosed ->
False, ConvertReverseClosed -> False, ConvertLinkedNotebooks
-> False, CharacterEncoding -> Automatic,
ConversionStyleEnvironment -> None, ConversionRules ->
Automatic, HeadAttributes -> {}, HeadElements -> {}, CSS
-> Automatic, ConvertLinkedNotebooks -> False, MathOutput
-> GIF, GraphicsOutput -> GIF, Graphics3DOutput ->
Automatic, ManipulateOutput -> CDF, ConvertClosed -> True,
ConvertReverseClosed -> False, FullDocument -> True,
AltMathOutput -> FileName, TableOutput -> {TextForm,
Automatic}, AnimationOutput -> Automatic, FilesDirectory
-> HTMLFiles, LinksDirectory -> HTMLLinks, HTMLEntities
-> {HTML}, AllowBlockMathML -> False, ShowStyles ->
True, DataUri -> False, MathMLOptions ->
{UseUnicodePlane1Characters -> False,
IncludeMarkupAnnotations -> False, Entities -> MathML}]],
StandardForm]]], Annotation[#1,
Dynamic[FEPrivate`FrontEndResource[System`Convert`CommonDump`ConvertText[FEStrings,
System`Convert`HTMLDump`htmlsave, HTMLEntities ->
{HTMLBasic}, AltMathOutput -> PlotLabel, WindowSize ->
{2000, Automatic}, MathOutput -> PNG, ConvertClosed ->
False, ConvertReverseClosed -> False, ConvertLinkedNotebooks
-> False, CharacterEncoding -> Automatic,
ConversionStyleEnvironment -> None, ConversionRules ->
Automatic, HeadAttributes -> {}, HeadElements -> {}, CSS
-> Automatic, ConvertLinkedNotebooks -> False, MathOutput
-> GIF, GraphicsOutput -> GIF, Graphics3DOutput ->
Automatic, ManipulateOutput -> CDF, ConvertClosed -> True,
ConvertReverseClosed -> False, FullDocument -> True,
AltMathOutput -> FileName, TableOutput -> {TextForm,
Automatic}, AnimationOutput -> Automatic, FilesDirectory
-> HTMLFiles, LinksDirectory -> HTMLLinks, HTMLEntities
-> {HTML}, AllowBlockMathML -> False, ShowStyles ->
True, DataUri -> False, MathMLOptions ->
{UseUnicodePlane1Characters -> False,
IncludeMarkupAnnotations -> False, Entities -> MathML}],
System`Convert`CommonDump`ConvertText[stopText,
System`Convert`HTMLDump`htmlsave, HTMLEntities ->
{HTMLBasic}, AltMathOutput -> PlotLabel, WindowSize ->
{2000, Automatic}, MathOutput -> PNG, ConvertClosed ->
False, ConvertReverseClosed -> False, ConvertLinkedNotebooks
-> False, CharacterEncoding -> Automatic,
ConversionStyleEnvironment -> None, ConversionRules ->
Automatic, HeadAttributes -> {}, HeadElements -> {}, CSS
-> Automatic, ConvertLinkedNotebooks -> False, MathOutput
-> GIF, GraphicsOutput -> GIF, Graphics3DOutput ->
Automatic, ManipulateOutput -> CDF, ConvertClosed -> True,
ConvertReverseClosed -> False, FullDocument -> True,
AltMathOutput -> FileName, TableOutput -> {TextForm,
Automatic}, AnimationOutput -> Automatic, FilesDirectory
-> HTMLFiles, LinksDirectory -> HTMLLinks, HTMLEntities
-> {HTML}, AllowBlockMathML -> False, ShowStyles ->
True, DataUri -> False, MathMLOptions ->
{UseUnicodePlane1Characters -> False,
IncludeMarkupAnnotations -> False, Entities -> MathML}]]],
System`Convert`CommonDump`ConvertText[Tooltip,
System`Convert`HTMLDump`htmlsave, HTMLEntities ->
{HTMLBasic}, AltMathOutput -> PlotLabel, WindowSize ->
{2000, Automatic}, MathOutput -> PNG, ConvertClosed ->
False, ConvertReverseClosed -> False, ConvertLinkedNotebooks
-> False, CharacterEncoding -> Automatic,
ConversionStyleEnvironment -> None, ConversionRules ->
Automatic, HeadAttributes -> {}, HeadElements -> {}, CSS
-> Automatic, ConvertLinkedNotebooks -> False, MathOutput
-> GIF, GraphicsOutput -> GIF, Graphics3DOutput ->
Automatic, ManipulateOutput -> CDF, ConvertClosed -> True,
ConvertReverseClosed -> False, FullDocument -> True,
AltMathOutput -> FileName, TableOutput -> {TextForm,
Automatic}, AnimationOutput -> Automatic, FilesDirectory
-> HTMLFiles, LinksDirectory -> HTMLLinks, HTMLEntities
-> {HTML}, AllowBlockMathML -> False, ShowStyles ->
True, DataUri -> False, MathMLOptions ->
{UseUnicodePlane1Characters -> False,
IncludeMarkupAnnotations -> False, Entities -> MathML}]]
& ], {GrayLevel[0.75], StyleBox[LineBox[{{0, 0}, {360, 0},
{360, -164}, {0, -164}, {0, 0}}], Antialiasing -> False]}},
ContentSelectable -> False, ImageSize -> 250, PlotRange
-> {{0, 360}, {-164, 0}}, PlotRangePadding -> 1],
Sound[SampledSoundList[{-0.0428012, -0.0415677, -0.0421228,
-0.0444047, -0.0451139, -0.0454223, -0.0450523, -0.0453298,
-0.0438188, -0.0431712, -0.0442505, -0.0453298, -0.0450214,
-0.0434179, -0.0432637, -0.0428012, -0.0434179, -0.0428937,
-0.0439422, -0.0448056, -0.0427395, -0.042277, -0.0402726,
-0.0373123, -0.0386999, -0.039255, -0.0367881, -0.037559,
-0.0371889, -0.038114, -0.0379599, -0.0382374, -0.0387308,
-0.0370964, -0.0387308, -0.0378057, -0.0356471, -0.0351537,
-0.0361713, -0.0384841, -0.0411669, -0.040951, -0.0410127,
-0.0418144, -0.0402726, -0.0387308, -0.03981, -0.0417836,
-0.0407043, -0.039255, -0.0405501, -0.0391625, -0.0379599,
-0.0404268, -0.0424312, -0.0445897, -0.0432637, -0.0415677,
-0.0421845, -0.0400876, -0.040581, -0.0425545, -0.0448056,
-0.04681, -0.0442505, -0.0406426, -0.0435721, -0.0421228,
-0.0430479, -0.0441272, -0.0438188, -0.0442505, -0.0419378,
-0.0401801, -0.0419378, -0.0434796, -0.0451139, -0.0435721,
-0.0402726, -0.0399334, -0.0401801, -0.0442505, -0.0441888,
-0.0408585, -0.0384224, -0.0384841, -0.038114, -0.0391625,
-0.0394092, -0.0385766, -0.0387924, -0.0378673, -0.0390083,
-0.0421228, -0.0456382, -0.0423386, -0.0389466, -0.0404268,
-0.0397175, -0.0386999, -0.0399334, -0.0411669, -0.0423386,
-0.0427087, -0.0391625, -0.0366956, -0.0374048, -0.035863,
-0.0360171, -0.0382682, -0.0366339, -0.0376515, -0.0390391,
-0.0383916, -0.039625, -0.0411052, -0.0417836, -0.0416294,
-0.0403343, -0.0403959, -0.0385766, -0.0402418, -0.0399642,
-0.0384841, -0.0385766, -0.0404268, -0.0395634, -0.0393475,
-0.0388849, -0.0398717, -0.0434179, -0.0438188, -0.0425853,
-0.0408893, -0.0403343, -0.0407968, -0.0368497, -0.0387308,
-0.0412594, -0.040581, -0.042092, -0.0425545, -0.0411052,
-0.042277, -0.0419686, -0.0390083, -0.0374048, -0.0374665,
-0.0383916, -0.0400259, -0.0423386, -0.0408585, -0.0411669,
-0.0398717, -0.0381757, -0.040581, -0.0405501, -0.0399642,
-0.0394092, -0.0397175, -0.0386383, -0.0349995, -0.0365414,
-0.0401801, -0.0394092, -0.0378673, -0.0359555, -0.0352462,
-0.0391933, -0.0381757, -0.037929, -0.0374973, -0.0364797,
-0.0383299, -0.0373123, -0.0356471, -0.0372506, -0.0368497,
-0.0339511, -0.035092, -0.0368497, -0.0360788, -0.0378673,
-0.0417836, -0.0421228, -0.0396559, -0.0360171, -0.0329952,
-0.0351537, -0.0357705, -0.0339511, -0.0354929, -0.0391008,
-0.0401184, -0.0373123, -0.0377132, -0.0367881, -0.0363255,
-0.0366956, -0.0323784, -0.034722, -0.0377132, -0.0358013,
-0.0362638, -0.0366339, -0.0343211, -0.033026, -0.0341669,
-0.0319467, -0.0324093, -0.0344753, -0.0324093, -0.0314842,
-0.0325326, -0.0343211, -0.0373123, -0.0397792, -0.0379599,
-0.039255, -0.0415677, -0.0385766, -0.0401801, -0.0424928,
-0.0417219, -0.0371581, -0.0355546, -0.0383916, -0.0362638,
-0.0367881, -0.0407043, -0.041321, -0.0408893, -0.0367881,
-0.0340744, -0.035092, -0.039625, -0.0408585, -0.0411669,
-0.0428937, -0.0400259, -0.0377132, -0.0417219, -0.0411977,
-0.0400259, -0.0416294, -0.0391008, -0.0362638, -0.0337044,
-0.0320701, -0.0336427, -0.0367264, -0.0395017, -0.0397175,
-0.0378057, -0.0370039, -0.034537, -0.0385457, -0.0408893,
-0.0357088, -0.0359246, -0.0346295, -0.0332419, -0.0336427,
-0.0310833, -0.0334577, -0.0354621, -0.0334885, -0.0316075,
-0.0310833, -0.032841, -0.0325326, -0.0324093, -0.0360171,
-0.0381757, -0.0377132, -0.0360171, -0.0352462, -0.0368497,
-0.0373123, -0.0354621, -0.0382682, -0.0404885, -0.0393167,
-0.0393167, -0.0386383, -0.0378673, -0.0374048, -0.0373123,
-0.0370964, -0.0341669, -0.0342286, -0.0354929, -0.0349995,
-0.0360788, -0.0350304, -0.0376206, -0.0368806, -0.0325326,
-0.0317, -0.0317617, -0.0308366, -0.0305282, -0.0308366,
-0.0308674, -0.0315458, -0.0321626, -0.0340128, -0.0361097,
-0.0382682, -0.0382682, -0.0381757, -0.0385457, -0.0387308,
-0.0404268, -0.0417219, -0.0404885, -0.0384224, -0.0393475,
-0.0376515, -0.035863, -0.0360788, -0.0382682, -0.0393475,
-0.0377748, -0.035863, -0.0362638, -0.0363872, -0.0342286,
-0.0361097, -0.039625, -0.0414135, -0.0393167, -0.0393167,
-0.039625, -0.0351846, -0.0366956, -0.0390083, -0.037929,
-0.0386383, -0.0393475, -0.0386999, -0.0381757, -0.0357088,
-0.0348762, -0.0384841, -0.0378673, -0.036418, -0.0371581,
-0.0372506, -0.037929, -0.0376206, -0.0402418, -0.0377748,
-0.0354621, -0.0357705, -0.0363872, -0.0397175, -0.0413519,
-0.042092, -0.0402418, -0.0387924, -0.0393167, -0.0371581,
-0.0385457, -0.0411052, -0.041321, -0.0420303, -0.0417219,
-0.0388849, -0.0387924, -0.0394708, -0.037559, -0.0361097,
-0.0374048, -0.0377132, -0.0378673, -0.038114, -0.0378057,
-0.0366339, -0.0370348, -0.0377748, -0.0370348, -0.035092,
-0.0336119, -0.0359246, -0.0351537, -0.0344136, -0.0366339,
-0.0385457, -0.0370348, -0.0347837, -0.0339511, -0.0346295,
-0.0355546, -0.0365722, -0.0370348, -0.0354929, -0.0343211,
-0.0333344, -0.033396, -0.0366956, -0.0369422, -0.034722,
-0.0339203, -0.0322551, -0.0311758, -0.0334885, -0.0341053,
-0.0317925, -0.0293873, -0.0314533, -0.0307749, -0.0290172,
-0.0342286, -0.0339203, -0.0319467, -0.0302507, -0.0311758,
-0.0351846, -0.0352462, -0.0351537, -0.0321626, -0.0313917,
-0.0314842, -0.0329335, -0.0342286, -0.0333035, -0.0321009,
-0.0312991, -0.0354621, -0.0343828, -0.0307133, -0.0325326,
-0.0303124, -0.0284005, -0.0333035, -0.0357088, -0.0360788,
-0.0347837, -0.0336427, -0.033026, -0.0311758, -0.0297573,
-0.0292948, -0.0321626, -0.0357705, -0.0344753, -0.0361097,
-0.0365722, -0.0314842, -0.0269203, -0.0267662, -0.0291714,
-0.0302199, -0.0310833, -0.033026, -0.0327793, -0.0324093,
-0.0320084, -0.0349995, -0.0358013, -0.0308674, -0.0270129,
-0.0257794, -0.0268587, -0.0288322, -0.0308674, -0.0330877,
-0.0354004, -0.034722, -0.0321009, -0.032841, -0.0357705,
-0.0364797, -0.0322551, -0.0310833, -0.03133, -0.0278454,
-0.0297882, -0.0317617, -0.0304049, -0.0308366, -0.0321009,
-0.0318542, -0.0297882, -0.0304049, -0.0339511, -0.0346295,
-0.036233, -0.0340128, -0.0306824, -0.0324093, -0.036418,
-0.0384224, -0.0360171, -0.0346295, -0.0334577, -0.0334885,
-0.0342595, -0.0343211, -0.0380832, -0.0387308, -0.0339203,
-0.0341053, -0.0366339, -0.0322551, -0.0318542, -0.032841,
-0.0336119, -0.0325326, -0.0307749, -0.034722, -0.0342595,
-0.0334577, -0.0336427, -0.0322242, -0.0318542, -0.028678,
-0.0280921, -0.0318542, -0.0337044, -0.0316075, -0.0315458,
-0.0317925, -0.0318542, -0.0324709, -0.0336427, -0.0329952,
-0.0324093, -0.0330877, -0.0316383, -0.0295415, -0.0322242,
-0.0298498, -0.0283697, -0.031145, -0.0315458, -0.0342595,
-0.0339511, -0.0301582, -0.0307133, -0.0312991, -0.028678,
-0.0268278, -0.0260569, -0.0262419, -0.0274446, -0.0300657,
-0.0332419, -0.0321626, -0.0328718, -0.0325634, -0.0314842,
-0.0296956, -0.0280921, -0.0284622, -0.0262419, -0.0257486,
-0.0299423, -0.0312991, -0.0320701, -0.0314533, -0.0270745,
-0.0262419, -0.0272904, -0.0297573, -0.0314842, -0.0317617,
-0.0284005, -0.0264578, -0.0291406, -0.0290172, -0.030004,
-0.0327793, -0.0299423, -0.0289864, -0.0302199, -0.029634,
-0.0314842, -0.0311758, -0.0301582, -0.0309908, -0.032841,
-0.0353387, -0.0344136, -0.0327176, -0.0350304, -0.0314842,
-0.0318542, -0.0336119, -0.0322551, -0.0333344, -0.0354621,
-0.0367264, -0.0337661, -0.0327793, -0.0351846, -0.0344753,
-0.0378057, -0.0376206, -0.0361713, -0.0380832, -0.0382682,
-0.036233, -0.0363872, -0.0354004, -0.0331493, -0.0359246,
-0.0365722, -0.0352462, -0.0349995, -0.0366339, -0.0371581,
-0.0359246, -0.0349379, -0.0344753, -0.0326868, -0.0313917,
-0.0297882, -0.0313917, -0.0345678, -0.033396, -0.033396,
-0.0322551, -0.0310216, -0.033026, -0.0329952, -0.0327176,
-0.0335502, -0.0303124, -0.030004, -0.0341053, -0.0348762,
-0.0346295, -0.0349379, -0.0361097, -0.036418, -0.0354621,
-0.0355546, -0.0364797, -0.0345678, -0.0316383, -0.0324709,
-0.0324709, -0.0317925, -0.0324093, -0.0326868, -0.0333344,
-0.0343828, -0.0340744, -0.035092, -0.0333035, -0.0299115,
-0.0306824, -0.0317925, -0.0321009, -0.0340744, -0.0333344,
-0.0323784, -0.0325634, -0.0328718, -0.0343828, -0.0370348,
-0.0366339, -0.0357705, -0.0334577, -0.0303124, -0.0306824,
-0.0305591, -0.0312991, -0.0348762, -0.0315458, -0.0297573,
-0.0313917, -0.0288322, -0.0302507, -0.0322551, -0.0336119,
-0.0312991, -0.0274754, -0.0309908, -0.0285239, -0.028678,
-0.0308674, -0.0285239, -0.0274754, -0.0257794, -0.0238367,
-0.0276296, -0.030004, -0.0291714, -0.0300657, -0.0297573,
-0.0296031, -0.0283697, -0.027938, -0.026612, -0.0236825,
-0.0240834, -0.025286, -0.0249776, -0.0264578, -0.0266737,
-0.026982, -0.0235283, -0.0226032, -0.0256869, -0.0244534,
-0.0243917, -0.0272287, -0.0257794, -0.0260878, -0.0264578,
-0.0255944, -0.0287705, -0.0295415, -0.0262419, -0.0273212,
-0.026982, -0.0277529, -0.0288631, -0.0293256, -0.030374,
-0.0306824, -0.03133, -0.0275988, -0.0266737, -0.028308,
-0.0275988, -0.0294798, -0.029634, -0.0284622, -0.0301582,
-0.0335502, -0.0296031, -0.0256869, -0.0276296, -0.0247618,
-0.0260878, -0.0257486, -0.0256869, -0.0238367, -0.0241451,
-0.0274754, -0.0297573, -0.0304666, -0.0273212, -0.0271362,
-0.0256252, -0.0243609, -0.0274754, -0.0260569, -0.026612,
-0.0273829, -0.0257794, -0.0267662, -0.0287089, -0.0290172,
-0.0290172, -0.0315458, -0.0284622, -0.0242992, -0.0251627,
-0.0253785, -0.0269203, -0.0299115, -0.0272287, -0.0279071,
-0.0302199, -0.0274446, -0.0284005, -0.0331802, -0.0329335,
-0.0316075, -0.0309291, -0.0276296, -0.0240834, -0.0228191,
-0.0245151, -0.0263653, -0.0253168, -0.0242992, -0.0263036,
-0.0274754, -0.0275371, -0.0291406, -0.0285547, -0.027938,
-0.024916, -0.0239909, -0.026612, -0.0230658, -0.0231583,
-0.0265503, -0.023775, -0.0254402, -0.0284622, -0.0308366,
-0.0316383, -0.0282155, -0.0280921, -0.0280613, -0.0226649,
-0.0199204, -0.0229733, -0.0275988, -0.0262419, -0.0251318,
-0.0324709, -0.0368806, -0.0414752, -0.0331493, -0.0203522,
-0.0230658, -0.020753, -0.0128897, -0.0135681, -0.00841839,
-0.00462549, -0.0141232, -0.0103919, -0.00826421, -0.0121805,
-0.0219248, -0.0415061, -0.0363872, -0.0242992, -0.0321009,
-0.0333035, -0.0282155, -0.025286, -0.0176077, -0.0151408,
-0.0219248, -0.0228499, -0.0200746, -0.017731, -0.0319159,
-0.0482901, -0.0461932, -0.0567085, -0.0557526, -0.0594838,
-0.0455765, -0.0337661, -0.0384224, -0.0312375, -0.0278454,
-0.030004, -0.0151408, -0.0100836, -0.0225107, -0.0141232,
-0.0273212, -0.0323784, -0.044343, -0.0602547, -0.0346912,
-0.025286, -0.025286, -0.0151099, -0.0088501, -0.00348454,
0.0111012, 0.0110087, 0.0104228, 0.00971353, -0.00302199,
-0.00394708, -0.0320701, -0.0358013, -0.0482593, -0.0589287,
-0.058682, -0.0671929, -0.0343211, -0.036418, -0.0345678,
-0.0361713, -0.0399642, -0.0311758, -0.0161275, -0.0305591,
-0.0456382, -0.0263961, -0.0311758, -0.0377748, -0.0634,
-0.0416602, -0.00299115, -0.0125813, 0.00163434, 0.020753,
0.0272904, 0.0368806, 0.0451139, 0.0307749, 0.00986771,
0.00400876, 0.00718493, -0.0126738, -0.0632459, -0.0693515,
-0.0909988, -0.0984304, -0.104197, -0.0903204, -0.0719726,
-0.104752, -0.0970119, -0.0907521, -0.0826729, -0.0650035,
-0.0536248, -0.0711092, -0.0699682, -0.0585587, -0.0519905,
-0.0614573, -0.0514971, 0.0110087, 0.02396, 0.0397175,
0.0724968, 0.0933115, 0.108113, 0.11243, 0.133553, 0.124919,
0.0921706, 0.0630608, 0.0610873, -0.00792501, -0.0562151,
-0.0878535, -0.138826, -0.123069, -0.126769, -0.110827,
-0.132011, -0.167813, -0.14854, -0.137346, -0.134201, -0.117981,
-0.11499, -0.102717, -0.104814, -0.102963, -0.0835363,
-0.108977, -0.0268587, 0.0304357, 0.032841, 0.0950692, 0.142897,
0.181165, 0.204447, 0.205002, 0.2005, 0.181689, 0.123223,
0.119615, 0.0578495, -0.0499553, -0.0817478, -0.134725,
-0.150298, -0.155416, -0.140276, -0.138611, -0.194209,
-0.194887, -0.189892, -0.189553, -0.174998, -0.188658, -0.19279,
-0.149157, -0.182707, -0.155632, -0.142619, -0.125166,
0.000832588, 0.0369422, 0.0920164, 0.189152, 0.248389, 0.285485,
0.317278, 0.280613, 0.277252, 0.226433, 0.188627, 0.175152,
0.0181319, -0.0467174, -0.088316, -0.131333, -0.185112,
-0.174813, -0.132412, -0.194733, -0.266829, -0.244997,
-0.231521, -0.252798, -0.234821, -0.272996, -0.221869,
-0.222949, -0.243085, -0.188319, -0.203676, -0.0706466,
0.0202596, 0.0608406, 0.161738, 0.271455, 0.346172, 0.380215,
0.375651, 0.309784, 0.32767, 0.268618, 0.245644, 0.121681,
-0.00425545, -0.0132906, -0.0885319, -0.140831, -0.176509,
-0.119985, -0.132659, -0.228962, -0.263375, -0.224213,
-0.244103, -0.254248, -0.26282, -0.263345, -0.210922, -0.27756,
-0.249931, -0.231213, -0.185636, -0.0289247, 0.0147399,
0.124919, 0.22042, 0.312005, 0.372259, 0.390607, 0.348423,
0.305467, 0.266428, 0.214253, 0.181998, 0.00354621, 0.000400876,
-0.0324709, -0.117056, -0.144531, -0.12532, -0.0511271,
-0.104505, -0.174535, -0.178698, -0.180764, -0.229301,
-0.241759, -0.259675, -0.205063, -0.264115, -0.308798,
-0.269789, -0.282741, -0.115206, -0.0267662, 0.0269203,
0.137254, 0.242622, 0.325912, 0.35792, 0.340467, 0.249468,
0.247464, 0.179592, 0.171051, 0.0261186, -0.0337044, 0.040951,
-0.053594, -0.0960868, -0.107651, 0.0081717, 0.0301582,
-0.0572327, -0.0957785, -0.12239, -0.203522, -0.210151,
-0.260199, -0.248111, -0.217151, -0.354621, -0.323445, -0.36048,
-0.258102, -0.0742545, -0.052268, 0.0868359, 0.172962, 0.233587,
0.30408, 0.345432, 0.30115, 0.268988, 0.176848, 0.164482,
0.107496, -0.0508187, 0.0763514, 0.0775849, -0.0440963,
-0.0691048, 0.0238059, 0.120941, 0.0764439, -0.0150483,
-0.0468716, -0.122946, -0.230689, -0.198495, -0.260816,
-0.191341, -0.283481, -0.378673, -0.376977, -0.400012,
-0.153782, -0.0889327, -0.0380215, 0.053964, 0.150668, 0.198958,
0.234605, 0.249776, 0.187147, 0.182553, 0.0879768, 0.10688,
-0.0418761, 0.0117796, 0.156002, 0.016035, -0.0471183,
0.00114095, 0.181597, 0.184403, 0.105554, 0.0330877,
0.000678405, -0.164791, -0.18024, -0.198187, -0.210367,
-0.143298, -0.360449, -0.36455, -0.443615, -0.329242,
-0.0839064, -0.103118, -0.0175152, 0.056431, 0.127263, 0.153998,
0.203922, 0.193931, 0.154707, 0.0487218, 0.0484443, 0.0325326,
-0.0642326, 0.124796, 0.142588, -0.0135989, -0.00360788,
0.150606, 0.256036, 0.236918, 0.108668, 0.043788, -0.056986,
-0.206297, -0.162478, -0.232045, -0.159394, -0.271763,
-0.419008, -0.402818, -0.442289, -0.178051, -0.0954084,
-0.0770298, 0.00407043, 0.0789109, 0.121003, 0.167104, 0.240895,
0.159734, 0.121835, 0.0308366, 0.104043, -0.0373431, 0.0352462,
0.214715, 0.0560609, -0.0126738, 0.0543649, 0.249406, 0.233649,
0.181597, 0.049061, -0.0182861, -0.188412, -0.226279, -0.198372,
-0.273027, -0.180641, -0.375343, -0.417281, -0.487619,
-0.382744, -0.0913072, -0.100188, -0.0214623, 0.0361097,
0.0910605, 0.164328, 0.234204, 0.223504, 0.172808, 0.0729286,
0.105862, 0.0944833, -0.0110395, 0.142958, 0.185544, 0.0181936,
-0.00333035, 0.153011, 0.245552, 0.238274, 0.0869284,
0.00262111, -0.0980912, -0.267384, -0.180147, -0.260138,
-0.180918, -0.28012, -0.448611, -0.406334, -0.472756, -0.194949,
-0.0753338, -0.0498319, 0.0153566, 0.109254, 0.164791, 0.223411,
0.308088, 0.207777, 0.197971, 0.0764131, 0.154399, 0.0431712,
0.0495852, 0.206698, 0.0579111, -0.00903512, 0.0444355,
0.173209, 0.17728, 0.155139, -0.02359, -0.0641093, -0.234852,
-0.294304, -0.204971, -0.310864, -0.192205, -0.412902,
-0.453452, -0.462857, -0.403867, -0.113078, -0.0597613,
-0.0145857, 0.0896112, 0.212618, 0.245305, 0.385211, 0.321811,
0.260138, 0.158099, 0.183755, 0.207314, 0.0475809, 0.131734,
0.164513, 0.0473342, -0.0206914, 0.115606, 0.153844, 0.16957,
0.0607789, -0.100188, -0.147831, -0.352216, -0.234913,
-0.298776, -0.255574, -0.312036, -0.54001, -0.42684, -0.505998,
-0.283049, -0.0982762, -0.0461315, 0.022449, 0.161645, 0.227327,
0.317494, 0.418915, 0.260045, 0.264115, 0.138888, 0.26134,
0.152518, 0.0567393, 0.160659, 0.0724043, 0.0370964, 0.0382374,
0.121311, 0.129483, 0.160196, -0.0853865, -0.136359, -0.268217,
-0.350612, -0.237133, -0.361559, -0.218539, -0.464646,
-0.505967, -0.485707, -0.455241, -0.13565, -0.0786642,
-0.00391625, 0.0988005, 0.237596, 0.265441, 0.416664, 0.362083,
0.295445, 0.219248, 0.182769, 0.25542, 0.118012, 0.113417,
0.13821, 0.065682, -0.00777082, 0.0922323, 0.0994789, 0.16772,
0.0592063, -0.169725, -0.179623, -0.398871, -0.268248,
-0.313331, -0.313639, -0.319375, -0.571988, -0.426316,
-0.510438, -0.284128, -0.103333, -0.0429554, 0.0209072,
0.171051, 0.296926, 0.34133, 0.478615, 0.291807, 0.262666,
0.182707, 0.28049, 0.21268, 0.0659286, 0.166795, 0.119615,
0.0500478, 0.0302199, 0.13158, 0.137192, 0.17398, -0.0758889,
-0.17546, -0.270838, -0.378643, -0.216319, -0.414382, -0.287952,
-0.447624, -0.543217, -0.479694, -0.479232, -0.167104,
-0.097197, -0.00980604, 0.0887477, 0.2676, 0.299516, 0.433038,
0.390237, 0.307102, 0.253353, 0.204231, 0.316723, 0.128619,
0.108884, 0.151469, 0.134509, 0.0312991, 0.104783, 0.134818,
0.19057, 0.124857, -0.186037, -0.18502, -0.404206, -0.303925,
-0.314287, -0.39144, -0.344876, -0.588116, -0.472756, -0.505751,
-0.31922, -0.113386, -0.0494927, 0.0343828, 0.165408, 0.311696,
0.362238, 0.481606, 0.353449, 0.290111, 0.229979, 0.335317,
0.261957, 0.0975362, 0.175214, 0.166055, 0.145117, 0.0307749,
0.153135, 0.145148, 0.18061, -0.0115946, -0.226834, -0.266397,
-0.426254, -0.279503, -0.410805, -0.383299, -0.454161,
-0.566376, -0.533134, -0.5072, -0.193438, -0.120694, -0.035863,
0.0752105, 0.221715, 0.311018, 0.419439, 0.393012, 0.300842,
0.257886, 0.277067, 0.343705, 0.168429, 0.162663, 0.181473,
0.226125, 0.075488, 0.134324, 0.20235, 0.175892, 0.169139,
-0.141293, -0.172592, -0.367541, -0.344938, -0.308273,
-0.445681, -0.371242, -0.58127, -0.532363, -0.550711, -0.389775,
-0.173733, -0.138025, -0.0174227, 0.0767523, 0.22372, 0.293657,
0.378057, 0.309569, 0.244164, 0.249622, 0.331, 0.251565,
0.113664, 0.219495, 0.227112, 0.198125, 0.115452, 0.215455,
0.190786, 0.2079, 0.0718493, -0.172531, -0.205618, -0.38296,
-0.255173, -0.363687, -0.394708, -0.396559, -0.550402,
-0.551636, -0.521817, -0.262666, -0.173055, -0.0870517,
-0.0126738, 0.154861, 0.233186, 0.323568, 0.367233, 0.263807,
0.239354, 0.278701, 0.336026, 0.195658, 0.189799, 0.205218,
0.278701, 0.156095, 0.164205, 0.263036, 0.159086, 0.18576,
-0.0445897, -0.161337, -0.311974, -0.337568, -0.265318,
-0.405871, -0.341546, -0.502421, -0.525116, -0.550094,
-0.410034, -0.211015, -0.170835, -0.0655586, 0.0470566,
0.201887, 0.212711, 0.347498, 0.323044, 0.227882, 0.24216,
0.305066, 0.305159, 0.165747, 0.20087, 0.223349, 0.253477,
0.131117, 0.216935, 0.173456, 0.146042, 0.122637, -0.147676,
-0.197508, -0.359555, -0.286657, -0.326313, -0.388079,
-0.365722, -0.520398, -0.538993, -0.53853, -0.301674, -0.178143,
-0.124333, -0.0263036, 0.128034, 0.217336, 0.254279, 0.366986,
0.2886, 0.284344, 0.308643, 0.323291, 0.252706, 0.237997,
0.203614, 0.269697, 0.178236, 0.136945, 0.237534, 0.0647877,
0.163403, -0.00801752, -0.2009, -0.277961, -0.377039, -0.265041,
-0.393845, -0.355453, -0.448919, -0.508742, -0.541306,
-0.446915, -0.198372, -0.181782, -0.0657128, 0.0270745,
0.198896, 0.22412, 0.317339, 0.384131, 0.245336, 0.266367,
0.350489, 0.336551, 0.20568, 0.196491, 0.234204, 0.252336,
0.108576, 0.166949, 0.150513, 0.0781091, 0.094915, -0.158346,
-0.216411, -0.333405, -0.312406, -0.309353, -0.407968,
-0.340621, -0.457153, -0.496037, -0.510932, -0.313732,
-0.169755, -0.135866, 0.00144932, 0.117857, 0.219248, 0.24623,
0.360696, 0.317339, 0.288106, 0.310555, 0.349594, 0.27941,
0.188473, 0.194271, 0.262759, 0.174967, 0.0909063, 0.166672,
0.0391625, 0.100928, -0.0131056, -0.213605, -0.267754,
-0.374634, -0.283049, -0.368035, -0.379136, -0.415431,
-0.475192, -0.476765, -0.42021, -0.193962, -0.147245,
-0.0632459, 0.0672546, 0.18394, 0.255111, 0.309877, 0.402325,
0.306485, 0.26538, 0.351599, 0.348176, 0.21601, 0.172808,
0.204292, 0.24734, 0.104783, 0.0787258, 0.110272, 0.0255019,
0.0537482, -0.153412, -0.268155, -0.327145, -0.375096,
-0.333004, -0.410188, -0.377502, -0.42462, -0.472602, -0.485183,
-0.324894, -0.132104, -0.122452, 0.0186561, 0.126708, 0.22372,
0.290049, 0.350057, 0.350211, 0.312159, 0.337106, 0.392612,
0.297758, 0.21268, 0.177619, 0.238059, 0.188936, 0.0565235,
0.131857, 0.0284313, 0.0430479, -0.036233, -0.227266, -0.27941,
-0.381603, -0.327762, -0.36677, -0.394153, -0.386136, -0.4611,
-0.443831, -0.40618, -0.202196, -0.116223, -0.0622283, 0.093219,
0.156002, 0.266212, 0.318326, 0.372876, 0.338462, 0.291529,
0.37081, 0.373709, 0.24031, 0.178451, 0.220266, 0.239755,
0.122082, 0.0782016, 0.087761, 0.017176, 0.0111628, -0.171729,
-0.265688, -0.308551, -0.402942, -0.334855, -0.414906,
-0.383885, -0.408122, -0.47291, -0.449937, -0.348731, -0.1622,
-0.126245, -0.0162817, 0.0916155, 0.22301, 0.299824, 0.338092,
0.370964, 0.324278, 0.330599, 0.404422, 0.337877, 0.245552,
0.206914, 0.244164, 0.226587, 0.102933, 0.123932, 0.0707083,
0.0167134, -0.0411977, -0.21746, -0.280336, -0.37448, -0.342009,
-0.362762, -0.41284, -0.376977, -0.46773, -0.452003, -0.432082,
-0.266151, -0.162509, -0.125937, 0.00838755, 0.132258, 0.243362,
0.265349, 0.343951, 0.314194, 0.297141, 0.333529, 0.369392,
0.306547, 0.201671, 0.224583, 0.245459, 0.184619, 0.105184,
0.131487, 0.0638318, 0.0208764, -0.116686, -0.24253, -0.260045,
-0.3557, -0.309877, -0.366493, -0.348053, -0.374665, -0.470566,
-0.433254, -0.383114, -0.189953, -0.156342, -0.0958093,
0.033396, 0.164267, 0.240217, 0.257331, 0.293904, 0.28493,
0.321502, 0.337476, 0.310925, 0.258565, 0.21601, 0.219187,
0.222486, 0.112584, 0.150544, 0.105554, 0.0185945, 0.020198,
-0.189028, -0.239847, -0.298437, -0.315181, -0.296586,
-0.376638, -0.307811, -0.418607, -0.413303, -0.415061,
-0.273798, -0.151377, -0.16735, -0.0246076, 0.0590521, 0.219094,
0.225045, 0.270591, 0.287644, 0.237596, 0.310956, 0.350026,
0.290111, 0.186531, 0.217305, 0.251195, 0.181998, 0.115113,
0.150236, 0.0975362, 0.0461007, -0.0721268, -0.208055,
-0.211292, -0.299978, -0.269851, -0.346819, -0.332943, -0.31256,
-0.427488, -0.406581, -0.396343, -0.196737, -0.201147, -0.1338,
0.0131672, 0.102254, 0.203121, 0.200191, 0.251041, 0.247803,
0.279565, 0.286194, 0.312498, 0.210521, 0.169046, 0.230874,
0.221037, 0.131796, 0.14891, 0.133399, 0.0613957, 0.0530698,
-0.130716, -0.186808, -0.24842, -0.285177, -0.260662, -0.350735,
-0.296371, -0.388849, -0.397083, -0.396466, -0.294119,
-0.159179, -0.201455, -0.0508804, 0.0467174, 0.142989, 0.193623,
0.205618, 0.262728, 0.230041, 0.236578, 0.319899, 0.282802,
0.156372, 0.203306, 0.229578, 0.202196, 0.120941, 0.14743,
0.119153, 0.0472725, -0.0234667, -0.166826, -0.191495,
-0.287829, -0.270159, -0.301366, -0.322983, -0.294983, -0.39255,
-0.391841, -0.395233, -0.219957, -0.182954, -0.144315,
0.0164051, 0.0601314, 0.160412, 0.184372, 0.199975, 0.24253,
0.242221, 0.270159, 0.321749, 0.193315, 0.181998, 0.209442,
0.217491, 0.145765, 0.134633, 0.145271, 0.069259, 0.0597613,
-0.0991088, -0.158346, -0.235314, -0.290512, -0.241173,
-0.339172, -0.277098, -0.350427, -0.395942, -0.382744,
-0.331247, -0.159549, -0.187116, -0.0622591, 0.0518055,
0.0944525, 0.185945, 0.201918, 0.237658, 0.239662, 0.214314,
0.297974, 0.276327, 0.130254, 0.194425, 0.226495, 0.177125,
0.112338, 0.120386, 0.0995405, 0.0623208, -0.0205372, -0.162571,
-0.155386, -0.280181, -0.281261, -0.284498, -0.33137, -0.267292,
-0.371396, -0.384687, -0.377902, -0.22742, -0.150483, -0.111289,
0.0265811, 0.081532, 0.18061, 0.22594, 0.237041, 0.264671,
0.241913, 0.239693, 0.322828, 0.198865, 0.171143, 0.200407,
0.202812, 0.139104, 0.102162, 0.131888, 0.0518363, 0.0195812,
-0.0933732, -0.178544, -0.240926, -0.318511, -0.262111,
-0.342009, -0.288816, -0.31882, -0.379413, -0.372506, -0.335841,
-0.143699, -0.136575, -0.0377132, 0.0700299, 0.143267, 0.203984,
0.217645, 0.269543, 0.243702, 0.227266, 0.253569, 0.295661,
0.145888, 0.15702, 0.202442, 0.173117, 0.0983379, 0.0854482,
0.0946375, 0.0206605, -0.0261494, -0.173147, -0.183324,
-0.271393, -0.306947, -0.281631, -0.319683, -0.246323,
-0.344352, -0.359709, -0.372167, -0.245028, -0.0881618,
-0.0814395, 0.0373123, 0.101113, 0.198649, 0.226741, 0.247957,
0.256653, 0.256653, 0.239662, 0.276018, 0.218878, 0.161337,
0.186407, 0.182059, 0.125721, 0.062845, 0.125937, 0.0300657,
0.0072466, -0.0688581, -0.218786, -0.217491, -0.324524,
-0.270314, -0.311357, -0.301089, -0.281507, -0.364026, -0.33248,
-0.34281, -0.110734, -0.091153, -0.0334577, 0.063215, 0.134016,
0.240217, 0.211292, 0.277375, 0.231675, 0.201764, 0.255358,
0.284714, 0.14928, 0.128034, 0.208147, 0.17583, 0.0871442,
0.0701841, 0.108514, 0.0321626, -0.0166826, -0.165408,
-0.186407, -0.240217, -0.310031, -0.270869, -0.351753,
-0.251041, -0.306238, -0.34463, -0.358784, -0.265318, -0.082272,
-0.114527, 0.0174227, 0.0745937, 0.161954, 0.196953, 0.215147,
0.231521, 0.233649, 0.214376, 0.254433, 0.228283, 0.101082,
0.168214, 0.208394, 0.139505, 0.0792192, 0.127417, 0.0567702,
0.0368497, -0.0257486, -0.178143, -0.17213, -0.297758,
-0.262111, -0.288754, -0.310432, -0.252953, -0.350982,
-0.319652, -0.341577, -0.150174, -0.0813778, -0.0713559,
0.0590521, 0.118135, 0.201826, 0.20127, 0.248265, 0.240433,
0.203275, 0.235283, 0.295815, 0.160258, 0.121095, 0.222178,
0.208363, 0.145271, 0.0805144, 0.123254, 0.0498936, 0.0229733,
-0.102347, -0.164637, -0.196645, -0.310895, -0.264516,
-0.348947, -0.277159, -0.294304, -0.351815, -0.363872,
-0.315428, -0.115606, -0.126029, -0.0237442, 0.0710167,
0.125166, 0.193623, 0.208363, 0.207438, 0.229733, 0.224182,
0.285023, 0.24549, 0.128034, 0.197046, 0.224398, 0.199174,
0.103426, 0.15224, 0.103549, 0.0661445, 0.0205988, -0.132505,
-0.122298, -0.269173, -0.264054, -0.289494, -0.346573,
-0.237843, -0.355669, -0.344784, -0.371889, -0.229208,
-0.109038, -0.114897, 0.0263036, 0.0686423, 0.135804, 0.181751,
0.203522, 0.203367, 0.211693, 0.2396, 0.284468, 0.17583,
0.117395, 0.250486, 0.242592, 0.159487, 0.112739, 0.130963,
0.0755805, 0.066237, -0.0711709, -0.137655, -0.150637,
-0.318203, -0.258133, -0.338462, -0.285269, -0.257362,
-0.368497, -0.380678, -0.349039, -0.171575, -0.133954,
-0.0565543, 0.0243609, 0.0956243, 0.158808, 0.206389, 0.211015,
0.21672, 0.228345, 0.267847, 0.250732, 0.143143, 0.200191,
0.235684, 0.21672, 0.119307, 0.137593, 0.114065, 0.0538407,
0.0399334, -0.113047, -0.128003, -0.252891, -0.286811, -0.27056,
-0.351291, -0.233156, -0.334639, -0.359308, -0.383299,
-0.274631, -0.123408, -0.121928, -0.0115946, 0.0640784,
0.136359, 0.165346, 0.229116, 0.212156, 0.214407, 0.23553,
0.247001, 0.220482, 0.130932, 0.227266, 0.233957, 0.172839,
0.0995714, 0.12384, 0.0736995, 0.0585279, -0.0324093, -0.138055,
-0.121311, -0.289741, -0.247495, -0.292362, -0.261032,
-0.212063, -0.346634, -0.356533, -0.357242, -0.173518,
-0.0897653, -0.059453, 0.0282155, 0.106633, 0.16735, 0.206821,
0.22486, 0.213543, 0.258503, 0.233526, 0.215702, 0.156773,
0.172346, 0.197323, 0.184927, 0.0820562, 0.0885319, 0.0941441,
-0.00138765, 0.0462857, -0.121003, -0.152333, -0.207931,
-0.317833, -0.234512, -0.325388, -0.20716, -0.276481, -0.333559,
-0.337476, -0.265472, -0.0619507, -0.07851, 0.0193654,
0.0598538, 0.160782, 0.203984, 0.235283, 0.247649, 0.195319,
0.23297, 0.237534, 0.198557, 0.0983379, 0.160936, 0.198557,
0.121311, 0.0333344, 0.0695365, 0.0470258, 0.0228191,
-0.0427087, -0.1692, -0.126646, -0.279102, -0.256129, -0.266675,
-0.278177, -0.166333, -0.296771, -0.31256, -0.326128, -0.147522,
-0.0478276, -0.0349995, 0.0721885, 0.103888, 0.179901, 0.219156,
0.244565, 0.213328, 0.241235, 0.198403, 0.203614, 0.130038,
0.0830738, 0.153751, 0.147276, 0.0321009, 0.0226649, 0.0502945,
-0.0180702, 0.0329335, -0.106448, -0.143298, -0.180394,
-0.306855, -0.207746, -0.280551, -0.180548, -0.213328,
-0.293996, -0.274785, -0.235777, -0.0310216, -0.0322551,
0.0238367, 0.100867, 0.15076, 0.217491, 0.237041, 0.259336,
0.223041, 0.192945, 0.205372, 0.193407, 0.0639243, 0.10025,
0.144809, 0.0867742, -0.015665, 0.00191187, 0.0165593,
-0.0187487, -0.0373123, -0.161121, -0.134818, -0.262574,
-0.27349, -0.231429, -0.248728, -0.148694, -0.249653, -0.28712,
-0.300163, -0.14154, -0.00400876, -0.019057, 0.0798976,
0.125536, 0.186561, 0.248851, 0.238429, 0.224737, 0.234759,
0.20161, 0.222486, 0.115915, 0.0828271, 0.129267, 0.131271,
0.0307441, -0.0175769, 0.0471183, -0.0216165, 0.0230349,
-0.0948534, -0.135249, -0.16402, -0.309784, -0.211632,
-0.268926, -0.185729, -0.174504, -0.288816, -0.26686, -0.258133,
-0.0485676, -0.0161275, 0.00595146, 0.112276, 0.136668, 0.20716,
0.244873, 0.233032, 0.228129, 0.207006, 0.208918, 0.206359,
0.0661753, 0.0879768, 0.167042, 0.0966419, -0.014339,
-0.00255944, 0., -0.014524, -0.0285547, -0.160104, -0.122606,
-0.246107, -0.30337, -0.219002, -0.259182, -0.146011, -0.227975,
-0.300009, -0.305683, -0.189707, -0.0321009, -0.0247618,
0.0524222, 0.123562, 0.189244, 0.253353, 0.27093, 0.258873,
0.265811, 0.21857, 0.263684, 0.168738, 0.105184, 0.148077,
0.144994, 0.0652194, -0.0193654, 0.0339511, -0.0222332,
-0.0229116, -0.0814395, -0.149712, -0.18465, -0.315058,
-0.244565, -0.273767, -0.215764, -0.178606, -0.305159, -0.28897,
-0.302846, -0.112769, -0.0391933, -0.0403343, 0.0827654,
0.167258, 0.221777, 0.244226, 0.282802, 0.271609, 0.261649,
0.238922, 0.251349, 0.152672, 0.11536, 0.175275, 0.133183,
0.0301274, 0.00271362, 0.0231274, -0.0353079, -0.0439422,
-0.142311, -0.156187, -0.233834, -0.327855, -0.251349,
-0.275032, -0.181628, -0.247032, -0.337722, -0.326282,
-0.267322, -0.064541, -0.0543958, 0.00129514, 0.122791,
0.196244, 0.250732, 0.273613, 0.288754, 0.311172, 0.298221,
0.278917, 0.229887, 0.174196, 0.172839, 0.172068, 0.106355,
-0.00329952, 0.0508187, -0.0166518, -0.044343, -0.0478276,
-0.177526, -0.18872, -0.314657, -0.306084, -0.27238, -0.276327,
-0.211077, -0.339233, -0.324679, -0.363872, -0.184187,
-0.0581578, -0.0738228, 0.0622283, 0.131271, 0.235684, 0.245922,
0.299608, 0.318665, 0.275463, 0.300996, 0.30152, 0.206914,
0.140276, 0.191927, 0.176848, 0.0631534, 0.00425545, 0.029819,
-0.0202288, -0.0391625, -0.1305, -0.178698, -0.222085, -0.33137,
-0.270684, -0.301089, -0.229363, -0.242067, -0.346665, -0.35092,
-0.32659, -0.108267, -0.105214, -0.0231274, 0.115267, 0.164112,
0.235653, 0.265133, 0.306762, 0.31108, 0.299855, 0.285331,
0.272164, 0.160967, 0.145456, 0.186531, 0.118598, 0.00262111,
0.0336119, 0.00514971, -0.0405501, -0.0428937, -0.157483,
-0.174597, -0.28712, -0.316569, -0.259058, -0.281014, -0.216473,
-0.325696, -0.327392, -0.349255, -0.21083, -0.0621049,
-0.0828271, 0.0565235, 0.140646, 0.218847, 0.253785, 0.29304,
0.349255, 0.293965, 0.277221, 0.318357, 0.230257, 0.131641,
0.184002, 0.16698, 0.0981837, 0.00431712, 0.0265811,
-0.00561226, -0.0518363, -0.0951617, -0.183385, -0.209751,
-0.331709, -0.291498, -0.284098, -0.251935, -0.244164,
-0.334392, -0.341269, -0.338863, -0.119245, -0.0704, -0.0285547,
0.122545, 0.142835, 0.233125, 0.275247, 0.286441, 0.312868,
0.289987, 0.31219, 0.289741, 0.161707, 0.165901, 0.179006,
0.141047, 0.0182861, 0.0171143, 0.0222949, -0.0353079,
-0.0296956, -0.132659, -0.162108, -0.265842, -0.310124,
-0.23405, -0.270005, -0.17654, -0.270838, -0.309815, -0.328595,
-0.245768, -0.0502945, -0.072281, 0.0461007, 0.128959, 0.164575,
0.249468, 0.28049, 0.302908, 0.280181, 0.274076, 0.303617,
0.229363, 0.105554, 0.164328, 0.170496, 0.0732369, -0.0104228,
-0.00638318, -0.0271362, -0.0444047, -0.0798359, -0.17654,
-0.175368, -0.305992, -0.261433, -0.224645, -0.225816, -0.1618,
-0.289802, -0.31922, -0.31845, -0.144377, -0.0534398,
-0.0231274, 0.0867742, 0.125998, 0.216535, 0.279256, 0.303,
0.304542, 0.278393, 0.286719, 0.28049, 0.152857, 0.13821,
0.154831, 0.131241, 0.0185945, -0.0267045, 0.00231274,
-0.0693515, -0.0577569, -0.104505, -0.180394, -0.254587,
-0.304912, -0.213173, -0.244565, -0.159117, -0.22264, -0.296617,
-0.320577, -0.27241, -0.0733603, -0.0610873, 0.0148941,
0.0993864, 0.165808, 0.21638, 0.274076, 0.311326, 0.273089,
0.281384, 0.2676, 0.245089, 0.116377, 0.132258, 0.153011,
0.0872367, -0.0102378, -0.0247001, -0.0217398, -0.0671004,
-0.0462857, -0.156496, -0.177125, -0.267292, -0.249499,
-0.17728, -0.18872, -0.110457, -0.248851, -0.301551, -0.318665,
-0.179685, -0.0228191, -0.0294798, 0.0619816, 0.120232,
0.197817, 0.248543, 0.298776, 0.289062, 0.298899, 0.289741,
0.243362, 0.169879, 0.131395, 0.139351, 0.111814, 0.00262111,
-0.0578495, -0.00333035, -0.0969503, -0.050572, -0.070955,
-0.201116, -0.206698, -0.286133, -0.179469, -0.185575,
-0.144932, -0.161337, -0.278177, -0.290049, -0.292208,
-0.0519905, -0.0370039, 0.0124888, 0.0846156, 0.153165,
0.244103, 0.269666, 0.340621, 0.272688, 0.273151, 0.276635,
0.239045, 0.113201, 0.099263, 0.151469, 0.0728669, -0.0496469,
-0.0574794, -0.0309291, -0.0779858, -0.0440963, -0.16513,
-0.196337, -0.24031, -0.247772, -0.166271, -0.210521, -0.119677,
-0.224429, -0.302754, -0.328749, -0.207993, -0.0408585,
-0.0645718, 0.0588362, 0.103118, 0.179469, 0.224737, 0.299824,
0.297974, 0.290666, 0.27793, 0.237133, 0.189861, 0.0916772,
0.125382, 0.129853, 0.00194271, -0.0696599, -0.0129514,
-0.0792809, -0.0433254, -0.0470258, -0.183879, -0.187086,
-0.275957, -0.189429, -0.170588, -0.164359, -0.148602,
-0.284714, -0.290882, -0.285269, -0.0821487, -0.0356471,
-0.0189028, 0.0852015, 0.149527, 0.220019, 0.261957, 0.344414,
0.308705, 0.267137, 0.265503, 0.266212, 0.138271, 0.101853,
0.151624, 0.0965494, -0.0223565, -0.0718184, -0.0141848,
-0.0633075, -0.0273212, -0.134047, -0.20198, -0.225446,
-0.280027, -0.183786, -0.214561, -0.157945, -0.22483, -0.316754,
-0.343273, -0.242931, -0.0543958, -0.0676555, 0.0356471,
0.108021, 0.157082, 0.241913, 0.296926, 0.29745, 0.295353,
0.286811, 0.30263, 0.22964, 0.131888, 0.160196, 0.155941,
0.0561226, -0.0482593, 0.0194887, -0.0346295, -0.026612,
-0.031145, -0.162941, -0.175368, -0.275648, -0.214068,
-0.192174, -0.210244, -0.166333, -0.311357, -0.319375,
-0.328934, -0.152919, -0.0502945, -0.0499861, 0.0606247,
0.10873, 0.175738, 0.256283, 0.305375, 0.28934, 0.274137,
0.278177, 0.285578, 0.165654, 0.110056, 0.184002, 0.139196,
0.0131981, -0.0231274, 0.00857257, -0.0411052, -0.000709242,
-0.111228, -0.17654, -0.189953, -0.29304, -0.191434, -0.230658,
-0.183724, -0.214839, -0.338031, -0.346202, -0.285516,
-0.104659, -0.071325, -0.00693823, 0.0674088, 0.14006, 0.221962,
0.30115, 0.309384, 0.294767, 0.280089, 0.306608, 0.260723,
0.154399, 0.168029, 0.175676, 0.0995405, -0.0208147, 0.0234975,
-0.0016035, -0.0385766, -0.0253785, -0.143236, -0.181628,
-0.27093, -0.249098, -0.195103, -0.233433, -0.179469, -0.30741,
-0.339233, -0.352524, -0.216473, -0.083598, -0.0753646,
0.00533473, 0.0964569, 0.173363, 0.224552, 0.314194, 0.282926,
0.276234, 0.284622, 0.282617, 0.231984, 0.135959, 0.186777,
0.156619, 0.0582812, 0.00385457, 0.0463474, -0.0167443,
-0.0131364, -0.0643868, -0.17768, -0.174967, -0.275032,
-0.198218, -0.200746, -0.181319, -0.188165, -0.332449,
-0.342471, -0.308798, -0.128774, -0.0563693, -0.0465633,
0.0454223, 0.134417, 0.198588, 0.267045, 0.292763, 0.274692,
0.30371, 0.281785, 0.243362, 0.185451, 0.173918, 0.170341,
0.110981, -0.0141848, 0.0419378, 0.0292023, -0.0638009,
0.00308366, -0.131117, -0.185482, -0.220081, -0.265472,
-0.169725, -0.218878, -0.168059, -0.273459, -0.323815,
-0.334485, -0.235468, -0.0546733, -0.0827346, -0.00333035,
0.0694132, 0.173579, 0.229794, 0.288816, 0.300533, 0.250578,
0.284098, 0.28604, 0.23627, 0.134108, 0.163804, 0.168337,
0.0521138, -0.0150483, 0.0427087, -0.00499553, -0.0216165,
-0.0529773, -0.170804, -0.162941, -0.245922, -0.199605,
-0.192575, -0.193407, -0.161491, -0.304141, -0.330383,
-0.324278, -0.144901, -0.0763514, -0.0666379, 0.0516821,
0.105862, 0.18761, 0.242622, 0.289957, 0.26538, 0.288415,
0.264917, 0.252583, 0.177742, 0.122791, 0.163588, 0.117457,
-0.0101144, 0.0207222, 0.0281538, -0.0438805, 0.0161275,
-0.0811928, -0.154183, -0.183077, -0.236239, -0.152456,
-0.19242, -0.148848, -0.224799, -0.301859, -0.300287, -0.232076,
-0.0574794, -0.0730211, -0.0139073, 0.0797434, 0.147615,
0.217922, 0.268988, 0.303401, 0.263961, 0.244997, 0.261741,
0.233649, 0.113109, 0.139597, 0.152055, 0.0739462, -0.00838755,
0.0191187, 0.0115637, -0.0132906, -0.00678405, -0.138981,
-0.146751, -0.214222, -0.205526, -0.168275, -0.182491, -0.15332,
-0.266706, -0.306701, -0.315798, -0.154337, -0.0506029,
-0.0689506, 0.0541491, 0.100651, 0.1688, 0.249499, 0.267076,
0.263807, 0.259274, 0.258133, 0.271146, 0.166579, 0.135866,
0.152703, 0.12239, 0.0127355, 0.00807919, 0.0589287, -0.0111012,
0.032841, -0.0534398, -0.127787, -0.163341, -0.236671, -0.15554,
-0.192328, -0.151007, -0.205433, -0.309815, -0.30078, -0.27056,
-0.0779858, -0.0663295, -0.0251627, 0.082272, 0.102007,
0.197663, 0.266891, 0.2709, 0.256129, 0.249036, 0.263375,
0.235992, 0.110333, 0.134324, 0.173764, 0.0853865, 0.000370039,
0.0290481, 0.0181319, -0.00209689, 0.00545808, -0.121866,
-0.124549, -0.205125, -0.231151, -0.163033, -0.210984,
-0.154337, -0.264917, -0.336489, -0.333251, -0.21672,
-0.0809769, -0.0759814, 0.0150174, 0.077369, 0.153474, 0.244843,
0.280459, 0.266428, 0.25727, 0.246847, 0.281322, 0.190724,
0.150298, 0.171051, 0.159333, 0.0730211, 0.0181319, 0.0690123,
0.00900429, 0.00838755, -0.0376206, -0.130624, -0.173117,
-0.253261, -0.196059, -0.216689, -0.192112, -0.219649,
-0.332634, -0.322921, -0.320978, -0.142619, -0.0876684,
-0.0621666, 0.0407043, 0.10173, 0.176046, 0.245336, 0.283481,
0.246693, 0.267076, 0.256345, 0.262913, 0.179592, 0.152549,
0.188381, 0.125998, 0.0509112, 0.0495236, 0.0579728,
-0.00718493, 0.00601314, -0.101792, -0.149619, -0.195751,
-0.26353, -0.193561, -0.223812, -0.175306, -0.269604, -0.353141,
-0.346665, -0.272935, -0.0920164, -0.084924, -0.0178236,
0.0717259, 0.146906, 0.224336, 0.271979, 0.264455, 0.282309,
0.294829, 0.2639, 0.216627, 0.190539, 0.187702, 0.168214,
0.092849, 0.0219557, 0.092479, 0.00431712, -0.0105461,
0.0000925098, -0.157544, -0.1655, -0.250393, -0.236609,
-0.207222, -0.225138, -0.198588, -0.330938, -0.317339,
-0.349594, -0.168337, -0.0812853, -0.0831971, 0.0361097,
0.0958401, 0.216689, 0.251318, 0.304758, 0.280027, 0.268926,
0.294058, 0.283728, 0.204508, 0.14561, 0.195011, 0.154553,
0.0522989, 0.0398717, 0.0741312, 0.00453298, 0.00962102,
-0.0827654, -0.159795, -0.17768, -0.256129, -0.201918,
-0.246878, -0.199821, -0.244103, -0.34318, -0.349564, -0.305251,
-0.105985, -0.115915, -0.0275371, 0.0729286, 0.134478, 0.212464,
0.263838, 0.278917, 0.283327, 0.296309, 0.261741, 0.250794,
0.162571, 0.159024, 0.190323, 0.108637, 0.0239909, 0.0800518,
0.0241142, -0.000400876, 0.0234975, -0.118844, -0.140276,
-0.222733, -0.241451, -0.196522, -0.229054, -0.191187,
-0.308397, -0.312591, -0.330599, -0.19094, -0.0744395,
-0.0866817, 0.0351846, 0.103241, 0.186161, 0.236424, 0.289957,
0.305097, 0.272626, 0.264516, 0.28456, 0.209781, 0.121373,
0.175429, 0.155139, 0.0764131, 0.0200438, 0.0629375, 0.0135681,
0.0125505, -0.0407968, -0.15187, -0.159703, -0.259336,
-0.214098, -0.229363, -0.209627, -0.229208, -0.321533,
-0.343951, -0.323908, -0.121373, -0.0969503, -0.0440347,
0.0797434, 0.119924, 0.211015, 0.265349, 0.265071, 0.281014,
0.270468, 0.279719, 0.267353, 0.154676, 0.161707, 0.176354,
0.133183, 0.0329335, 0.0829813, 0.0636776, 0.0184094, 0.0459465,
-0.0856949, -0.10691, -0.196583, -0.229301, -0.181011,
-0.238059, -0.177526, -0.292763, -0.321903, -0.337075,
-0.240525, -0.081902, -0.102748, 0.0125813, 0.0887786, 0.129575,
0.224429, 0.258256, 0.253662, 0.245182, 0.244781, 0.27167,
0.203737, 0.0989546, 0.169293, 0.17398, 0.0789109, 0.0363255,
0.0747171, 0.0229116, 0.0401801, -0.00447131, -0.111906,
-0.101206, -0.234235, -0.193654, -0.197663, -0.209473,
-0.183848, -0.310956, -0.335471, -0.332542, -0.166518,
-0.0944833, -0.0597922, 0.0436338, 0.101884, 0.181843, 0.248851,
0.263684, 0.259737, 0.249869, 0.258041, 0.266582, 0.159271,
0.143575, 0.163897, 0.152055, 0.0518055, 0.0675321, 0.0830738,
0.00965185, 0.0357088, -0.051898, -0.108576, -0.1725, -0.22079,
-0.171667, -0.227574, -0.173918, -0.27093, -0.322273, -0.336242,
-0.279349, -0.108915, -0.104197, -0.0234667, 0.071325, 0.139566,
0.19279, 0.254895, 0.257979, 0.231645, 0.247094, 0.236733,
0.235499, 0.123377, 0.146227, 0.167289, 0.102038, 0.04718,
0.0811311, 0.0469025, 0.0177927, 0.0170218, -0.106201, -0.10799,
-0.210922, -0.208455, -0.184002, -0.205834, -0.168337,
-0.303216, -0.335225, -0.341731, -0.211755, -0.0837522,
-0.0843689, 0.0211231, 0.105184, 0.175306, 0.230288, 0.253878,
0.237812, 0.267662, 0.252737, 0.227944, 0.177064, 0.148509,
0.149218, 0.141355, 0.0458849, 0.0448056, 0.0889019, -0.0222332,
0.0380832, -0.0271362, -0.135496, -0.141602, -0.240988,
-0.176663, -0.214068, -0.186099, -0.230504, -0.319375,
-0.316445, -0.303617, -0.0881618, -0.0878226, -0.0255327,
0.0681489, 0.142681, 0.232292, 0.253878, 0.283635, 0.23812,
0.254803, 0.261032, 0.241389, 0.133245, 0.124302, 0.170896,
0.0978445, 0.020568, 0.0544266, 0.0484135, 0.0111628, 0.0221098,
-0.101792, -0.112893, -0.179592, -0.206975, -0.180086, -0.2322,
-0.161707, -0.273767, -0.324, -0.340929, -0.223442, -0.0818403,
-0.100096, 0.0459465, 0.111043, 0.183385, 0.233032, 0.268309,
0.25471, 0.277684, 0.251472, 0.234882, 0.193345, 0.0988005,
0.1301, 0.134972, 0.0362638, 0.0247618, 0.0696907, -0.014339,
0.0284622, -0.0191187, -0.133646, -0.136822, -0.239909,
-0.18579, -0.207068, -0.198033, -0.210306, -0.31737, -0.297203,
-0.289987, -0.103056, -0.0707392, -0.0323168, 0.0975362,
0.151469, 0.225724, 0.264362, 0.306547, 0.285547, 0.254279,
0.250177, 0.261032, 0.137285, 0.103488, 0.150051, 0.100342,
0.0298498, 0.0189028, 0.0398717, -0.0127972, 0.0103919,
-0.0951001, -0.146751, -0.198341, -0.262142, -0.210306,
-0.254279, -0.199883, -0.2713, -0.326313, -0.343489, -0.250085,
-0.0730211, -0.0810694, 0.0509729, 0.132628, 0.177835, 0.265996,
0.283172, 0.277992, 0.298375, 0.266922, 0.285269, 0.218231,
0.126923, 0.145919, 0.142033, 0.070955, 0.0197971, 0.0766598,
0.0065682, 0.0253785, -0.00940516, -0.120602, -0.135804,
-0.249314, -0.210213, -0.232847, -0.234235, -0.211601,
-0.337938, -0.312714, -0.330322, -0.158654, -0.0716643,
-0.0499553, 0.0963335, 0.126461, 0.199112, 0.281076, 0.292454,
0.283419, 0.274908, 0.267662, 0.273212, 0.149989, 0.100096,
0.172654, 0.121558, 0.0365414, 0.0395634, 0.0444972,
-0.00514971, 0.0255019, -0.0804527, -0.124487, -0.165716,
-0.268001, -0.198434, -0.252028, -0.198804, -0.244072,
-0.331833, -0.333775, -0.282864, -0.109069, -0.0751179,
0.0236825, 0.112492, 0.171359, 0.259027, 0.312159, 0.301767,
0.302137, 0.265904, 0.293749, 0.250948, 0.145456, 0.158007,
0.159086, 0.107651, 0.0319467, 0.0749638, 0.0285855, 0.00672238,
0.0037929, -0.102748, -0.142311, -0.244688, -0.227913,
-0.222887, -0.245644, -0.206759, -0.325234, -0.316569,
-0.344661, -0.208455, -0.0866817, -0.0648494, 0.0521138,
0.130778, 0.199328, 0.255944, 0.312251, 0.282001, 0.28712,
0.267816, 0.277314, 0.219156, 0.118474, 0.170742, 0.138672,
0.0767215, 0.0477967, 0.0738845, 0.0146474, 0.0310525,
-0.0290789, -0.121835, -0.138734, -0.253045, -0.201733,
-0.229671, -0.194486, -0.217645, -0.337229, -0.338185,
-0.325511, -0.140461, -0.0731136, -0.0271362, 0.0876684,
0.155447, 0.225045, 0.277776, 0.277622, 0.282648, 0.29267,
0.259798, 0.234605, 0.1618, 0.147676, 0.146042, 0.112122,
0.0319467, 0.0824571, 0.0433254, -0.0189028, 0.0510346,
-0.0935274, -0.133122, -0.190323, -0.250023, -0.196337,
-0.24586, -0.186623, -0.303, -0.318419, -0.352925, -0.250085,
-0.0801443, -0.0958093, 0.0234975, 0.0895495, 0.190323,
0.242684, 0.282186, 0.285239, 0.254402, 0.270776, 0.272626,
0.210676, 0.0982454, 0.138981, 0.148232, 0.0734219, 0.0255944,
0.0663912, 0.0234358, 0.0316383, -0.00576644, -0.117395,
-0.116439, -0.222949, -0.200438, -0.229208, -0.218015,
-0.193284, -0.321348, -0.336705, -0.352123, -0.169725,
-0.104752, -0.0616424, 0.0734219, 0.12017, 0.197478, 0.244873,
0.267908, 0.257054, 0.276943, 0.232446, 0.243085, 0.145765,
0.0921706, 0.151223, 0.12495, 0.0359555, 0.0609948, 0.0523605,
0.00684572, 0.076043, -0.0436338, -0.101483, -0.156619,
-0.235314, -0.177927, -0.226433, -0.168892, -0.262666,
-0.312406, -0.330692, -0.268371, -0.0868359, -0.0890561,
0.0113479, 0.105276, 0.1655, 0.21672, 0.256807, 0.285393,
0.256869, 0.233741, 0.244997, 0.215486, 0.0794967, 0.117857,
0.140646, 0.105338, 0.0383299, 0.0534398, 0.0509112, 0.0348762,
0.0382682, -0.0872059, -0.0992013, -0.203306, -0.211539,
-0.211847, -0.21601, -0.184958, -0.291807, -0.322921, -0.350766,
-0.177742, -0.0783558, -0.0629375, 0.0837522, 0.117672, 0.18061,
0.248235, 0.252706, 0.257732, 0.261957, 0.239508, 0.256129,
0.13713, 0.100867, 0.142989, 0.139721, 0.0588979, 0.0491844,
0.0782633, 0.0271362, 0.0848932, -0.0129514, -0.0747479,
-0.138734, -0.2359, -0.178451, -0.234235, -0.169817, -0.239385,
-0.31626, -0.322212, -0.299454, -0.102254, -0.0852015,
-0.000215856, 0.104783, 0.124179, 0.20198, 0.25064, 0.251935,
0.241389, 0.227019, 0.238922, 0.216411, 0.0642326, 0.109131,
0.160474, 0.099633, 0.0371889, 0.050202, 0.0465016, 0.0431712,
0.0472725, -0.0863733, -0.0858491, -0.199574, -0.226741,
-0.187702, -0.226217, -0.16217, -0.271331, -0.31882, -0.33615,
-0.208363, -0.0722501, -0.0515896, 0.0630608, 0.113972,
0.173363, 0.252891, 0.280459, 0.271146, 0.25619, 0.22964,
0.267384, 0.155386, 0.105955, 0.14561, 0.154861, 0.0791884,
0.0310525, 0.0734836, 0.0179469, 0.0391008, -0.00872676,
-0.0957785, -0.157174, -0.250393, -0.194795, -0.234358,
-0.190416, -0.224675, -0.305837, -0.308551, -0.313022,
-0.120386, -0.0664837, -0.00955935, 0.0984613, 0.157174,
0.21083, 0.269358, 0.294058, 0.260908, 0.2643, 0.235129,
0.251657, 0.128712, 0.121003, 0.170064, 0.126307, 0.0619816,
0.0531315, 0.0655586, 0.0161275, 0.0417219, -0.0772765,
-0.114928, -0.188473, -0.24364, -0.193962, -0.223874, -0.16217,
-0.257732, -0.319652, -0.330013, -0.239323, -0.05492, -0.040581,
0.044343, 0.131426, 0.192482, 0.252644, 0.287366, 0.269234,
0.285855, 0.267538, 0.244781, 0.191403, 0.1408, 0.146906,
0.146135, 0.0767215, 0.017176, 0.0862191, -0.000308366,
0.0147399, 0.0116562, -0.14154, -0.150452, -0.247186, -0.222239,
-0.215548, -0.211447, -0.199112, -0.305221, -0.29893, -0.326467,
-0.115668, -0.0411669, -0.0107928, 0.0922323, 0.149773,
0.246323, 0.270745, 0.311635, 0.269358, 0.257486, 0.261494,
0.259737, 0.154615, 0.10432, 0.165346, 0.119862, 0.0247618,
0.0185636, 0.0542107, -0.0016035, 0.0212773, -0.0923248,
-0.15039, -0.185235, -0.25434, -0.20127, -0.251349, -0.178451,
-0.237935, -0.316569, -0.332943, -0.261433, -0.0577569,
-0.0647877, 0.0391008, 0.12162, 0.183324, 0.247001, 0.292886,
0.288446, 0.285979, 0.265287, 0.233125, 0.216843, 0.107805,
0.118474, 0.157637, 0.0794351, 0.00730827, 0.0664529,
0.00918931, 0.0114712, 0.0173302, -0.125844, -0.139813,
-0.238367, -0.232693, -0.206975, -0.221499, -0.183416,
-0.294613, -0.290142, -0.308119, -0.141047, -0.0326868,
-0.0246076, 0.0929107, 0.156064, 0.225416, 0.265071, 0.308088,
0.293965, 0.255512, 0.236979, 0.264578, 0.170526, 0.0961793,
0.157914, 0.131549, 0.0630608, 0.010577, 0.05492, 0.00792501,
0.0281538, -0.0532856, -0.155016, -0.171266, -0.273089,
-0.217768, -0.246939, -0.196491, -0.228653, -0.315582,
-0.335934, -0.29415, -0.0779858, -0.0584662, 0.0172685,
0.128496, 0.154676, 0.236918, 0.288137, 0.27423, 0.283697,
0.259953, 0.267816, 0.239847, 0.128496, 0.14413, 0.16698,
0.124765, 0.0306207, 0.0798051, 0.0459774, 0.033026, 0.0373123,
-0.0985846, -0.121558, -0.232909, -0.242622, -0.21638,
-0.246539, -0.177125, -0.305375, -0.308736, -0.327916,
-0.205588, -0.0491227, -0.0529773, 0.0700299, 0.130315,
0.171205, 0.260199, 0.287983, 0.263345, 0.251041, 0.247495,
0.270622, 0.182707, 0.0939283, 0.182244, 0.171205, 0.0858182,
0.047365, 0.0755188, 0.0333344, 0.0598538, -0.021894, -0.122298,
-0.131734, -0.269481, -0.209936, -0.24179, -0.210984, -0.203121,
-0.327053, -0.336335, -0.317679, -0.13195, -0.065867,
-0.0138148, 0.0810694, 0.131641, 0.205526, 0.282001, 0.275926,
0.268217, 0.255882, 0.266829, 0.267292, 0.156619, 0.164359,
0.197724, 0.176077, 0.0759814, 0.0965494, 0.0849857, 0.0354929,
0.0452065, -0.0631534, -0.12162, -0.221715, -0.247464,
-0.209165, -0.255358, -0.182954, -0.299917, -0.327454,
-0.346573, -0.262265, -0.0897653, -0.0816553, 0.00872676,
0.0923864, 0.148972, 0.207623, 0.279719, 0.260199, 0.249869,
0.256252, 0.253323, 0.240988, 0.134972, 0.190539, 0.205279,
0.14891, 0.0901354, 0.111721, 0.0696907, 0.056431, 0.0243609,
-0.106756, -0.116593, -0.244843, -0.221037, -0.220636,
-0.211447, -0.183169, -0.323137, -0.331555, -0.337537,
-0.175614, -0.057942, -0.0506645, 0.0557526, 0.125258, 0.18761,
0.253816, 0.26612, 0.250424, 0.291282, 0.26575, 0.243362,
0.190478, 0.178081, 0.191002, 0.18098, 0.0839064, 0.0938666,
0.109562, 0.00934349, 0.0698757, -0.0454223, -0.144531,
-0.177927, -0.268248, -0.205588, -0.255019, -0.189953,
-0.264609, -0.327145, -0.333251, -0.295538, -0.0731136,
-0.0777391, -0.000308366, 0.0830738, 0.157791, 0.228407,
0.267816, 0.286873, 0.244164, 0.272626, 0.282463, 0.254279,
0.150668, 0.175923, 0.220327, 0.146443, 0.0626908, 0.0916155,
0.067563, 0.0368806, 0.0234358, -0.115298, -0.12495, -0.22264,
-0.225755, -0.222733, -0.242869, -0.162478, -0.292053, -0.32252,
-0.342502, -0.190046, -0.0624749, -0.0739462, 0.0673163,
0.119245, 0.181782, 0.235037, 0.277005, 0.260045, 0.292578,
0.255728, 0.251966, 0.199482, 0.126307, 0.182306, 0.188257,
0.0795893, 0.0661445, 0.094915, 0.0124271, 0.0651577,
-0.0276913, -0.131888, -0.157236, -0.265534, -0.206544,
-0.241296, -0.1902, -0.225878, -0.317833, -0.307811, -0.287027,
-0.0831355, -0.0567085, -0.00585895, 0.109871, 0.157082,
0.218477, 0.267076, 0.300595, 0.27238, 0.253878, 0.255049,
0.254741, 0.134818, 0.141108, 0.188257, 0.145425, 0.0601314,
0.0522064, 0.0637084, 0.0120263, 0.0233433, -0.112276,
-0.145765, -0.226834, -0.268679, -0.234759, -0.260138,
-0.185636, -0.281785, -0.318758, -0.334485, -0.204848,
-0.0434179, -0.0571402, 0.0695365, 0.131549, 0.174535, 0.257177,
0.281631, 0.266829, 0.283635, 0.255666, 0.277992, 0.201733,
0.135249, 0.171575, 0.18283, 0.0972278, 0.0415677, 0.0933732,
0.0184403, 0.0523605, -0.0205988, -0.122606, -0.156187,
-0.275093, -0.226988, -0.263375, -0.216103, -0.21638, -0.33578,
-0.305992, -0.305714, -0.112677, -0.0479817, -0.0166826,
0.111505, 0.133862, 0.195011, 0.264763, 0.278855, 0.258719,
0.254186, 0.258256, 0.259675, 0.134478, 0.12239, 0.2042,
0.152394, 0.0575103, 0.0555984, 0.0567393, 0.0156342, 0.0366956,
-0.0999414, -0.128465, -0.202751, -0.286441, -0.215301,
-0.262358, -0.181874, -0.255019, -0.330692, -0.321132,
-0.234512, -0.067933, -0.0456382, 0.0415061, 0.116778, 0.167566,
0.241759, 0.303864, 0.285578, 0.274785, 0.248111, 0.282556,
0.223812, 0.151469, 0.178143, 0.197878, 0.13713, 0.0493386,
0.0937124, 0.0322551, 0.0226032, -0.00878843, -0.124796,
-0.172993, -0.283172, -0.251411, -0.257208, -0.234204,
-0.208918, -0.332018, -0.31256, -0.319436, -0.157853,
-0.0543958, -0.0322551, 0.0718493, 0.134263, 0.183694, 0.248019,
0.305097, 0.261525, 0.267384, 0.250239, 0.263745, 0.202504,
0.142342, 0.203275, 0.18539, 0.104259, 0.0677172, 0.0799901,
0.0122421, 0.0321009, -0.0696599, -0.154769, -0.194579,
-0.293842, -0.231521, -0.25727, -0.197601, -0.245028, -0.34426,
-0.32215, -0.28086, -0.0931574, -0.039255, 0.000986771,
0.0943908, 0.155293, 0.219002, 0.28049, 0.268587, 0.272287,
0.286441, 0.259891, 0.226587, 0.195504, 0.186253, 0.191403,
0.154831, 0.0464399, 0.107281, 0.0432637, 0.00601314, 0.0448981,
-0.133122, -0.171359, -0.246076, -0.27056, -0.225107, -0.247186,
-0.186191, -0.312036, -0.3063, -0.327546, -0.190169, -0.0418761,
-0.0505103, 0.0495852, 0.102038, 0.197354, 0.248882, 0.299053,
0.281723, 0.248481, 0.285979, 0.28308, 0.22594, 0.157606,
0.19942, 0.210244, 0.104351, 0.0550742, 0.0889944, 0.0254402,
0.036418, -0.0411977, -0.157236, -0.169663, -0.267754,
-0.222548, -0.252583, -0.222548, -0.207746, -0.325049,
-0.326005, -0.304696, -0.116007, -0.0730211, -0.0228499,
0.0810694, 0.128311, 0.207376, 0.262265, 0.278547, 0.269697,
0.289124, 0.249807, 0.253415, 0.189337, 0.156866, 0.203275,
0.174196, 0.0624749, 0.0926948, 0.0616732, 0.0216473, 0.0706158,
-0.0922323, -0.152487, -0.210552, -0.269389, -0.201918,
-0.237442, -0.184187, -0.280736, -0.312097, -0.309044,
-0.210706, -0.0545191, -0.0576028, 0.0335502, 0.102809, 0.16772,
0.23297, 0.279626, 0.304943, 0.25656, 0.252089, 0.270776,
0.235129, 0.14854, 0.17065, 0.196552, 0.1371, 0.0474267,
0.0718801, 0.0448056, 0.0353387, 0.00524222, -0.146011,
-0.156496, -0.256807, -0.247649, -0.2289, -0.231891, -0.21194,
-0.309322, -0.323969, -0.311203, -0.136051, -0.0548275,
-0.0312991, 0.0867433, 0.122452, 0.198804, 0.269543, 0.275679,
0.277468, 0.274477, 0.270437, 0.272996, 0.190694, 0.173918,
0.18431, 0.188103, 0.0831971, 0.0836597, 0.0852324, 0.0297573,
0.0803602, -0.0595455, -0.134972, -0.192482, -0.269389,
-0.204447, -0.253631, -0.192729, -0.261063, -0.32585, -0.306855,
-0.252798, -0.0782016, -0.068889, 0.0131056, 0.100003, 0.12202,
0.225107, 0.274168, 0.278454, 0.253168, 0.250856, 0.276543,
0.236455, 0.1371, 0.159394, 0.204693, 0.13821, 0.053594,
0.0741929, 0.0455148, 0.0486601, 0.0296031, -0.121835,
-0.123716, -0.234975, -0.254803, -0.209288, -0.238459,
-0.183262, -0.288661, -0.32437, -0.305406, -0.180857,
-0.0702458, -0.0284005, 0.059453, 0.103395, 0.186407, 0.261803,
0.291221, 0.279071, 0.260816, 0.259336, 0.274754, 0.196861,
0.168954, 0.166795, 0.192729, 0.108267, 0.0549817, 0.0824571,
0.0198896, 0.0440347, -0.0353387, -0.142743, -0.193037,
-0.272935, -0.222949, -0.244843, -0.204354, -0.236763,
-0.321595, -0.306608, -0.274014, -0.114774, -0.0650961,
-0.00163434, 0.0789725, 0.135804, 0.208764, 0.268463, 0.303987,
0.253107, 0.263684, 0.254803, 0.254556, 0.181165, 0.148232,
0.191094, 0.166363, 0.0769681, 0.0696907, 0.0599155, 0.0198896,
0.0363872, -0.101514, -0.147461, -0.210306, -0.273798,
-0.203121, -0.2326, -0.189337, -0.268217, -0.331833, -0.305313,
-0.226063, -0.0699682, -0.0393475, 0.0344753, 0.10395, 0.179993,
0.242283, 0.275309, 0.270684, 0.275463, 0.278794, 0.244565,
0.209134, 0.192544, 0.154861, 0.172284, 0.113725, 0.0403343,
0.0938358, -0.00780166, 0.0270437, 0.00826421, -0.168645,
-0.168491, -0.264578, -0.245243, -0.214098, -0.221962,
-0.198372, -0.306947, -0.292454, -0.292824, -0.124025,
-0.0502945, -0.0100219, 0.0778932, 0.125721, 0.241512, 0.257732,
0.315397, 0.276327, 0.251966, 0.290512, 0.256283, 0.203429,
0.144069, 0.179222, 0.178143, 0.0643868, 0.0470566, 0.0517438,
0.00360788, 0.0322242, -0.0838139, -0.167751, -0.179068,
-0.268371, -0.204909, -0.234204, -0.197909, -0.209689,
-0.317586, -0.303617, -0.236702, -0.0899195, -0.064541,
0.030374, 0.0940208, 0.16587, 0.235499, 0.278146, 0.292578,
0.277252, 0.280551, 0.249314, 0.239199, 0.174443, 0.139258,
0.177619, 0.130809, 0.0381757, 0.0741929, 0.0106386, 0.0216473,
0.0453298, -0.136822, -0.156033, -0.226433, -0.252336,
-0.187579, -0.228592, -0.1902, -0.281261, -0.302384, -0.274631,
-0.148447, -0.0534398, -0.0280921, 0.0729286, 0.116624,
0.209627, 0.249036, 0.297388, 0.312251, 0.244997, 0.260508,
0.261895, 0.211786, 0.1408, 0.150976, 0.179839, 0.101237,
0.028123, 0.0482901, 0.0119338, 0.0307441, -0.0317617,
-0.164667, -0.164513, -0.265133, -0.233063, -0.219002, -0.22264,
-0.209319, -0.308397, -0.325449, -0.260662, -0.110457,
-0.0643868, 0.0156342, 0.100466, 0.143668, 0.233063, 0.271917,
0.291344, 0.288353, 0.27386, 0.281415, 0.24879, 0.194271,
0.170187, 0.166117, 0.170218, 0.0635234, 0.0737303, 0.0486601,
0.025286, 0.0695674, -0.0870517, -0.142311, -0.200222,
-0.254248, -0.191865, -0.239693, -0.184773, -0.268309,
-0.320731, -0.298622, -0.213482, -0.080761, -0.064541,
0.0470566, 0.0926331, 0.149434, 0.244103, 0.270468, 0.296062,
0.245243, 0.270221, 0.282186, 0.216781, 0.152302, 0.159734,
0.204601, 0.130655, 0.0554442, 0.0639859, 0.0228191, 0.053224,
0.00755497, -0.122637, -0.12384, -0.243609, -0.234081,
-0.199204, -0.231675, -0.192636, -0.298159, -0.33615, -0.293349,
-0.167258, -0.0944525, -0.01622, 0.0542107, 0.104474, 0.212402,
0.2569, 0.296124, 0.283882, 0.265996, 0.289895, 0.265966,
0.212402, 0.18246, 0.175676, 0.200253, 0.109038, 0.0648494,
0.0686114, 0.0254402, 0.0626908, -0.0328718, -0.140584,
-0.190971, -0.268463, -0.216535, -0.239446, -0.20938, -0.255049,
-0.330291, -0.32215, -0.25582, -0.128465, -0.0876993,
0.00918931, 0.0713867, 0.138888, 0.212557, 0.258411, 0.303555,
0.250578, 0.277221, 0.268124, 0.258966, 0.196707, 0.170341,
0.209997, 0.174196, 0.0853865, 0.0806685, 0.0517438, 0.0280613,
0.0507262, -0.0982454, -0.130809, -0.207623, -0.26282,
-0.184094, -0.235931, -0.184156, -0.285578, -0.349132,
-0.308181, -0.219341, -0.0935582, -0.056616, 0.0324709,
0.0855407, 0.187548, 0.227204, 0.263653, 0.279472, 0.284036,
0.293503, 0.241821, 0.224891, 0.207314, 0.166363, 0.18502,
0.118937, 0.0577569, 0.0813469, -0.0138765, 0.0561226,
0.00215856, -0.16698, -0.145086, -0.268833, -0.216565,
-0.207777, -0.215178, -0.199266, -0.322767, -0.313485,
-0.289278, -0.127633, -0.0916155, -0.0131364, 0.054735,
0.111721, 0.237534, 0.225477, 0.316013, 0.261032, 0.26538,
0.294921, 0.245182, 0.20161, 0.154553, 0.19279, 0.167597,
0.0666996, 0.0395634, 0.0418144, 0.0121805, 0.0430171,
-0.0800518, -0.143452, -0.165438, -0.258904, -0.175152,
-0.230442, -0.17768, -0.213143, -0.330784, -0.309784, -0.231675,
-0.107836, -0.082272, 0.0410127, 0.0671621, 0.17028, 0.215301,
0.251195, 0.291067, 0.271516, 0.274322, 0.230719, 0.218416,
0.151531, 0.130346, 0.163866, 0.114219, 0.0417219, 0.0455765,
-0.00625983, 0.0337044, 0.0418761, -0.139289, -0.129082,
-0.224645, -0.221006, -0.169447, -0.205279, -0.167258, -0.27904,
-0.294921, -0.262512, -0.132659, -0.0774307, -0.0198279,
0.0779858, 0.102809, 0.221715, 0.222486, 0.302846, 0.305529,
0.239662, 0.263653, 0.240834, 0.185945, 0.116038, 0.145364,
0.152055, 0.0827654, 0.00795584, 0.0248851, 0.00255944,
0.0337969, -0.0268278, -0.146782, -0.148756, -0.263745,
-0.206204, -0.196984, -0.199112, -0.1935, -0.302476, -0.309168,
-0.240248, -0.104444, -0.0670388, 0.0388541, 0.0843073,
0.147738, 0.231028, 0.240525, 0.292115, 0.282772, 0.265441,
0.261124, 0.215486, 0.166178, 0.141447, 0.140646, 0.132813,
0.0432637, 0.0398717, 0.0184403, 0.018502, 0.0610565,
-0.0863116, -0.117672, -0.198125, -0.236856, -0.170496,
-0.212402, -0.155108, -0.260446, -0.303555, -0.285979,
-0.172747, -0.0715101, -0.0472725, 0.0775232, 0.0867433,
0.176694, 0.236116, 0.258657, 0.293749, 0.238213, 0.264208,
0.248728, 0.179839, 0.117857, 0.156064, 0.167104, 0.0879151,
0.0305282, 0.0343828, 0.00638318, 0.0328718, -0.0119029,
-0.119368, -0.125104, -0.259891, -0.208209, -0.182028,
-0.199975, -0.171914, -0.295137, -0.31034, -0.266243, -0.127108,
-0.0783558, 0.0140307, 0.0625983, 0.124148, 0.236424, 0.244072,
0.300749, 0.289895, 0.267353, 0.279842, 0.243455, 0.191773,
0.166518, 0.160258, 0.162108, 0.075673, 0.0412594, 0.0482901,
0.00447131, 0.0456382, -0.0573869, -0.14043, -0.193746,
-0.263745, -0.186161, -0.217768, -0.179901, -0.251102,
-0.317124, -0.313331, -0.219402, -0.102563, -0.0700299,
0.0393167, 0.0764131, 0.173456, 0.221253, 0.26282, 0.310463,
0.261741, 0.276851, 0.254864, 0.245953, 0.1622, 0.165562,
0.17435, 0.132011, 0.0572019, 0.0544574, 0.0220482, 0.0034537,
0.0205063, -0.119677, -0.130932, -0.240865, -0.243301, -0.17728,
-0.219156, -0.17398, -0.300904, -0.327238, -0.301921, -0.170187,
-0.0764439, -0.0329952, 0.0500478, 0.102933, 0.221777, 0.225416,
0.281631, 0.297697, 0.296463, 0.285023, 0.242684, 0.223565,
0.195658, 0.16217, 0.150236, 0.0823029, 0.0431096, 0.0501403,
-0.0340744, 0.0437263, -0.0448981, -0.158716, -0.163742,
-0.28567, -0.186006, -0.217768, -0.186315, -0.226957, -0.320886,
-0.318881, -0.264578, -0.0952234, -0.0902279, 0.0208147,
0.0545191, 0.168214, 0.256961, 0.242777, 0.345586, 0.281076,
0.29745, 0.297141, 0.262974, 0.188227, 0.170434, 0.18872,
0.13895, 0.0604397, 0.0393167, 0.0351846, 0.00237442, 0.0212156,
-0.109963, -0.139967, -0.2079, -0.250732, -0.179839, -0.232076,
-0.167412, -0.267137, -0.33063, -0.3203, -0.202751, -0.0993555,
-0.0611798, 0.0578495, 0.0813469, 0.216997, 0.224244, 0.281168,
0.322828, 0.310494, 0.293503, 0.272935, 0.240741, 0.164174,
0.170989, 0.1622, 0.107651, 0.0494311, 0.0446514, -0.00622899,
0.0457923, 0.00178852, -0.136329, -0.138765, -0.264671,
-0.197447, -0.196182, -0.196121, -0.213143, -0.313639,
-0.309014, -0.273243, -0.109285, -0.087761, -0.000524222,
0.0845848, 0.137901, 0.243794, 0.233741, 0.337167, 0.314502,
0.265596, 0.282617, 0.27275, 0.177526, 0.144038, 0.166826,
0.145456, 0.0791884, 0.0147091, 0.0421845, 0.00154183,
0.0193345, -0.0727127, -0.149928, -0.198033, -0.277653,
-0.200222, -0.225878, -0.204077, -0.261587, -0.33541, -0.330938,
-0.229455, -0.0904746, -0.0748713, 0.0528848, 0.0868359,
0.186839, 0.251041, 0.264362, 0.32289, 0.306762, 0.282864,
0.294613, 0.236609, 0.179284, 0.178976, 0.160165, 0.133122,
0.0514971, 0.0580036, 0.0269203, 0.0357088, 0.0242067,
-0.101514, -0.134787, -0.250116, -0.216781, -0.19757, -0.206389,
-0.197416, -0.315058, -0.31256, -0.29967, -0.141201, -0.0865892,
-0.0369422, 0.0942983, 0.0955318, 0.211909, 0.246107, 0.291344,
0.312036, 0.269203, 0.284498, 0.276481, 0.175923, 0.141047,
0.193315, 0.152549, 0.0863116, 0.0432637, 0.0464091, 0.0232816,
0.0351537, -0.0403959, -0.103056, -0.157883, -0.264578,
-0.177989, -0.204077, -0.177989, -0.221191, -0.318912,
-0.318758, -0.249191, -0.0960252, -0.0748713, 0.0303124,
0.0707083, 0.159425, 0.245552, 0.259891, 0.31111, 0.292053,
0.261371, 0.287027, 0.241975, 0.1762, 0.176139, 0.167412,
0.140954, 0.0667612, 0.0588362, 0.0464091, 0.0180394, 0.0270745,
-0.0863116, -0.139536, -0.23994, -0.237226, -0.188504,
-0.206759, -0.186006, -0.291745, -0.31111, -0.320516, -0.172346,
-0.0883777, -0.0572327, 0.0535015, 0.0901662, 0.200438,
0.228962, 0.285424, 0.295445, 0.270745, 0.253415, 0.264671,
0.218786, 0.148602, 0.191495, 0.153289, 0.119523, 0.0603164,
0.0643868, 0.021894, 0.0241142, -0.0148324, -0.114465,
-0.150637, -0.260292, -0.191279, -0.189491, -0.172192,
-0.206081, -0.321811, -0.321749, -0.293071, -0.109038,
-0.0744395, -0.0063215, 0.0617657, 0.136884, 0.231645, 0.237688,
0.284961, 0.296, 0.286595, 0.254032, 0.234266, 0.187456,
0.181905, 0.153782, 0.119831, 0.0630608, 0.0612106, 0.0373431,
-0.00709242, 0.0530389, -0.0845231, -0.127417, -0.207777,
-0.244843, -0.157853, -0.205927, -0.151839, -0.271023,
-0.295908, -0.330599, -0.188412, -0.0580036, -0.0778316,
0.051898, 0.0715717, 0.210706, 0.241821, 0.271609, 0.311018,
0.262204, 0.265503, 0.270159, 0.222332, 0.136205, 0.179777,
0.14854, 0.095871, 0.0353387, 0.0481051, 0.0264578, 0.0136298,
-0.0183478, -0.124179, -0.14191, -0.241235, -0.189398,
-0.194332, -0.176601, -0.167104, -0.302384, -0.30778, -0.308243,
-0.110272, -0.0825187, -0.0219248, 0.0801135, 0.114126,
0.228283, 0.236979, 0.280952, 0.294829, 0.282309, 0.236147,
0.25064, 0.16109, 0.131241, 0.161337, 0.109593, 0.0590829,
0.0370348, 0.0254402, -0.00508804, 0.0451756, -0.0691973,
-0.122298, -0.189645, -0.246569, -0.162725, -0.206235,
-0.147985, -0.259675, -0.289525, -0.305529, -0.208918,
-0.0444972, -0.0809769, 0.0457923, 0.1058, 0.183169, 0.253353,
0.268124, 0.326899, 0.286904, 0.238521, 0.265287, 0.231645,
0.107496, 0.155632, 0.135403, 0.101082, 0.0272904, 0.0236517,
0.0334577, 0.00962102, 0.000154183, -0.107897, -0.141756,
-0.239446, -0.223195, -0.202442, -0.193099, -0.186777,
-0.300533, -0.312282, -0.323137, -0.128928, -0.05529,
-0.0346295, 0.10725, 0.121311, 0.227112, 0.267353, 0.275772,
0.310771, 0.282648, 0.254864, 0.285269, 0.169755, 0.149897,
0.168183, 0.12091, 0.0710784, 0.0388541, 0.0595146, 0.0225724,
0.0474267, -0.0465016, -0.103981, -0.183385, -0.251195,
-0.178297, -0.218323, -0.152919, -0.259274, -0.310864,
-0.316414, -0.254248, -0.0488143, -0.0759505, 0.0292023,
0.116316, 0.141972, 0.256653, 0.276327, 0.293904, 0.296371,
0.25212, 0.265133, 0.251102, 0.0958401, 0.1692, 0.176077,
0.0972586, 0.0550742, 0.0410435, 0.0412594, 0.0289247,
0.0018502, -0.0975053, -0.11058, -0.23553, -0.228653, -0.199605,
-0.20605, -0.167042, -0.296926, -0.313577, -0.333775, -0.162324,
-0.0552283, -0.0475192, 0.0804527, 0.111814, 0.216935, 0.288199,
0.292578, 0.306762, 0.290573, 0.250424, 0.302908, 0.188998,
0.149311, 0.191927, 0.145148, 0.0912455, 0.050757, 0.0793426,
0.0343828, 0.0242992, -0.0337969, -0.110919, -0.183539,
-0.271177, -0.199729, -0.24068, -0.176663, -0.260292, -0.316877,
-0.327515, -0.301459, -0.0722501, -0.0782633, -0.00595146,
0.0994172, 0.156311, 0.242622, 0.286904, 0.298745, 0.290758,
0.275679, 0.239076, 0.289216, 0.139443, 0.174844, 0.185174,
0.119091, 0.091708, 0.0672546, 0.0753338, 0.0247618, 0.0179469,
-0.0942366, -0.114928, -0.228438, -0.240464, -0.203984,
-0.202812, -0.158038, -0.312745, -0.318881, -0.352524,
-0.204848, -0.0359246, -0.0663295, 0.0585895, 0.113417, 0.20531,
0.275309, 0.283789, 0.284714, 0.317031, 0.260569, 0.268124,
0.211015, 0.155756, 0.202134, 0.138179, 0.080576, 0.0546116,
0.0931574, 0.0134139, 0.0195196, -0.020198, -0.136822,
-0.157544, -0.273089, -0.2005, -0.2252, -0.176663, -0.233896,
-0.311326, -0.30445, -0.32622, -0.0466558, -0.061149,
-0.0158808, 0.0885319, 0.152394, 0.261895, 0.281538, 0.301058,
0.279225, 0.275001, 0.249314, 0.291838, 0.141108, 0.157328,
0.197169, 0.109439, 0.0641401, 0.0490302, 0.0757347, 0.0136298,
0.00841839, -0.102593, -0.120324, -0.208209, -0.22375,
-0.201671, -0.227667, -0.137963, -0.286256, -0.290727,
-0.342101, -0.21453, -0.0176077, -0.0858491, 0.061704, 0.11647,
0.193253, 0.272904, 0.288661, 0.269974, 0.308335, 0.237442,
0.258719, 0.232138, 0.0970736, 0.182368, 0.148817, 0.0650961,
0.0485985, 0.091153, 0.0347837, 0.0442505, -0.00493386,
-0.102871, -0.122791, -0.249314, -0.177434, -0.207068,
-0.158963, -0.21009, -0.311881, -0.272842, -0.316044,
-0.0582503, -0.0265503, -0.030004, 0.107897, 0.156403, 0.229486,
0.288661, 0.296895, 0.292763, 0.26427, 0.20605, 0.291529,
0.119245, 0.119214, 0.178143, 0.101329, 0.065682, 0.0360788,
0.0873601, 0.0162509, 0.0263653, -0.0778932, -0.106602,
-0.193037, -0.231151, -0.197909, -0.228746, -0.150328,
-0.286595, -0.290203, -0.343489, -0.243794, -0.0144932,
-0.0718801, 0.0464399, 0.132721, 0.169139, 0.271239, 0.290049,
0.248574, 0.288754, 0.232415, 0.275062, 0.227975, 0.08699,
0.177588, 0.147923, 0.0750254, 0.0385766, 0.102563, 0.062845,
0.0541182, 0.00101761, -0.07851, -0.104289, -0.248882,
-0.182861, -0.223257, -0.168892, -0.198649, -0.317956,
-0.273151, -0.337722, -0.097197, -0.0198279, -0.0448056,
0.0981837, 0.141417, 0.189953, 0.292454, 0.274014, 0.252182,
0.278331, 0.207592, 0.291899, 0.119769, 0.0979987, 0.208301,
0.107805, 0.0677172, 0.0550742, 0.0895495, 0.0395017, 0.0494927,
-0.0732678, -0.0884394, -0.164945, -0.240865, -0.175522,
-0.232539, -0.138148, -0.264578, -0.303216, -0.335533,
-0.266613, -0.0274446, -0.0495236, 0.0250393, 0.119307,
0.163187, 0.254864, 0.321441, 0.252398, 0.282001, 0.221561,
0.264979, 0.239909, 0.0880076, 0.182553, 0.17876, 0.0997872,
0.0434179, 0.113355, 0.0794351, 0.0357088, 0.00687656,
-0.0885319, -0.119615, -0.259182, -0.210306, -0.236239,
-0.200037, -0.203152, -0.333313, -0.274168, -0.35863, -0.141386,
-0.0194579, -0.0576028, 0.0603781, 0.152086, 0.187857, 0.276543,
0.298313, 0.23149, 0.282957, 0.205927, 0.281014, 0.175275,
0.110333, 0.207931, 0.128188, 0.102501, 0.0699374, 0.121558,
0.0464399, 0.0465016, -0.0647877, -0.104968, -0.164729,
-0.249345, -0.186962, -0.241081, -0.133276, -0.271239,
-0.315674, -0.326745, -0.304326, -0.0390391, -0.0408893,
-0.00175769, 0.112369, 0.169447, 0.236301, 0.320947, 0.254279,
0.279935, 0.271917, 0.250331, 0.249036, 0.133954, 0.187394,
0.182368, 0.108637, 0.0395017, 0.118628, 0.0838139, 0.0154183,
0.0241451, -0.115298, -0.134571, -0.236301, -0.222979,
-0.223349, -0.202041, -0.187271, -0.326436, -0.256252,
-0.359709, -0.157544, -0.00317617, -0.0476734, 0.0504487,
0.141602, 0.217182, 0.284868, 0.324494, 0.241697, 0.277684,
0.24031, 0.307688, 0.209905, 0.11499, 0.219711, 0.157791,
0.0919856, 0.0580653, 0.125536, 0.0519905, 0.0500478,
-0.0619199, -0.121003, -0.164359, -0.250702, -0.194271,
-0.272719, -0.152179, -0.256406, -0.318665, -0.319529,
-0.329212, -0.0487218, -0.0616115, -0.0337969, 0.104104,
0.171266, 0.227975, 0.330291, 0.274908, 0.278701, 0.291838,
0.252028, 0.2886, 0.117611, 0.148602, 0.213944, 0.134108,
0.0251935, 0.0930032, 0.0735453, 0.0196737, 0.0152641,
-0.134941, -0.130871, -0.247556, -0.225755, -0.215024,
-0.234759, -0.204046, -0.341269, -0.261032, -0.323075,
-0.169601, 0.0152024, -0.026612, 0.0546116, 0.180702, 0.216319,
0.282247, 0.357119, 0.290111, 0.310648, 0.220327, 0.277869,
0.19609, 0.0683031, 0.16991, 0.117302, 0.0698757, 0.00144932,
0.102162, 0.0348454, 0.0117179, -0.0748096, -0.155848,
-0.127849, -0.228067, -0.162632, -0.228838, -0.135897,
-0.195905, -0.276327, -0.286503, -0.321657, -0.0391625,
0.0173302, 0.0114095, 0.118443, 0.148694, 0.191557, 0.302445,
0.239909, 0.212711, 0.219094, 0.221931, 0.273151, 0.083043,
0.0840606, 0.132659, 0.106479, 0.0287705, 0.118289, 0.141293,
0.0869284, 0.104012, -0.0424312, -0.0465941, -0.18542,
-0.190817, -0.149928, -0.164637, -0.109223, -0.298992,
-0.287736, -0.353603, -0.242468, -0.0419686, -0.0794351,
-0.0182861, 0.111505, 0.154214, 0.205618, 0.251349, 0.149681,
0.199636, 0.21268, 0.289957, 0.245459, 0.11351, 0.244873,
0.237195, 0.152148, 0.0675321, 0.140584, 0.127324, 0.162416,
0.0656203, -0.0926948, -0.110148, -0.263745, -0.198341,
-0.264424, -0.231583, -0.252028, -0.342872, -0.319282, -0.37081,
-0.194641, -0.132196, -0.110765, 0.0304666, 0.147831, 0.197878,
0.329921, 0.332943, 0.308643, 0.296062, 0.254957, 0.315643,
0.21046, 0.261494, 0.31811, 0.263129, 0.0889327, 0.0942983,
0.122298, 0.0312375, 0.00918931, -0.135095, -0.129113,
-0.214623, -0.264763, -0.288661, -0.381603, -0.295846,
-0.396096, -0.333991, -0.341793, -0.271917, -0.044343,
0.0104844, 0.0255944, 0.107188, 0.178544, 0.271362, 0.464399,
0.396559, 0.370224, 0.311851, 0.284036, 0.268741, 0.115606,
0.14891, 0.129884, 0.124302, 0.0735761, 0.0980912, -0.00996022,
-0.0899195, -0.136483, -0.240525, -0.175121, -0.243147,
-0.194024, -0.229363, -0.150606, -0.163742, -0.343242,
-0.347343, -0.308335, -0.0363255, 0.136051, 0.106325, 0.114743,
0.190385, 0.2009, 0.298591, 0.301058, 0.191495, 0.263961,
0.281384, 0.27423, 0.104104, 0.0000925098, 0.00755497,
0.0761972, 0.0138148, 0.0750563, 0.160474, 0.043973, 0.126492,
-0.0105461, -0.141077, -0.209473, -0.192883, -0.0694132,
-0.0891486, -0.037559, -0.229918, -0.29045, -0.340313,
-0.323846, -0.103333, -0.111135, -0.0752721, 0.0672238,
0.173918, 0.143267, 0.160319, 0.102963, 0.123778, 0.226803,
0.326652, 0.333313, 0.19424, 0.260107, 0.314256, 0.228283,
0.0590521, 0.166795, 0.233433, 0.217244, 0.161892, -0.0967036,
-0.151932, -0.27719, -0.265226, -0.336181, -0.36785, -0.29782,
-0.392766, -0.362145, -0.46813, -0.387215, -0.235931, -0.179592,
0.0148016, 0.213019, 0.285701, 0.364519, 0.471831, 0.418144,
0.43825, 0.358753, 0.390669, 0.396065, 0.327207, 0.342872,
0.267292, 0.029449, -0.0419378, 0.0101144, -0.145395, -0.156002,
-0.282402, -0.315366, -0.297203, -0.401955, -0.427796,
-0.478923, -0.3026, -0.261124, -0.215548, -0.164667, -0.1375,
0.139751, 0.240279, 0.240155, 0.300009, 0.399026, 0.478121,
0.582812, 0.521848, 0.338, 0.237658, 0.184403, 0.145919,
-0.0799901, -0.174535, -0.131025, -0.117827, -0.196429,
-0.180795, -0.221715, -0.272256, -0.126091, -0.158192,
-0.0650961, -0.0543032, -0.036418, 0.0404268, 0.0672238,
0.146289, -0.0110395, -0.0470566, -0.0386383, 0.0921706,
0.213852, 0.0548891, 0.0317617, 0.0919239, 0.0623208, 0.0407043,
-0.00240525, -0.109285, -0.0683956, -0.0296956, 0.00616732,
-0.151099, -0.232693, -0.0399642, 0.171451, 0.161707, 0.1622,
0.32767, 0.330908, 0.457183, 0.367696, 0.230288, 0.197478,
0.130192, 0.168429, 0.0168985, -0.0895186, -0.237781, -0.38962,
-0.435659, -0.560208, -0.484844, -0.432483, -0.406519,
-0.254803, -0.17583, -0.201147, -0.102717, 0.0789109, 0.199328,
0.322797, 0.413149, 0.481359, 0.438712, 0.522557, 0.636005,
0.575226, 0.439329, 0.491535, 0.48176, 0.327207, 0.194116,
-0.128465, -0.201887, -0.323198, -0.510222, -0.588825,
-0.713127, -0.605076, -0.63363, -0.682815, -0.743995, -0.64026,
-0.289957, -0.0791884, 0.0883777, 0.276388, 0.403158, 0.552006,
0.755774, 0.750347, 0.704154, 0.671714, 0.748743, 0.658207,
0.454901, 0.313577, 0.219618, 0.0753646, -0.107188, -0.146011,
-0.354775, -0.413765, -0.464183, -0.537451, -0.544759, -0.68411,
-0.609794, -0.48395, -0.270529, -0.152703, -0.173733,
-0.0865275, -0.0195812, 0.243609, 0.424003, 0.430171, 0.481452,
0.628296, 0.625027, 0.592217, 0.52231, 0.266151, 0.221623,
0.149002, 0.0351537, -0.186253, -0.333251, -0.277005, -0.229455,
-0.309322, -0.380369, -0.316815, -0.21564, -0.00746246,
-0.0257486, 0.0158192, 0.0698757, 0.0746554, 0.21894, 0.218878,
0.281939, 0.186376, 0.11243, 0.0825804, 0.0260569, 0.0913997,
-0.00900429, -0.0740387, -0.0286164, -0.0646952, -0.168059,
-0.126307, -0.178606, -0.184341, -0.11351, -0.150544, -0.179531,
-0.0909063, 0.0813778, 0.237503, 0.328934, 0.2639, 0.435659,
0.484751, 0.498504, 0.505535, 0.299146, 0.296, 0.189799,
0.0795276, -0.0491844, -0.222949, -0.285794, -0.492491,
-0.593204, -0.733942, -0.648124, -0.501496, -0.477289, -0.35792,
-0.270869, -0.184804, -0.0256252, 0.255111, 0.310864, 0.406704,
0.560578, 0.624564, 0.652903, 0.620124, 0.664128, 0.683185,
0.551636, 0.460884, 0.426933, 0.229979, 0.0822104, -0.160104,
-0.347128, -0.455086, -0.678868, -0.676493, -0.748928,
-0.677634, -0.628912, -0.732277, -0.724753, -0.594745,
-0.196676, -0.0203522, 0.150698, 0.379136, 0.526874, 0.663696,
0.794721, 0.815443, 0.739184, 0.757532, 0.696784, 0.608252,
0.393999, 0.179376, 0.109963, -0.015665, -0.305868, -0.374418,
-0.453298, -0.500046, -0.453791, -0.575072, -0.562675,
-0.627617, -0.54701, -0.304851, -0.197971, -0.0171143,
0.0116562, 0.0808844, 0.168368, 0.319344, 0.480126, 0.460175,
0.526011, 0.587961, 0.578402, 0.496007, 0.408955, 0.244781,
0.0784175, -0.0385457, -0.181998, -0.296586, -0.4261, -0.383206,
-0.265472, -0.331216, -0.429554, -0.262574, -0.0777391,
0.0695674, 0.146659, 0.139505, 0.25949, 0.268063, 0.341084,
0.327423, 0.288877, 0.285424, 0.14521, 0.0459465, -0.0704,
-0.0540874, -0.114435, -0.19057, -0.211323, -0.303555,
-0.325203, -0.256345, -0.222085, -0.195134, -0.168491,
-0.172037, -0.0679639, 0.0365722, 0.166518, 0.324185, 0.487681,
0.435875, 0.573592, 0.673656, 0.615498, 0.607851, 0.416078,
0.348577, 0.190632, 0.00394708, -0.101052, -0.316569, -0.36711,
-0.585433, -0.810355, -0.861297, -0.818928, -0.616362,
-0.511147, -0.40436, -0.332326, -0.186654, 0.0899812, 0.320886,
0.457769, 0.53927, 0.645564, 0.80095, 0.836566, 0.724321,
0.686731, 0.703691, 0.603596, 0.408862, 0.331062, 0.131857,
-0.0259336, -0.170681, -0.47621, -0.619446, -0.81276, -0.801505,
-0.750069, -0.717753, -0.603904, -0.720466, -0.662678,
-0.423602, -0.138364, 0.08662, 0.285701, 0.449659, 0.652102,
0.805884, 0.862099, 0.873755, 0.778285, 0.722902, 0.638996,
0.549169, 0.30815, 0.106417, -0.00841839, -0.107219, -0.400506,
-0.542539, -0.486478, -0.526566, -0.426223, -0.494742,
-0.568935, -0.52194, -0.37303, -0.156002, -0.0927565, 0.0976903,
0.154615, 0.179623, 0.281846, 0.305251, 0.394708, 0.413673,
0.448148, 0.422215, 0.400629, 0.30778, 0.236517, 0.162786,
-0.0537482, -0.205896, -0.295692, -0.287644, -0.351846,
-0.334084, -0.23368, -0.234852, -0.279256, -0.0530698, 0.118752,
0.176509, 0.325819, 0.276697, 0.363533, 0.386198, 0.318357,
0.325449, 0.250177, 0.244997, 0.0394708, -0.125536, -0.218015,
-0.283512, -0.259983, -0.319375, -0.438373, -0.439514,
-0.335225, -0.280798, -0.147769, -0.133646, -0.117364,
-0.0269203, 0.138117, 0.27275, 0.359524, 0.428567, 0.576213,
0.616331, 0.592124, 0.67674, 0.51639, 0.519103, 0.416387,
0.134047, 0.030374, -0.176046, -0.287798, -0.401647, -0.531284,
-0.677048, -0.870394, -0.820654, -0.784791, -0.598908,
-0.461007, -0.370409, -0.236517, 0.0350304, 0.307318, 0.419686,
0.620648, 0.650128, 0.717691, 0.865892, 0.830245, 0.737118,
0.623423, 0.589102, 0.510592, 0.241913, 0.120232, -0.00641401,
-0.180363, -0.267168, -0.56616, -0.721977, -0.698264, -0.753554,
-0.645502, -0.629282, -0.567455, -0.498504, -0.421475,
-0.235992, -0.0749021, 0.156218, 0.321441, 0.490949, 0.622406,
0.741404, 0.745506, 0.759536, 0.726233, 0.587715, 0.482069,
0.352339, 0.18061, 0.0179469, -0.148848, -0.269173, -0.391008,
-0.505905, -0.426624, -0.458879, -0.388079, -0.351229,
-0.452681, -0.267939, -0.13232, -0.0606247, 0.0801443, 0.15298,
0.270838, 0.270684, 0.251935, 0.253508, 0.309229, 0.332233,
0.306701, 0.259737, 0.195319, 0.180764, 0.0996947, 0.0678405,
-0.0976595, -0.292886, -0.225755, -0.230658, -0.259274,
-0.270375, -0.25727, -0.125875, -0.0411669, 0.0767215, 0.197971,
0.260138, 0.392211, 0.424096, 0.377656, 0.394554, 0.287675,
0.261494, 0.224336, 0.10688, -0.0197354, -0.219156, -0.379568,
-0.403281, -0.390854, -0.490579, -0.503284, -0.439144,
-0.329705, -0.254186, -0.157328, -0.0900737, -0.0452681,
0.13047, 0.356194, 0.390391, 0.435104, 0.513306, 0.571464,
0.724321, 0.61371, 0.60523, 0.538284, 0.459404, 0.423294,
0.116285, -0.0595455, -0.228499, -0.380277, -0.433254, -0.64504,
-0.718585, -0.778069, -0.828271, -0.766937, -0.637238,
-0.509297, -0.388664, -0.0978754, 0.148972, 0.300133, 0.45154,
0.618952, 0.74344, 0.771562, 0.850843, 0.844923, 0.706035,
0.634, 0.507355, 0.415122, 0.246939, 0.00169601, -0.0719726,
-0.234913, -0.373894, -0.528138, -0.672793, -0.648833,
-0.725986, -0.686608, -0.617503, -0.576614, -0.355669,
-0.237133, -0.206667, -0.0589904, 0.144192, 0.296278, 0.532826,
0.621018, 0.672423, 0.721145, 0.708625, 0.696753, 0.529495,
0.383607, 0.300318, 0.135866, -0.0037929, -0.189645, -0.402633,
-0.343026, -0.415616, -0.457307, -0.400937, -0.449166,
-0.322212, -0.242006, -0.117549, -0.0617657, -0.0564618,
0.0941441, 0.198557, 0.323044, 0.335934, 0.225508, 0.18394,
0.217922, 0.208918, 0.162416, 0.161399, 0.0634617, 0.0484443,
-0.000215856, -0.106664, -0.191896, -0.300071, -0.234667,
-0.216165, -0.219341, -0.20861, -0.235283, -0.0448056, 0.207839,
0.17691, 0.252428, 0.344044, 0.422708, 0.590027, 0.503747,
0.421475, 0.333004, 0.203367, 0.225416, 0.0484135, -0.0644177,
-0.228283, -0.45006, -0.48139, -0.597274, -0.687594, -0.583552,
-0.495883, -0.425329, -0.272071, -0.229918, -0.127417,
0.0565852, 0.261834, 0.419439, 0.424312, 0.521724, 0.672485,
0.678744, 0.761479, 0.722995, 0.566067, 0.565605, 0.374572,
0.302754, 0.173764, -0.135743, -0.241605, -0.446206, -0.61112,
-0.732277, -0.794721, -0.693238, -0.792007, -0.782941,
-0.675661, -0.579636, -0.358167, -0.00641401, 0.160659,
0.283573, 0.534583, 0.644331, 0.859508, 0.879306, 0.833667,
0.8592, 0.716828, 0.663912, 0.475284, 0.304789, 0.237226,
-0.00709242, -0.156249, -0.33763, -0.580715, -0.552777,
-0.567085, -0.661476, -0.631688, -0.722316, -0.61078, -0.469888,
-0.251565, -0.05492, -0.165808, -0.0202905, 0.19094, 0.340159,
0.509236, 0.605292, 0.58386, 0.663604, 0.640476, 0.543464,
0.499738, 0.319961, 0.239354, 0.0855099, -0.137809, -0.320886,
-0.458633, -0.395233, -0.337414, -0.425607, -0.42277, -0.452373,
-0.298622, 0.0383916, 0.0101761, 0.00848006, 0.110426, 0.181227,
0.369854, 0.392365, 0.396867, 0.305313, 0.174196, 0.19094,
0.13232, 0.0327176, 0.0339203, 0.00934349, -0.0691665,
-0.112214, -0.325604, -0.291591, -0.198125, -0.276018, -0.17876,
-0.239292, -0.224675, -0.131395, 0.032841, 0.268371, 0.272472,
0.301058, 0.422461, 0.510284, 0.619045, 0.637022, 0.41281,
0.359986, 0.239199, 0.0749021, 0.00222023, -0.176971, -0.229733,
-0.437263, -0.662709, -0.779611, -0.781523, -0.632767,
-0.482069, -0.41947, -0.320053, -0.224799, -0.106201, 0.239076,
0.379136, 0.433933, 0.551112, 0.615313, 0.743594, 0.755003,
0.694378, 0.732616, 0.610164, 0.485985, 0.355114, 0.135804,
0.147923, -0.0620741, -0.307256, -0.457091, -0.787875,
-0.785994, -0.738043, -0.698171, -0.670696, -0.786087,
-0.707577, -0.532918, -0.241019, 0.0256869, 0.198187, 0.341731,
0.557032, 0.720744, 0.830553, 0.945635, 0.801566, 0.808135,
0.739184, 0.542323, 0.373339, 0.178513, 0.125382, 0.00178852,
-0.276697, -0.494187, -0.620987, -0.570477, -0.437294,
-0.559869, -0.586975, -0.635172, -0.605322, -0.234852,
-0.127633, -0.0149866, 0.0255019, 0.0674705, 0.240155, 0.378889,
0.460236, 0.563045, 0.57908, 0.575534, 0.591908, 0.393753,
0.398008, 0.293842, 0.134201, 0.0225724, -0.283481, -0.378057,
-0.392642, -0.420858, -0.319344, -0.320053, -0.431404,
-0.296679, -0.133276, 0.132505, 0.212526, 0.137038, 0.282648,
0.26982, 0.371951, 0.42903, 0.355669, 0.35274, 0.168337,
0.0327176, -0.0536248, -0.126862, -0.140276, -0.0948534,
-0.211632, -0.348515, -0.399087, -0.354898, -0.162786,
-0.248543, -0.187024, -0.166271, -0.131796, 0.0957168, 0.206852,
0.300472, 0.440902, 0.489932, 0.543156, 0.630701, 0.568195,
0.676185, 0.544451, 0.356286, 0.231984, -0.105029, -0.0724043,
-0.241451, -0.320361, -0.460483, -0.834592, -0.902094,
-0.814055, -0.675722, -0.540689, -0.428012, -0.374726,
-0.149773, 0.0305282, 0.323106, 0.497394, 0.535046, 0.719664,
0.723673, 0.802214, 0.84409, 0.729409, 0.695766, 0.68152,
0.427704, 0.247402, 0.0374973, -0.0481976, -0.0332419,
-0.385211, -0.595886, -0.853094, -0.854235, -0.678343,
-0.750008, -0.622375, -0.71066, -0.692621, -0.411915, -0.128619,
0.042277, 0.254094, 0.448734, 0.594591, 0.816522, 0.79802,
0.947023, 0.886799, 0.783435, 0.711524, 0.452157, 0.335564,
0.137285, 0.0034537, -0.0823029, -0.35459, -0.60856, -0.576151,
-0.594961, -0.482223, -0.45154, -0.616979, -0.509205, -0.466712,
-0.124086, -0.0238367, 0.0181011, 0.240525, 0.153011, 0.249869,
0.34796, 0.430109, 0.495112, 0.554103, 0.464893, 0.422153,
0.299238, 0.216226, 0.251195, 0.0533473, -0.111659, -0.367171,
-0.380277, -0.352061, -0.433501, -0.382991, -0.299824,
-0.341392, -0.205896, 0.0272904, 0.107866, 0.364519, 0.322427,
0.348669, 0.389682, 0.339634, 0.485615, 0.379907, 0.355515,
0.190077, -0.0836905, -0.172284, -0.208702, -0.235222,
-0.247618, -0.335996, -0.489007, -0.36711, -0.35385, -0.223411,
-0.133122, -0.215394, -0.116778, -0.00730827, 0.235746,
0.268525, 0.309168, 0.51787, 0.59897, 0.548491, 0.60856,
0.597274, 0.592649, 0.627617, 0.293133, 0.123716, -0.148478,
-0.251812, -0.252583, -0.473588, -0.58016, -0.874927, -0.92627,
-0.826359, -0.718924, -0.574239, -0.432853, -0.337383,
-0.0832896, 0.225261, 0.341546, 0.571155, 0.683185, 0.766012,
0.796879, 0.820839, 0.822782, 0.723396, 0.637639, 0.608221,
0.365475, 0.103888, 0.0334885, -0.157328, -0.12276, -0.404792,
-0.730642, -0.75414, -0.838848, -0.68152, -0.690616, -0.642388,
-0.609023, -0.585556, -0.287829, -0.105276, 0.084924, 0.304481,
0.533134, 0.621419, 0.766259, 0.825311, 0.839989, 0.903358,
0.707885, 0.559345, 0.367449, 0.216103, 0.0359555, -0.114743,
-0.250331, -0.463659, -0.605384, -0.557495, -0.537297,
-0.524284, -0.37266, -0.496037, -0.382035, -0.226896, -0.118474,
0.104937, 0.14265, 0.314934, 0.287675, 0.279842, 0.306238,
0.377132, 0.443739, 0.46147, 0.332912, 0.219772, 0.251503,
0.0971661, 0.110179, -0.0574794, -0.320207, -0.379876,
-0.363378, -0.352431, -0.391131, -0.377563, -0.274939,
-0.159487, -0.0444972, 0.17728, 0.209134, 0.434426, 0.550402,
0.446884, 0.487773, 0.35789, 0.423787, 0.38666, 0.26797,
0.0898578, -0.209072, -0.310956, -0.39107, -0.388603, -0.473835,
-0.570755, -0.602547, -0.449906, -0.363163, -0.324987,
-0.135804, -0.170496, -0.0436338, 0.170372, 0.348885, 0.385612,
0.488791, 0.635388, 0.718894, 0.704092, 0.666841, 0.668537,
0.5636, 0.5949, 0.288908, 0.00555059, -0.157328, -0.376176,
-0.354158, -0.592803, -0.776435, -0.93367, -0.957075, -0.902526,
-0.805144, -0.599309, -0.471954, -0.290419, -0.0143699, 0.32952,
0.383823, 0.625212, 0.848469, 0.870301, 0.909217, 0.881464,
0.853156, 0.78106, 0.654445, 0.472417, 0.297697, 0.0618582,
-0.0495236, -0.245182, -0.361775, -0.521632, -0.813685,
-0.769496, -0.85809, -0.768479, -0.656295, -0.641401, -0.489932,
-0.402633, -0.204693, -0.0906904, 0.199636, 0.417466, 0.586481,
0.689352, 0.788153, 0.901539, 0.807518, 0.880847, 0.674705,
0.437972, 0.323137, 0.172222, -0.00462549, -0.224737, -0.439977,
-0.564741, -0.578649, -0.615437, -0.53816, -0.52598, -0.395233,
-0.351136, -0.265041, -0.0671004, -0.0633384, 0.1935, 0.305683,
0.418391, 0.41651, 0.32252, 0.330599, 0.342255, 0.431959,
0.312498, 0.22557, 0.121835, 0.131641, 0.0279996, -0.0888402,
-0.204385, -0.390916, -0.389898, -0.38629, -0.375343, -0.383145,
-0.33763, -0.2326, -0.0100836, 0.105646, 0.193315, 0.338555,
0.524345, 0.671189, 0.542632, 0.535971, 0.426563, 0.398162,
0.407351, 0.199359, -0.000616732, -0.255975, -0.361405,
-0.463567, -0.473588, -0.610935, -0.692158, -0.560733,
-0.497425, -0.341885, -0.301459, -0.142989, -0.0126738,
0.0872367, 0.292732, 0.412655, 0.490949, 0.606217, 0.702766,
0.746492, 0.759475, 0.640322, 0.643005, 0.577446, 0.434025,
0.197786, -0.0967961, -0.228345, -0.446298, -0.513923,
-0.721237, -0.876777, -0.885103, -0.936631, -0.894415,
-0.796509, -0.540134, -0.412995, -0.114157, 0.151531, 0.336181,
0.561134, 0.726233, 0.911006, 0.951895, 0.899689, 0.903512,
0.849795, 0.711739, 0.554473, 0.305837, 0.188473, 0.00400876,
-0.161121, -0.276388, -0.494403, -0.614943, -0.726788,
-0.734404, -0.806284, -0.757069, -0.617441, -0.559283,
-0.347498, -0.252089, -0.159549, -0.0252243, 0.287428, 0.505535,
0.576398, 0.749113, 0.747356, 0.829813, 0.813377, 0.705541,
0.555336, 0.335255, 0.18098, 0.0825187, -0.123624, -0.409448,
-0.522495, -0.580006, -0.540843, -0.578957, -0.515249,
-0.408647, -0.324617, -0.160875, -0.0405501, 0.0374973,
0.0377748, 0.284005, 0.404946, 0.457183, 0.460853, 0.323106,
0.293503, 0.264054, 0.331401, 0.159579, 0.0719418, 0.0361097,
-0.0154491, -0.0322242, -0.227759, -0.35644, -0.366616,
-0.419624, -0.390761, -0.311727, -0.353665, -0.244873,
-0.0835055, 0.136051, 0.215486, 0.281322, 0.532363, 0.623053,
0.699682, 0.655524, 0.560116, 0.416202, 0.354683, 0.292269,
0.0238984, -0.116007, -0.340498, -0.480249, -0.648586, -0.69848,
-0.739677, -0.773875, -0.586882, -0.530729, -0.357612,
-0.234451, -0.122606, 0.0997872, 0.291344, 0.345555, 0.499985,
0.663295, 0.684141, 0.807456, 0.771501, 0.77884, 0.690431,
0.639397, 0.538746, 0.299978, 0.103179, -0.110518, -0.296,
-0.521046, -0.649604, -0.853094, -0.856795, -0.844923,
-0.945974, -0.889574, -0.807518, -0.495976, -0.305375,
-0.030004, 0.207623, 0.369607, 0.68118, 0.810077, 0.91153,
0.991273, 0.933362, 0.844614, 0.831324, 0.627926, 0.451694,
0.240772, 0.058682, -0.0786025, -0.249715, -0.389682, -0.635481,
-0.651978, -0.677819, -0.720312, -0.767862, -0.701193,
-0.548799, -0.440963, -0.140368, -0.142003, -0.0449598,
0.0876993, 0.352524, 0.597737, 0.57831, 0.714823, 0.702951,
0.78547, 0.747572, 0.55586, 0.404391, 0.259798, 0.056431,
-0.0297882, -0.213543, -0.552715, -0.530914, -0.549786,
-0.538068, -0.547103, -0.446976, -0.32252, -0.202751,
0.00462549, 0.0666379, 0.126091, 0.20198, 0.399951, 0.42684,
0.513614, 0.483549, 0.293842, 0.276635, 0.140738, 0.188227,
0.0279688, -0.0852015, -0.0710167, -0.164051, -0.198125,
-0.378797, -0.444818, -0.357149, -0.358784, -0.405409,
-0.220266, -0.271177, -0.146381, 0.128465, 0.225107, 0.317124,
0.450584, 0.640569, 0.684757, 0.754171, 0.642851, 0.552623,
0.404237, 0.288353, 0.15554, -0.118474, -0.160782, -0.465355,
-0.569552, -0.743347, -0.858028, -0.708872, -0.736748,
-0.582812, -0.46921, -0.315212, -0.143544, 0.0119338, 0.256283,
0.455487, 0.417743, 0.619476, 0.804527, 0.687656, 0.850874,
0.766721, 0.716211, 0.618582, 0.54661, 0.404885, 0.137562,
-0.0209689, -0.254094, -0.420303, -0.675044, -0.81424,
-0.940763, -0.838509, -0.801135, -0.900151, -0.777082,
-0.741898, -0.369947, -0.061704, 0.112184, 0.348269, 0.528416,
0.785131, 0.918098, 0.934226, 0.95097, 0.898609, 0.742638,
0.792161, 0.466126, 0.229116, 0.14891, -0.0823646, -0.222548,
-0.372414, -0.511055, -0.660366, -0.59638, -0.644485, -0.62034,
-0.667705, -0.627309, -0.424836, -0.26575, 0.0372506,
-0.0598538, 0.0966419, 0.239816, 0.36785, 0.658978, 0.580838,
0.643498, 0.694841, 0.679053, 0.604089, 0.432175, 0.230257,
0.142588, -0.0640784, -0.224028, -0.343026, -0.688735,
-0.487157, -0.480095, -0.531839, -0.443615, -0.345802,
-0.178667, 0.0053964, 0.183139, 0.184372, 0.31293, 0.3273,
0.457923, 0.451602, 0.481051, 0.449536, 0.232446, 0.221623,
-0.00940516, 0.00740078, -0.0321626, -0.191187, -0.183324,
-0.249499, -0.356286, -0.387894, -0.364951, -0.351506,
-0.317278, -0.360079, -0.135866, -0.167104, 0.000462549,
0.322335, 0.321903, 0.426008, 0.602516, 0.766259, 0.733171,
0.734651, 0.621419, 0.521786, 0.364149, 0.12162, -0.0228499,
-0.251966, -0.289679, -0.585032, -0.699035, -0.903235,
-0.999537, -0.665145, -0.669863, -0.575873, -0.398162,
-0.228499, -0.045669, 0.217552, 0.382065, 0.506769, 0.590274,
0.702489, 0.885812, 0.715995, 0.841901, 0.77551, 0.660427,
0.621635, 0.474575, 0.261433, 0.0576953, -0.0846773, -0.342564,
-0.463659, -0.798483, -0.873447, -0.893028, -0.788183,
-0.756915, -0.871226, -0.700114, -0.690216, -0.251873,
0.0912455, 0.148694, 0.399026, 0.639181, 0.820716, 0.942706,
0.954115, 0.891671, 0.888125, 0.718308, 0.65426, 0.332326,
0.134725, 0.0970119, -0.168029, -0.318604, -0.489315, -0.581732,
-0.649049, -0.574455, -0.630238, -0.637639, -0.600296,
-0.580776, -0.31219, -0.143544, 0.0603164, 0.0163434, 0.210059,
0.283388, 0.343643, 0.664066, 0.588794, 0.606926, 0.641093,
0.616269, 0.456628, 0.387308, 0.195967, 0.0467483, -0.0967344,
-0.316198, -0.407968, -0.631934, -0.467945, -0.474452,
-0.499121, -0.412039, -0.286287, -0.07851, 0.091523, 0.201733,
0.183015, 0.385457, 0.366246, 0.467514, 0.446976, 0.465108,
0.437201, 0.197786, 0.166826, -0.157945, -0.0922323, -0.0672546,
-0.259336, -0.249006, -0.338617, -0.461408, -0.387524,
-0.313423, -0.385766, -0.278547, -0.28789, -0.114126,
-0.0410435, 0.102162, 0.350335, 0.364859, 0.495544, 0.618798,
0.763792, 0.712449, 0.71507, 0.56283, 0.466095, 0.302754,
-0.020383, -0.103179, -0.278732, -0.319683, -0.608622,
-0.768417, -0.942336, -0.970489, -0.625582, -0.627124, -0.56616,
-0.364612, -0.182799, 0.00703074, 0.347189, 0.423386, 0.512011,
0.653119, 0.748281, 0.886645, 0.718431, 0.83413, 0.758179,
0.654969, 0.515218, 0.341084, 0.196182, -0.0247618, -0.142989,
-0.428875, -0.575072, -0.889266, -0.902001, -0.842826,
-0.820469, -0.751087, -0.813839, -0.65315, -0.593111, -0.144839,
0.163897, 0.206143, 0.481452, 0.701378, 0.804218, 0.943723,
0.98896, 0.85439, 0.825465, 0.678251, 0.567763, 0.267076,
0.0726202, 0.0529773, -0.159024, -0.380986, -0.585032,
-0.535909, -0.570477, -0.557402, -0.620802, -0.578094,
-0.550711, -0.515465, -0.197447, -0.102748, 0.0620124,
0.0795276, 0.229887, 0.290296, 0.342101, 0.626692, 0.603441,
0.57023, 0.599679, 0.497117, 0.325665, 0.342317, 0.124857,
-0.0302507, -0.18465, -0.416202, -0.428104, -0.595609,
-0.451078, -0.433193, -0.41321, -0.351969, -0.181535, 0.103333,
0.18576, 0.268371, 0.269974, 0.424219, 0.385457, 0.437818,
0.441333, 0.408862, 0.381819, 0.146998, 0.0197971, -0.262142,
-0.17213, -0.122298, -0.278269, -0.336797, -0.427765, -0.48176,
-0.343273, -0.258719, -0.366863, -0.277807, -0.252336,
-0.0168985, 0.106047, 0.203152, 0.392612, 0.504579, 0.595455,
0.656141, 0.827161, 0.758149, 0.709242, 0.577323, 0.430479,
0.170434, -0.132659, -0.168954, -0.379198, -0.4294, -0.721299,
-0.916865, -0.999877, -0.964168, -0.664775, -0.602054,
-0.525826, -0.348484, -0.0974745, 0.134324, 0.463782, 0.482315,
0.581332, 0.744827, 0.783527, 0.927534, 0.75784, 0.815782,
0.739492, 0.642542, 0.456073, 0.25397, 0.170434, -0.0433254,
-0.172377, -0.483394, -0.685189, -0.903759, -0.822566, -0.81606,
-0.804218, -0.698942, -0.796972, -0.622653, -0.475531,
-0.0927873, 0.170064, 0.308027, 0.523636, 0.724012, 0.839002,
0.935767, 0.99999, 0.829659, 0.799655, 0.599124, 0.443584,
0.246014, 0.0518055, -0.0289247, -0.2252, -0.469117, -0.634617,
-0.487249, -0.528909, -0.537081, -0.55472, -0.582812, -0.514385,
-0.351075, -0.0625675, -0.0660828, 0.157174, 0.177465, 0.267662,
0.337877, 0.327423, 0.580252, 0.58534, 0.541552, 0.456844,
0.409047, 0.276789, 0.296741, 0.110796, -0.116439, -0.291036,
-0.44491, -0.33393, -0.503438, -0.453946, -0.403127, -0.345185,
-0.294613, -0.0810386, 0.210676, 0.225354, 0.345493, 0.357982,
0.458787, 0.419994, 0.50498, 0.449844, 0.38003, 0.38777,
0.0619199, -0.0802985, -0.296062, -0.274261, -0.209535,
-0.358167, -0.50498, -0.526103, -0.450214, -0.352771, -0.243917,
-0.321194, -0.222856, -0.155416, 0.111197, 0.273829, 0.263992,
0.450893, 0.618243, 0.673009, 0.655339, 0.811311, 0.74566,
0.680749, 0.529711, 0.303, 0.0513738, -0.169601, -0.193407,
-0.429708, -0.487927, -0.806377, -0.972555, -0.928521,
-0.919825, -0.66863, -0.554473, -0.475346, -0.340467, 0.0185945,
0.251349, 0.476148, 0.595763, 0.685744, 0.804743, 0.838355,
0.975639, 0.791452, 0.765734, 0.720374, 0.585587, 0.307626,
0.136945, 0.0885319, -0.151223, -0.278547, -0.644022, -0.843998,
-0.905609, -0.814364, -0.817725, -0.829443, -0.672084, -0.71396,
-0.487311, -0.314564, -0.0707083, 0.264424, 0.4368, 0.592587,
0.776836, 0.883654, 0.93401, 0.983811, 0.821179, 0.685343,
0.472725, 0.402233, 0.209781, -0.0657745, -0.149157, -0.328749,
-0.562429, -0.663696, -0.485152, -0.532425, -0.50828, -0.527182,
-0.546239, -0.395387, -0.220482, -0.00823337, -0.00132597,
0.245799, 0.283882, 0.318881, 0.385427, 0.345277, 0.532363,
0.571834, 0.495729, 0.3273, 0.292208, 0.207592, 0.145456,
0.0327793, -0.262265, -0.451232, -0.465047, -0.340405,
-0.514077, -0.474144, -0.348669, -0.285516, -0.156958,
0.0751179, 0.281785, 0.30963, 0.502914, 0.469518, 0.48617,
0.473218, 0.479386, 0.454439, 0.327886, 0.280706, -0.0410435,
-0.20901, -0.355978, -0.379259, -0.324679, -0.460175, -0.633538,
-0.561349, -0.411884, -0.371118, -0.232138, -0.252398,
-0.215394, -0.0694132, 0.279256, 0.373863, 0.34574, 0.565574,
0.73203, 0.778131, 0.732955, 0.846557, 0.761232, 0.675784,
0.508989, 0.163804, -0.0748713, -0.275648, -0.331401, -0.550032,
-0.709118, -0.954886, -1., -0.947331, -0.955225, -0.743193,
-0.550772, -0.420673, -0.238614, 0.185297, 0.392149, 0.520306,
0.768325, 0.794382, 0.866663, 0.915415, 0.999599, 0.837676,
0.734004, 0.663295, 0.469426, 0.24808, 0.0858182, -0.00638318,
-0.213143, -0.37451, -0.749391, -0.885874, -0.858028, -0.838601,
-0.792007, -0.784545, -0.635141, -0.577076, -0.340806, -0.1972,
-0.0330877, 0.31882, 0.547689, 0.644855, 0.788769, 0.936322,
0.905517, 0.953283, 0.824478, 0.564587, 0.385149, 0.294921,
0.116686, -0.0955318, -0.299824, -0.504055, -0.569213,
-0.637146, -0.512319, -0.517623, -0.486077, -0.429554,
-0.445836, -0.221191, -0.0926948, 0.0609023, 0.156835, 0.316013,
0.383761, 0.357149, 0.410404, 0.330291, 0.442197, 0.494095,
0.353572, 0.167874, 0.19279, 0.14854, 0.0317925, -0.0354004,
-0.383823, -0.51568, -0.409294, -0.339881, -0.424373, -0.443831,
-0.339233, -0.139998, 0.0402418, 0.161954, 0.347128, 0.444571,
0.603472, 0.556786, 0.514786, 0.518302, 0.477813, 0.452435,
0.277252, 0.130655, -0.142218, -0.3063, -0.44528, -0.543248,
-0.516235, -0.661753, -0.733818, -0.582472, -0.415523,
-0.390977, -0.23183, -0.147861, -0.0947609, 0.179469, 0.401801,
0.473958, 0.537759, 0.643159, 0.783835, 0.862037, 0.726788,
0.777761, 0.711678, 0.596842, 0.396065, -0.00391625, -0.143668,
-0.332789, -0.422831, -0.600358, -0.862685, -0.958741,
-0.967097, -0.908631, -0.908384, -0.724598, -0.509297,
-0.340498, -0.0642326, 0.268217, 0.446884, 0.621018, 0.869839,
0.908138, 0.91264, 0.967375, 0.994388, 0.869808, 0.693083,
0.515465, 0.355762, 0.157297, -0.0776774, -0.144901, -0.352678,
-0.577415, -0.803293, -0.88612, -0.826205, -0.848253, -0.740294,
-0.70844, -0.598045, -0.336643, -0.169663, -0.112369, 0.0592988,
0.397761, 0.583182, 0.677172, 0.803509, 0.880076, 0.869284,
0.869685, 0.72244, 0.437479, 0.2993, 0.226433, 0.0747171,
-0.175306, -0.470412, -0.588825, -0.489408, -0.60708, -0.547997,
-0.480157, -0.438188, -0.32289, -0.269789, -0.0491227,
-0.00622899, 0.12569, 0.31589, 0.356656, 0.440717, 0.423787,
0.383885, 0.331771, 0.348053, 0.337075, 0.176694, 0.0835055,
0.0516513, -0.00792501, -0.0987388, -0.253724, -0.42832,
-0.483919, -0.394308, -0.332604, -0.329859, -0.35385, -0.268772,
0.0399642, 0.238675, 0.242684, 0.417589, 0.558204, 0.68892,
0.661137, 0.525394, 0.530482, 0.415893, 0.369546, 0.196892,
-0.07851, -0.179685, -0.367017, -0.528971, -0.625829, -0.723704,
-0.764316, -0.678498, -0.558636, -0.444294, -0.337846,
-0.213543, -0.0601005, 0.0910605, 0.307009, 0.463967, 0.60486,
0.711184, 0.742175, 0.803879, 0.933609, 0.809368, 0.729871,
0.70292, 0.508681, 0.274384, -0.0428937, -0.23775, -0.417743,
-0.583737, -0.762404, -1., -0.950291, -0.893275, -0.937772,
-0.855561, -0.714114, -0.518178, -0.215702, 0.102162, 0.303833,
0.527552, 0.724999, 0.891424, 0.986185, 0.92445, 0.95689,
0.931913, 0.863209, 0.646643, 0.341484, 0.265226, 0.150298,
-0.114743, -0.238706, -0.457245, -0.659533, -0.702118,
-0.810756, -0.792871, -0.779302, -0.722532, -0.621912,
-0.492245, -0.147399, -0.0962719, -0.0371581, 0.191464,
0.363317, 0.584415, 0.691233, 0.752043, 0.803756, 0.830121,
0.732955, 0.57979, 0.368466, 0.218847, 0.111814, -0.0452681,
-0.277252, -0.543248, -0.609023, -0.441611, -0.504148,
-0.549323, -0.397268, -0.403805, -0.174042, -0.0101761,
-0.00363872, 0.119245, 0.235437, 0.379136, 0.403034, 0.446822,
0.461346, 0.324833, 0.295846, 0.205834, 0.109439, 0.0324709,
-0.0164976, -0.0929415, -0.12017, -0.234697, -0.426717,
-0.389682, -0.426378, -0.398162, -0.290419, -0.239693,
-0.232446, -0.173888, 0.181843, 0.387678, 0.330383, 0.520553,
0.668013, 0.706466, 0.74381, 0.574362, 0.495112, 0.44858,
0.270622, 0.0839681, -0.204447, -0.261217, -0.417774, -0.643467,
-0.786087, -0.952727, -0.857473, -0.706651, -0.588023,
-0.485553, -0.298591, -0.209936, 0.0174844, 0.303062, 0.443276,
0.553856, 0.716581, 0.841777, 0.801752, 0.800271, 0.901847,
0.834099, 0.638009, 0.597983, 0.310864, 0.142681, -0.0267045,
-0.360233, -0.455241, -0.683031, -0.911345, -0.960159,
-0.924759, -0.828888, -0.867989, -0.813377, -0.690771,
-0.473496, -0.109963, 0.155632, 0.338092, 0.572759, 0.814857,
0.891887, 0.99999, 0.99999, 0.929847, 0.930124, 0.829258,
0.564125, 0.253477, 0.151007, 0.064911, -0.183879, -0.420364,
-0.631626, -0.741435, -0.64541, -0.706281, -0.786611, -0.66715,
-0.681951, -0.504888, -0.269018, -0.0599463, 0.0686114,
0.123932, 0.275463, 0.390823, 0.544143, 0.636313, 0.710198,
0.704709, 0.726171, 0.5632, 0.400228, 0.318018, 0.15554,
0.0337969, -0.117148, -0.371026, -0.553579, -0.528447, -0.46332,
-0.385303, -0.473064, -0.39107, -0.279318, -0.0242992, 0.21046,
0.111289, 0.263807, 0.387832, 0.421937, 0.487927, 0.440562,
0.485091, 0.358599, 0.23368, 0.0752105, -0.104351, -0.129329,
-0.167134, -0.18872, -0.325542, -0.458386, -0.513244, -0.390083,
-0.321595, -0.365691, -0.235746, -0.134478, -0.0901662,
0.0839064, 0.290357, 0.46443, 0.556816, 0.590058, 0.700176,
0.698141, 0.748219, 0.662, 0.442752, 0.414536, 0.115144,
-0.110611, -0.240834, -0.36677, -0.432545, -0.693238, -0.937926,
-1., -0.868698, -0.747818, -0.561658, -0.488174, -0.303617,
-0.123778, 0.127478, 0.456536, 0.502359, 0.652749, 0.845169,
0.914398, 0.905702, 0.896975, 0.840513, 0.861019, 0.687995,
0.424836, 0.199112, -0.0137531, -0.0634926, -0.351075,
-0.573098, -0.812143, -1., -0.926301, -0.895834, -0.804342,
-0.756483, -0.76925, -0.626045, -0.324679, -0.042277, 0.157945,
0.440347, 0.608869, 0.79139, 0.862253, 0.960375, 0.99999,
0.86472, 0.833822, 0.67711, 0.402541, 0.223473, 0.0487218,
-0.050757, -0.153628, -0.538129, -0.678251, -0.684603,
-0.641555, -0.566283, -0.676432, -0.585124, -0.559869,
-0.397484, -0.0833513, -0.0256252, 0.177927, 0.280551, 0.281384,
0.390391, 0.464738, 0.519412, 0.625274, 0.586512, 0.502421,
0.368251, 0.195319, 0.199019, 0.0583737, -0.0918622, -0.255173,
-0.478461, -0.500725, -0.409294, -0.47658, -0.347744, -0.278084,
-0.33137, -0.0578495, 0.0623824, 0.277067, 0.345277, 0.355053,
0.495482, 0.416757, 0.472571, 0.448981, 0.408862, 0.388664,
0.101853, -0.137655, -0.235129, -0.289833, -0.332388, -0.297049,
-0.497117, -0.600234, -0.499275, -0.424219, -0.270714,
-0.300163, -0.219927, -0.033026, 0.0701533, 0.302168, 0.386198,
0.477844, 0.76188, 0.704925, 0.703629, 0.750748, 0.677634,
0.716581, 0.527182, 0.297542, 0.0343211, -0.260138, -0.300163,
-0.456227, -0.558019, -0.715378, -1., -1., -0.872398, -0.82087,
-0.595146, -0.417682, -0.318049, 0.0170218, 0.25582, 0.464091,
0.655124, 0.777576, 0.925067, 0.93808, 0.904437, 0.911684,
0.79284, 0.727559, 0.673101, 0.24731, 0.0556601, -0.118628,
-0.216874, -0.263345, -0.639243, -0.844984, -0.942305,
-0.887354, -0.815227, -0.773043, -0.620525, -0.617657,
-0.516328, -0.183478, 0.00857257, 0.148047, 0.495267, 0.674951,
0.751303, 0.905517, 0.894724, 0.970551, 0.940855, 0.733942,
0.574393, 0.300472, 0.144069, 0.00699991, -0.217244, -0.312591,
-0.580036, -0.749915, -0.666626, -0.690832, -0.560794, -0.46921,
-0.518548, -0.36563, -0.189707, -0.037559, 0.101422, 0.276296,
0.439884, 0.394462, 0.367696, 0.444664, 0.452681, 0.49835,
0.536341, 0.314317, 0.220543, 0.141047, 0.0562768, 0.0524531,
-0.178914, -0.372814, -0.434426, -0.461346, -0.416818,
-0.417065, -0.409973, -0.206297, -0.174073, 0.0153566, 0.176848,
0.227882, 0.560517, 0.582102, 0.551636, 0.531654, 0.453298,
0.470289, 0.407814, 0.352431, 0.0734836, -0.260261, -0.347097,
-0.413673, -0.480064, -0.53446, -0.626692, -0.677418, -0.533967,
-0.454686, -0.340159, -0.168214, -0.166209, 0.0514354, 0.289062,
0.353912, 0.463042, 0.565296, 0.759875, 0.844152, 0.701317,
0.716519, 0.630053, 0.586635, 0.602455, 0.238829, -0.0514971,
-0.251195, -0.432483, -0.458725, -0.647908, -0.82232, -0.958987,
-1., -0.917204, -0.822813, -0.682044, -0.428382, -0.241851,
0.0555059, 0.351291, 0.418514, 0.751611, 0.919085, 0.939838,
0.99999, 0.927287, 0.91449, 0.850227, 0.661908, 0.527645,
0.266212, -0.0353387, -0.152703, -0.363224, -0.423849,
-0.627432, -0.863425, -0.843936, -0.911098, -0.853249,
-0.700114, -0.607388, -0.444355, -0.33541, -0.182337,
0.000770915, 0.191187, 0.442289, 0.680286, 0.740171, 0.803663,
0.839434, 0.824694, 0.9226, 0.640075, 0.424373, 0.305159,
0.0779549, -0.00391625, -0.238305, -0.495791, -0.532733,
-0.612353, -0.633939, -0.621974, -0.614573, -0.37303, -0.293503,
-0.21638, -0.0300657, -0.0737303, 0.217398, 0.407968, 0.469981,
0.521015, 0.364458, 0.383515, 0.391316, 0.365599, 0.333374,
0.190015, 0.0564618, 0.0522989, -0.0767215, -0.146782,
-0.247926, -0.448148, -0.354775, -0.403559, -0.423757,
-0.274415, -0.288446, -0.178081, 0.120139, 0.160782, 0.233587,
0.327269, 0.52857, 0.762312, 0.611551, 0.549231, 0.443646,
0.338648, 0.416911, 0.185544, -0.0136606, -0.238151, -0.470289,
-0.495328, -0.617287, -0.733726, -0.718616, -0.638842,
-0.568164, -0.434241, -0.374264, -0.132721, 0.011317, 0.157174,
0.44121, 0.423171, 0.6023, 0.763391, 0.7571, 0.889883, 0.849332,
0.685436, 0.642727, 0.521879, 0.436122, 0.246076, -0.142157,
-0.269543, -0.509359, -0.616269, -0.724598, -0.974807,
-0.824571, -0.92553, -0.962904, -0.789694, -0.686114, -0.435906,
-0.0772765, 0.148447, 0.351815, 0.529495, 0.733726, 0.99999,
0.986031, 0.99999, 0.947855, 0.829042, 0.833421, 0.562213,
0.277221, 0.233032, -0.0259027, -0.266243, -0.391131, -0.670018,
-0.609393, -0.684912, -0.813284, -0.788646, -0.84224, -0.609701,
-0.522403, -0.338617, -0.0680872, -0.149311, 0.0519905,
0.306608, 0.4438, 0.649326, 0.752937, 0.755404, 0.822258,
0.754695, 0.735885, 0.615406, 0.322797, 0.239508, 0.0167443,
-0.112615, -0.33985, -0.657621, -0.565821, -0.488729, -0.634247,
-0.602825, -0.524716, -0.402418, -0.0197354, -0.00662987,
0.0313917, 0.114126, 0.230565, 0.523883, 0.458108, 0.520923,
0.451355, 0.286873, 0.293503, 0.205927, 0.0740387, 0.0617657,
-0.0386383, -0.0883777, -0.129853, -0.362176, -0.340097,
-0.37559, -0.360326, -0.364304, -0.372629, -0.245151, -0.233125,
-0.125567, 0.22116, 0.30815, 0.248944, 0.52416, 0.550711,
0.791791, 0.831324, 0.533196, 0.539733, 0.339388, 0.301674,
0.0976903, -0.180949, -0.221314, -0.544235, -0.660458,
-0.785716, -0.935706, -0.79802, -0.618644, -0.591446, -0.458232,
-0.318604, -0.159795, 0.192266, 0.325511, 0.462703, 0.562028,
0.701625, 0.827099, 0.764963, 0.833051, 0.87801, 0.669247,
0.591662, 0.491165, 0.181381, 0.214469, -0.0601622, -0.34389,
-0.463351, -0.807302, -0.79062, -0.911345, -0.843011, -0.812298,
-0.925283, -0.812236, -0.662216, -0.410836, -0.00468716,
0.189614, 0.307842, 0.676432, 0.768633, 0.982423, 0.99999,
0.994696, 0.977705, 0.83043, 0.772179, 0.48691, 0.184156,
0.109408, -0.0056431, -0.345555, -0.490425, -0.750902,
-0.730457, -0.519566, -0.771408, -0.719233, -0.740448,
-0.640322, -0.329612, -0.196275, 0.0279996, -0.00468716,
0.126954, 0.346665, 0.425483, 0.580468, 0.697555, 0.678128,
0.708964, 0.695458, 0.467791, 0.48506, 0.290604, 0.0998489,
-0.0154183, -0.259058, -0.422523, -0.606618, -0.577014,
-0.486016, -0.5315, -0.5389, -0.402356, -0.330599, 0.106109,
0.235684, 0.0992322, 0.359894, 0.330784, 0.564834, 0.593111,
0.500139, 0.520183, 0.303679, 0.232508, 0.0275988, -0.0999414,
-0.076814, -0.173672, -0.280736, -0.299516, -0.524962,
-0.504456, -0.321132, -0.388079, -0.328749, -0.303309,
-0.211847, -0.0440347, 0.114496, 0.259737, 0.430325, 0.463813,
0.606618, 0.681489, 0.674273, 0.884486, 0.613186, 0.49209,
0.378211, 0.0576953, 0.030374, -0.230288, -0.314965, -0.519967,
-0.807518, -0.941719, -1., -0.809584, -0.691542, -0.624287,
-0.488698, -0.257886, -0.137192, 0.268525, 0.500817, 0.479047,
0.716427, 0.828178, 0.926455, 0.897808, 0.828734, 0.8555,
0.759259, 0.560671, 0.381572, 0.0963335, 0.0327176, -0.0687039,
-0.467976, -0.57538, -0.919331, -0.948719, -0.809121, -0.913719,
-0.773999, -0.838293, -0.762157, -0.589133, -0.264979,
0.0765981, 0.215548, 0.44121, 0.727682, 0.855654, 0.921953,
0.99999, 0.98967, 0.932684, 0.801721, 0.589966, 0.383977,
0.1128, -0.0625675, -0.139135, -0.376484, -0.686361, -0.764717,
-0.758241, -0.542632, -0.666996, -0.725369, -0.604243,
-0.598199, -0.16402, -0.031145, 0.0453298, 0.195658, 0.261278,
0.423695, 0.488791, 0.61704, 0.661198, 0.676647, 0.657344,
0.584261, 0.369453, 0.301058, 0.261032, -0.0197354, -0.166641,
-0.421074, -0.522649, -0.557557, -0.613802, -0.540473, -0.46002,
-0.467329, -0.363934, -0.0684264, 0.158068, 0.33985, 0.281322,
0.448148, 0.481976, 0.494619, 0.643005, 0.477597, 0.475377,
0.313547, 0.10173, -0.135095, -0.210367, -0.176971, -0.280243,
-0.350458, -0.494712, -0.542447, -0.506738, -0.348793,
-0.345493, -0.336181, -0.254248, -0.128342, 0.1091, 0.233649,
0.278239, 0.494187, 0.678189, 0.652903, 0.780813, 0.769897,
0.832496, 0.720836, 0.485615, 0.337846, -0.0660212, -0.109192,
-0.274569, -0.467051, -0.610318, -0.973265, -1., -1., -0.80869,
-0.719664, -0.578926, -0.413519, -0.216843, 0.114188, 0.358753,
0.57868, 0.64063, 0.801443, 0.915415, 0.959111, 0.898887,
0.803108, 0.785377, 0.699837, 0.476302, 0.199204, 0.0854482,
-0.0844306, -0.156619, -0.43273, -0.712603, -0.914891,
-0.974344, -0.760862, -0.869623, -0.760492, -0.744765,
-0.698726, -0.448395, -0.14632, 0.119091, 0.28749, 0.57097,
0.738814, 0.943569, 0.972956, 0.99999, 0.99999, 0.870764,
0.699374, 0.461192, 0.281168, 0.0486601, -0.145055, -0.27608,
-0.496192, -0.778778, -0.715502, -0.627926, -0.630701,
-0.545222, -0.591045, -0.519412, -0.393629, -0.0607789,
0.0495236, 0.130192, 0.339018, 0.305714, 0.412748, 0.423633,
0.551266, 0.580314, 0.569305, 0.522804, 0.365475, 0.300009,
0.154461, 0.141818, -0.0543958, -0.33985, -0.533689, -0.491813,
-0.497363, -0.573067, -0.509051, -0.428629, -0.324216,
-0.204817, 0.141355, 0.234111, 0.371951, 0.531191, 0.526257,
0.577446, 0.527337, 0.596195, 0.50498, 0.464862, 0.226741,
-0.0909988, -0.239323, -0.341114, -0.307256, -0.427919,
-0.548306, -0.681119, -0.553949, -0.455302, -0.414752,
-0.285732, -0.250578, -0.179376, 0.0354004, 0.286349, 0.35237,
0.439884, 0.596688, 0.74344, 0.74088, 0.792316, 0.801042,
0.705788, 0.676555, 0.415369, 0.110734, -0.136329, -0.228746,
-0.361713, -0.519072, -0.718832, -1., -1., -0.977119, -0.798051,
-0.685652, -0.572235, -0.369484, -0.121003, 0.312036, 0.411175,
0.601468, 0.824632, 0.863116, 0.926516, 0.99999, 0.93586,
0.814364, 0.762712, 0.602455, 0.347652, 0.0825804, 0.0257486,
-0.150328, -0.321996, -0.549107, -0.859601, -0.925375,
-0.885627, -0.821271, -0.813685, -0.652194, -0.669463,
-0.543464, -0.254186, -0.0776774, 0.222887, 0.390145, 0.638379,
0.769651, 0.930309, 0.995375, 0.934688, 0.958833, 0.821487,
0.50165, 0.338956, 0.223349, -0.0551358, -0.188257, -0.406827,
-0.639767, -0.730457, -0.661013, -0.598137, -0.585433,
-0.497055, -0.500293, -0.382991, -0.182799, 0.0116562, 0.103703,
0.312097, 0.43532, 0.37118, 0.476765, 0.436554, 0.571063,
0.587036, 0.479447, 0.385457, 0.238922, 0.226341, 0.0858182,
-0.0158192, -0.17065, -0.493016, -0.626692, -0.433162,
-0.531993, -0.559098, -0.425021, -0.399426, -0.188103,
-0.0111937, 0.255204, 0.353295, 0.473527, 0.615622, 0.602763,
0.569274, 0.536896, 0.519227, 0.43347, 0.388294, 0.0202905,
-0.222023, -0.331987, -0.450245, -0.338555, -0.540535,
-0.676802, -0.661784, -0.530297, -0.404268, -0.387585,
-0.276943, -0.162632, -0.140615, 0.195782, 0.403774, 0.327269,
0.582935, 0.681335, 0.760461, 0.788245, 0.805359, 0.821764,
0.720929, 0.601067, 0.31293, 0.0155108, -0.230442, -0.319745,
-0.508125, -0.639335, -0.897838, -1., -0.972401, -0.999784,
-0.763884, -0.58349, -0.512319, -0.226741, 0.0913997, 0.396929,
0.530883, 0.686885, 0.87838, 0.949181, 0.85772, 0.99999,
0.846711, 0.719048, 0.75414, 0.385427, 0.205002, 0.0364797,
-0.0539024, -0.194116, -0.408061, -0.668938, -0.820315,
-0.848777, -0.86435, -0.802214, -0.768355, -0.587036, -0.604952,
-0.376422, -0.162509, -0.0601622, 0.364519, 0.487866, 0.652965,
0.826575, 0.917728, 0.997132, 0.960992, 0.845632, 0.706158,
0.327731, 0.217706, 0.148848, -0.217305, -0.267939, -0.554195,
-0.737056, -0.666564, -0.584415, -0.517623, -0.500416,
-0.438527, -0.359863, -0.144469, -0.0663912, 0.0782633,
0.187178, 0.395634, 0.475192, 0.359431, 0.472756, 0.317124,
0.502822, 0.529279, 0.288045, 0.204539, 0.147985, 0.115606,
0.01548, -0.122853, -0.388973, -0.482099, -0.599001, -0.421475,
-0.490549, -0.521817, -0.305097, -0.329088, -0.00693823,
0.192636, 0.328071, 0.474298, 0.627062, 0.64171, 0.680101,
0.597675, 0.507077, 0.507755, 0.363903, 0.298375, -0.167659,
-0.311419, -0.443924, -0.576243, -0.425237, -0.705973,
-0.778902, -0.63215, -0.484381, -0.391378, -0.282864, -0.23223,
-0.0614573, 0.0913997, 0.297141, 0.470597, 0.425329, 0.739893,
0.755003, 0.734189, 0.796879, 0.79284, 0.786364, 0.64026,
0.445188, 0.115421, -0.0784483, -0.336088, -0.409263, -0.598538,
-0.784545, -0.946344, -1., -0.90231, -1., -0.684357, -0.497888,
-0.437725, -0.0902896, 0.235129, 0.46813, 0.626816, 0.849764,
0.883777, 0.99999, 0.878473, 0.996608, 0.841284, 0.679423,
0.667458, 0.234204, 0.111289, -0.044343, -0.122144, -0.313978,
-0.567239, -0.802677, -0.810972, -0.820716, -0.86805, -0.732893,
-0.728946, -0.498443, -0.451294, -0.188566, -0.0965494,
0.0395634, 0.527337, 0.567363, 0.707577, 0.843782, 0.905054,
0.923279, 0.922508, 0.696753, 0.493324, 0.264054, 0.100188,
0.0470258, -0.325758, -0.415986, -0.626445, -0.703629, -0.61997,
-0.562922, -0.472139, -0.448611, -0.374325, -0.243486,
0.0302199, -0.0209997, 0.145456, 0.330291, 0.476425, 0.529249,
0.374048, 0.476826, 0.334793, 0.501742, 0.47954, 0.172592,
0.122915, 0.0984613, 0.0195812, -0.0648494, -0.229363,
-0.524561, -0.47661, -0.550927, -0.419624, -0.480773, -0.460082,
-0.220266, -0.167905, 0.143298, 0.237812, 0.459959, 0.590737,
0.689969, 0.682414, 0.663049, 0.582257, 0.439329, 0.459558,
0.24916, 0.0846156, -0.262759, -0.368189, -0.509914, -0.617719,
-0.529372, -0.769034, -0.72614, -0.552777, -0.459188, -0.369022,
-0.191742, -0.16991, -0.00755497, 0.241451, 0.363378, 0.515064,
0.54183, 0.777206, 0.82087, 0.787012, 0.77736, 0.823861,
0.796324, 0.582627, 0.299978, 0.0168985, -0.110673, -0.441457,
-0.535447, -0.739893, -0.926424, -0.98637, -1., -0.925992,
-0.956613, -0.621512, -0.425453, -0.254248, 0.11058, 0.351136,
0.521416, 0.772488, 0.944032, 0.895495, 0.99999, 0.883623,
0.911992, 0.734805, 0.586481, 0.48839, 0.133707, 0.0295106,
-0.120294, -0.168337, -0.426871, -0.677203, -0.784606, -0.76817,
-0.801906, -0.845447, -0.696691, -0.658361, -0.431188,
-0.317494, -0.128311, -0.075488, 0.195473, 0.611089, 0.64319,
0.767122, 0.841469, 0.906442, 0.890098, 0.89753, 0.58534,
0.322828, 0.169509, 0.030004, -0.0920164, -0.442999, -0.553178,
-0.637485, -0.640723, -0.629221, -0.479694, -0.365321, -0.39625,
-0.240094, -0.0661753, 0.0870825, 0.0318542, 0.246169, 0.405255,
0.503654, 0.468655, 0.367295, 0.404885, 0.27238, 0.420673,
0.297388, 0.0870825, 0.0430479, 0.0240525, -0.060008, -0.167751,
-0.369854, -0.578865, -0.466095, -0.540319, -0.413611,
-0.450615, -0.367079, -0.149249, 0.00749329, 0.257424, 0.335841,
0.621327, 0.689445, 0.757069, 0.714761, 0.659132, 0.55435,
0.435413, 0.401863, 0.116994, -0.0495236, -0.374572, -0.471492,
-0.633168, -0.735329, -0.70474, -0.819791, -0.67196, -0.566129,
-0.439607, -0.3203, -0.112122, -0.0527306, 0.178667, 0.352123,
0.461932, 0.638379, 0.692467, 0.875081, 0.832866, 0.812205,
0.765426, 0.789016, 0.72099, 0.391902, 0.14228, -0.111382,
-0.282432, -0.527583, -0.622529, -0.894724, -0.958586,
-0.978507, -1., -0.908878, -0.917204, -0.566222, -0.359061,
-0.0569244, 0.196028, 0.414197, 0.646273, 0.900521, 0.99999,
0.951031, 0.995837, 0.889574, 0.963674, 0.720836, 0.530513,
0.328595, 0.073792, -0.0331802, -0.20861, -0.275093, -0.609578,
-0.738197, -0.788923, -0.800364, -0.855654, -0.767276,
-0.628512, -0.587961, -0.233772, -0.209627, -0.0598538,
0.0671004, 0.309168, 0.642018, 0.692744, 0.778963, 0.819544,
0.885257, 0.82972, 0.773598, 0.443029, 0.262913, 0.0865892,
-0.00931265, -0.16735, -0.56616, -0.609948, -0.635851,
-0.597983, -0.612785, -0.473342, -0.351229, -0.315212,
-0.117241, 0.0264578, 0.0996947, 0.129853, 0.423016, 0.445836,
0.561966, 0.489469, 0.356903, 0.444047, 0.282093, 0.335564,
0.1762, 0.0608406, -0.042647, -0.0477351, -0.151408, -0.311326,
-0.423386, -0.513676, -0.453791, -0.533596, -0.305375,
-0.384995, -0.254402, 0.0107928, 0.171729, 0.320947, 0.4051,
0.729563, 0.738722, 0.777761, 0.677819, 0.581023, 0.453761,
0.398563, 0.258719, -0.0889327, -0.167289, -0.461254, -0.532671,
-0.710814, -0.867834, -0.776311, -0.735576, -0.624534,
-0.548953, -0.388202, -0.264979, -0.03133, 0.110179, 0.31,
0.391131, 0.598754, 0.806655, 0.736409, 0.882081, 0.867125,
0.836905, 0.744272, 0.764254, 0.614543, 0.277375, 0.0424928,
-0.190724, -0.382343, -0.655925, -0.755466, -1., -0.946252,
-0.951494, -1., -0.840667, -0.855037, -0.498504, -0.191958,
0.113818, 0.268309, 0.501835, 0.776065, 0.94141, 0.99999,
0.967159, 0.966326, 0.844368, 0.939221, 0.609177, 0.353202,
0.248574, 0.00206605, -0.0905979, -0.282402, -0.424466,
-0.682876, -0.691757, -0.745691, -0.808351, -0.838694,
-0.717043, -0.573006, -0.480989, -0.109655, -0.162632,
0.0116254, 0.182769, 0.370163, 0.6727, 0.724012, 0.77588,
0.800364, 0.865892, 0.755466, 0.637454, 0.37411, 0.181751,
-0.0227574, -0.0791884, -0.278424, -0.673317, -0.604151,
-0.566222, -0.573067, -0.546024, -0.382836, -0.281723,
-0.140461, 0.072466, 0.0915539, 0.153535, 0.238367, 0.498905,
0.469179, 0.506522, 0.436739, 0.295692, 0.354991, 0.142188,
0.127941, 0.028308, -0.0334885, -0.14521, -0.16328, -0.267322,
-0.445219, -0.408647, -0.473804, -0.473218, -0.483086,
-0.229208, -0.284498, -0.141848, 0.19094, 0.250177, 0.435968,
0.604551, 0.786457, 0.809276, 0.842703, 0.677511, 0.573006,
0.430109, 0.330846, 0.116223, -0.214623, -0.244534, -0.560794,
-0.643005, -0.87946, -1., -0.825033, -0.710352, -0.63437,
-0.560363, -0.302229, -0.192328, 0.0859724, 0.321903, 0.416202,
0.480527, 0.744735, 0.889975, 0.824077, 0.910019, 0.860094,
0.834253, 0.732184, 0.676555, 0.424373, 0.159394, -0.0197663,
-0.31219, -0.500293, -0.793025, -0.871442, -1., -0.935151,
-0.943569, -1., -0.7991, -0.81313, -0.424527, -0.053594,
0.183231, 0.290573, 0.622128, 0.906164, 0.968485, 0.99999,
0.998612, 0.939314, 0.880169, 0.906226, 0.541213, 0.242592,
0.14706, -0.0597922, -0.175614, -0.42903, -0.599679, -0.72244,
-0.657621, -0.770113, -0.807425, -0.783003, -0.655771,
-0.419686, -0.301058, -0.00394708, -0.0596997, 0.167566,
0.305375, 0.398409, 0.671559, 0.703167, 0.734466, 0.735268,
0.803663, 0.58571, 0.446514, 0.298005, 0.0896728, -0.0934041,
-0.19757, -0.42055, -0.682907, -0.586574, -0.575072, -0.522958,
-0.52009, -0.379413, -0.201517, 0.0369422, 0.174134, 0.12239,
0.29267, 0.366246, 0.555953, 0.53742, 0.519689, 0.463042,
0.312344, 0.341392, 0.015665, -0.0326251, -0.0491227, -0.147861,
-0.23775, -0.307102, -0.419624, -0.518332, -0.371797, -0.423849,
-0.468901, -0.364859, -0.160412, -0.1305, 0.0528848, 0.274292,
0.370533, 0.562367, 0.655586, 0.844399, 0.826082, 0.831786,
0.667767, 0.515927, 0.39292, 0.145672, -0.0151408, -0.288754,
-0.373493, -0.601314, -0.746276, -1., -1., -0.791113, -0.71322,
-0.633014, -0.487866, -0.262419, -0.0892103, 0.226556, 0.435351,
0.480989, 0.614789, 0.894292, 0.986802, 0.897808, 0.906133,
0.863733, 0.873292, 0.67526, 0.537821, 0.275864, 0.0843689,
-0.0863733, -0.416387, -0.59419, -0.941534, -0.986771,
-0.951833, -0.94141, -0.922045, -0.923063, -0.737272, -0.671097,
-0.248389, 0.0735453, 0.23112, 0.480681, 0.737026, 0.923186,
0.99999, 0.99999, 0.99999, 0.894755, 0.823152, 0.732338,
0.379753, 0.157236, 0.0273829, -0.128959, -0.279565, -0.589719,
-0.675321, -0.694163, -0.615591, -0.71029, -0.74862, -0.688365,
-0.612785, -0.250424, -0.107342, -0.00462549, 0.114188,
0.313947, 0.370224, 0.473588, 0.654661, 0.688766, 0.720744,
0.698541, 0.654137, 0.431003, 0.353295, 0.21416, 0.0207222,
-0.212618, -0.373585, -0.503839, -0.591569, -0.551482,
-0.584724, -0.408739, -0.413981, -0.278886, -0.0170526,
0.187641, 0.278023, 0.252336, 0.424219, 0.428783, 0.545469,
0.566191, 0.475038, 0.431558, 0.283111, 0.158315, -0.141694,
-0.169817, -0.203367, -0.266675, -0.337568, -0.490857,
-0.561504, -0.509976, -0.386198, -0.411514, -0.408739,
-0.316908, -0.11243, 0.0672546, 0.256345, 0.314472, 0.484443,
0.756761, 0.765488, 0.891424, 0.871134, 0.863641, 0.70955,
0.484905, 0.302075, -0.0365722, -0.139597, -0.337476, -0.512227,
-0.668167, -0.928737, -1., -1., -0.871381, -0.739986, -0.604551,
-0.456073, -0.206852, 0.0610565, 0.379814, 0.535508, 0.631595,
0.802738, 0.951556, 0.99999, 0.99999, 0.941996, 0.795276,
0.855777, 0.596688, 0.311542, 0.158161, -0.0447439, -0.150945,
-0.494095, -0.781091, -1., -1., -0.881341, -0.960128, -0.868143,
-0.816152, -0.710444, -0.494434, -0.149989, 0.0920781, 0.299917,
0.591045, 0.779888, 0.964322, 0.99999, 0.99999, 0.99999,
0.887662, 0.762497, 0.569922, 0.352185, 0.163249, -0.118382,
-0.204077, -0.367541, -0.729871, -0.700793, -0.646828,
-0.623208, -0.632212, -0.711955, -0.620679, -0.432082,
-0.117302, -0.0037929, 0.0430171, 0.293965, 0.391933, 0.412131,
0.488082, 0.561966, 0.625212, 0.644269, 0.587715, 0.444109,
0.320731, 0.231274, 0.123531, -0.0563693, -0.28604, -0.49943,
-0.524654, -0.470967, -0.564464, -0.57831, -0.344198, -0.331216,
-0.213081, 0.123932, 0.217706, 0.396867, 0.443214, 0.463875,
0.545407, 0.558482, 0.5916, 0.484011, 0.409942, 0.286595,
0.00440963, -0.204601, -0.271393, -0.346357, -0.386968, -0.4965,
-0.650344, -0.619137, -0.465571, -0.409818, -0.345092,
-0.292578, -0.216226, 0.0310833, 0.297666, 0.413118, 0.383268,
0.645657, 0.875451, 0.794227, 0.846526, 0.828703, 0.77628,
0.702242, 0.406858, 0.097937, -0.118906, -0.275463, -0.397946,
-0.608468, -0.789479, -0.981406, -1., -1., -0.914798, -0.772981,
-0.585402, -0.407136, -0.155016, 0.202843, 0.437109, 0.55805,
0.769897, 0.914706, 0.995775, 0.99999, 0.99999, 0.928613,
0.773104, 0.782232, 0.522033, 0.171266, 0.0636159, -0.171914,
-0.244873, -0.524592, -0.936168, -0.994018, -0.952296,
-0.903389, -0.894292, -0.842548, -0.674643, -0.575318,
-0.307718, -0.0568318, 0.0737303, 0.36492, 0.636683, 0.797804,
0.887169, 0.993123, 0.995837, 0.960067, 0.866817, 0.595115,
0.430541, 0.295384, 0.0882852, -0.175738, -0.337075, -0.475531,
-0.705171, -0.664714, -0.654229, -0.640322, -0.507663,
-0.574918, -0.522033, -0.220112, -0.0624749, 0.0478892,
0.186623, 0.380832, 0.49209, 0.456227, 0.480681, 0.490086,
0.497795, 0.522187, 0.431311, 0.226957, 0.194702, 0.0929415,
-0.0293873, -0.147522, -0.436831, -0.542847, -0.461408,
-0.427087, -0.469672, -0.455457, -0.299454, -0.0889944,
0.0535015, 0.243794, 0.293441, 0.486077, 0.675568, 0.565913,
0.567363, 0.556477, 0.48802, 0.424928, 0.308181, 0.134047,
-0.15076, -0.327978, -0.416078, -0.51161, -0.612353, -0.701779,
-0.72799, -0.635296, -0.490024, -0.462086, -0.307934, -0.184249,
-0.0926331, 0.198896, 0.426316, 0.522464, 0.617935, 0.750439,
0.949243, 0.977489, 0.878627, 0.836258, 0.731413, 0.691202,
0.412902, -0.0514971, -0.16109, -0.365414, -0.545253, -0.689753,
-0.965, -1., -1., -1., -0.929816, -0.794967, -0.589873,
-0.321595, -0.0255944, 0.308613, 0.485923, 0.619045, 0.908446,
0.989423, 0.99999, 0.99999, 0.99999, 0.935613, 0.814703,
0.579636, 0.413149, 0.171297, -0.0532856, -0.227728, -0.455611,
-0.579173, -0.902618, -0.972401, -0.875143, -0.941164,
-0.828425, -0.769496, -0.606001, -0.323815, -0.184403,
-0.0614573, 0.163033, 0.403096, 0.600851, 0.826236, 0.849641,
0.92553, 0.920102, 0.871504, 0.811588, 0.463104, 0.320331,
0.232415, 0.0128589, -0.194641, -0.493016, -0.610965, -0.5282,
-0.628604, -0.653983, -0.590367, -0.493016, -0.355608,
-0.283018, -0.0356471, 0.0618274, 0.108113, 0.377748, 0.430695,
0.549261, 0.566807, 0.419686, 0.394092, 0.403867, 0.259521,
0.186531, 0.105955, -0.0056431, -0.0219865, -0.221468,
-0.321287, -0.488421, -0.488791, -0.409417, -0.430078,
-0.386383, -0.336766, -0.24771, 0.0241451, 0.329366, 0.269759,
0.389775, 0.564803, 0.753862, 0.794012, 0.594499, 0.616639,
0.481853, 0.411946, 0.25471, -0.0452065, -0.143606, -0.367788,
-0.56175, -0.622529, -0.801289, -0.94064, -0.713035, -0.623516,
-0.590829, -0.422708, -0.316291, -0.0678713, 0.121928, 0.365445,
0.53079, 0.58864, 0.773197, 0.869993, 0.884394, 0.99999,
0.910235, 0.721977, 0.667396, 0.450276, 0.27938, 0., -0.253261,
-0.403959, -0.669463, -0.824201, -1., -0.993401, -0.868698,
-0.993617, -0.939005, -0.745691, -0.631595, -0.298683, 0.151377,
0.250732, 0.509236, 0.703321, 0.905054, 0.99999, 0.99999,
0.99999, 0.99999, 0.896605, 0.767955, 0.47806, 0.227019,
0.196892, -0.133553, -0.364458, -0.594838, -0.830121, -0.699343,
-0.829258, -0.839681, -0.853773, -0.786703, -0.630824,
-0.473989, -0.0557834, -0.0158808, -0.00447131, 0.262913,
0.442104, 0.528262, 0.74603, 0.841068, 0.748034, 0.79987,
0.679515, 0.563446, 0.399642, 0.217645, 0.140276, -0.0766598,
-0.341084, -0.54516, -0.624996, -0.507509, -0.485553, -0.646551,
-0.517161, -0.493663, -0.24734, 0.0947609, 0.0916772, 0.180147,
0.24771, 0.430109, 0.514077, 0.573468, 0.63471, 0.450924,
0.331709, 0.276296, 0.0644793, -0.0938358, 0.00777082,
-0.175275, -0.24808, -0.361929, -0.594437, -0.444756, -0.436369,
-0.387123, -0.342009, -0.339388, -0.209134, -0.0200438,
0.182676, 0.426069, 0.473897, 0.507601, 0.679114, 0.658269,
0.875759, 0.774677, 0.60523, 0.498597, 0.272133, 0.0847698,
-0.163496, -0.192266, -0.349656, -0.664868, -0.830275,
-0.978877, -1., -0.830491, -0.630208, -0.634216, -0.478862,
-0.338648, -0.0731136, 0.344969, 0.444417, 0.582719, 0.76632,
0.849086, 0.968855, 0.987974, 0.946406, 0.996145, 0.766629,
0.623115, 0.320824, 0.0515896, 0.0848315, -0.20824, -0.45817,
-0.739369, -1., -1., -0.935243, -0.831293, -0.849178, -0.89753,
-0.736409, -0.519473, -0.219464, 0.167104, 0.325974, 0.520398,
0.786857, 0.861636, 0.99999, 0.99999, 0.99999, 0.99999, 0.82639,
0.548491, 0.423016, 0.186931, -0.00123346, -0.0916155,
-0.451602, -0.725832, -0.922353, -0.734867, -0.616424,
-0.746215, -0.723396, -0.756329, -0.574455, -0.24179, 0.014339,
0.143914, 0.195936, 0.308397, 0.484782, 0.538037, 0.637022,
0.758919, 0.729378, 0.666595, 0.506984, 0.335009, 0.338154,
0.196552, -0.00370039, -0.147831, -0.490117, -0.595115,
-0.490888, -0.570909, -0.471738, -0.450245, -0.498042,
-0.378211, -0.142527, 0.220482, 0.313176, 0.331863, 0.436554,
0.456721, 0.546764, 0.629437, 0.56875, 0.55549, 0.340189,
0.0626908, -0.0972586, -0.224583, -0.215548, -0.254895,
-0.400783, -0.581732, -0.68559, -0.543711, -0.35092, -0.378797,
-0.305529, -0.250948, -0.188412, 0.144963, 0.320731, 0.336951,
0.626538, 0.714515, 0.658454, 0.701409, 0.752906, 0.877301,
0.754757, 0.507139, 0.217491, -0.0876684, -0.17654, -0.258812,
-0.445003, -0.620432, -1., -1., -0.979093, -0.89164, -0.71766,
-0.548614, -0.433162, -0.251719, 0.0570785, 0.429615, 0.630917,
0.71211, 0.914182, 0.938789, 0.967313, 0.99999, 0.858583,
0.842302, 0.811928, 0.445897, 0.118012, -0.0777391, -0.139536,
-0.153474, -0.463505, -0.829042, -1., -1., -0.833452, -0.861204,
-0.758395, -0.708594, -0.718585, -0.405655, -0.103118,
0.0856024, 0.383206, 0.645657, 0.791791, 0.909063, 0.955904,
0.99999, 0.99999, 0.962965, 0.744642, 0.404021, 0.307626,
0.120078, -0.168275, -0.248481, -0.497579, -0.866231, -0.821117,
-0.812914, -0.637608, -0.482099, -0.620432, -0.558821,
-0.401708, -0.0739462, 0.120078, 0.192235, 0.463042, 0.413981,
0.429307, 0.547165, 0.545469, 0.594345, 0.661538, 0.528663,
0.310802, 0.180826, 0.147831, 0.16109, -0.0808844, -0.328626,
-0.536988, -0.571525, -0.487342, -0.582781, -0.529187, -0.34648,
-0.373092, -0.229517, 0.0607789, 0.119769, 0.485707, 0.640784,
0.554164, 0.610102, 0.513984, 0.657991, 0.585433, 0.497949,
0.368528, -0.0702458, -0.263375, -0.316599, -0.433778,
-0.444695, -0.566993, -0.783558, -0.64541, -0.580961, -0.417157,
-0.252798, -0.25212, -0.11206, 0.0210614, 0.333374, 0.438712,
0.454624, 0.703105, 0.890808, 0.743501, 0.771439, 0.72099,
0.690061, 0.844707, 0.452157, 0.113201, -0.148139, -0.324123,
-0.313978, -0.563662, -0.719387, -0.99926, -1., -0.970613,
-0.944802, -0.810694, -0.56064, -0.417003, -0.165438, 0.183324,
0.340004, 0.676555, 0.881002, 0.92738, 0.99999, 0.99999,
0.99999, 0.904684, 0.775109, 0.71214, 0.406272, 0.0671621,
-0.0368806, -0.329982, -0.308643, -0.428999, -0.929754,
-0.907706, -0.966234, -0.854174, -0.721854, -0.739215, -0.53705,
-0.475038, -0.267908, -0.0387308, 0.0867433, 0.425853, 0.67748,
0.732092, 0.898517, 0.902001, 0.920041, 0.99999, 0.834716,
0.576089, 0.335163, 0.188103, 0.0391008, -0.190632, -0.454161,
-0.589102, -0.749669, -0.749453, -0.712819, -0.768417,
-0.388973, -0.426563, -0.40473, -0.092849, -0.0680255, 0.213913,
0.370008, 0.510006, 0.61556, 0.480773, 0.525178, 0.502051,
0.506676, 0.522927, 0.305251, 0.137809, 0.0824571, -0.070955,
-0.0758272, -0.195566, -0.540936, -0.591292, -0.530451,
-0.493016, -0.501187, -0.490086, -0.327084, -0.108452,
0.0251935, 0.214561, 0.252644, 0.528878, 0.859879, 0.669802,
0.695519, 0.641401, 0.560825, 0.655648, 0.398779, 0.197478,
-0.0365414, -0.315181, -0.41947, -0.551852, -0.633785,
-0.766259, -0.841932, -0.664529, -0.619353, -0.571926,
-0.307225, -0.242468, -0.0738845, 0.190879, 0.34759, 0.477813,
0.599309, 0.711184, 0.886583, 0.91116, 0.789232, 0.773505,
0.61778, 0.722532, 0.46039, -0.00222023, -0.0944833, -0.375251,
-0.414074, -0.586204, -0.928459, -0.940239, -0.965463,
-0.955349, -0.902217, -0.758179, -0.543834, -0.336088,
-0.00154183, 0.266459, 0.37081, 0.66015, 0.94249, 0.946468,
0.978723, 0.993894, 0.954732, 0.866971, 0.653057, 0.460267,
0.291529, 0.0446514, -0.152919, -0.330846, -0.51013, -0.584939,
-0.836042, -0.846095, -0.821487, -0.87283, -0.634525, -0.633692,
-0.51383, -0.165654, -0.0537482, -0.00863425, 0.207592, 0.51787,
0.679114, 0.755157, 0.867187, 0.880539, 0.814086, 0.860403,
0.661137, 0.384964, 0.22449, 0.0524222, -0.0688581, -0.340097,
-0.667304, -0.739215, -0.622128, -0.717136, -0.676432,
-0.628049, -0.441364, -0.206359, -0.128804, 0.121311, 0.112893,
0.331524, 0.601684, 0.560054, 0.666379, 0.605754, 0.534028,
0.466188, 0.421629, 0.324216, 0.0947917, 0.0228191, -0.072281,
-0.196337, -0.299608, -0.455457, -0.618829, -0.594745,
-0.523945, -0.518147, -0.451787, -0.466434, -0.299608,
0.0490302, 0.21194, 0.268309, 0.446915, 0.615344, 0.817386,
0.833976, 0.738197, 0.709396, 0.548768, 0.590891, 0.34944,
-0.00946684, -0.100867, -0.319991, -0.509359, -0.695859,
-0.812236, -0.906534, -0.827716, -0.698572, -0.6303, -0.508465,
-0.352462, -0.138734, 0.0825804, 0.335101, 0.439329, 0.613926,
0.777761, 0.782756, 0.85587, 0.942305, 0.826853, 0.730858,
0.678282, 0.449073, 0.262974, 0.00246693, -0.19094, -0.382528,
-0.570909, -0.719387, -0.965679, -0.892904, -0.882173,
-0.902371, -0.824971, -0.71692, -0.478615, -0.221777, 0.108175,
0.271208, 0.489716, 0.726171, 0.897437, 0.99999, 0.966635,
0.988806, 0.920257, 0.877394, 0.600358, 0.277406, 0.146381,
0.00317617, -0.218015, -0.398563, -0.658454, -0.834192,
-0.740109, -0.793271, -0.78217, -0.750594, -0.604089, -0.43973,
-0.280551, 0.0192729, 0.0579728, 0.21601, 0.385889, 0.576089,
0.709334, 0.731876, 0.783465, 0.777206, 0.784699, 0.59419,
0.42129, 0.244164, 0.0967652, -0.0450214, -0.221037, -0.447316,
-0.725462, -0.739277, -0.637547, -0.64134, -0.637238, -0.501033,
-0.444664, -0.152024, 0.124919, 0.128558, 0.302939, 0.47476,
0.662216, 0.699467, 0.717136, 0.641648, 0.56727, 0.529341,
0.33726, 0.168584, -0.0342286, -0.0954701, -0.229979, -0.301397,
-0.499275, -0.702581, -0.585248, -0.595825, -0.561565,
-0.477135, -0.356163, -0.305005, -0.134324, 0.160504, 0.30926,
0.403466, 0.591446, 0.744735, 0.741867, 0.849702, 0.742268,
0.646859, 0.602393, 0.418391, 0.210922, -0.0304049, -0.180949,
-0.38296, -0.503531, -0.773259, -0.930772, -0.862191, -0.808813,
-0.707422, -0.639705, -0.427611, -0.365013, -0.0845848,
0.240217, 0.341731, 0.503747, 0.717444, 0.866508, 0.844244,
0.860249, 0.874433, 0.845694, 0.714823, 0.586481, 0.296833,
0.0712325, -0.037559, -0.325388, -0.436739, -0.695766,
-0.879614, -0.877702, -0.827963, -0.84776, -0.808751, -0.652749,
-0.580869, -0.275093, -0.00610565, 0.201826, 0.353418, 0.627617,
0.83413, 0.836042, 0.99999, 0.94656, 0.856733, 0.862438,
0.730457, 0.41321, 0.158778, -0.000215856, -0.148478, -0.294119,
-0.565204, -0.740294, -0.849764, -0.737889, -0.736285,
-0.769589, -0.623516, -0.560332, -0.312714, -0.0243609,
0.113725, 0.167196, 0.428475, 0.557865, 0.650652, 0.780813,
0.732338, 0.773289, 0.727466, 0.699158, 0.412439, 0.207068,
0.141355, -0.113232, -0.211385, -0.381202, -0.645472, -0.750748,
-0.692837, -0.689537, -0.601468, -0.52968, -0.435968, -0.229054,
0.00638318, 0.23738, 0.268463, 0.464029, 0.625305, 0.682445,
0.76925, 0.736655, 0.640723, 0.56838, 0.509081, 0.229578,
0.0663295, -0.0856024, -0.224737, -0.304018, -0.487342,
-0.673101, -0.793703, -0.633754, -0.610626, -0.647353,
-0.460545, -0.343489, -0.219927, 0.0533781, 0.213852, 0.323815,
0.563816, 0.695088, 0.80869, 0.809214, 0.813469, 0.782448,
0.658423, 0.594961, 0.293904, 0.0751796, -0.0518055, -0.251627,
-0.436214, -0.613032, -0.858583, -0.924142, -0.796633,
-0.800796, -0.694317, -0.569829, -0.407197, -0.227605,
0.0414752, 0.337383, 0.368312, 0.568534, 0.847636, 0.861482,
0.896574, 0.87801, 0.786518, 0.773289, 0.667211, 0.413827,
0.175429, -0.0326251, -0.155694, -0.330692, -0.563354,
-0.787567, -0.900675, -0.800426, -0.771285, -0.791545, -0.68781,
-0.589503, -0.423171, -0.0759814, 0.119985, 0.225354, 0.482161,
0.71251, 0.838355, 0.85439, 0.909217, 0.913318, 0.774831,
0.738413, 0.554874, 0.249468, 0.0929415, -0.11906, -0.271485,
-0.410805, -0.711493, -0.802214, -0.753246, -0.744365,
-0.690092, -0.631071, -0.524808, -0.380431, -0.116007, 0.162632,
0.217336, 0.366092, 0.58864, 0.648555, 0.744889, 0.784082,
0.705171, 0.689352, 0.655432, 0.477351, 0.221253, 0.0532856,
-0.0424312, -0.213759, -0.419902, -0.590644, -0.759382,
-0.702026, -0.66385, -0.709889, -0.567825, -0.486386, -0.352154,
-0.0678097, 0.133707, 0.241821, 0.419779, 0.597212, 0.705881,
0.765704, 0.798267, 0.786672, 0.660767, 0.62552, 0.409202,
0.12569, 0.0391008, -0.162046, -0.331555, -0.453452, -0.676709,
-0.797712, -0.75192, -0.710753, -0.62367, -0.592371, -0.469179,
-0.25249, -0.0339203, 0.236455, 0.268278, 0.444818, 0.694378,
0.752845, 0.839927, 0.835271, 0.766567, 0.704709, 0.639613,
0.425021, 0.183601, 0.00262111, -0.121095, -0.29045, -0.485306,
-0.680965, -0.894662, -0.797743, -0.715964, -0.77921, -0.664467,
-0.527953, -0.356286, -0.0892411, 0.146597, 0.283728, 0.471677,
0.636992, 0.81791, 0.883869, 0.871812, 0.851306, 0.724845,
0.716427, 0.507509, 0.222486, 0.0674088, -0.121219, -0.287644,
-0.440655, -0.69848, -0.87431, -0.797434, -0.748219, -0.713744,
-0.689198, -0.540627, -0.412902, -0.20568, 0.158685, 0.224799,
0.348053, 0.596133, 0.75084, 0.816306, 0.8695, 0.805298,
0.785747, 0.730087, 0.505042, 0.334546, 0.101699, -0.021894,
-0.224367, -0.41281, -0.587653, -0.835271, -0.780752, -0.735638,
-0.738444, -0.657313, -0.556724, -0.471892, -0.186962,
0.0919856, 0.1935, 0.361312, 0.549693, 0.727004, 0.750439,
0.807425, 0.84261, 0.705788, 0.656419, 0.5562, 0.291128,
0.115576, -0.0459465, -0.240834, -0.335626, -0.620679, -0.79765,
-0.738567, -0.718678, -0.686053, -0.670172, -0.526566,
-0.405501, -0.176509, 0.118536, 0.218724, 0.347251, 0.589257,
0.706497, 0.742638, 0.841068, 0.788091, 0.737087, 0.663758,
0.517315, 0.285115, 0.0372506, -0.0374973, -0.212618, -0.399241,
-0.603164, -0.775818, -0.791637, -0.700268, -0.721145,
-0.658516, -0.490487, -0.456628, -0.154245, 0.122915, 0.243239,
0.369546, 0.553548, 0.741558, 0.788399, 0.834716, 0.798514,
0.741281, 0.678405, 0.554935, 0.259274, 0.0745629, -0.0408893,
-0.256746, -0.377193, -0.611582, -0.809368, -0.834377,
-0.737334, -0.684202, -0.676586, -0.582318, -0.428228,
-0.197293, 0.105585, 0.28123, 0.333559, 0.606833, 0.744426,
0.787135, 0.902063, 0.842363, 0.788214, 0.710136, 0.567208,
0.316106, 0.101792, -0.0519597, -0.221006, -0.37374, -0.567239,
-0.795738, -0.860495, -0.723242, -0.725153, -0.699004,
-0.580931, -0.480773, -0.245552, 0.0286164, 0.226279, 0.33615,
0.535262, 0.690431, 0.804434, 0.873909, 0.877085, 0.808443,
0.718832, 0.671313, 0.34981, 0.149064, 0.0358013, -0.198187,
-0.336304, -0.563076, -0.792346, -0.856024, -0.774523,
-0.753924, -0.701563, -0.60193, -0.467051, -0.267477, 0.0391008,
0.252644, 0.307688, 0.536187, 0.706405, 0.788708, 0.846557,
0.846403, 0.793611, 0.733479, 0.602516, 0.356841, 0.163804,
0.0270437, -0.124395, -0.325357, -0.498566, -0.724228,
-0.837614, -0.712295, -0.714885, -0.71214, -0.598693, -0.505443,
-0.327546, -0.0226957, 0.167967, 0.2643, 0.479139, 0.680872,
0.767646, 0.823152, 0.85479, 0.792562, 0.717506, 0.640476,
0.392766, 0.155293, 0.0191804, -0.144778, -0.283635, -0.482562,
-0.761109, -0.815165, -0.707823, -0.692097, -0.665947,
-0.589904, -0.450615, -0.289124, 0.00178852, 0.248111, 0.281877,
0.482531, 0.685128, 0.74421, 0.796016, 0.805575, 0.749669,
0.696321, 0.602054, 0.38777, 0.141602, -0.00117179, -0.129236,
-0.316137, -0.503438, -0.734127, -0.826174, -0.748589,
-0.713374, -0.692621, -0.583182, -0.512597, -0.350735,
-0.0133522, 0.209997, 0.314348, 0.484628, 0.674489, 0.796879,
0.831262, 0.871504, 0.81939, 0.703691, 0.659441, 0.426162,
0.127263, -0.00317617, -0.181628, -0.342718, -0.523205,
-0.762558, -0.855469, -0.78954, -0.717506, -0.69407, -0.624349,
-0.505134, -0.321502, -0.0339203, 0.206914, 0.29708, 0.48324,
0.689846, 0.758549, 0.842147, 0.879244, 0.813377, 0.765704,
0.674489, 0.446976, 0.201147, 0.0295415, -0.10873, -0.314348,
-0.509451, -0.713682, -0.887169, -0.828949, -0.766814,
-0.773104, -0.67048, -0.552499, -0.381418, -0.0758272, 0.168738,
0.279719, 0.446884, 0.64726, 0.766875, 0.849456, 0.867989,
0.833791, 0.765333, 0.710753, 0.483826, 0.19535, 0.0767215,
-0.0913688, -0.254741, -0.426008, -0.706744, -0.841377,
-0.778932, -0.741528, -0.736964, -0.689136, -0.547473,
-0.390761, -0.16513, 0.12162, 0.21857, 0.374017, 0.618181,
0.728021, 0.820624, 0.862284, 0.82272, 0.763175, 0.692775,
0.487465, 0.241851, 0.0775232, -0.0732678, -0.232385, -0.394801,
-0.635326, -0.830491, -0.763884, -0.693299, -0.709889,
-0.629282, -0.533072, -0.424157, -0.132505, 0.125073, 0.217645,
0.361898, 0.568072, 0.730611, 0.783373, 0.803201, 0.790681,
0.712418, 0.66678, 0.504733, 0.22486, 0.0884394, -0.0506645,
-0.249006, -0.412224, -0.664837, -0.840081, -0.772118,
-0.714361, -0.69333, -0.616115, -0.51309, -0.374048, -0.121866,
0.168121, 0.284406, 0.417127, 0.643036, 0.742576, 0.79543,
0.858553, 0.80021, 0.717814, 0.643251, 0.472417, 0.23149,
0.0212773, -0.116285, -0.277714, -0.448765, -0.654137,
-0.850566, -0.801721, -0.695489, -0.705202, -0.656665,
-0.538623, -0.426316, -0.152086, 0.149619, 0.267199, 0.406951,
0.636066, 0.771192, 0.830121, 0.887323, 0.865429, 0.790373,
0.724382, 0.565512, 0.258442, 0.0781091, -0.0580961, -0.270221,
-0.43788, -0.693145, -0.874156, -0.833914, -0.789016, -0.787104,
-0.70844, -0.58164, -0.46002, -0.206605, 0.130778, 0.292979,
0.37966, 0.595362, 0.750748, 0.811373, 0.877825, 0.866508,
0.788214, 0.737581, 0.599988, 0.315798, 0.121712, -0.0107928,
-0.18542, -0.344568, -0.576768, -0.818557, -0.836967, -0.737981,
-0.755003, -0.72762, -0.618798, -0.528447, -0.262111, 0.0407968,
0.156403, 0.287829, 0.515619, 0.680039, 0.767338, 0.848315,
0.879922, 0.825095, 0.724783, 0.599278, 0.329458, 0.132567,
0.00872676, -0.186407, -0.341577, -0.557865, -0.775294,
-0.811989, -0.698418, -0.694409, -0.662833, -0.548614, -0.43788,
-0.22264, 0.0711092, 0.246693, 0.312159, 0.524931, 0.664683,
0.74273, 0.840297, 0.789448, 0.710722, 0.669, 0.557742,
0.291128, 0.0936816, 0.00206605, -0.139906, -0.32952, -0.563508,
-0.785007, -0.813439, -0.707977, -0.695859, -0.672392,
-0.561874, -0.435043, -0.240834, 0.0738536, 0.260138, 0.339696,
0.578618, 0.737118, 0.800056, 0.855777, 0.851768, 0.783681,
0.684665, 0.575534, 0.282772, 0.0880693, -0.0326251, -0.255327,
-0.401647, -0.602547, -0.828024, -0.867279, -0.745351,
-0.694934, -0.640476, -0.564741, -0.462271, -0.246847,
0.0659903, 0.27645, 0.337322, 0.548306, 0.732338, 0.81754,
0.857165, 0.881002, 0.824077, 0.73681, 0.648586, 0.374942,
0.147368, -0.000986771, -0.152456, -0.341793, -0.570693,
-0.823707, -0.915261, -0.768355, -0.771748, -0.775047,
-0.647908, -0.539209, -0.349101, -0.0249776, 0.219772, 0.341639,
0.538993, 0.699929, 0.788553, 0.871966, 0.890098, 0.835795,
0.76225, 0.67233, 0.432329, 0.176046, 0.0391933, -0.12054,
-0.309199, -0.492183, -0.739492, -0.863671, -0.760646,
-0.729779, -0.704955, -0.640846, -0.544914, -0.362947,
-0.0470258, 0.207931, 0.236918, 0.433624, 0.649326, 0.741404,
0.80758, 0.841284, 0.811681, 0.768726, 0.66678, 0.388541,
0.162355, 0.0477967, -0.0997872, -0.286287, -0.47769, -0.71877,
-0.816707, -0.738351, -0.710907, -0.67896, -0.608807, -0.488082,
-0.337537, -0.0459774, 0.200345, 0.287027, 0.476425, 0.636005,
0.724444, 0.787998, 0.844059, 0.797959, 0.676339, 0.612415,
0.38592, 0.134108, -0.00894261, -0.137593, -0.265534, -0.456721,
-0.726325, -0.86361, -0.74236, -0.688273, -0.69185, -0.593666,
-0.488698, -0.314872, -0.0176077, 0.216781, 0.319806, 0.484597,
0.688458, 0.79765, 0.825958, 0.865275, 0.829011, 0.747972,
0.652256, 0.391471, 0.14521, 0.00477967, -0.128157, -0.327053,
-0.526812, -0.759721, -0.898424, -0.813439, -0.747387,
-0.706806, -0.614882, -0.503192, -0.38666, -0.10395, 0.195658,
0.297542, 0.465633, 0.66678, 0.776897, 0.871442, 0.893984,
0.842363, 0.795276, 0.709858, 0.505227, 0.228715, 0.0481976,
-0.0917697, -0.272565, -0.449443, -0.743285, -0.922662,
-0.850628, -0.756483, -0.733572, -0.699559, -0.581332,
-0.419624, -0.125104, 0.148293, 0.270437, 0.471584, 0.679669,
0.772673, 0.815597, 0.874988, 0.868759, 0.770884, 0.706004,
0.487773, 0.219557, 0.0984613, -0.0731752, -0.237288, -0.39662,
-0.669401, -0.824571, -0.788862, -0.736193, -0.713343,
-0.648802, -0.556631, -0.46443, -0.187116, 0.113756, 0.233371,
0.375806, 0.579019, 0.70107, 0.770977, 0.839156, 0.81461,
0.754602, 0.714977, 0.533504, 0.22409, 0.0363872, -0.0574486,
-0.225138, -0.407907, -0.661229, -0.858429, -0.770977,
-0.693793, -0.72062, -0.616516, -0.50498, -0.395109, -0.122329,
0.153381, 0.276789, 0.415986, 0.640877, 0.729933, 0.762466,
0.81902, 0.814364, 0.743871, 0.648956, 0.465355, 0.190786,
0.0330877, -0.0926331, -0.258102, -0.384902, -0.622498,
-0.833112, -0.823121, -0.730704, -0.684418, -0.648648,
-0.544914, -0.430849, -0.180702, 0.151161, 0.254587, 0.388819,
0.642388, 0.74973, 0.825095, 0.884702, 0.846927, 0.800056,
0.733387, 0.556169, 0.240741, 0.0388849, -0.0721885, -0.25397,
-0.428166, -0.677264, -0.896882, -0.888248, -0.770637,
-0.746215, -0.666379, -0.536002, -0.420519, -0.166178, 0.112831,
0.288045, 0.421475, 0.623208, 0.759845, 0.802368, 0.884856,
0.874773, 0.771254, 0.726541, 0.585587, 0.286595, 0.1128,
-0.0251627, -0.202041, -0.349564, -0.58642, -0.825742,
-0.874218, -0.77699, -0.742114, -0.699035, -0.600851, -0.513923,
-0.289525, 0.0407351, 0.224706, 0.335626, 0.597829, 0.747202,
0.810077, 0.87098, 0.853495, 0.834808, 0.747664, 0.595208,
0.306146, 0.0934657, -0.00231274, -0.188812, -0.362022,
-0.563385, -0.813377, -0.837738, -0.70659, -0.728391, -0.667088,
-0.534275, -0.447902, -0.249653, 0.0309908, 0.22927, 0.338339,
0.532826, 0.684048, 0.749453, 0.789139, 0.805051, 0.761541,
0.709643, 0.60745, 0.304604, 0.122298, -0.0191187, -0.168121,
-0.289186, -0.544328, -0.782016, -0.845293, -0.724321,
-0.684418, -0.682445, -0.578155, -0.451849, -0.275402,
0.0505103, 0.240587, 0.323137, 0.570693, 0.722224, 0.79139,
0.82639, 0.818403, 0.788307, 0.722162, 0.593975, 0.301551,
0.0676863, -0.0665454, -0.207684, -0.366555, -0.550094,
-0.802492, -0.877455, -0.743995, -0.724475, -0.652071,
-0.551081, -0.466712, -0.264979, 0.0524222, 0.276296, 0.364211,
0.557495, 0.732616, 0.79802, 0.843998, 0.885411, 0.801721,
0.737581, 0.655586, 0.357766, 0.108329, -0.0383916, -0.184156,
-0.329057, -0.551112, -0.820562, -0.890715, -0.805668,
-0.777082, -0.724783, -0.615869, -0.491042, -0.343088,
0.000215856, 0.227358, 0.313238, 0.566437, 0.714453, 0.789787,
0.851152, 0.881341, 0.848407, 0.764933, 0.653828, 0.399858,
0.129421, 0.00965185, -0.129945, -0.331216, -0.500416,
-0.763422, -0.872244, -0.777144, -0.757316, -0.707021,
-0.602825, -0.519319, -0.357396, -0.053224, 0.163095, 0.268772,
0.482439, 0.687749, 0.755867, 0.802183, 0.855469, 0.812236,
0.764624, 0.682907, 0.410497, 0.144346, 0.0275062, -0.109963,
-0.265041, -0.469487, -0.738598, -0.854112, -0.782232,
-0.712202, -0.706281, -0.62145, -0.493632, -0.352832,
-0.0598538, 0.175429, 0.278331, 0.485676, 0.675013, 0.732184,
0.805606, 0.831355, 0.773968, 0.740017, 0.668568, 0.429091,
0.143452, 0.00962102, -0.118628, -0.277869, -0.438651,
-0.726757, -0.874557, -0.783404, -0.709273, -0.679577,
-0.584261, -0.492738, -0.340775, -0.050202, 0.202658, 0.318573,
0.474359, 0.700793, 0.794567, 0.821919, 0.85257, 0.809615,
0.755928, 0.683123, 0.423757, 0.146289, 0.00101761, -0.159949,
-0.312868, -0.465663, -0.707577, -0.878226, -0.814672,
-0.735977, -0.703044, -0.593728, -0.495421, -0.366709,
-0.0981221, 0.189398, 0.308304, 0.479047, 0.68744, 0.7748,
0.834099, 0.853927, 0.842147, 0.78291, 0.706929, 0.493016,
0.194024, 0.0258102, -0.113448, -0.269759, -0.435444, -0.69885,
-0.897129, -0.818465, -0.745536, -0.756915, -0.652071,
-0.514231, -0.382991, -0.121465, 0.15298, 0.284468, 0.47991,
0.695828, 0.775263, 0.816985, 0.851337, 0.845539, 0.782355,
0.720281, 0.500755, 0.198495, 0.0461315, -0.0937741, -0.236239,
-0.403651, -0.650436, -0.834901, -0.805822, -0.733479,
-0.715964, -0.640723, -0.526442, -0.422862, -0.174196, 0.116902,
0.216935, 0.383206, 0.62515, 0.74936, 0.790219, 0.83746,
0.822104, 0.785747, 0.764408, 0.548398, 0.251195, 0.0516821,
-0.0774307, -0.22412, -0.394493, -0.648216, -0.858337,
-0.833575, -0.757008, -0.719079, -0.636406, -0.519473,
-0.397885, -0.133893, 0.148201, 0.266212, 0.423448, 0.644639,
0.760184, 0.779272, 0.827192, 0.807981, 0.725678, 0.663758,
0.520152, 0.226495, 0.0275371, -0.0799593, -0.251966, -0.35829,
-0.589657, -0.821949, -0.802492, -0.741281, -0.708656, -0.63437,
-0.525826, -0.420241, -0.197817, 0.107496, 0.231583, 0.378118,
0.632613, 0.752999, 0.810139, 0.864134, 0.828949, 0.78069,
0.734959, 0.566437, 0.260261, 0.0524531, -0.0785716, -0.264424,
-0.417898, -0.640569, -0.843843, -0.851861, -0.753862,
-0.742669, -0.6583, -0.478615, -0.395233, -0.167566, 0.119461,
0.256961, 0.403312, 0.630208, 0.765426, 0.800518, 0.835672,
0.801289, 0.759259, 0.719757, 0.582966, 0.278023, 0.0821179,
-0.0417219, -0.224737, -0.353079, -0.577323, -0.814518,
-0.854945, -0.766259, -0.752845, -0.690986, -0.584107,
-0.465201, -0.23405, 0.0353387, 0.221499, 0.326128, 0.609023,
0.778069, 0.801042, 0.860742, 0.841068, 0.81091, 0.7678,
0.626692, 0.333837, 0.0898578, -0.0553209, -0.220389, -0.367541,
-0.571525, -0.813007, -0.860834, -0.74458, -0.7361, -0.679484,
-0.54001, -0.439267, -0.230349, 0.0649419, 0.225971, 0.327361,
0.55509, 0.710444, 0.795584, 0.821857, 0.81569, 0.771809,
0.715594, 0.648339, 0.339696, 0.11206, -0.0175152, -0.18502,
-0.31441, -0.524099, -0.774153, -0.835055, -0.75121, -0.755404,
-0.701409, -0.584415, -0.469025, -0.284961, 0.0293564, 0.225971,
0.30815, 0.566037, 0.733078, 0.805452, 0.849178, 0.836196,
0.774831, 0.724938, 0.609609, 0.325573, 0.115206, -0.0492769,
-0.19683, -0.36677, -0.536125, -0.747757, -0.84739, -0.736594,
-0.727836, -0.677973, -0.543156, -0.438805, -0.268001,
0.0323168, 0.217028, 0.302137, 0.521324, 0.704339, 0.776897,
0.816399, 0.841839, 0.770422, 0.723858, 0.640229, 0.3664,
0.131271, -0.012643, -0.171297, -0.331, -0.530821, -0.792007,
-0.855346, -0.774153, -0.759937, -0.714916, -0.610935,
-0.458232, -0.297758, -0.00410127, 0.209473, 0.290419, 0.530328,
0.716673, 0.785223, 0.833513, 0.853403, 0.785624, 0.722686,
0.640075, 0.393074, 0.131025, -0.00530389, -0.151685, -0.334238,
-0.507817, -0.764408, -0.86435, -0.778162, -0.740356, -0.71103,
-0.606803, -0.498659, -0.335225, 0.0018502, 0.19609, 0.292917,
0.50313, 0.711184, 0.822412, 0.848685, 0.870671, 0.797897,
0.737796, 0.676401, 0.416448, 0.143606, 0.00194271, -0.156187,
-0.331154, -0.503808, -0.744272, -0.861297, -0.787258,
-0.737673, -0.722316, -0.626846, -0.50683, -0.351383,
-0.0585587, 0.182769, 0.270375, 0.467822, 0.677326, 0.757624,
0.837429, 0.853464, 0.798668, 0.743748, 0.672423, 0.454686,
0.174689, 0.0265811, -0.12865, -0.318295, -0.477135, -0.722625,
-0.866539, -0.782479, -0.737519, -0.731876, -0.63471, -0.509081,
-0.355083, -0.0723427, 0.18283, 0.285948, 0.454285, 0.672238,
0.768726, 0.827778, 0.856486, 0.813932, 0.752937, 0.680872,
0.452897, 0.171051, 0.0424003, -0.123254, -0.2886, -0.439422,
-0.687995, -0.834222, -0.769096, -0.713898, -0.719541,
-0.635943, -0.507447, -0.373955, -0.103734, 0.15298, 0.240279,
0.417528, 0.645965, 0.757624, 0.808967, 0.844861, 0.830707,
0.768109, 0.696321, 0.493725, 0.224891, 0.0599772, -0.0926023,
-0.263745, -0.431003, -0.692097, -0.870856, -0.79765, -0.73388,
-0.733109, -0.640538, -0.512473, -0.366647, -0.083043, 0.186407,
0.292732, 0.441796, 0.667551, 0.787382, 0.831786, 0.858429,
0.801967, 0.732246, 0.664683, 0.462796, 0.196028, 0.0228191,
-0.103056, -0.259058, -0.430325, -0.664066, -0.842517,
-0.799439, -0.724444, -0.716427, -0.643159, -0.528293, -0.40914,
-0.146227, 0.142804, 0.246724, 0.401616, 0.64541, 0.770021,
0.832496, 0.869962, 0.838755, 0.770206, 0.712264, 0.53113,
0.235992, 0.0574486, -0.0963335, -0.281476, -0.438126,
-0.688735, -0.870671, -0.84039, -0.761849, -0.738968, -0.657313,
-0.527953, -0.40803, -0.141077, 0.14706, 0.268525, 0.408893,
0.643652, 0.766875, 0.806747, 0.855469, 0.830121, 0.762774,
0.707176, 0.542693, 0.256807, 0.0768756, -0.0621049, -0.226896,
-0.384224, -0.62589, -0.825249, -0.807765, -0.730951, -0.747664,
-0.677973, -0.570785, -0.463628, -0.212464, 0.0751796, 0.223812,
0.37007, 0.615005, 0.742946, 0.808597, 0.867834, 0.8629,
0.798483, 0.738876, 0.596503, 0.281723, 0.0807302, -0.0494311,
-0.230349, -0.386352, -0.622221, -0.8345, -0.83083, -0.743069,
-0.729255, -0.663018, -0.552468, -0.428259, -0.181998, 0.118906,
0.243856, 0.350643, 0.596904, 0.717907, 0.779673, 0.823337,
0.80095, 0.755003, 0.70403, 0.568442, 0.273212, 0.0873909,
-0.025286, -0.201301, -0.355392, -0.560023, -0.791884,
-0.832434, -0.736255, -0.731105, -0.678251, -0.570292,
-0.448858, -0.224336, 0.081532, 0.238737, 0.34318, 0.592063,
0.728638, 0.806963, 0.861359, 0.846927, 0.768047, 0.709797,
0.587036, 0.271146, 0.0641401, -0.0778932, -0.240248, -0.378057,
-0.58497, -0.8312, -0.853711, -0.735052, -0.732184, -0.677326,
-0.546332, -0.421999, -0.237596, 0.0654044, 0.24731, 0.343581,
0.568133, 0.728021, 0.801721, 0.852478, 0.850227, 0.786703,
0.738105, 0.613309, 0.323291, 0.112584, -0.0175152, -0.193654,
-0.365722, -0.562614, -0.818928, -0.869746, -0.769712,
-0.762867, -0.703722, -0.58719, -0.475593, -0.291498, 0.0262728,
0.225169, 0.31811, 0.552808, 0.740263, 0.812976, 0.845848,
0.863116, 0.80684, 0.749977, 0.639859, 0.369854, 0.138364,
-0.0088501, -0.1688, -0.339233, -0.531068, -0.795399, -0.867526,
-0.758241, -0.734559, -0.714206, -0.60671, -0.479756, -0.302014,
0.0111937, 0.195566, 0.297234, 0.530359, 0.717691, 0.782355,
0.827315, 0.85772, 0.789479, 0.72907, 0.65241, 0.395541,
0.141417, 0.00687656, -0.149557, -0.317339, -0.509852,
-0.754294, -0.835764, -0.755312, -0.727158, -0.701409, -0.59382,
-0.481143, -0.318295, -0.000400876, 0.214777, 0.295846,
0.501742, 0.6937, 0.775263, 0.826082, 0.833976, 0.778069,
0.73092, 0.665145, 0.394061, 0.126245, -0.00422461, -0.152086,
-0.31882, -0.507848, -0.745968, -0.839125, -0.760153, -0.730303,
-0.707052, -0.585433, -0.474205, -0.314811, -0.00918931,
0.210706, 0.31293, 0.506738, 0.709488, 0.790527, 0.821549,
0.843905, 0.794628, 0.729933, 0.651947, 0.401708, 0.137963,
-0.00144932, -0.169108, -0.325912, -0.485861, -0.729162,
-0.864072, -0.793703, -0.739585, -0.721206, -0.630393,
-0.506676, -0.334639, -0.0476425, 0.187949, 0.273212, 0.47806,
0.689907, 0.771439, 0.838694, 0.859169, 0.821764, 0.759105,
0.688149, 0.458725, 0.172346, 0.0218323, -0.1305, -0.310586,
-0.491011, -0.745506, -0.891517, -0.810077, -0.760554,
-0.745444, -0.643097, -0.505381, -0.350304, -0.0668846,
0.182306, 0.289062, 0.477813, 0.68707, 0.792223, 0.848716,
0.8699, 0.807734, 0.742669, 0.686268, 0.455364, 0.180548,
0.0325634, -0.11391, -0.277098, -0.44158, -0.688766, -0.841068,
-0.78769, -0.729224, -0.722131, -0.642573, -0.521786, -0.390916,
-0.114743, 0.150544, 0.233988, 0.415153, 0.662432, 0.782695,
0.837923, 0.85994, 0.828271, 0.771748, 0.705171, 0.491566,
0.216843, 0.0518363, -0.099263, -0.285948, -0.44306, -0.681581,
-0.866601, -0.793641, -0.724938, -0.716118, -0.622498,
-0.506984, -0.368621, -0.094915, 0.170496, 0.285485, 0.428012,
0.648555, 0.768479, 0.807055, 0.848777, 0.803293, 0.73388,
0.683123, 0.503592, 0.223103, 0.0495852, -0.0839681, -0.25286,
-0.412995, -0.661137, -0.839064, -0.789941, -0.718894,
-0.723766, -0.661692, -0.529588, -0.404823, -0.145302, 0.143452,
0.249036, 0.416972, 0.650806, 0.753554, 0.822535, 0.865121,
0.836134, 0.772888, 0.699312, 0.530821, 0.235437, 0.0515896,
-0.0893028, -0.283357, -0.447131, -0.669771, -0.852169,
-0.824971, -0.742977, -0.731382, -0.649419, -0.530297,
-0.403651, -0.123377, 0.161183, 0.272596, 0.400937, 0.634617,
0.772518, 0.811989, 0.860495, 0.831015, 0.756329, 0.71914,
0.536526, 0.244072, 0.0720035, -0.0749638, -0.241543, -0.407351,
-0.642635, -0.834037, -0.831663, -0.747818, -0.745228, -0.69,
-0.568133, -0.430109, -0.179469, 0.114373, 0.248944, 0.377563,
0.629591, 0.752444, 0.824262, 0.880231, 0.853156, 0.786672,
0.71322, 0.567918, 0.270591, 0.0719418, -0.0635542, -0.246323,
-0.391748, -0.613032, -0.842857, -0.831509, -0.73388, -0.741034,
-0.675938, -0.554319, -0.432422, -0.194887, 0.106479, 0.249561,
0.352987, 0.578525, 0.740325, 0.813685, 0.85479, 0.846526,
0.772179, 0.720836, 0.580715, 0.281692, 0.104166, -0.030004,
-0.206204, -0.362546, -0.591446, -0.812359, -0.832835, -0.74751,
-0.737951, -0.694101, -0.565142, -0.457029, -0.249653,
0.0765673, 0.222702, 0.331, 0.57353, 0.719202, 0.803047,
0.854852, 0.852324, 0.782078, 0.710568, 0.595732, 0.317093,
0.108637, -0.0273212, -0.205433, -0.370317, -0.577169, -0.8205,
-0.854575, -0.734096, -0.718986, -0.675476, -0.566592,
-0.443739, -0.228746, 0.0792192, 0.247402, 0.337383, 0.573314,
0.739277, 0.791175, 0.847606, 0.848716, 0.768664, 0.71877,
0.595917, 0.315428, 0.103241, -0.0252243, -0.198526, -0.362916,
-0.559962, -0.802368, -0.842703, -0.745752, -0.726171,
-0.692251, -0.589657, -0.468439, -0.278578, 0.0448056, 0.238829,
0.322828, 0.559808, 0.732092, 0.808998, 0.860125, 0.857504,
0.798976, 0.731074, 0.641, 0.354837, 0.105184, -0.0129822,
-0.188782, -0.364612, -0.550557, -0.807425, -0.870085,
-0.757408, -0.74529, -0.70659, -0.592988, -0.481544, -0.282895,
0.0337044, 0.236455, 0.333467, 0.529958, 0.713806, 0.790311,
0.836597, 0.870363, 0.800672, 0.741034, 0.650097, 0.379722,
0.146597, 0.0112554, -0.148293, -0.318758, -0.506059, -0.747849,
-0.853804, -0.763576, -0.726603, -0.719048, -0.618027,
-0.501126, -0.330692, -0.0124888, 0.199019, 0.286873, 0.503747,
0.691665, 0.773752, 0.84483, 0.877394, 0.828178, 0.761726,
0.666379, 0.415739, 0.15776, 0.0164976, -0.140985, -0.322057,
-0.507601, -0.75599, -0.861975, -0.770422, -0.730396, -0.708347,
-0.607635, -0.482223, -0.304758, -0.00601314, 0.218631,
0.308397, 0.494927, 0.698757, 0.781276, 0.829967, 0.8662,
0.796324, 0.726079, 0.648956, 0.39992, 0.153135, 0.0276913,
-0.125628, -0.285269, -0.470906, -0.730858, -0.842918,
-0.767739, -0.71359, -0.707792, -0.624534, -0.502667, -0.353757,
-0.0548583, 0.188843, 0.281076, 0.4718, 0.686423, 0.790465,
0.851614, 0.867218, 0.819236, 0.747356, 0.671714, 0.441179,
0.153443, 0.0169601, -0.135804, -0.311511, -0.480773, -0.744056,
-0.874927, -0.777298, -0.717968, -0.707484, -0.60523, -0.496408,
-0.355145, -0.0574794, 0.194486, 0.289371, 0.45447, 0.668537,
0.772518, 0.822258, 0.853249, 0.814765, 0.744796, 0.672947,
0.459928, 0.188843, 0.0402418, -0.106571, -0.276018, -0.455148,
-0.710506, -0.863425, -0.800426, -0.725215, -0.724999,
-0.649665, -0.534121, -0.39773, -0.109192, 0.16328, 0.262574,
0.444818, 0.671559, 0.755527, 0.823923, 0.869037, 0.833328,
0.761417, 0.684757, 0.491319, 0.205156, 0.0450523, -0.107959,
-0.284128, -0.452219, -0.700392, -0.865768, -0.806284,
-0.729532, -0.72429, -0.642265, -0.532733, -0.387369, -0.109192,
0.171822, 0.281785, 0.427488, 0.655339, 0.757532, 0.816676,
0.858182, 0.818681, 0.750439, 0.693392, 0.501187, 0.205125,
0.0538099, -0.0782016, -0.260261, -0.427241, -0.665762,
-0.843535, -0.798668, -0.731259, -0.732493, -0.662709, -0.54957,
-0.410343, -0.147769, 0.146536, 0.26612, 0.400105, 0.632304,
0.74714, 0.820377, 0.870579, 0.843936, 0.772488, 0.710599,
0.526627, 0.229733, 0.0650035, -0.0761972, -0.257208, -0.417219,
-0.640723, -0.854544, -0.828024, -0.722841, -0.725924,
-0.653736, -0.536896, -0.409911, -0.139536, 0.148817, 0.260138,
0.389929, 0.621882, 0.748281, 0.808813, 0.852416, 0.837275,
0.75895, 0.698171, 0.533442, 0.244072, 0.0678713, -0.0609331,
-0.223103, -0.391933, -0.624965, -0.836689, -0.819945,
-0.731475, -0.728607, -0.666256, -0.556631, -0.438527, -0.20901,
0.102655, 0.247464, 0.363625, 0.598754, 0.731876, 0.80684,
0.874618, 0.853865, 0.780228, 0.723766, 0.564741, 0.277067,
0.0879151, -0.0496778, -0.218385, -0.389065, -0.6303, -0.854636,
-0.852077, -0.741281, -0.726233, -0.671929, -0.555891,
-0.436492, -0.207376, 0.110734, 0.260415, 0.371581, 0.605322,
0.750501, 0.799285, 0.829874, 0.840205, 0.768201, 0.7007,
0.566222, 0.270745, 0.0892411, -0.0326868, -0.215609, -0.370933,
-0.585433, -0.815998, -0.831262, -0.73203, -0.716303, -0.675414,
-0.570138, -0.459619, -0.245182, 0.0778316, 0.243362, 0.351414,
0.583891, 0.734497, 0.806223, 0.867218, 0.870517, 0.795708,
0.739092, 0.612939, 0.316168, 0.097567, -0.0368806, -0.197663,
-0.369577, -0.587746, -0.832126, -0.857473, -0.727096,
-0.726171, -0.689136, -0.563354, -0.455395, -0.244534, 0.080576,
0.251164, 0.357211, 0.571834, 0.716828, 0.786827, 0.837429,
0.857627, 0.79543, 0.728638, 0.61186, 0.33322, 0.112985,
-0.00530389, -0.163588, -0.327392, -0.531284, -0.788461,
-0.836597, -0.75047, -0.728391, -0.682599, -0.594036, -0.48361,
-0.303771, 0.0307749, 0.231799, 0.307318, 0.538839, 0.709704,
0.781369, 0.849764, 0.866416, 0.808967, 0.746986, 0.634309,
0.353912, 0.11351, -0.014339, -0.178914, -0.338956, -0.541521,
-0.802738, -0.869685, -0.761849, -0.72099, -0.698264, -0.590027,
-0.464245, -0.282895, 0.0340744, 0.228037, 0.327916, 0.529557,
0.695674, 0.76925, 0.820839, 0.860742, 0.78806, 0.717043,
0.62845, 0.360912, 0.119368, 0.00499553, -0.151007, -0.318511,
-0.501064, -0.77221, -0.864812, -0.769188, -0.73055, -0.703629,
-0.615807, -0.504456, -0.329921, -0.0222332, 0.204693, 0.303987,
0.512011, 0.712911, 0.780382, 0.843535, 0.865182, 0.804527,
0.757254, 0.65241, 0.386691, 0.12017, -0.00672238, -0.146998,
-0.335163, -0.523975, -0.771439, -0.881187, -0.777082,
-0.725061, -0.708718, -0.592032, -0.481637, -0.328841,
-0.027167, 0.204046, 0.303155, 0.491258, 0.691048, 0.767492,
0.824632, 0.85257, 0.810077, 0.746647, 0.66015, 0.423911,
0.154923, 0.0305899, -0.116223, -0.280428, -0.456258, -0.728946,
-0.863671, -0.780906, -0.718061, -0.709273, -0.629529,
-0.519319, -0.370933, -0.074347, 0.182059, 0.282309, 0.470443,
0.691542, 0.763267, 0.808351, 0.853958, 0.822936, 0.76632,
0.687995, 0.451448, 0.176385, 0.029449, -0.130192, -0.286441,
-0.465263, -0.722471, -0.871596, -0.803509, -0.72833, -0.720004,
-0.612569, -0.50276, -0.364766, -0.075488, 0.183324, 0.29967,
0.459249, 0.662154, 0.755527, 0.807888, 0.849764, 0.809923,
0.736717, 0.674242, 0.455395, 0.166209, 0.0204138, -0.113355,
-0.278239, -0.443924, -0.692621, -0.855191, -0.784915,
-0.727096, -0.718924, -0.629221, -0.529372, -0.388233,
-0.111382, 0.163897, 0.271239, 0.446668, 0.668938, 0.756329,
0.822998, 0.85772, 0.8345, 0.771717, 0.696845, 0.482747,
0.184927, 0.0290481, -0.110148, -0.274384, -0.445126, -0.688674,
-0.860958, -0.810447, -0.732585, -0.723396, -0.628141,
-0.513213, -0.390299, -0.111043, 0.173733, 0.272688, 0.429492,
0.659441, 0.760862, 0.81498, 0.849764, 0.829504, 0.761726,
0.707947, 0.511918, 0.213451, 0.0555984, -0.0728977, -0.238244,
-0.406673, -0.658855, -0.866293, -0.823861, -0.739523,
-0.731167, -0.660767, -0.549878, -0.419779, -0.169262, 0.123408,
0.251657, 0.403805, 0.638873, 0.747448, 0.809615, 0.863271,
0.838663, 0.775047, 0.72099, 0.541861, 0.244534, 0.0681797,
-0.0678713, -0.23775, -0.392365, -0.635234, -0.850874,
-0.833267, -0.737673, -0.722378, -0.655833, -0.542323,
-0.422461, -0.173826, 0.124487, 0.251719, 0.386506, 0.625613,
0.743039, 0.798668, 0.840667, 0.816676, 0.758241, 0.703845,
0.538499, 0.239292, 0.0586204, -0.0568318, -0.235376, -0.391779,
-0.608314, -0.831509, -0.820315, -0.733664, -0.724136,
-0.653057, -0.540596, -0.426686, -0.202812, 0.100157, 0.249345,
0.373277, 0.618644, 0.74751, 0.797804, 0.851152, 0.84298,
0.782756, 0.730087, 0.577446, 0.276234, 0.0734219, -0.0656511,
-0.232045, -0.389281, -0.613093, -0.837738, -0.840451,
-0.734867, -0.729625, -0.672423, -0.539517, -0.425298,
-0.206975, 0.108051, 0.259953, 0.372784, 0.604243, 0.747602,
0.796879, 0.83228, 0.836258, 0.778686, 0.723303, 0.580684,
0.287829, 0.0806685, -0.0491227, -0.204046, -0.363779,
-0.575257, -0.82528, -0.850473, -0.747232, -0.739739, -0.680039,
-0.579728, -0.466558, -0.259644, 0.0496469, 0.224799, 0.335255,
0.563755, 0.731567, 0.794937, 0.840821, 0.863486, 0.799408,
0.754294, 0.628851, 0.333097, 0.109809, -0.0371889, -0.198218,
-0.352678, -0.573561, -0.823954, -0.872244, -0.773444,
-0.745043, -0.695088, -0.573777, -0.459465, -0.262142,
0.0622283, 0.230596, 0.336396, 0.56838, 0.72577, 0.793333,
0.839773, 0.84961, 0.779765, 0.722532, 0.614789, 0.332172,
0.100651, -0.0138148, -0.176447, -0.338709, -0.519011,
-0.771501, -0.83746, -0.751827, -0.727836, -0.681828, -0.580036,
-0.477227, -0.294613, 0.013969, 0.195257, 0.300626, 0.536958,
0.717136, 0.781985, 0.836967, 0.855716, 0.792562, 0.742792,
0.63841, 0.353357, 0.106417, -0.0225107, -0.186037, -0.34648,
-0.544636, -0.796879, -0.864905, -0.768726, -0.725523,
-0.704585, -0.579173, -0.455487, -0.289371, 0.0214314, 0.218385,
0.320269, 0.53705, 0.717198, 0.783897, 0.830121, 0.839156,
0.78069, 0.727219, 0.635943, 0.373277, 0.117765, -0.00191187,
-0.160659, -0.320824, -0.501033, -0.767739, -0.863918,
-0.767646, -0.728175, -0.706127, -0.607388, -0.498443,
-0.333374, -0.0334577, 0.19424, 0.293225, 0.497888, 0.711123,
0.78399, 0.838385, 0.865028, 0.816306, 0.76817, 0.679793,
0.420611, 0.149928, 0.0100836, -0.160504, -0.327084, -0.500663,
-0.761325, -0.882266, -0.790558, -0.733263, -0.715193,
-0.601437, -0.492275, -0.330137, -0.0226649, 0.209072, 0.297604,
0.492553, 0.697215, 0.76851, 0.82972, 0.855654, 0.806963,
0.742946, 0.66607, 0.434642, 0.161275, 0.0275371, -0.118289,
-0.282957, -0.457708, -0.713374, -0.850874, -0.778686,
-0.732801, -0.724321, -0.62589, -0.512165, -0.366863,
-0.0735144, 0.184249, 0.277622, 0.470196, 0.687348, 0.769712,
0.825496, 0.863795, 0.825496, 0.754171, 0.685528, 0.447439,
0.164729, 0.0166518, -0.131703, -0.293379, -0.467668, -0.711832,
-0.863147, -0.784329, -0.717506, -0.713806, -0.602455,
-0.483795, -0.352524, -0.0711709, 0.189398, 0.281322, 0.440963,
0.664066, 0.760245, 0.80428, 0.843597, 0.811681, 0.750131,
0.685898, 0.462703, 0.186099, 0.0354621, -0.102038, -0.263221,
-0.438527, -0.686361, -0.866508, -0.800796, -0.736409, -0.72762,
-0.637454, -0.529526, -0.38592, -0.115298, 0.15409, 0.256406,
0.428875, 0.661661, 0.765272, 0.818372, 0.859262, 0.828888,
0.751149, 0.689229, 0.489223, 0.191341, 0.0282155, -0.110765,
-0.275648, -0.438373, -0.69, -0.872614, -0.824879, -0.739955,
-0.72022, -0.639952, -0.524716, -0.393228, -0.121095, 0.155694,
0.2639, 0.430787, 0.658361, 0.763545, 0.820223, 0.857782,
0.823553, 0.75158, 0.6974, 0.509667, 0.208147, 0.0424928,
-0.0919856, -0.262728, -0.424712, -0.66052, -0.849487,
-0.820469, -0.739277, -0.730704, -0.651824, -0.536218,
-0.419378, -0.159734, 0.136668, 0.257948, 0.40988, 0.641648,
0.757933, 0.822227, 0.86142, 0.830029, 0.764809, 0.716581,
0.534645, 0.231274, 0.0572944, -0.0795893, -0.255635, -0.409448,
-0.645965, -0.85442, -0.821734, -0.738043, -0.736717, -0.65682,
-0.542138, -0.416078, -0.172901, 0.118443, 0.256746, 0.38959,
0.628234, 0.745444, 0.802985, 0.844059, 0.826267, 0.769342,
0.711986, 0.549323, 0.249869, 0.0661753, -0.066422, -0.236702,
-0.385735, -0.606309, -0.831663, -0.826729, -0.732092,
-0.727528, -0.670418, -0.550557, -0.433038, -0.207129, 0.102871,
0.235499, 0.358044, 0.599124, 0.732616, 0.803818, 0.843535,
0.844522, 0.785932, 0.728545, 0.587591, 0.28123, 0.0785716,
-0.0509112, -0.220574, -0.376638, -0.602239, -0.836659,
-0.845848, -0.75229, -0.735052, -0.672392, -0.551112, -0.430726,
-0.211539, 0.10395, 0.253353, 0.365229, 0.600851, 0.744426,
0.795183, 0.845385, 0.836134, 0.757008, 0.705726, 0.564649,
0.28123, 0.0713867, -0.055475, -0.212063, -0.372044, -0.571525,
-0.815381, -0.843843, -0.74384, -0.733017, -0.677665, -0.560023,
-0.444602, -0.243177, 0.0762589, 0.237843, 0.339542, 0.577138,
0.742884, 0.806809, 0.84739, 0.852169, 0.785161, 0.732308,
0.606155, 0.31148, 0.0909988, -0.0396559, -0.215239, -0.378581,
-0.581023, -0.834901, -0.870209, -0.765858, -0.747541,
-0.694471, -0.565081, -0.443523, -0.251102, 0.0602855, 0.241975,
0.349718, 0.571988, 0.738814, 0.796725, 0.842394, 0.852015,
0.787382, 0.733788, 0.622283, 0.343026, 0.11428, -0.00940516,
-0.170372, -0.327454, -0.529649, -0.780937, -0.84631, -0.74862,
-0.723858, -0.703938, -0.593358, -0.491011, -0.304851,
0.0111937, 0.195967, 0.313392, 0.546085, 0.730766, 0.797188,
0.839896, 0.865429, 0.809461, 0.754942, 0.661075, 0.384532,
0.128034, -0.00755497, -0.17546, -0.338617, -0.535817,
-0.783712, -0.865152, -0.77443, -0.725092, -0.697709, -0.583644,
-0.466558, -0.287274, 0.0261494, 0.227266, 0.314657, 0.525733,
0.711894, 0.771285, 0.826883, 0.835518, 0.77406, 0.728607,
0.640784, 0.381665, 0.127941, 0.00530389, -0.155786, -0.312591,
-0.483179, -0.736563, -0.845539, -0.767708, -0.729779,
-0.708872, -0.601005, -0.490271, -0.322736, -0.0148016,
0.207993, 0.296895, 0.509667, 0.70881, 0.785439, 0.848839,
0.867218, 0.814518, 0.745906, 0.663542, 0.39992, 0.129421,
-0.00314533, -0.171822, -0.331, -0.50498, -0.758303, -0.873292,
-0.779981, -0.732863, -0.716427, -0.598384, -0.477906,
-0.318295, -0.0276913, 0.206513, 0.298591, 0.484443, 0.689846,
0.77073, 0.822381, 0.845755, 0.807425, 0.744272, 0.669493,
0.429307, 0.157174, 0.0259027, -0.12347, -0.290203, -0.469734,
-0.726541, -0.870856, -0.791575, -0.745752, -0.736347,
-0.632304, -0.513399, -0.366647, -0.0827346, 0.172654, 0.269358,
0.461655, 0.685652, 0.777421, 0.83043, 0.856579, 0.817447,
0.752074, 0.686268, 0.463042, 0.179469, 0.0288322, -0.121774,
-0.2886, -0.462703, -0.711585, -0.863826, -0.791329, -0.722162,
-0.713374, -0.62182, -0.502421, -0.360603, -0.0730211, 0.18761,
0.275309, 0.44491, 0.683339, 0.776897, 0.816985, 0.848469,
0.804218, 0.741127, 0.681365, 0.471738, 0.195319, 0.0394092,
-0.107342, -0.277344, -0.44121, -0.682876, -0.856579, -0.799346,
-0.734867, -0.723519, -0.635758, -0.52379, -0.383731, -0.115051,
0.162324, 0.272225, 0.438959, 0.668938, 0.77295, 0.830707,
0.861359, 0.821857, 0.751735, 0.700022, 0.498104, 0.197508,
0.0354621, -0.107527, -0.276635, -0.441426, -0.678405,
-0.852077, -0.799963, -0.727219, -0.730087, -0.637084,
-0.518857, -0.391008, -0.124025, 0.153782, 0.27386, 0.421752,
0.644084, 0.761232, 0.814086, 0.851553, 0.832403, 0.764624,
0.705233, 0.516606, 0.221314, 0.0528848, -0.0871442, -0.255975,
-0.414752, -0.64874, -0.843843, -0.816399, -0.737642, -0.728453,
-0.653828, -0.541244, -0.417682, -0.162632, 0.129329, 0.241512,
0.392087, 0.629776, 0.751303, 0.809892, 0.848561, 0.840143,
0.775047, 0.72355, 0.549477, 0.253045, 0.0703074, -0.0740387,
-0.241235, -0.403127, -0.636467, -0.846372, -0.835425, -0.74384,
-0.733418, -0.667859, -0.545006, -0.411977, -0.161275, 0.133276,
0.257424, 0.390515, 0.621974, 0.746122, 0.807672, 0.85439,
0.830029, 0.74899, 0.698942, 0.544328, 0.246261, 0.0599155,
-0.0651886, -0.231891, -0.38114, -0.603842, -0.828487,
-0.819328, -0.732431, -0.716735, -0.656357, -0.54701, -0.425144,
-0.203059, 0.104721, 0.240279, 0.359277, 0.604366, 0.746955,
0.818928, 0.858398, 0.848839, 0.785069, 0.731382, 0.582627,
0.280767, 0.0828271, -0.0511271, -0.232076, -0.393074,
-0.608005, -0.841993, -0.847945, -0.753307, -0.744056,
-0.674088, -0.542477, -0.433655, -0.214253, 0.10173, 0.248882,
0.360387, 0.593728, 0.745968, 0.79913, 0.842086, 0.837522,
0.76447, 0.711678, 0.583336, 0.303771, 0.0981529, -0.0313917,
-0.197354, -0.353295, -0.560949, -0.810047, -0.834284, -0.73203,
-0.729841, -0.693793, -0.581085, -0.461408, -0.262574,
0.0453606, 0.211323, 0.322828, 0.566838, 0.727466, 0.78362,
0.843998, 0.85365, 0.791945, 0.74088, 0.615159, 0.33578,
0.102563, -0.0357088, -0.206359, -0.372105, -0.574486,
-0.813624, -0.858491, -0.757408, -0.726449, -0.68852, -0.567825,
-0.45595, -0.259428, 0.0576028, 0.237349, 0.33507, 0.549878,
0.720682, 0.78362, 0.833267, 0.833945, 0.762096, 0.717383,
0.616886, 0.332542, 0.0922939, -0.022449, -0.182337, -0.347559,
-0.534676, -0.775355, -0.841747, -0.752536, -0.728299,
-0.700237, -0.593358, -0.479941, -0.291498, 0.0216781, 0.217151,
0.31111, 0.534953, 0.725308, 0.797249, 0.85146, 0.861821,
0.7958, 0.734713, 0.634555, 0.357828, 0.111289, -0.0263036,
-0.195041, -0.352524, -0.533689, -0.780382, -0.870671,
-0.765704, -0.72799, -0.710136, -0.586173, -0.469179, -0.290265,
0.0219865, 0.219464, 0.311573, 0.516914, 0.709889, 0.787906,
0.834562, 0.853033, 0.796633, 0.735114, 0.650282, 0.393629,
0.139412, 0.0138148, -0.142373, -0.306146, -0.497888, -0.757871,
-0.858984, -0.774893, -0.74014, -0.724938, -0.615344, -0.493324,
-0.334608, -0.034537, 0.193006, 0.285886, 0.494465, 0.695365,
0.780536, 0.838601, 0.8625, 0.813747, 0.745876, 0.666996,
0.421012, 0.155632, 0.0141848, -0.151685, -0.312961, -0.496716,
-0.750316, -0.867063, -0.783404, -0.723827, -0.710568,
-0.608807, -0.487311, -0.330846, -0.0286164, 0.197632, 0.282186,
0.482531, 0.696475, 0.776342, 0.820099, 0.840821, 0.796818,
0.732801, 0.660582, 0.430232, 0.160628, 0.0299115, -0.128928,
-0.303155, -0.469518, -0.717383, -0.854544, -0.778162, -0.72833,
-0.717537, -0.622745, -0.511672, -0.356533, -0.068118, 0.186407,
0.278239, 0.460545, 0.681797, 0.769034, 0.83783, 0.864967,
0.816676, 0.746276, 0.683956, 0.462426, 0.169262, 0.0182861,
-0.135249, -0.3026, -0.469518, -0.721761, -0.869376, -0.790805,
-0.728145, -0.723704, -0.619446, -0.499337, -0.361528,
-0.0695057, 0.19131, 0.286194, 0.456536, 0.674181, 0.76925,
0.825773, 0.854945, 0.817848, 0.746832, 0.682106, 0.479232,
0.190478, 0.0414752, -0.101668, -0.277869, -0.441518, -0.682198,
-0.851337, -0.797804, -0.737118, -0.728946, -0.64504, -0.535755,
-0.394338, -0.120633, 0.161553, 0.266428, 0.420519, 0.654568,
0.760461, 0.81902, 0.868297, 0.839927, 0.770267, 0.712726,
0.505659, 0.218231, 0.0582195, -0.0913997, -0.262111, -0.432175,
-0.677973, -0.862191, -0.812822, -0.731876, -0.724382,
-0.652348, -0.529495, -0.383268, -0.115298, 0.163557, 0.267507,
0.417281, 0.647939, 0.761232, 0.811218, 0.855654, 0.827808,
0.745444, 0.692127, 0.510623, 0.217953, 0.0501403, -0.0780474,
-0.250331, -0.411206, -0.639644, -0.843165, -0.808196, -0.72907,
-0.727836, -0.659225, -0.547781, -0.417312, -0.164112, 0.135743,
0.252182, 0.38814, 0.628203, 0.760862, 0.83009, 0.867649,
0.843905, 0.768633, 0.715039, 0.538438, 0.23775, 0.0633692,
-0.0742854, -0.246539, -0.416602, -0.648432, -0.854266,
-0.83006, -0.733171, -0.733109, -0.658084, -0.524345, -0.411669,
-0.170989, 0.136575, 0.262111, 0.390083, 0.611706, 0.745043,
0.808351, 0.85072, 0.839218, 0.762651, 0.708625, 0.555398,
0.270838, 0.0865892, -0.0467483, -0.21746, -0.377286, -0.606309,
-0.834068, -0.826729, -0.737488, -0.72907, -0.670634, -0.563138,
-0.44269, -0.209473, 0.0946375, 0.233649, 0.362823, 0.604706,
0.744056, 0.80428, 0.854174, 0.855623, 0.787474, 0.730611,
0.586666, 0.292208, 0.0910913, -0.0461315, -0.222733, -0.383206,
-0.608098, -0.832958, -0.842363, -0.746585, -0.728453,
-0.682753, -0.558512, -0.438897, -0.216689, 0.101422, 0.245706,
0.356286, 0.586728, 0.733479, 0.798051, 0.848777, 0.838663,
0.764871, 0.713898, 0.586728, 0.299454, 0.085294, -0.0289864,
-0.201517, -0.363687, -0.56616, -0.808906, -0.82898, -0.734744,
-0.725308, -0.68337, -0.580499, -0.462086, -0.249098, 0.0670079,
0.238614, 0.333467, 0.566345, 0.732184, 0.799593, 0.856795,
0.858553, 0.796016, 0.741805, 0.617009, 0.32622, 0.0989238,
-0.029634, -0.203213, -0.367387, -0.567517, -0.816306,
-0.861605, -0.75414, -0.73055, -0.691079, -0.564279, -0.451294,
-0.25912, 0.0638626, 0.244103, 0.331216, 0.547627, 0.717999,
0.780197, 0.836196, 0.846372, 0.784391, 0.728145, 0.614851,
0.343951, 0.112677, -0.00730827, -0.172284, -0.335996,
-0.526412, -0.782695, -0.851923, -0.753554, -0.730766,
-0.701563, -0.593574, -0.478923, -0.295353, 0.00662987,
0.211077, 0.313331, 0.526257, 0.714731, 0.781831, 0.846835,
0.874927, 0.809831, 0.750439, 0.647476, 0.377347, 0.138487,
0.00647569, -0.16072, -0.330291, -0.531345, -0.78106, -0.869592,
-0.76925, -0.722902, -0.701348, -0.591816, -0.477536, -0.296895,
0.0181936, 0.227204, 0.317093, 0.518394, 0.709581, 0.780844,
0.831509, 0.850412, 0.791791, 0.729532, 0.635696, 0.382127,
0.1268, 0.00579728, -0.142928, -0.317216, -0.50461, -0.751765,
-0.852015, -0.760924, -0.723057, -0.701872, -0.603688,
-0.500293, -0.329088, -0.0205372, 0.213913, 0.298529, 0.494958,
0.702088, 0.787628, 0.84702, 0.867804, 0.815782, 0.746832,
0.671868, 0.420149, 0.154553, 0.0165593, -0.148756, -0.308428,
-0.499059, -0.751673, -0.868605, -0.776126, -0.717043,
-0.710599, -0.605076, -0.492029, -0.33911, -0.0322242, 0.211323,
0.302476, 0.48617, 0.687132, 0.770021, 0.82565, 0.848376,
0.802954, 0.735237, 0.664683, 0.435166, 0.164513, 0.0296648,
-0.116994, -0.288045, -0.464954, -0.716272, -0.858799,
-0.777761, -0.727836, -0.718308, -0.628666, -0.523266,
-0.371118, -0.0819637, 0.178143, 0.272472, 0.454377, 0.672176,
0.76558, 0.832588, 0.870825, 0.833883, 0.762157, 0.697,
0.468655, 0.182213, 0.0391625, -0.117364, -0.289278, -0.464738,
-0.715378, -0.864134, -0.795553, -0.731259, -0.721237,
-0.632767, -0.510993, -0.359863, -0.0715101, 0.192698, 0.279225,
0.452219, 0.667767, 0.758765, 0.81569, 0.849857, 0.816399,
0.74566, 0.677172, 0.473218, 0.194548, 0.0416602, -0.0934041,
-0.27201, -0.433624, -0.675198, -0.857165, -0.794967, -0.729841,
-0.724999, -0.644238, -0.533504, -0.39036, -0.113448, 0.167751,
0.269142, 0.426994, 0.664128, 0.773413, 0.831355, 0.875143,
0.842086, 0.769496, 0.70881, 0.502112, 0.203614, 0.0424312,
-0.0959327, -0.272071, -0.436338, -0.679885, -0.869623,
-0.809923, -0.727404, -0.722471, -0.638842, -0.510315,
-0.392211, -0.13821, 0.157544, 0.271763, 0.412563, 0.639243,
0.75562, 0.807919, 0.852385, 0.826421, 0.757686, 0.702026,
0.51972, 0.232446, 0.0590829, -0.0652502, -0.241142, -0.404484,
-0.636313, -0.850473, -0.815936, -0.7324, -0.723211, -0.653458,
-0.546918, -0.421999, -0.172993, 0.124457, 0.252428, 0.394708,
0.631595, 0.755466, 0.810694, 0.861821, 0.853557, 0.785593,
0.726017, 0.554473, 0.257208, 0.079065, -0.0582195, -0.240217,
-0.406056, -0.639304, -0.847698, -0.830985, -0.736039, -0.72062,
-0.654507, -0.538746, -0.420303, -0.171667, 0.13343, 0.265657,
0.39292, 0.619014, 0.748589, 0.798174, 0.848222, 0.836412,
0.764933, 0.714761, 0.55472, 0.259644, 0.0630608, -0.0599155,
-0.220389, -0.384687, -0.60338, -0.824971, -0.823553, -0.725462,
-0.722933, -0.666533, -0.551173, -0.436646, -0.204138, 0.103796,
0.251873, 0.371334, 0.606155, 0.750439, 0.809923, 0.854945,
0.853927, 0.790249, 0.733233, 0.587283, 0.282247, 0.0774924,
-0.0495236, -0.222949, -0.385673, -0.607882, -0.833667,
-0.841839, -0.746061, -0.72725, -0.674427, -0.552931, -0.43788,
-0.223349, 0.0966111, 0.255265, 0.362299, 0.588825, 0.739246,
0.802646, 0.850412, 0.852385, 0.785747, 0.734189, 0.597151,
0.305992, 0.0967961, -0.0249776, -0.186099, -0.348361, -0.56175,
-0.806809, -0.843751, -0.747818, -0.726911, -0.683277,
-0.572081, -0.462487, -0.260261, 0.0513738, 0.218539, 0.332758,
0.564341, 0.723519, 0.788553, 0.847698, 0.864041, 0.798822,
0.737488, 0.622128, 0.341022, 0.11465, -0.0186561, -0.192636,
-0.347868, -0.559962, -0.812606, -0.859817, -0.758796,
-0.726233, -0.68963, -0.574147, -0.458879, -0.266089, 0.0518363,
0.23368, 0.330445, 0.557649, 0.726233, 0.781985, 0.834346,
0.837614, 0.777576, 0.718739, 0.601776, 0.331925, 0.0999414,
-0.00996022, -0.1692, -0.339418, -0.526134, -0.77662, -0.850165,
-0.750131, -0.723858, -0.69996, -0.587591, -0.480095, -0.299238,
0.0140307, 0.218724, 0.314472, 0.532178, 0.718154, 0.783681,
0.841993, 0.854575, 0.79728, 0.74236, 0.643036, 0.361682,
0.108946, -0.0189953, -0.186808, -0.347744, -0.539455,
-0.796324, -0.879706, -0.770977, -0.723704, -0.701779,
-0.583706, -0.467421, -0.295538, 0.0115637, 0.229178, 0.320022,
0.518949, 0.713898, 0.779302, 0.824632, 0.843782, 0.792716,
0.738259, 0.64541, 0.390761, 0.137593, 0.00561226, -0.142064,
-0.308428, -0.492954, -0.744519, -0.862962, -0.768571,
-0.733973, -0.712295, -0.606247, -0.506522, -0.340097,
-0.0404268, 0.196552, 0.298622, 0.493077, 0.69555, 0.776126,
0.829474, 0.867341, 0.823399, 0.753924, 0.681026, 0.428567,
0.157174, 0.018502, -0.137254, -0.303155, -0.490425, -0.742669,
-0.875173, -0.789787, -0.730704, -0.711493, -0.608622,
-0.491474, -0.33248, -0.0370039, 0.207623, 0.296, 0.48987,
0.696167, 0.769496, 0.822535, 0.854112, 0.811373, 0.743902,
0.669463, 0.430325, 0.156403, 0.0191804, -0.119307, -0.281723,
-0.459712, -0.705572, -0.848531, -0.77699, -0.721854, -0.708594,
-0.611551, -0.502606, -0.360326, -0.0672546, 0.188535, 0.28234,
0.470412, 0.686978, 0.780505, 0.835209, 0.867187, 0.82565,
0.756329, 0.692467, 0.454223, 0.166333, 0.0209072, -0.122699,
-0.285208, -0.461315, -0.715902, -0.872398, -0.796509,
-0.725832, -0.713035, -0.618027, -0.501588, -0.361837,
-0.0838139, 0.184218, 0.287952, 0.458571, 0.67526, 0.768479,
0.821703, 0.853927, 0.817694, 0.751827, 0.691079, 0.478214,
0.191649, 0.0399334, -0.0994172, -0.265287, -0.425638,
-0.682445, -0.863764, -0.798945, -0.729224, -0.722933,
-0.644331, -0.532733, -0.408431, -0.13713, 0.14928, 0.258719,
0.428783, 0.652287, 0.756761, 0.818064, 0.858799, 0.84261,
0.772888, 0.713281, 0.520799, 0.217953, 0.0539024, -0.0884394,
-0.263067, -0.422862, -0.672392, -0.861914, -0.815535,
-0.735669, -0.723057, -0.645873, -0.524438, -0.393012,
-0.135188, 0.158377, 0.270992, 0.418237, 0.64911, 0.756175,
0.808844, 0.850473, 0.827778, 0.759783, 0.702303, 0.521169,
0.225107, 0.0504178, -0.0720343, -0.243239, -0.405193,
-0.632921, -0.841531, -0.810139, -0.73018, -0.726171, -0.656511,
-0.543773, -0.415153, -0.164945, 0.134509, 0.260353, 0.395603,
0.637392, 0.761849, 0.816553, 0.861174, 0.846156, 0.777761,
0.71951, 0.546301, 0.235807, 0.0508187, -0.0773382, -0.249006,
-0.406488, -0.637392, -0.858121, -0.832187, -0.73866, -0.735114,
-0.660767, -0.535909, -0.416078, -0.178914, 0.125937, 0.259644,
0.376731, 0.61149, 0.749422, 0.79987, 0.848253, 0.837029,
0.766104, 0.717537, 0.563138, 0.268155, 0.071325, -0.0479509,
-0.207993, -0.370964, -0.594745, -0.8275, -0.833112, -0.743501,
-0.731413, -0.671775, -0.556046, -0.448518, -0.223596,
0.0866817, 0.232446, 0.360079, 0.597521, 0.746585, 0.804033,
0.854544, 0.861112, 0.79139, 0.735021, 0.595671, 0.3063,
0.0959943, -0.0399334, -0.209936, -0.369638, -0.586975,
-0.81939, -0.843227, -0.745136, -0.724012, -0.671189, -0.551852,
-0.436985, -0.220112, 0.0895186, 0.243948, 0.356841, 0.586327,
0.739122, 0.791452, 0.840297, 0.839619, 0.766968, 0.715039,
0.584724, 0.302538, 0.0918622, -0.0303124, -0.192575, -0.355207,
-0.560363, -0.795492, -0.840297, -0.746462, -0.727096,
-0.688766, -0.570292, -0.461655, -0.263036, 0.0496778, 0.225323,
0.335255, 0.564341, 0.729409, 0.795553, 0.844676, 0.84298,
0.783126, 0.73203, 0.618335, 0.32437, 0.0932499, -0.0318542,
-0.203059, -0.357674, -0.564464, -0.806994, -0.854945,
-0.751673, -0.728545, -0.693854, -0.56875, -0.459157, -0.264979,
0.0474884, 0.239076, 0.332449, 0.547627, 0.726387, 0.787135,
0.83598, 0.844676, 0.785932, 0.729008, 0.625582, 0.352987,
0.11869, -0.00946684, -0.171976, -0.32659, -0.522804, -0.779364,
-0.855962, -0.755373, -0.726541, -0.700793, -0.593604,
-0.485491, -0.307873, 0.00339203, 0.205433, 0.298622, 0.523729,
0.704339, 0.772734, 0.832187, 0.849949, 0.803139, 0.74051,
0.651176, 0.386537, 0.129853, -0.00194271, -0.17213, -0.329242,
-0.514139, -0.773814, -0.867433, -0.771717, -0.731413,
-0.707885, -0.597367, -0.475439, -0.300225, 0.00360788,
0.218477, 0.301613, 0.511918, 0.707237, 0.773197, 0.829936,
0.847606, 0.784976, 0.720775, 0.638626, 0.384378, 0.127417,
0.00225107, -0.146011, -0.314132, -0.488945, -0.733356,
-0.851491, -0.762034, -0.72355, -0.702889, -0.597767, -0.489161,
-0.327855, -0.0325326, 0.2042, 0.293133, 0.493324, 0.705788,
0.787937, 0.843073, 0.86179, 0.814148, 0.750378, 0.667859,
0.415677, 0.142064, 0.00770915, -0.146844, -0.319961, -0.497487,
-0.74751, -0.876469, -0.786179, -0.734744, -0.713436, -0.602917,
-0.486571, -0.331401, -0.0425853, 0.205218, 0.298467, 0.479663,
0.691542, 0.776435, 0.828086, 0.85772, 0.81313, 0.746276,
0.671775, 0.440902, 0.168337, 0.0255019, -0.11536, -0.28049,
-0.45632, -0.708286, -0.862839, -0.784946, -0.722532, -0.714761,
-0.629899, -0.514786, -0.374634, -0.0920781, 0.166795, 0.269697,
0.45965, 0.67304, 0.771501, 0.827623, 0.865367, 0.833174,
0.765549, 0.707083, 0.484289, 0.19609, 0.0400259, -0.113386,
-0.282032, -0.454377, -0.699004, -0.865121, -0.8065, -0.731167,
-0.718154, -0.622653, -0.506584, -0.370163, -0.0869284,
0.183169, 0.28675, 0.453144, 0.670881, 0.765549, 0.812051,
0.845632, 0.808227, 0.741188, 0.687286, 0.479694, 0.190848,
0.0387308, -0.099263, -0.267754, -0.430232, -0.673101,
-0.850998, -0.80095, -0.733325, -0.72762, -0.648833, -0.533905,
-0.398933, -0.133276, 0.147368, 0.25619, 0.421382, 0.65426,
0.762466, 0.822474, 0.857967, 0.836042, 0.769404, 0.708255,
0.510161, 0.206975, 0.0410435, -0.100805, -0.272565, -0.432113,
-0.67563, -0.861729, -0.810386, -0.72833, -0.724012, -0.64211,
-0.51531, -0.390977, -0.132351, 0.156681, 0.268217, 0.412655,
0.637485, 0.754078, 0.806809, 0.844368, 0.827161, 0.7604,
0.712048, 0.528663, 0.227512, 0.0620124, -0.0693207, -0.235592,
-0.391625, -0.630978, -0.842394, -0.818496, -0.740973,
-0.731937, -0.662771, -0.546147, -0.424373, -0.184002, 0.116223,
0.238459, 0.383206, 0.626353, 0.749977, 0.811434, 0.863671,
0.846249, 0.774122, 0.719603, 0.556662, 0.263067, 0.069629,
-0.0651886, -0.239631, -0.395788, -0.62589, -0.847081,
-0.831416, -0.737118, -0.717753, -0.654846, -0.538438, -0.41651,
-0.182183, 0.12091, 0.253014, 0.379105, 0.61849, 0.74714,
0.798329, 0.848068, 0.834253, 0.762805, 0.711431, 0.5599,
0.267662, 0.074347, -0.0469641, -0.22372, -0.385211, -0.597582,
-0.823646, -0.832588, -0.744611, -0.729532, -0.674335,
-0.559098, -0.444664, -0.221037, 0.0922323, 0.244843, 0.361682,
0.602763, 0.753554, 0.809985, 0.857936, 0.850628, 0.779056,
0.726171, 0.588979, 0.286965, 0.0782016, -0.0513429, -0.225416,
-0.380585, -0.592741, -0.829042, -0.846526, -0.740294,
-0.729471, -0.679022, -0.550341, -0.441518, -0.227297,
0.0778932, 0.240217, 0.347713, 0.571988, 0.737642, 0.793796,
0.841839, 0.844306, 0.782509, 0.732092, 0.60301, 0.314472,
0.0947917, -0.028308, -0.191033, -0.358013, -0.563138,
-0.803201, -0.849918, -0.751087, -0.738567, -0.697863,
-0.582318, -0.474729, -0.269851, 0.0441272, 0.220543, 0.325449,
0.554658, 0.722594, 0.784668, 0.838601, 0.851306, 0.793302,
0.738197, 0.6266, 0.34611, 0.109902, -0.0208455, -0.185544,
-0.345401, -0.553794, -0.797434, -0.858583, -0.762774,
-0.727312, -0.692775, -0.574702, -0.457461, -0.262913,
0.0492152, 0.231984, 0.335564, 0.559098, 0.730642, 0.79284,
0.835055, 0.845755, 0.782232, 0.722008, 0.620401, 0.343427,
0.110272, -0.0148324, -0.176601, -0.32767, -0.512843, -0.75932,
-0.842672, -0.748743, -0.722841, -0.695951, -0.583891,
-0.473958, -0.2956, 0.0100219, 0.21746, 0.312776, 0.530174,
0.720775, 0.798976, 0.8555, 0.869222, 0.811373, 0.748743,
0.658608, 0.380215, 0.12276, -0.00363872, -0.17028, -0.332604,
-0.523328, -0.776311, -0.864535, -0.768941, -0.733017,
-0.708748, -0.585032, -0.467575, -0.305683, 0.000986771,
0.221407, 0.310648, 0.519381, 0.711986, 0.786395, 0.842147,
0.851028, 0.79728, 0.7361, 0.652657, 0.402325, 0.145672,
0.0150174, -0.140522, -0.303, -0.476148, -0.73351, -0.852169,
-0.759166, -0.721145, -0.707885, -0.612322, -0.504579,
-0.344106, -0.0455765, 0.189028, 0.279472, 0.486694, 0.699158,
0.778285, 0.833482, 0.865059, 0.823954, 0.759074, 0.684665,
0.441272, 0.16365, 0.0228808, -0.139042, -0.309044, -0.481082,
-0.739677, -0.870301, -0.784175, -0.72725, -0.704863, -0.606864,
-0.485337, -0.334916, -0.0411052, 0.207746, 0.295908, 0.486231,
0.698696, 0.776805, 0.824262, 0.85109, 0.800117, 0.73425,
0.675106, 0.449998, 0.167967, 0.0249776, -0.115822, -0.289062,
-0.454871, -0.696691, -0.845077, -0.770637, -0.725061,
-0.715224, -0.622437, -0.511394, -0.362392, -0.0799593,
0.181843, 0.277714, 0.455487, 0.681273, 0.776959, 0.831663,
0.866508, 0.830121, 0.759567, 0.694008, 0.46813, 0.178051,
0.0249776, -0.122606, -0.294366, -0.462333, -0.701193,
-0.869438, -0.800364, -0.730951, -0.728175, -0.624657,
-0.503222, -0.364704, -0.0844614, 0.179531, 0.276635, 0.438496,
0.662308, 0.764038, 0.814672, 0.852848, 0.818866, 0.747572,
0.691973, 0.488236, 0.204385, 0.0477351, -0.0884394, -0.252737,
-0.423325, -0.668784, -0.855716, -0.80576, -0.738752, -0.739215,
-0.65793, -0.541244, -0.405964, -0.141232, 0.137716, 0.251041,
0.413611, 0.644855, 0.759629, 0.813284, 0.858799, 0.83891,
0.760646, 0.708255, 0.519227, 0.224028, 0.0511271, -0.0956551,
-0.262111, -0.427457, -0.669771, -0.860989, -0.824571,
-0.737118, -0.727404, -0.65537, -0.527429, -0.395849, -0.134941,
0.149989, 0.255173, 0.402633, 0.63252, 0.75084, 0.805976,
0.841377, 0.813994, 0.745043, 0.696229, 0.524253, 0.233896,
0.0604706, -0.0694132, -0.250547, -0.410065, -0.63437,
-0.840513, -0.815906, -0.732863, -0.725986, -0.657683,
-0.545777, -0.425483, -0.175584, 0.124395, 0.248851, 0.388911,
0.626661, 0.755558, 0.81717, 0.858491, 0.838817, 0.767739,
0.714885, 0.552098, 0.24879, 0.0602855, -0.072096, -0.250331,
-0.404946, -0.632859, -0.852385, -0.831571, -0.734744,
-0.728021, -0.662987, -0.529958, -0.412902, -0.180055, 0.119399,
0.252552, 0.374264, 0.60893, 0.743655, 0.79432, 0.844522,
0.833976, 0.767091, 0.71251, 0.560887, 0.267292, 0.0741312,
-0.044343, -0.21709, -0.37448, -0.586358, -0.819421, -0.826945,
-0.739369, -0.733726, -0.680101, -0.560208, -0.444386,
-0.225878, 0.0843689, 0.229825, 0.343026, 0.578556, 0.726849,
0.786919, 0.840205, 0.842147, 0.780073, 0.730241, 0.594745,
0.296525, 0.0887786, -0.0387308, -0.210306, -0.36563, -0.580499,
-0.813469, -0.837985, -0.740726, -0.727065, -0.686207,
-0.560671, -0.439761, -0.225601, 0.0825187, 0.237688, 0.341947,
0.57205, 0.72429, 0.773197, 0.827469, 0.826482, 0.759228,
0.708347, 0.579944, 0.298282, 0.0820562, -0.0329952, -0.190169,
-0.353141, -0.547165, -0.784791, -0.832187, -0.731537,
-0.720466, -0.680965, -0.565759, -0.447747, -0.243702, 0.053964,
0.227112, 0.323507, 0.549477, 0.720528, 0.786703, 0.838755,
0.84298, 0.780968, 0.722378, 0.603688, 0.309939, 0.0835363,
-0.032841, -0.191711, -0.354282, -0.559098, -0.793333, -0.84591,
-0.74344, -0.721761, -0.687502, -0.549539, -0.426223, -0.244318,
0.0603781, 0.242221, 0.329397, 0.542847, 0.721916, 0.773906,
0.818835, 0.831663, 0.773289, 0.716211, 0.600666, 0.32952,
0.111289, 0.00114095, -0.157883, -0.325758, -0.510777,
-0.761109, -0.848099, -0.74566, -0.724012, -0.696845, -0.583891,
-0.457646, -0.276018, 0.0208764, 0.207376, 0.29452, 0.510161,
0.705079, 0.781307, 0.831416, 0.861821, 0.809738, 0.736162,
0.625613, 0.352678, 0.0984613, -0.0231274, -0.175738, -0.328595,
-0.511086, -0.761849, -0.84739, -0.763391, -0.731629, -0.711832,
-0.581794, -0.441118, -0.254279, 0.040951, 0.235437, 0.306392,
0.506522, 0.696136, 0.753677, 0.800117, 0.826328, 0.780505,
0.724444, 0.624194, 0.358075, 0.0963952, -0.0264578, -0.159888,
-0.317956, -0.48654, -0.72762, -0.830491, -0.744889, -0.718894,
-0.712418, -0.597922, -0.458787, -0.286349, 0.00487218,
0.217861, 0.294829, 0.489099, 0.696167, 0.769342, 0.817231,
0.846557, 0.813069, 0.746585, 0.648401, 0.375898, 0.0959943,
-0.0211231, -0.160628, -0.319529, -0.490888, -0.741373,
-0.854482, -0.764717, -0.72062, -0.710568, -0.58497, -0.439607,
-0.279102, 0.0063215, 0.22964, 0.298282, 0.465478, 0.674581,
0.747263, 0.78547, 0.826421, 0.801875, 0.739955, 0.643036,
0.386537, 0.104783, -0.016991, -0.124148, -0.276388, -0.442752,
-0.690709, -0.838755, -0.755558, -0.715378, -0.717691,
-0.612877, -0.469826, -0.302785, -0.035863, 0.190539, 0.263437,
0.423695, 0.64248, 0.734713, 0.778532, 0.822381, 0.813531,
0.752937, 0.653643, 0.410651, 0.126029, -0.00900429, -0.120386,
-0.266367, -0.427179, -0.671251, -0.825187, -0.747849,
-0.685066, -0.693176, -0.599063, -0.445897, -0.281261,
-0.0107003, 0.222486, 0.283851, 0.415122, 0.634155, 0.725986,
0.755312, 0.793025, 0.771717, 0.722131, 0.633785, 0.39514,
0.106047, -0.0291406, -0.113078, -0.254556, -0.40803, -0.629467,
-0.78954, -0.725308, -0.664159, -0.677017, -0.592525, -0.447377,
-0.290512, -0.0351537, 0.199204, 0.265349, 0.388603, 0.609763,
0.715687, 0.743964, 0.777421, 0.768201, 0.71914, 0.637238,
0.407814, 0.109963, -0.0337661, -0.122329, -0.260754, -0.410589,
-0.631071, -0.792192, -0.726849, -0.641309, -0.656079,
-0.581393, -0.417219, -0.261803, -0.0202288, 0.209319, 0.276481,
0.379259, 0.587437, 0.692158, 0.70255, 0.73425, 0.740479,
0.694533, 0.61408, 0.400999, 0.112184, -0.0333344, -0.104043,
-0.228962, -0.368806, -0.579235, -0.756298, -0.701163,
-0.622529, -0.642542, -0.578032, -0.425792, -0.271239,
-0.0465633, 0.181011, 0.251719, 0.351722, 0.558636, 0.675352,
0.69848, 0.721145, 0.73277, 0.696784, 0.614882, 0.407876,
0.109747, -0.0420303, -0.101052, -0.226341, -0.363718,
-0.567979, -0.742052, -0.695489, -0.605785, -0.612631,
-0.562768, -0.40951, -0.24401, -0.018502, 0.207376, 0.2713,
0.351815, 0.552653, 0.663357, 0.674119, 0.691295, 0.692282,
0.653674, 0.576058, 0.38259, 0.094545, -0.0610873, -0.099633,
-0.20531, -0.334454, -0.519165, -0.696414, -0.6657, -0.574948,
-0.58534, -0.550803, -0.408801, -0.246014, -0.0380215, 0.186839,
0.255728, 0.315952, 0.518764, 0.652441, 0.671405, 0.682106,
0.690524, 0.655339, 0.577292, 0.391286, 0.0955318, -0.0705541,
-0.111197, -0.216473, -0.340929, -0.518764, -0.702643,
-0.663141, -0.554504, -0.563693, -0.531037, -0.380061,
-0.213482, -0.0234358, 0.18872, 0.266767, 0.31148, 0.489253,
0.624749, 0.63067, 0.637701, 0.646736, 0.619168, 0.553116,
0.384964, 0.106325, -0.0708008, -0.100496, -0.186253, -0.305375,
-0.466095, -0.658454, -0.643097, -0.528108, -0.538006,
-0.528046, -0.386753, -0.221561, -0.0396559, 0.167196, 0.244997,
0.283234, 0.459342, 0.603534, 0.614851, 0.616855, 0.633014,
0.611151, 0.548706, 0.397545, 0.119985, -0.0683956, -0.0967036,
-0.177465, -0.294921, -0.453175, -0.636252, -0.633137,
-0.522403, -0.506738, -0.496099, -0.370625, -0.196522,
-0.00918931, 0.196953, 0.278485, 0.295199, 0.448611, 0.592279,
0.593111, 0.581301, 0.590027, 0.564341, 0.509236, 0.362823,
0.0923248, -0.099263, -0.119769, -0.168275, -0.26945, -0.412964,
-0.588362, -0.597521, -0.48139, -0.466589, -0.47291, -0.36085,
-0.195196, -0.0178852, 0.175676, 0.259737, 0.271547, 0.414906,
0.5702, 0.585433, 0.564741, 0.575226, 0.559808, 0.505905,
0.372259, 0.102501, -0.105338, -0.135342, -0.175769, -0.271609,
-0.406827, -0.579265, -0.59049, -0.470751, -0.448241, -0.454778,
-0.345586, -0.174689, -0.00841839, 0.176077, 0.263992, 0.264917,
0.38666, 0.537112, 0.552561, 0.529804, 0.535107, 0.521169,
0.475809, 0.35311, 0.097567, -0.109223, -0.131796, -0.15887,
-0.244719, -0.363008, -0.534768, -0.560363, -0.445774,
-0.418206, -0.436739, -0.344568, -0.17583, -0.015665, 0.165963,
0.244688, 0.236578, 0.350365, 0.499337, 0.525332, 0.496099,
0.50976, 0.506892, 0.464183, 0.354806, 0.110025, -0.104968,
-0.138518, -0.154861, -0.235314, -0.352894, -0.512936,
-0.548706, -0.439607, -0.391316, -0.408338, -0.326991,
-0.151716, 0.0153258, 0.191804, 0.270221, 0.250856, 0.343242,
0.488236, 0.507046, 0.460082, 0.462549, 0.452835, 0.414135,
0.313176, 0.0816861, -0.132813, -0.1622, -0.147399, -0.213698,
-0.316569, -0.467822, -0.507355, -0.391594, -0.346202,
-0.375096, -0.312745, -0.152302, 0.0072466, 0.169755, 0.254957,
0.233803, 0.305622, 0.458324, 0.490795, 0.443029, 0.435814,
0.4368, 0.405964, 0.314163, 0.0933732, -0.139227, -0.17876,
-0.16143, -0.22557, -0.311419, -0.454161, -0.496747, -0.378427,
-0.325295, -0.351753, -0.291282, -0.12939, 0.0279688, 0.18687,
0.268741, 0.235345, 0.282802, 0.428567, 0.46443, 0.408092,
0.400783, 0.401647, 0.377748, 0.296525, 0.0921706, -0.126245,
-0.166487, -0.142218, -0.191896, -0.270468, -0.402202,
-0.454007, -0.351537, -0.291067, -0.326683, -0.2886, -0.139443,
0.0136298, 0.166826, 0.246477, 0.216226, 0.256715, 0.395233,
0.439206, 0.381418, 0.374572, 0.385519, 0.366215, 0.297697,
0.106109, -0.117827, -0.172654, -0.147461, -0.188782, -0.261957,
-0.380524, -0.440902, -0.33985, -0.264578, -0.291683, -0.25875,
-0.111289, 0.0485676, 0.191033, 0.265441, 0.230041, 0.247957,
0.37451, 0.415616, 0.347436, 0.32915, 0.32915, 0.309538,
0.251472, 0.0781091, -0.13232, -0.192575, -0.141694, -0.162632,
-0.231768, -0.334176, -0.390453, -0.307102, -0.230997,
-0.252891, -0.239292, -0.107897, 0.0417219, 0.176694, 0.255111,
0.218847, 0.224275, 0.345339, 0.404576, 0.344784, 0.310494,
0.313423, 0.301058, 0.25027, 0.0929107, -0.121928, -0.200345,
-0.15187, -0.164667, -0.2289, -0.321657, -0.379198, -0.296124,
-0.208548, -0.231059, -0.226433, -0.0991088, 0.0475809,
0.173363, 0.248635, 0.217151, 0.208825, 0.319282, 0.384656,
0.316507, 0.281723, 0.288045, 0.268833, 0.228252, 0.0920781,
-0.114219, -0.193345, -0.144315, -0.149249, -0.201147,
-0.290049, -0.359092, -0.279349, -0.187178, -0.206544,
-0.216689, -0.10395, 0.0366339, 0.160659, 0.236825, 0.198279,
0.19094, 0.296741, 0.362854, 0.302014, 0.25949, 0.264578,
0.256715, 0.228962, 0.106109, -0.0976595, -0.187641, -0.144315,
-0.146381, -0.197416, -0.272873, -0.332141, -0.257732,
-0.162879, -0.174967, -0.186962, -0.0840606, 0.0595146,
0.181751, 0.251164, 0.212865, 0.183632, 0.274322, 0.340806,
0.27901, 0.226341, 0.223473, 0.210552, 0.185945, 0.0793426,
-0.107435, -0.192205, -0.141447, -0.133399, -0.172839,
-0.237226, -0.29452, -0.230966, -0.135095, -0.142157, -0.169509,
-0.0833513, 0.0542107, 0.167443, 0.239076, 0.208455, 0.172222,
0.25471, 0.326128, 0.274384, 0.216319, 0.21268, 0.206081,
0.179901, 0.0890561, -0.0909063, -0.191249, -0.144469,
-0.129175, -0.168183, -0.221715, -0.283974, -0.233125, -0.1301,
-0.128866, -0.154245, -0.0776774, 0.0522064, 0.157544, 0.228283,
0.206359, 0.164174, 0.227266, 0.302445, 0.253878, 0.19387,
0.19094, 0.18246, 0.16143, 0.0863116, -0.0775232, -0.186469,
-0.140738, -0.112615, -0.149064, -0.195812, -0.258102,
-0.219248, -0.115206, -0.104567, -0.134571, -0.0697832,
0.0516513, 0.145826, 0.210306, 0.189306, 0.144654, 0.210151,
0.287212, 0.24401, 0.182306, 0.177526, 0.169755, 0.154368,
0.0907521, -0.0629375, -0.1762, -0.141818, -0.111999, -0.15187,
-0.193716, -0.241913, -0.209596, -0.109285, -0.0828888,
-0.108915, -0.0526072, 0.0630608, 0.161275, 0.226125, 0.201826,
0.150359, 0.196244, 0.269543, 0.227821, 0.150544, 0.1408,
0.1305, 0.120232, 0.0734219, -0.0677172, -0.172685, -0.140738,
-0.103179, -0.128249, -0.168584, -0.213852, -0.182799,
-0.0903821, -0.0666996, -0.101422, -0.061149, 0.0503562,
0.137346, 0.202843, 0.18946, 0.138981, 0.182152, 0.263375,
0.235376, 0.158963, 0.147676, 0.142897, 0.130408, 0.0883777,
-0.0427395, -0.159949, -0.143236, -0.106972, -0.132258,
-0.165438, -0.206359, -0.188812, -0.097197, -0.0597922,
-0.0936199, -0.0564001, 0.0542724, 0.138179, 0.202843, 0.194332,
0.143267, 0.175152, 0.248882, 0.227266, 0.152302, 0.135403,
0.126245, 0.115051, 0.0841531, -0.0367264, -0.156712, -0.141386,
-0.102038, -0.130038, -0.156095, -0.189183, -0.178513,
-0.0935274, -0.0539332, -0.0879151, -0.0587746, 0.042277,
0.123316, 0.189244, 0.184557, 0.134478, 0.15924, 0.235992,
0.22412, 0.146196, 0.128712, 0.127725, 0.114219, 0.0913072,
-0.0165284, -0.141694, -0.138672, -0.100897, -0.120694,
-0.146165, -0.177742, -0.168645, -0.0913688, -0.0448672,
-0.0715101, -0.0585587, 0.0393475, 0.124857, 0.188165, 0.189707,
0.135804, 0.152826, 0.2289, 0.216997, 0.135804, 0.118752,
0.11536, 0.100342, 0.0846156, -0.0111012, -0.129884, -0.129791,
-0.0856949, -0.100867, -0.12162, -0.148386, -0.147707,
-0.0764439, -0.0344753, -0.065867, -0.0579111, 0.035092,
0.112369, 0.169663, 0.179993, 0.13158, 0.137747, 0.214869,
0.218631, 0.14191, 0.121249, 0.122236, 0.107435, 0.0922939,
0.00533473, -0.119769, -0.135866, -0.0906288, -0.104814,
-0.129113, -0.151161, -0.15887, -0.0952542, -0.0430171,
-0.0699374, -0.061704, 0.0303124, 0.104629, 0.162355, 0.181227,
0.134509, 0.135743, 0.206821, 0.206698, 0.128311, 0.107558,
0.110518, 0.096241, 0.085294, 0.00838755, -0.114465, -0.13232,
-0.0836597, -0.0973511, -0.120324, -0.135342, -0.143359,
-0.0901354, -0.0367881, -0.0582503, -0.0629375, 0.0204447,
0.0929107, 0.145055, 0.161861, 0.122175, 0.126461, 0.196491,
0.204971, 0.127417, 0.104721, 0.113664, 0.0994172, 0.0875143,
0.0179469, -0.100188, -0.125412, -0.0853865, -0.0966419,
-0.114681, -0.124549, -0.129421, -0.0796818, -0.0263961,
-0.0481359, -0.0587746, 0.025286, 0.0995714, 0.149743, 0.168738,
0.13417, 0.131703, 0.190231, 0.205588, 0.13232, 0.0983996,
0.104937, 0.0875451, 0.077369, 0.02322, -0.0895495, -0.123562,
-0.0824571, -0.0943291, -0.118598, -0.121928, -0.12569,
-0.0850473, -0.0339203, -0.0559993, -0.0719726, 0.00703074,
0.0839989, 0.133584, 0.158007, 0.130562, 0.125012, 0.186685,
0.212002, 0.141108, 0.105646, 0.117919, 0.101637, 0.0909371,
0.042092, -0.0702766, -0.113695, -0.083598, -0.0961177,
-0.120016, -0.123778, -0.129082, -0.0947609, -0.0393167,
-0.0554442, -0.0736378, 0.00323784, 0.0802985, 0.125844,
0.158932, 0.13343, 0.118998, 0.171297, 0.195658, 0.133183,
0.0984613, 0.11058, 0.0963952, 0.0839989, 0.0410435, -0.0663912,
-0.109655, -0.0710167, -0.0769681, -0.102285, -0.107188,
-0.115606, -0.0893028, -0.035863, -0.0454223, -0.0695057,
-0.00194271, 0.0711092, 0.106016, 0.134941, 0.121157, 0.110827,
0.163403, 0.195011, 0.1338, 0.0955318, 0.113448, 0.10062,
0.0864658, 0.0529156, -0.0506645, -0.10321, -0.0699682,
-0.077184, -0.110272, -0.107897, -0.109439, -0.0903821,
-0.0406426, -0.0465016, -0.0698757, -0.00900429, 0.0660828,
0.105122, 0.134633, 0.121774, 0.107496, 0.156527, 0.19242,
0.133492, 0.089827, 0.105739, 0.0950692, 0.0801443, 0.0518363,
-0.0390391, -0.0920781, -0.0596997, -0.0698141, -0.108298,
-0.105646, -0.106664, -0.0914613, -0.0421228, -0.0411669,
-0.0712634, -0.0180394, 0.0600697, 0.0930032, 0.12754, 0.127725,
0.116131, 0.161491, 0.199174, 0.142342, 0.0938666, 0.111906,
0.102809, 0.0815011, 0.0541182, -0.0382374, -0.0985846,
-0.0710167, -0.0746554, -0.10984, -0.113294, -0.114589,
-0.0995714, -0.0519597, -0.0444047, -0.0704308, -0.0194579,
0.0572944, 0.0863116, 0.11684, 0.118628, 0.106016, 0.144994,
0.189645, 0.143452, 0.0893953, 0.107959, 0.101792, 0.0811311,
0.0672238, -0.0141848, -0.0802677, -0.0536865, -0.0519597,
-0.0944525, -0.0991088, -0.100589, -0.0933115, -0.0533165,
-0.0433563, -0.071325, -0.0276296, 0.0488143, 0.0793734,
0.111289, 0.12017, 0.110117, 0.139967, 0.182398, 0.145425,
0.0942366, 0.111598, 0.105893, 0.0837522, 0.0684881,
-0.00786333, -0.0794967, -0.0586204, -0.0543032, -0.0958093,
-0.0996639, -0.0956243, -0.0947609, -0.0565235, -0.0376206,
-0.0654044, -0.0287089, 0.0486601, 0.081902, 0.109439, 0.120386,
0.108822, 0.138826, 0.18283, 0.143359, 0.0887477, 0.105122,
0.104505, 0.07888, 0.0637084, -0.00391625, -0.074347,
-0.0560918, -0.0479817, -0.0863116, -0.0913072, -0.0880693,
-0.0909371, -0.0546116, -0.0339203, -0.0585587, -0.0234358,
0.053224, 0.0802677, 0.106325, 0.119924, 0.107558, 0.132813,
0.182398, 0.158562, 0.100466, 0.104505, 0.102933, 0.0790342,
0.0671621, 0.00447131, -0.0684264, -0.060008, -0.0537482,
-0.0910605, -0.100342, -0.0938666, -0.0997256, -0.0685806,
-0.0389466, -0.0634, -0.0342286, 0.0481051, 0.0776466,
0.0986154, 0.112184, 0.101946, 0.12347, 0.169262, 0.150452,
0.0938666, 0.101637, 0.103488, 0.0774307, 0.0643868, 0.00669154,
-0.0643251, -0.0528848, -0.0376515, -0.0784175, -0.0882235,
-0.0801135, -0.0889327, -0.0650344, -0.0293256, -0.0498936,
-0.0383916, 0.0374048, 0.0657128, 0.0801443, 0.102007,
0.0964569, 0.113448, 0.161029, 0.150544, 0.0908446, 0.0952542,
0.102778, 0.0765673, 0.065682, 0.0174227, -0.0548275,
-0.0475809, -0.0306824, -0.0736378, -0.0876684, -0.07888,
-0.0851398, -0.0652502, -0.0349379, -0.0530389, -0.0374665,
0.0387924, 0.0703074, 0.0872059, 0.108668, 0.104721, 0.115206,
0.160474, 0.149681, 0.0889327, 0.0901662, 0.100496, 0.0742545,
0.0609948, 0.0215856, -0.0524222, -0.0540874, -0.0316075,
-0.0708008, -0.0862191, -0.0724043, -0.0779858, -0.0568627,
-0.0172068, -0.0348762, -0.0290172, 0.0436338, 0.0756422,
0.08699, 0.1058, 0.104043, 0.1128, 0.156403, 0.152302,
0.0918622, 0.0887477, 0.102007, 0.074347, 0.060008, 0.0262728,
-0.0472725, -0.0559993, -0.0339511, -0.0678097, -0.0808844,
-0.0637701, -0.0693207, -0.0539024, -0.0192112, -0.0311758,
-0.0291406, 0.0370964, 0.0758272, 0.083598, 0.105708, 0.106016,
0.101637, 0.140584, 0.142527, 0.086435, 0.0854482, 0.0948534,
0.0692282, 0.0547658, 0.0242992, -0.0450214, -0.0542107,
-0.0222949, -0.0514971, -0.0727127, -0.0577569, -0.0691665,
-0.0617657, -0.0213081, -0.027938, -0.0297573, 0.0319159,
0.0723118, 0.0815011, 0.101175, 0.103395, 0.104629, 0.13713,
0.143668, 0.0923864, 0.0827346, 0.100311, 0.0764439, 0.0550742,
0.0285239, -0.0408893, -0.0615498, -0.0312375, -0.0527614,
-0.0718184, -0.0539949, -0.0580036, -0.0547658, -0.0161275,
-0.0141848, -0.0197354, 0.0390083, 0.0768756, 0.0812236,
0.0979987, 0.100805, 0.094545, 0.125474, 0.13565, 0.0835055,
0.0687964, 0.0855407, 0.0685498, 0.0529773, 0.0317617,
-0.0300965, -0.053779, -0.0260878, -0.0469641, -0.0697215,
-0.0527306, -0.0533781, -0.0516513, -0.0188103, -0.0169601,
-0.0231274, 0.0367881, 0.075488, 0.0749021, 0.0941441, 0.101884,
0.0983996, 0.124302, 0.135959, 0.0844614, 0.069629, 0.0913072,
0.0686423, 0.0487218, 0.0314533, -0.0314842, -0.0601622,
-0.0314533, -0.0447439, -0.0671004, -0.0474267, -0.0477967,
-0.0543032, -0.0166518, -0.0108853, -0.0263653, 0.02359,
0.0644793, 0.0659903, 0.0833513, 0.0918622, 0.0855099, 0.108946,
0.125073, 0.0796818, 0.0593604, 0.0806685, 0.0651577, 0.0464091,
0.0332419, -0.0215239, -0.0516821, -0.0237442, -0.0360171,
-0.0604089, -0.0428629, -0.0446514, -0.0547041, -0.0230658,
-0.00730827, -0.0216165, 0.0184094, 0.0621357, 0.0604706,
0.0770607, 0.0910913, 0.0855099, 0.101422, 0.116747, 0.0802985,
0.0536865, 0.073977, 0.0657745, 0.0455765, 0.0383299,
-0.0112862, -0.0493386, -0.0208147, -0.0253785, -0.0490302,
-0.0327793, -0.0309291, -0.0432637, -0.0193654, -0.00123346,
-0.0141848, 0.0200438, 0.0633075, 0.062845, 0.0786642,
0.0986154, 0.0853557, 0.0935582, 0.113263, 0.0750254, 0.0537482,
0.0799901, 0.0690123, 0.0430479, 0.0325326, -0.0105461,
-0.0467483, -0.0222023, -0.0213081, -0.0458232, -0.0304049,
-0.0213698, -0.0327793, -0.00468716, 0.0187178, 0.00400876,
0.0301582, 0.0694132, 0.0647877, 0.0778007, 0.0989546, 0.087761,
0.0907521, 0.111968, 0.0808844, 0.0517438, 0.0753646, 0.0689198,
0.0455765, 0.0399334, -0.0000925098, -0.040951, -0.0194579,
-0.014524, -0.0411052, -0.0234667, -0.018687, -0.0338586,
-0.0081717, 0.0151099, 0.000246693, 0.0229733, 0.0644793,
0.0629992, 0.0720343, 0.0944833, 0.0844306, 0.0845848, 0.103888,
0.0775232, 0.0476734, 0.0717876, 0.0702458, 0.0424928, 0.042277,
0.0110087, -0.0329952, -0.0148016, -0.00477967, -0.03133,
-0.022079, -0.0120571, -0.0290172, -0.0129822, 0.0146474,
0.00431712, 0.0247618, 0.0626291, 0.0580653, 0.0656203,
0.0848932, 0.0750254, 0.0710784, 0.0922939, 0.0764439,
0.0429554, 0.0578495, 0.0596071, 0.0355546, 0.0338586,
0.00715409, -0.0347837, -0.0202288, -0.00854174, -0.0302199,
-0.0185328, -0.00795584, -0.0230658, -0.00718493, 0.02359,
0.0138765, 0.0238367, 0.0607789, 0.056616, 0.0606247, 0.0844306,
0.0812236, 0.0724043, 0.0897653, 0.0733911, 0.0368806,
0.0508804, 0.0537482, 0.0305899, 0.0340128, 0.017731,
-0.0269203, -0.0189953, -0.00363872, -0.0198279, -0.00622899,
0.00625983, -0.0081717, 0.00283697, 0.0302199, 0.0167443,
0.0169601, 0.0566777, 0.0570785, 0.0587746, 0.0871442, 0.081532,
0.0685498, 0.0842764, 0.0715409, 0.037929, 0.0525147, 0.0622899,
0.0390083, 0.0359555, 0.0189028, -0.0238984, -0.0188103,
0.00255944, -0.0132906, -0.00709242, 0.0090968, -0.00872676,
0.000555059, 0.0347837, 0.0255327, 0.0289864, 0.061704,
0.0579111, 0.0556909, 0.0794351, 0.0811928, 0.0678713,
0.0826112, 0.0732369, 0.0379599, 0.0489685, 0.0577569, 0.035092,
0.0419378, 0.0305899, -0.0150483, -0.0130439, 0.00508804,
-0.00703074, -0.00360788, 0.0111628, -0.00400876, -0.00585895,
0.0258102, 0.0223565, 0.0193345, 0.0533781, 0.0558142,
0.0493694, 0.0735453, 0.0708008, 0.0524222, 0.0691048,
0.0661445, 0.030374, 0.0415677, 0.0553825, 0.0325326, 0.0293873,
0.0226649, -0.0158808, -0.0157575, 0.00678405, -0.00641401,
0.000215856, 0.0170526, 0.00222023, 0.00123346, 0.0355546,
0.0334885, 0.0213698, 0.0461932, 0.0485676, 0.0432637,
0.0719418, 0.0744395, 0.0486601, 0.0573869, 0.0587746,
0.0287397, 0.0351846, 0.0529156, 0.0302815, 0.0275062,
0.0289864, -0.00903512, -0.0122113, 0.0160967, 0.0081717,
0.00854174, 0.0267662, 0.0134139, 0.00854174, 0.0349995,
0.0353387, 0.02322, 0.0482593, 0.0492152, 0.035863, 0.0629067,
0.0731136, 0.050757, 0.0542724, 0.0565852, 0.0271362, 0.0285855,
0.0493386, 0.0323784, 0.0275988, 0.0342595, 0.00117179,
-0.00687656, 0.0167443, 0.00940516, 0.0104228, 0.0303124,
0.0192112, 0.0088501, 0.0363255, 0.0378673, 0.0229116,
0.0417836, 0.0456382, 0.0331493, 0.0498936, 0.0584662,
0.0359246, 0.0385766, 0.0472725, 0.0201055, 0.0219865,
0.0452681, 0.0317617, 0.0288939, 0.034537, 0.00107928,
-0.00764748, 0.0188103, 0.012273, 0.00733911, 0.0250393,
0.0182553, 0.00715409, 0.0336119, 0.0384224, 0.0204447,
0.0376515, 0.0425545, 0.0316075, 0.0482901, 0.058127, 0.0364797,
0.0341669, 0.0440963, 0.0192729, 0.0187487, 0.045484, 0.0332419,
0.0259644, 0.0366339, 0.0107311, -0.00271362, 0.0233741,
0.0251318, 0.0234975, 0.0374973, 0.0295415, 0.0170218,
0.0360171, 0.0415677, 0.0238984, 0.0356471, 0.0383916,
0.0223565, 0.0376515, 0.0505103, 0.0258411, 0.0233741,
0.0342595, 0.0138148, 0.0115637, 0.0382374, 0.0313917,
0.0217398, 0.0331493, 0.0108545, -0.000400876, 0.0246076,
0.025656, 0.0242067, 0.0402418, 0.0325634, 0.0133522, 0.0326868,
0.0419686, 0.0201363, 0.0306824, 0.034537, 0.0194887, 0.0351537,
0.0490302, 0.0299732, 0.0231891, 0.0341669, 0.013784,
0.00925098, 0.0403959, 0.0388849, 0.0316075, 0.0441272,
0.0248235, 0.00755497, 0.0284313, 0.0317, 0.0262728, 0.0442814,
0.0383916, 0.0145857, 0.028678, 0.0395017, 0.0216473, 0.0274446,
0.0308983, 0.0158192, 0.0275062, 0.0399642, 0.0220482,
0.0141232, 0.026427, 0.0107003, 0.00394708, 0.0385457,
0.0408585, 0.0270437, 0.043788, 0.0313608, 0.0100836, 0.0349995,
0.0462549, 0.0436646, 0.0544574, 0.0510346, 0.029819, 0.0354621,
0.0485676, 0.0285239, 0.0285855, 0.0305899, 0.00786333,
0.0217398, 0.0416602, 0.0239909, 0.0138765, 0.0239909,
0.0121805, 0.00425545, 0.0330877, 0.0408585, 0.0298498,
0.0427395, 0.0336119, 0.00838755, 0.028678, 0.0488143,
0.0438188, 0.0554442, 0.0527614, 0.028308, 0.034537, 0.0487218,
0.0321626, 0.0305282, 0.0320701, 0.0097752, 0.0149557,
0.0388541, 0.0224182, 0.00453298, 0.0212156, 0.0120879,
0.0000616732, 0.0267662, 0.0353079, 0.0279996, 0.0431096,
0.0376515, 0.0164359, 0.0301582, 0.0428012, 0.0422461,
0.0553825, 0.0535015, 0.0309291, 0.0353387, 0.0527614,
0.0322551, 0.02396, 0.0304357, 0.010947, 0.0181319, 0.0401184,
0.0241451, 0.00422461, 0.0168985, 0.0113479, 0.000246693,
0.0278454, 0.0399334, 0.0303124, 0.0414135, 0.0372506,
0.0138148, 0.0239909, 0.040581, 0.0377748, 0.0488143, 0.0522064,
0.0301582, 0.0334577, 0.0504487, 0.0354929, 0.0263036,
0.0255944, 0.00764748, 0.0113479, 0.0368497, 0.0299115,
0.00755497, 0.0166518, 0.0125813, -0.000832588, 0.02322,
0.0399642, 0.0309908, 0.043788, 0.0461932, 0.0185945, 0.0254402,
0.0455765, 0.0436646, 0.0544266, 0.0578495, 0.0323168,
0.0314533, 0.0493694, 0.0332419, 0.0193654, 0.0231891,
0.00996022, 0.00918931, 0.0349995, 0.0307749, 0.00931265,
0.0190262, 0.0210614, 0.00524222, 0.0201363, 0.0401184,
0.0344753, 0.0482901, 0.0540566, 0.0307749, 0.0377748,
0.0562151, 0.0557526, 0.0640168, 0.0651577, 0.0380215,
0.0289864, 0.0513738, 0.0411052, 0.0226032, 0.0299732,
0.0155725, 0.00770915, 0.0324709, 0.0296956, 0.0088501,
0.0167443, 0.020568, 0.00715409, 0.0222949, 0.0444972,
0.0382682, 0.0475809, 0.0553825, 0.029449, 0.0330877, 0.0534398,
0.0508187, 0.0544266, 0.0565852, 0.0355546, 0.0274446,
0.0484135, 0.0407043, 0.0240525, 0.0275988, 0.0150483,
0.00863425, 0.0309908, 0.0305899, 0.0113479, 0.0200438,
0.0275988, 0.0139381, 0.0250393, 0.0475192, 0.0342595, 0.03981,
0.0552283, 0.0331802, 0.0333035, 0.0528231, 0.0486601,
0.0481359, 0.0529773, 0.0344753, 0.0286164, 0.0462549,
0.0382682, 0.0193654, 0.0222023, 0.00792501, -0.00169601,
0.0244226, 0.0312375, 0.00807919, 0.0111012, 0.0205063,
0.00869592, 0.0205988, 0.0434179, 0.036233, 0.0424312,
0.0545808, 0.0295415, 0.0270437, 0.0461007, 0.0427395,
0.0444047, 0.0525147, 0.0325634, 0.0218323, 0.0425545,
0.0368497, 0.016035, 0.0176385, 0.00848006, -0.00447131,
0.0213698, 0.0336119, 0.0149557, 0.0202905, 0.0288939,
0.0170218, 0.028123, 0.0486601, 0.0416602, 0.0479817, 0.0600697,
0.0407968, 0.0302815, 0.0465941, 0.0509729, 0.0487218,
0.0536865, 0.035092, 0.0198279, 0.0407043, 0.0376206, 0.0174227,
0.0185945, 0.00826421, -0.00144932, 0.0198279, 0.0276913,
0.00848006, 0.0115637, 0.0254402, 0.0159425, 0.0190262,
0.0410127, 0.0356471, 0.0366956, 0.052268, 0.0354929, 0.0226649,
0.0422461, 0.048506, 0.0447439, 0.0470258, 0.0305282, 0.0148016,
0.0360788, 0.0433254, 0.0216781, 0.0194887, 0.0160967,
0.00407043, 0.0221098, 0.0385766, 0.0194271, 0.0226032,
0.0395634, 0.0304357, 0.0343828, 0.0557526, 0.0531315,
0.0496469, 0.0630917, 0.0446514, 0.0266737, 0.0447131,
0.0509112, 0.0462857, 0.0515896, 0.0381757, 0.0198279,
0.0321009, 0.0377132, 0.0216781, 0.020568, 0.0167134,
0.00348454, 0.0197971, 0.0338586, 0.0162509, 0.0171143,
0.0347837, 0.0312066, 0.031515, 0.0492769, 0.04718, 0.0411977,
0.0565852, 0.0463474, 0.0296956, 0.0439422, 0.0492769,
0.0424312, 0.0432021, 0.0307749, 0.013969, 0.0316075, 0.0408893,
0.0203522, 0.0171143, 0.0152024, 0.00237442, 0.0167134,
0.0378057, 0.022449, 0.0148632, 0.0362638, 0.032841, 0.0285239,
0.0496469, 0.0487218, 0.0448672, 0.0610565, 0.0499553,
0.0272287, 0.0365414, 0.0482593, 0.0444972, 0.0461007,
0.0357088}, 11025]]], ]}]}],
;}]}] 11025 11025 35 11025 11025 35 11025 2](HTMLFiles/ECE3340_HW%204A_example_class_2.gif)
To tackle this problem, we would use the PSD
analysis App on the AppPage of this class. Because the two sounds
were overlapped in the middle part of the sample. If we divided
the sound into three parts, the first part have purely sound 1,
the last part has purely sound 2. We would like to separate the
overlap part in the middle part. There are many different ways to
do this. However, we would choose to analysis this sample 4 times.
The first time would be the first portion to note the dominant
harmonics of sound 1 for later extraction. Then, we would go to
the first and middle parts and select exactly those frequencies to
save. It would pick out sound 1 from the combination. Similarly,
we would go to the last portion and analyze sound 2’s harmonics.
Then, we would go to the middle and last parts and pick out
exactly those frequencies to save. We would have sound 2 separated
from the combination.
Below is the procedure of what we did.
We load up the object in the app and work with portion 1.We counted
13 harmonics of sound 1 above the -60dB threshold. So, we would like to put a
passband over those 13 harmonics. The locations of those
passbands are showed below. Also with the 13 passband showed with
1.0 scaling magnitude (show in gray color plot). Notice we have a
0Hz coefficient because we did include a silent part at the
beginning of the snippet. Of course, we wouldn’t include that. We
save the passband for later extraction below.
Instructor’s comments. The instruction suggests 11 bands, the author did with 13 bands, while many in the class did zero bands, copied and pasted from others and claimed as own. Only by dedication to do real work does one discover true knowledge.
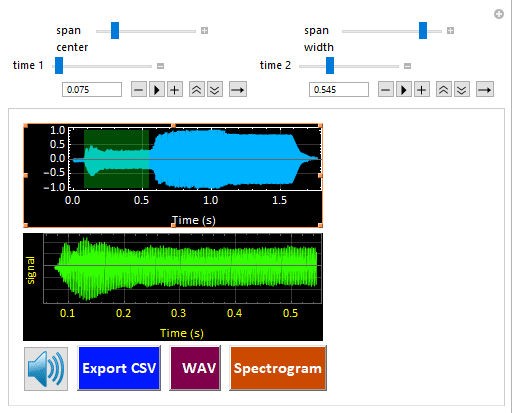
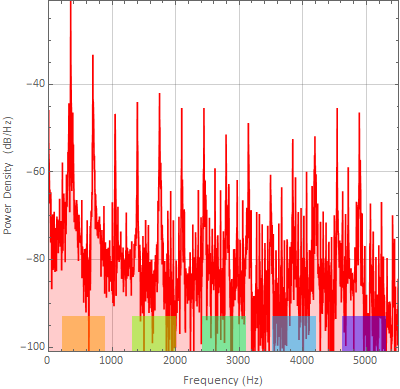
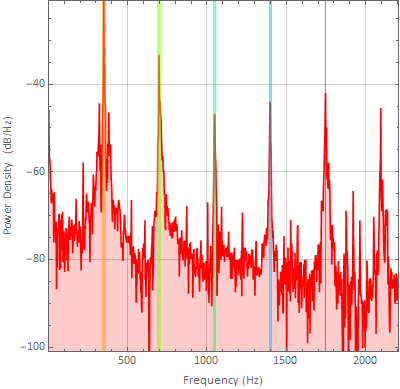
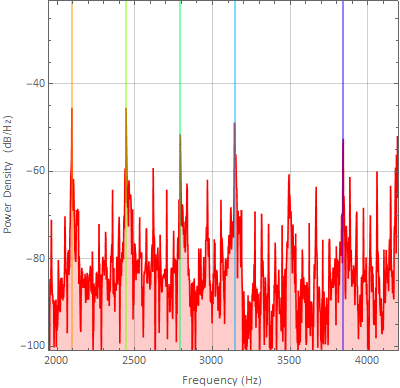
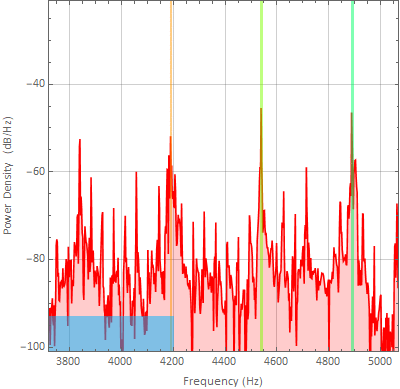
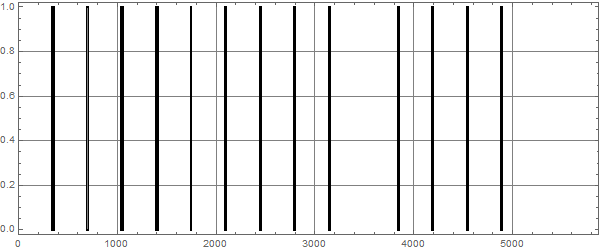
Having those 13 passband locations like above, we would go to the first and middle portions and pick exactly those bands. We tried our best to place the passbands at the same locations. The result was pretty good. They looked almost the same. We then saved the mp3. It would be sound 1.

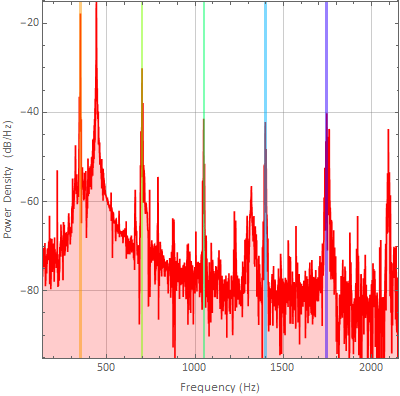
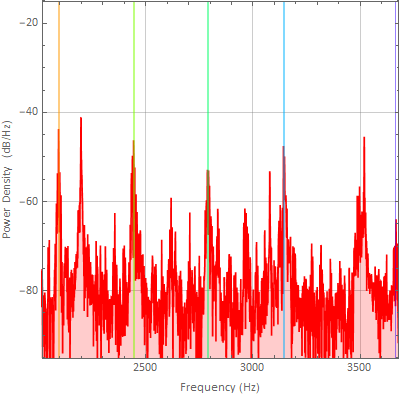
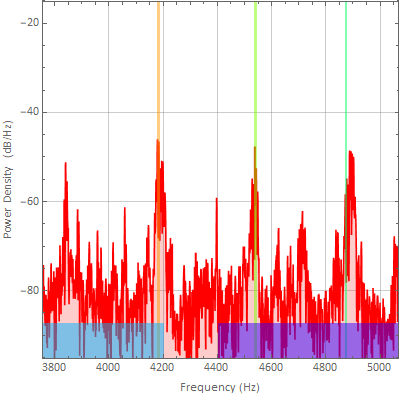
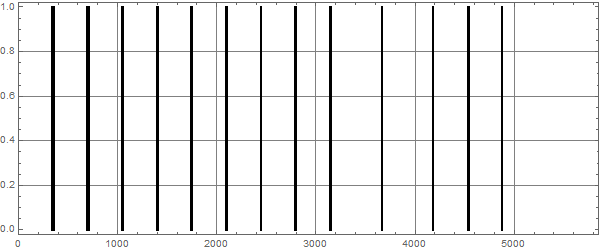
Next, to pick out sound 2, we would go to the last portion of the sample and choose dominant harmonics. We counted there were 10 bands above the -60dB. We chose 10 bands. However, the App said channel 1 was silent. And only output 9 bands in the gray plot of our passband filter (having 1.0 scaling magnitude). We saved the locations of those band for later extraction. We didn’t know which band was lost, so we would pick exactly 10 bands later.

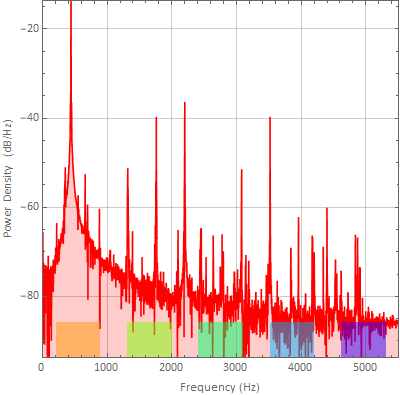
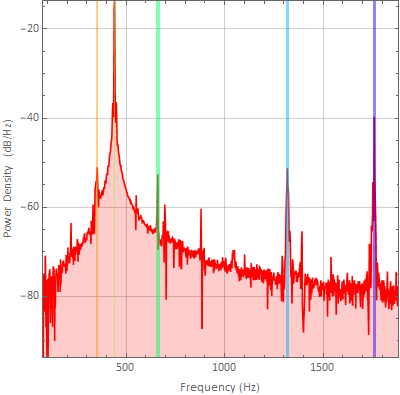
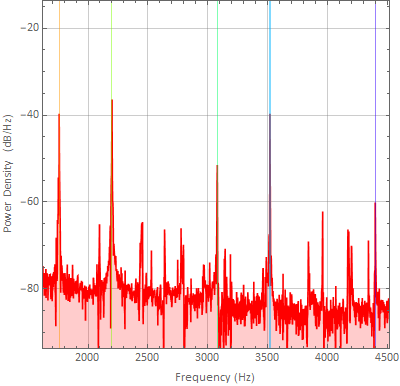
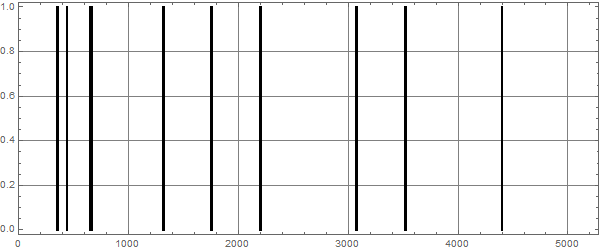
We then went to the middle and last portion of the sample and put the passbands at exact locations that we got from analyzing the last portion. We tried our best to replicate the location of those passbands. We got a pretty similar result. We then save the mp3 file. The file would be sound 2 separated from the overlapping.
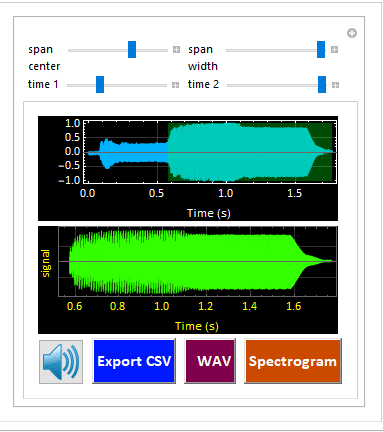
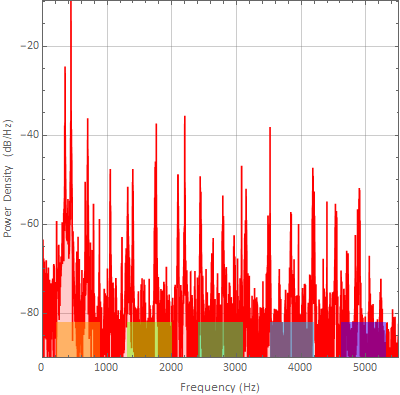


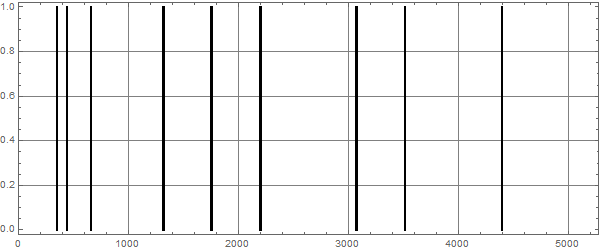
Lastly, lest check the result of our sound separation.

Out[384]=
| Sound 1 | Sound 2 |
|

|
Instructor’s
comments. Excellent work, except:
1- sound 2 is a bit short. The author might have made the mistake
of not selecting the whole second of the second note
2- the author forgot one last thing. Put the two sounds together.
But these are such a minor things. It is the approach how to do
the work and the presentation how it is done are what most
important.
1B. (40 pts + 20 pts bonus) Choose either 1B
(this) or 1A above.
Removing white noise from your voice
details and background of the question (open to see)
Author’s answer with Instructor’s comments
Instructor’s comments. Excellent work, demonstrated both technical understanding and dedication. Note how the author makes subsections to delineate each step.
Data Collection:
In[1]:=
![]()
In[4]:=
![]()
In[5]:=
![]()
In[2]:=
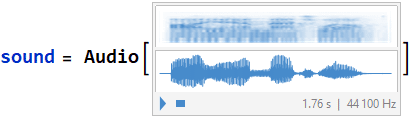
Out[2]=

In[3]:=
![]()
I used a similar method of ensuring the original recording is saved by using the method coded above. I tried to speak clearly and loudly enough to help aid in the reconstruction of the signal after noise is added.
White Noise, Interference, and Total Signal Creation:
In[4]:=

In[9]:=
![]()
Out[9]=
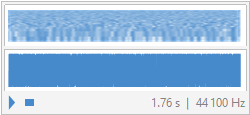
In[6]:=

In[12]:=
![]()
Out[12]=
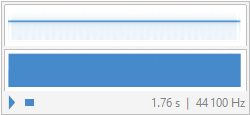
In[8]:=
![]()
In[9]:=
![]()
Out[9]=
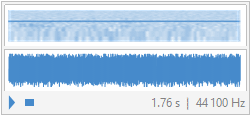
The final signal created, “totalSignal”, is much more cluttered than the original with an added frequency component at 2000 [Hz] and a Laplacian distribution of noise so it should take some time to remove the additional signals. The original recording is still heard well enough and I am hoping that is a good sign when filtering.
Spectrogram and Signal Time Separation of Initial Clean Signal:
Instructor’s comments. Note that the author understand the code well enough to spot typo errors to correct and use. The HW sometimes are designed to have little mistakes here and there to see if students can overcome. This one is not intended but it shows user’s understanding.
In[10]:=
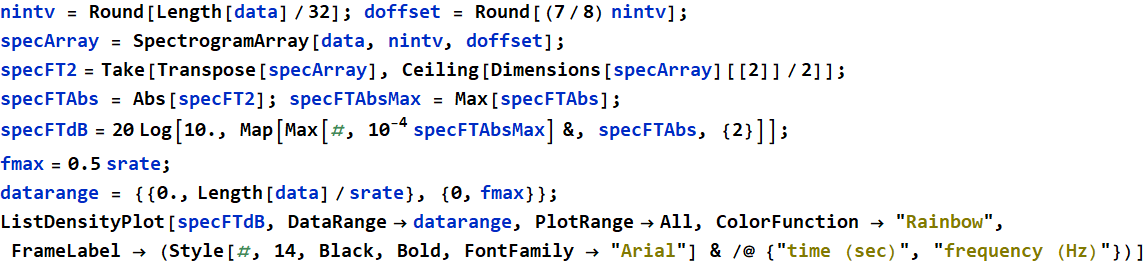
Out[17]=
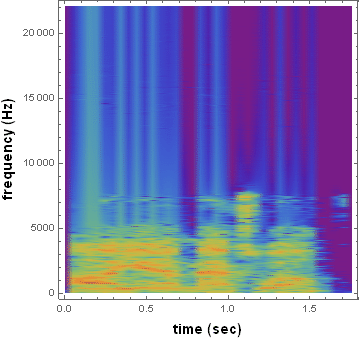
Time Separation:
“I” : t = 0.05 - 0.50 [sec]
“am”: t = 0.50 - 0.85 [sec]
“Ma”:
t = 0.85 - 1.05 [sec]
“x”
: t = 1.05 - 1.2 [sec]
“well”
: t = 1.2 - 1.65 [sec]
Instructor’s comments. As everyone’s name is different, the intelligence is in the decomposition of the sound, and this author had the insight to know one of the sound is actually a phoneme snippet (a unit of language pronunciation) although it is just a single consonant.
![]()
The spectrogram plot is a very useful tool especially when some words seem to flow together. In my case, “I” and “am” are almost slurred together, but in the spectrogram, the small nuances are made more apparent and shows how the application is helpful in partitioning the signal fragments. The way I said “I” also seems to increase in some frequency components as I finish the word and this can be seen at time segment 0.4 - 0.5 [s].
Instructor’s comments. This is what it means to be a scientist or engineer: making observation and gaining insight.
Using 5 Band Filter Application to Filter Data:
Instructor’s comments. The author did a bit overkill with this approach, however, it is still very good. For complex sound in human language, it is OK to use broadband filter, even with noises.The author could have used just a few broader bands to save some effort. But this shows excellent dedication into the work.
1. “I” separation:
Linear PSD Plot:
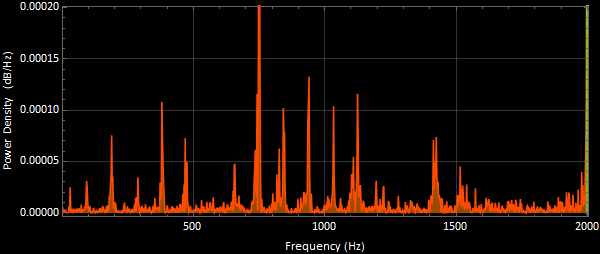
The plot above is shown to compare how closely my selected bands were to the strongest frequency components.
Selected Bands:
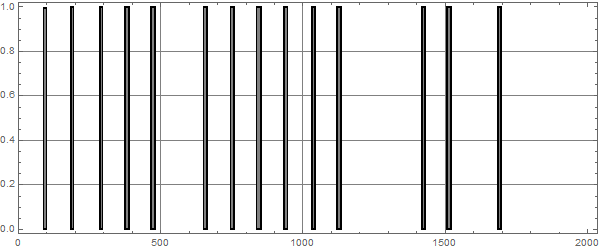
14 bands were selected to create a resemblance of me saying “I”.
![]()
Out[18]=

2. "Am" separation :
Linear PSD Plot:
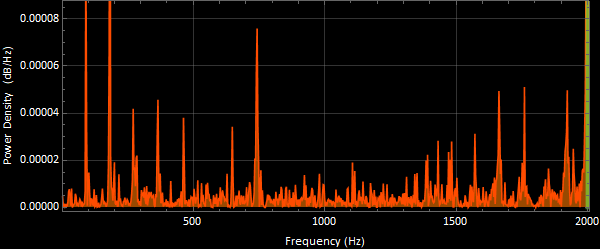
Selected Bands:
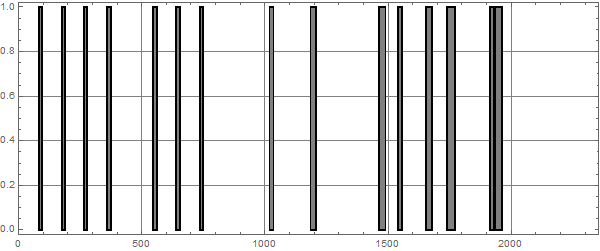
15 bands were selected and I think this segment was recreated quite well.
![]()
Out[19]=

3. "Ma"
separation :
Linear PSD Plot:
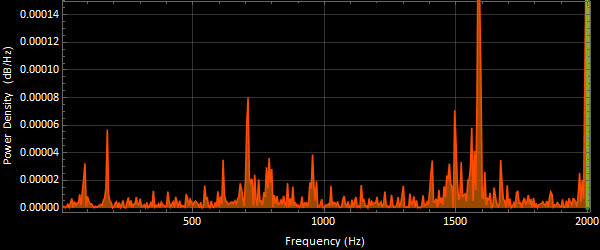
Instructor’s comments. For this, the author should have definitely used broadband: the group of lines are clumped together to form a phoneme typical of human language.
Selected Bands :
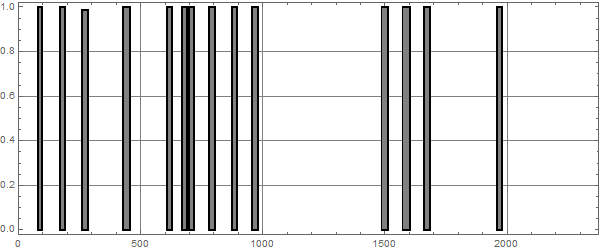
14 bands were used to recreate the “** ” sound, but I do not feel that this part of the segment was the best recreation.
![]()
Out[20]=

4. “x” Separation:
So, this is a bit of a conundrum. It seems that I
am fortunate and also at a disadvantage at the same time. Since
the “X” sound
sounds like static itself, it would be close to impossible and or
pointless to try and find bands and select the frequencies that
comprise the “x”
sound; however, since they do sound similar I can merely remove
the beep at 2000 [Hz] from the sound and hopefully get a
convincing ”x”
sound.
Picture Reasoning:
Instructor’s comments. Excellent insight, this is what “thinking and reasoning” means. The result approach is quite good.
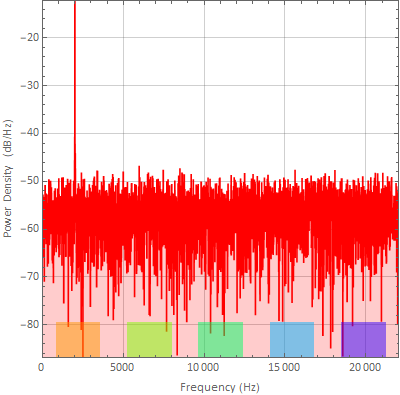
Selected Bands:
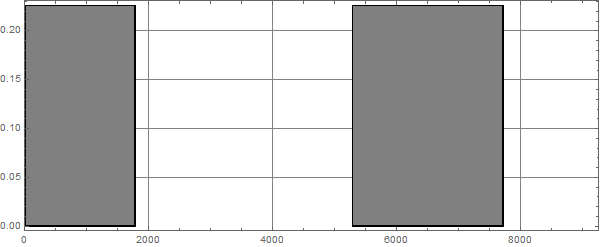
I removed the 2000 [Hz] component from the “x” fragment as well as choosing these two wide bands because I found that these two bands gave a good balance of high and low frequencies to produce a convincing “x” sound. In the final signal synthesis, I will reduce the amplitude of the “x” sound because it sounds too loud compared to the other fragments created.
![]()
Out[21]=

5. “Well”
Separation:
Linear PSD Plot:
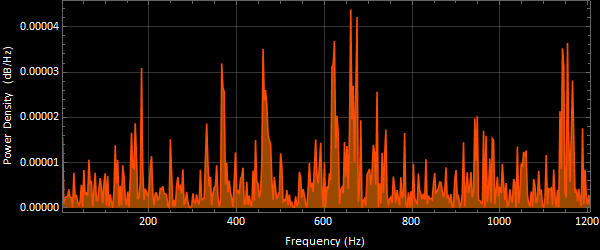
Selected Bands:
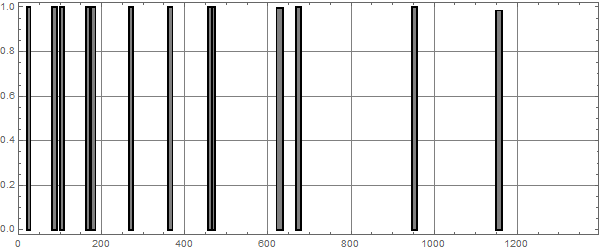
13 bands have been selected for this segment of the original signal.
![]()
Out[22]=

Each of the above signal fragments were reconstructed, I would say, to a passing version of the original recording. I believe that combining the individual fragments to a complete signal will also aid in how similar it sounds to the recorded signal. From my own experience, it seems that obtaining a somewhat even spread of frequency components in each time segment produced the best results. This can be seen quite well in the fragments “I” and “am”. In the cases that did not have a more even spread of frequency components, “well” and “ma”, their recreation was not ass successful. Not all time segments could get this even spread, however, because not each signal had strong frequency components somewhat evenly spread throughout.
Data Extraction Pt 2 :
Instructor’s comments. If anything, the author should start learning to use array in everything. An area to improve.
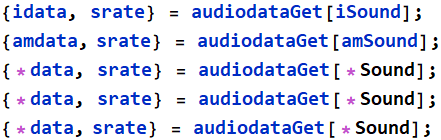

Out[29]=
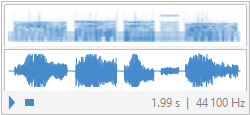
The reconstructed signal sounds close to the original recording, but I want to remove the empty space between each fragment to make the signal sound more natural and fluid.
Now using clipper tool in ECEgen_APP_PSD_analysis_M12_v2:

![]()
From the audio reconstructed and clipped, I had to reuse the “audiodataGet” function to separate the data in order to combine each of the data sets.
Final signal Recreated vs Original Comparison:
Final Signal Recreated:

Out[46]=
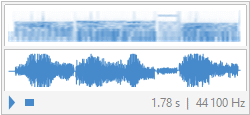
Original :
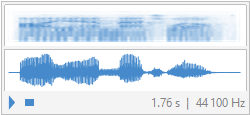
Conclusion:
This exercise was very time consuming as well as difficult; however, I am proud of what I was able to recreate with under 20 fourier components in each signal fragment. I will say the added difficulty in creating my signal was due to the “x” portion that was essentially noise, but I believe my solution is sufficient. The most difficult signal to recreate was the “well” portion and I think it was because of the “w” and also because not as many defined peaks were presented in the “well” data. This portion of the homework is a good example of how difficult noise removal can be from a very noisy signal and still not create a perfect replica!
Instructor’s comments. No. Fundamentally, once noise is added, there is no such a thing as perfect extraction, it is impossible by the definition of “noise”. Only the reduction of signal-to-noise ratio is relevant as a figure of merit. Overall, this is outstanding work demonstrating exceptional understanding and skills in Fourier signal processing.
2. (20 pts) Image processing
Instructor’s comments. This is designed as a “gimme” 20 points and most do get 20 pts. But this work gets extra because of it does exactly what the HW asks (but ignored by many in the class):
You must answer in the narrative style and in full sentences... Show your thinking and reasoning in your discussion or explanation. ...
2.1 (10 pts) A portrait for the work
Take a portrait of yourself with decent resolution and details to do this work. Limit the filesize to <= 5 MB. Reduce the image size for ease of processing and file size, below is an example:
You can execute the above in another notebook and paste the image here. If you include the original image, your HW file size may be too big. Next, add your name (first & last in any order you wish) with the style you like (pick color, font, face, etc). See help.
Solution:
First, in another Mathematica Note book we perform
the following function to reduce the image filesize to minimize
the overall size of our file:
imgPortrait0=ImageResize[“image copied here”,400]
We then copy the reduced image to the following variable
imgPortrait0:


Figure 2.1.1: Photograph of Myself with Name on Photo.
Instructor’s comments. note how each figure should have a caption like in a report?
Next, as can be seen in the lines of text above, our objective is to place our name, in any color/size/font of text we desire onto the photo we took. We do this using the Graphics function, and alter our text style, size, etc. using the Text function.
2.2 (10 pts) Fourier of Fourier:
What happens if we Fourier an object twice? i. e. Fourier of Fourier?
Out[30]=

Apply Fourier of Fourier to your selfie in 2.1 above and show the result.
Solution:
Instructor’s comments. If you are one of those who are of the strong, quiet type who only posted a pict and no caption, no explanation, nothing, nada... read the below to understand what it means “describing and explaining your work”
The first step in solving part 2.1 is to separate our photo with our name on it into the three layers of a photo. A photo is created with a 3D matrix. The matrix has 3 “layers’: Red, Green and Blue. Each color layer then has a 2D matrix, and each entry has a vallue with the “intensity” of the that color that corresponds to that pixel in the photo. When we put these all together, it creates the color needed for each pixel to create the original image. So sepearte the photo into our three RGB layers with variable “imgRGB”, and then we pull the image data from that variable into “imgdata”. Then we perform our first Fourier Transform of that photo data with variable imgFT. This information is in the form of complex numbers, so next we get the Absolute value of these values with variable imgFTAbs. Next, we get the phase angle of each complex number in our matrix of our Fourier Transform with variable imgFTφ. Now we visualize imgFTAbs and imgFTφ side by side with the Grid function (after combining our separated RGB image with function ColorCombine). As can be seen, the (left) absolute value variable matrix is mostly black in color, except at the edges where we see some colors. The (right) phase value variable matrix looks like static, gradients of random black and white.
In[115]:=
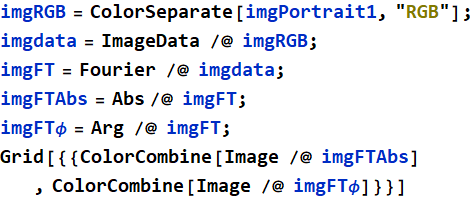
Out[120]=
 |
 |
Now we will perform our second Fourier’s Transform on our image to see what we get. After we get our second Fourier’s Transform, we use the Chop function to remove the small, residual, relatively insignificant imaginary values of our complex numbers. Again, we use the Grid and ColorCombine functions to show our original photo next to our photo that has been Fourier Transformed twice. As we can see, we know now that Fourier Transforming an image twice just inverts it by 180 degrees. Which is exactly what we would expect! Because we know that Fourier Transforming any value twice is just the inverse (or negative) quantity of the original value.
Instructor’s comments. Strictly speaking, it is NOT 180 degrees, which implies a rotation. That applies ONLY in 2D. More generally, it is just an inversion, period. f[x] --> f[-x] and x can be a multidimensional vector.
In[121]:=


Instructor’s comments. This work perfectly meets the intended objectives: Don’t just use the given code, but also look up to understand what it means. This is how one learns coding or using high-level language.
3. (40 pts) Numerical exercise: steps of DFT
The objective of
this problem is to guide you through various typical steps of numerical DFT. The codes
are given explicitly (in a tutorial file) and it is very easy to
translate into Python in a Jupyter notebook if you wish.
You must have a brief and simple
description or explanation of each step, (even if it
sounds so easy or silly for you). Just don’t show a bunch of lines
of code and output.
Remember, you MUST type every line of code yourself because an
objective is also for you to
exercise programming.
Instructor’s comments. Again below shows works that meet exactly the intention of the assignment. The codes are given, one only has to type. Perhaps one did the work to retype and many copied and pasted. But the objective is stated: :You must have a brief and simple description or explanation of each step. And too many in the class failed to do just this. See the excellent excerpts below.
3.1 (5 pts) Signal
Consider we have this message:
In[36]:=

Use the bit time (1/bit rate) as a unit time, we can plot the message digitial code:
In[37]:=

Out[38]=

Assume a sampling rate of 8 points per unit time (duration of a bit), use DFT to plot the digital signal spectrum. Suggestion, follow the Fourier tutorial 3. Discuss your observation about the spectrum
3.1 (5 pts) Signal
Answer
Consider we have this message:
In[16]:=

Use the bit time (1/bit rate) as a unit time, we
can plot the message digitial code:
The below code creates the function ‘digitsig’. This
function creates a linear function of our message signal,
‘msg.’ It creates unit steps (or rectangle functions)
where our signal is 1, and nothing where it is 0. I.e.
we start off with two 1’s, so the first part of our signal is 2
rectangle functions of 1.0 amplitude/height, and 0.5
width. We this plot our digitsig function so that we
can visualize our digital message.
In[17]:=

Out[18]=

Figure 3.1.1: Plot of Representation of our Digital Signal for our Message as a function of time.
Assume a sampling rate of 8 points per unit time
(duration of a bit), use DFT to plot the digital signal spectrum.
Suggestion, follow the Fourier tutorial 3. Discuss your
observation about the spectrum
As described above, using a sampling ratio of 8 units per unit
time, we take the DFT of our signal and plot it as a function of
frequency. We can see this transforms our function
slightly. The vertical lines from our rectangle
functions now have a slight slope to them, which also causes the
function’s shapes to come close to crossing over each
other. This let’s us realize that our sampling rate of
8 is very close to our Nyquist Rate, or the minimum rate a finite
signal can be sampled while retaining all it’s information (once
the shapes start to cross over each other all information in these
region’s cannot be retrieved).
In[19]:=

Out[22]=

Figure 3.1.2: Plot of our Digital Signal Spectrum using DFT.
Next, we setup the frequency array for our Fourier Transform. Our delta frequency is equal to one over the length of our message, and variable npt is just the length of our signal. Then our frequency array is a range from 1 to the length of our signal minus one, minus the next lowest integer than half the length of our signal all multiplied by the delta frequency. Then we plot the frequency array to get a visual of it.
In[23]:=
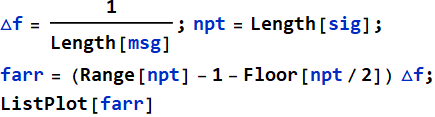
Out[25]=
Figure 3.1.3: Plot of our Frequency Array.
Instructor’s comments. This is what it means “learning”. This problem is designed to force one to learn DFT. This author nails it. Sadly, many in the class just cntrl+C, cntl+V the code and run it.
Now, we perform the Discrete Fourier Transform
(DFT). We know that the DFT is mathematically equal to:
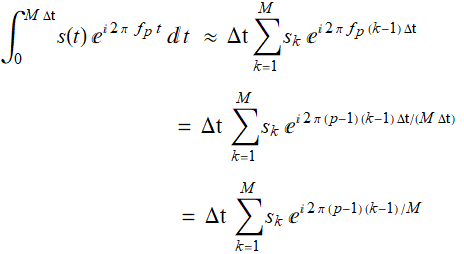
Where the Sum is an approximation of the actual integral that
computers use to simplify the calculation for
integration. For Mathematica, the summing portion of
the expression can be done using the function Fourier[] on the
original signal. Then we just need to approximate the
rest of the equation to get our DFT! We know that
Mathematica uses 1/2*Pi with it’s FourierTransform[] function, so
the function:
Must become:
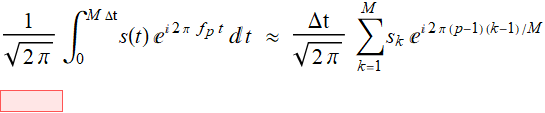
for our math to work. Hence the formula in our code
below for sigFT is created. We then use the RotateRight
function to shift our function to be centered around zero, and
take the absolute value of our Fourier Transform to remove our
complex numbers. Finally we take the Log of our last
result so we can plot this both linearly and
logarithmically. Finally, we plot both linear and
logarithmic plots so we can visualize them.
In[50]:=
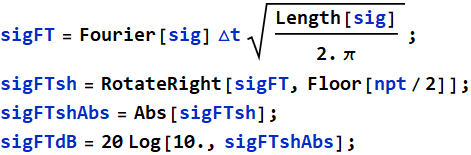
In[54]:=
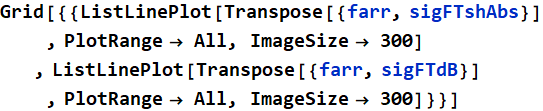
Out[54]=
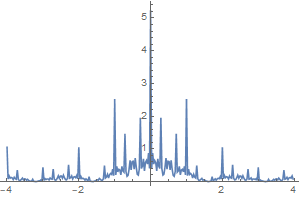 |
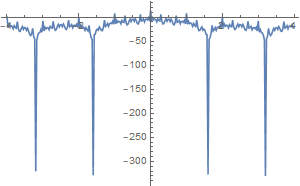 |
Figure
3.1.4: Linear and Logarithmic Plot of DFT of our
Digital Signal Centered About Origin.
We note above that the logarithmic scaled pot has drops in
two drops in power that can be seen on our plot that are mirrored
in the negative portion of the plot. Similarly, the
linear plot has spikes in power that are mirrored in the negative
portion of the plot.
Finally, we now want to plot the Power Spectral Density of
our sampled signal. We plot the logarithmic DFT of our
signal as a function of our frequency array in the following code
(along with adding some labels, titles, and coloring so that the
plot is easier to read).
In[55]:=
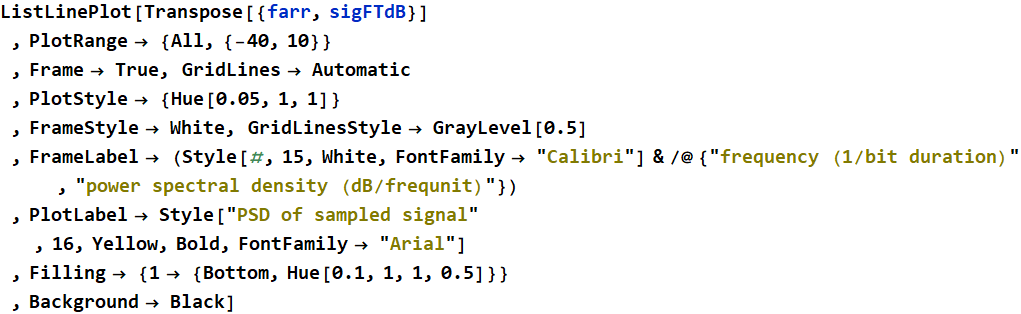
Out[55]=
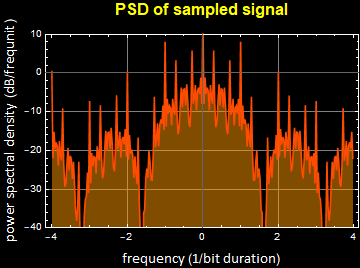
Figure 3.2.5: Logarithmic Power Spectral Density Plot of Digital Signal.
3.2 (5 pts) Signal with carrier
Now we use a
carrier with frequency fc=125, using direct amplitude modulation.
Obviously, we cannot use the same sampling rate.
1- explain why we cannot use the same sampling rate and expect to
know about the signal with carrier?
2- select sampling rate 1100, redo to obtain the same spectra as
above and explain, (in terms of the Fourier transform theorem in
sub-section 7.4.1 of this), how this
spectrum is different from the previous.
Solution
Instructor’s comments. This is what it means “learning”. Very few in the class quoted Nyquist theorem.
In answer to the first question, we cannot use the
same sampling rate of 8 due to the Nyquist Rate Theorem. This, in
summary, says that the sampling rate cannot be less than 2 times
the bandwidth of your signal or you will lose
information! Now that we’ve added a carrier of
frequency fc=125, a sampling rate of 8 would not allow us to
recover our original signal. So now we up our sampling
rate to 1100 (which is much greater than 2 * 125) so that we can
recover our original signal later once we add it to our carrier
frequency and use the Fourier Transform on the resulting signal.
Below we create the carrier function to create our carrier
frequency, then we set our sampling rate to 1100. Next
we create our time array as we did before, and create the digital
signal of our message. Finally we multiply our carrier
signal by our digital signal to get our final
output. Below is a figure showing what this looks like,
and an audio file of what the signal would sound like (we note
that the audio signal waveform looks almost exactly like our
original digital signal!).
In[56]:=
![]()
In[57]:=
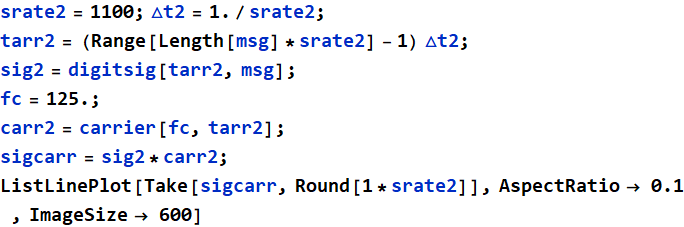
Out[63]=

Figure 3.2.1: Digital Signal Figure of Message and Carrier Frequency.
In[64]:=
![]()
Out[64]=
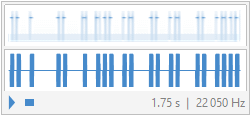
Dynamic Figure
3.2.1: Audio Sound of Digital Signal of Message and
Carrier Frequency.
Next, we repeat the process we did before. We
create and plot our frequency array for our digital signal.
In[65]:=
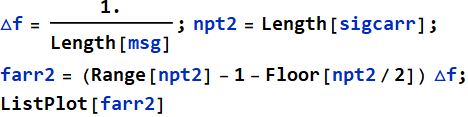
Out[67]=
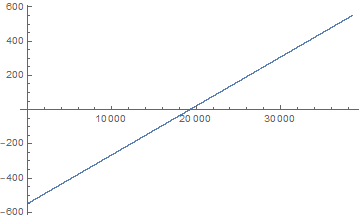
Figure 3.2.2: Plot of Frequency Array for the DFT of our Digital Signal and Carrier Signal.
Then, we create the Discrete Fourier Transform of said signal, and plot the result logarithmically and linearly.
In[68]:=
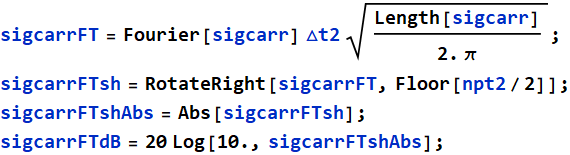
In[72]:=

Out[72]=
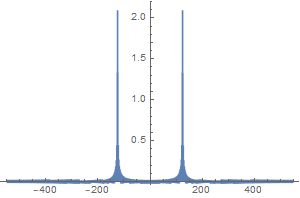 |
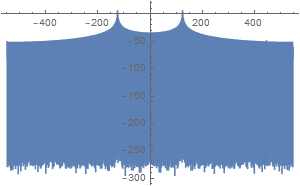 |
Figure
3.2.3: Linear and Logarithmic Plot of DFT of our
Digital Signal and Carrier Signal as a function of frequency.
We note that unlike the DFT of our original signal, this
plot has two even spikes about the y-axis in both plots.
Finally, as we did before, we plot the linear and logarithmic
scaled Power Spectral Density of the DFT of our digital signal as
a function of frequency. As expected, the carrier
frequency has shifted our PSD! It is now centered about
the fc=125 of our carrier signal!
Instructor’s
comments. The intention of this is to demonstrate one of
the Fourier transform theorem:

The author understands this well.
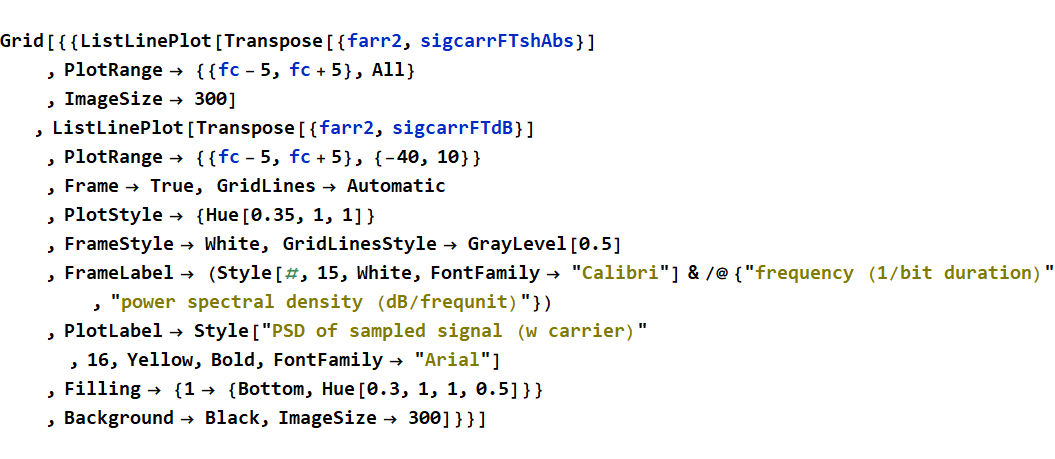
Out[76]=
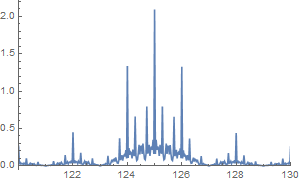 |
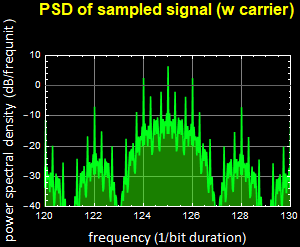 |
Figure 3.2.4: Logarithmic and Linear Plot of Power Spectral Density of Digital Signal and Carrier Signal as a Function of Frequency.
3.3 (5 pts) Signal with carrier + noise
Generate white Gaussian noise of amplitude 1/2 of the signal and add to the signal (the signal is 1, so 1/2 is 0.5). Obtain the spectrum again, and discuss your observation.
Answer
We create a noise with NormalDistribution of amplitude 1/2. Because our signal has amplitude of 1. We would directly put 1/2 as our σ. After that, add noise to signal and plot the noisy signal. Looks very different from the original signal.

Out[231]=

Also, we would like to listen to it. Apparently, a lot of white noise was introduced.
In[232]:=
![]()
Out[232]=
Below, the two spectra are of the noisy signal in linear scale and in log scale respectively. Compared to the original spectra, the log scale spectrum are more affected by the noise. whereas in the linear scale, we could still see the dominant harmonies. we could see how this noise is very bad by normal communication standard. On the dB scale plot, the noise killed the small lobes of the signal. We could only see the dominant central spikes.
Instructor’s comments. This is what it means “write your observation”. The author correctly observes that the noise overwhelms the smaller lobes of the signal PSD. This is the meaning and reason of PSD analysis here: to know the noise level and the signal-to-noise ratio.
In[233]:=
Out[237]=
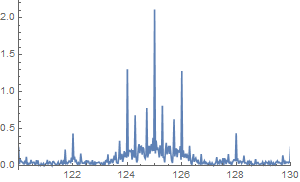 |
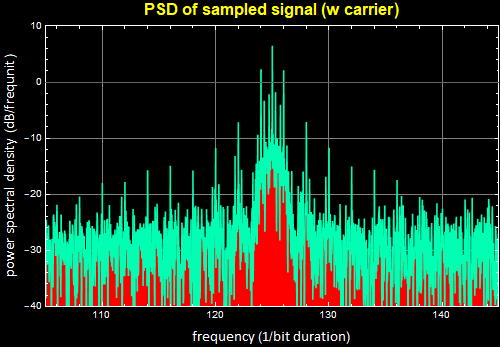 |
3.4 (10 pts) Band-pass filter
The two spectra from the above are shown below together in one graph.
Out[162]=
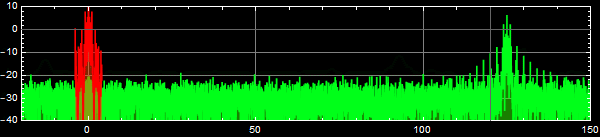
Why don’t we
communicate in baseband (the frequency range in red), but always
use a carrier band (such as 2.4 GHz for wifi, or Bluetooth, or RF
of HF for radio, TV)? There are many reasons, one of which is
that, of course EM waves can have much higher bandwidth (for
transmission capacity) and travel much farther than any other
natural waves that we know of. But interference and noise are also
canonical reasons.
But if we put our signal on a carrier, to receive it, it is best
to use a bandpass filter: a filter that allows only the small
range of frequencies around the carrier frequency. The width of
the frequency range is known as bandwidth, or bw.
Apply a Dirichlet filter from fc-0.5 bw to fc+0.5 bw, for a range
of bw: 5, 10, 20, 30, and calculate and plot the output.
Answer
Instructor’s comments. Some in the class simply copy the figures in the blog and passed as one’s own. Not even an attempt to run the code. Below is the kind of discussion expected for this assignment.The high-lighted portion below shows the understanding of the concept of trade-off: larger BW recovers more of signal but also with more noises. This is the objective why we demonstrate with different BWs.
To filter the signal, we would create bandpass filters. Because we
are modelling an ideal case. We would use brickwall model for our
bandpass filter. Thus, passband would multiply with 1 and stopband
would multiply with 0. We did this to kill all the signal outside
of our passband (the band of our interest). The plots showed below are
plots of the first sample (first piece of the signal, first 1 in
our message). We could see that, with a narrower bandwidth of
our bandpass filter, there were less noise on the side of the
signal. And the signal had less noise overall, the curve looks
pretty smooth. However, we lost part of the signal. Remember
that our original signal should look like a rectangular. But in
the plot of bw of 5, it looked like a curve. A smooth curve.
Increasing the bandwidth of the bandpass filter help sharpen up
the edge of the rectangular. The signal looked more resembled
with the overall shape of the original. However, increasing the
bandwidth of the filter introduce more noise. As we
could see, more noise was introduced on the side of the signal,
and the low frequency noise make the horizontal edge of the
rectangular mountainous. This is the trade of that we would face
if we just filter signal with this simple bandpass setup. Also, we
rotated the Fourier of filtered signal because we wished to bring
the band back to the original band. That is moving from the signal
centered at carrier frequency back to the baseband 0Hz frequency
before doing inverse Fourier transformation. Because we didn’t use
any lowpass filter, we could still see the high frequency of the
carrier making up the signal.
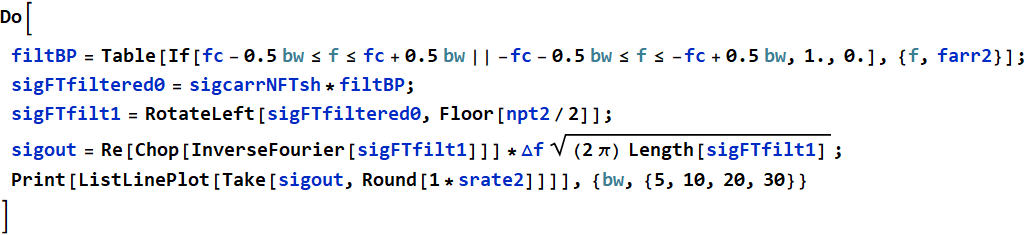
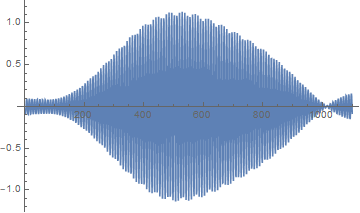
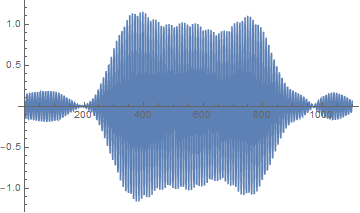
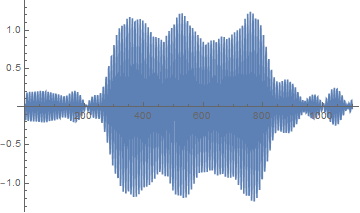
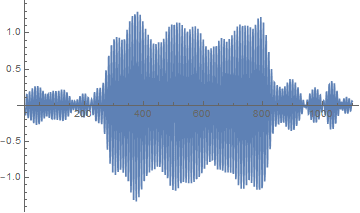
3.5 (10 pts) Remove the carrier with low-pass filter
The carrier can
be removed by mixing (heterodyne), but since we are learning
Fourier filter, we will apply that again for fun and learning. We
will use power detection (square of the signal) and then use a
low-pass filter to filter out the original signal, thereby
removing the carrier.
Let the signal above be filtered with a BP filter with BW=30 (just
enough to reduce the noise). Then square the signal just like it
would be with power detector, then filter it again with a low pass
filter. Do it for a series of LP bandwidth: 5, 10, 20. Observe and
discuss the results.
Answer
For this, we would apply a bandpass filter of bandwidth of 30
around the carrier frequency. After passing through the bandpass
filter, we rotate the signal to bring it back to the baseband at
0Hz. Then, we would do an inverse Fourier transform. This would
give us the signals look like which from the section above. Reap
function is just a convenient way to only get the output that
involved the sigoutBB variable (which inside Sow). Then, we get
the Fourier transform of the signal’s power (which is the square
of signal by definition). Again, we rotate the signal when we take
the Fourier transform. Then, the lowpass filter is a brickwall
model. We only take frequency within the range of our interest
(which are 5, 10, 20 respectively). Then, doing inverse Fourier
transform would give 3 output showed below. As we can see,
increasing the lowpass filter’s bandwidth introduce a
lot of noise in the output signal, although the noise floor would
decrease. It’s a matter of preference that we choose which set up.
However, with the relatively low noise level of the 5Hz bandwidth
low pass filter, I think the 5Hz lowpass is good for this
application. We could put a logic gate that read the HIGH/LOW
signal that read HIGH >= 0.25, we would get a clean signal. Of
course, this is just suggestion.
Instructor’s comments. The decode function in 3.5 does what the author mentions “logic gate” - although this “logic gate” concept is naive and simplistic. In communication, it is called “thresholding”. There is the stochastic mathematics behind the communication detection theory that the class may learn later.
In[245]:=


3.6 (5 pts) Decoding the message
What does the original message say?
Answer
As we discussed above, the first output signal (with a 5Hz lowpass filter) would be chosen for decoding because of it’s integrity. We again showed its plot below.
In[251]:=
![]()
Out[251]=

We assumed that the secret message was written with ASCII code which utilize 7 bits for one character. Our message has 35 characters, so the ASCII route is pretty viable. We would want to first recreate a clean digital signal from the lowpass filtered output. First, we implement a threshold assignment. If magnitude of signal >= 0.25 we would change it to 1 because we knew that our signal is digital (0 and1 only). We introduce a variable nz, which is the number of samples we took for one input 1/0. This nz would be equal to our sampling rate (1100Hz). So after assignment and getting the digital signal, we would group all the samples of one instance (one character of our message) together. Then, we again group 7 characters (0/1) in our input together in one bundle. That bundle would be a binary represent of the ASCII entry. The output we showed below is a list of partitioned ASCII code. Each sublist is a binary representation of the ASCII code of its character.
In[252]:=
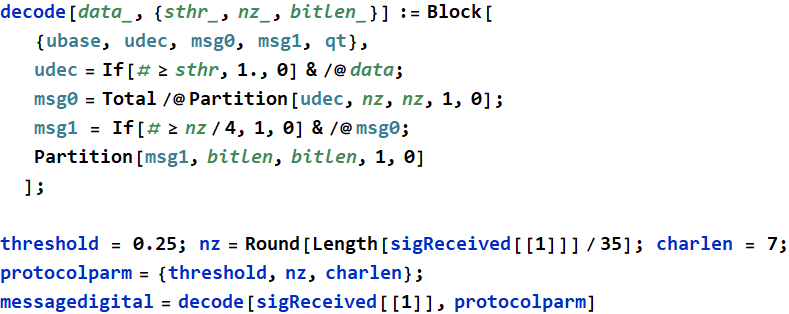
Out[255]=

Using FromDigits function to change the binary base to a decimal base of the ASCII code. Then, we would pass that decimal ASCII code to FromCharacterCode to receive the letters that our message represented. The result is “hello”. Through problem 3, we simulated how to transform a ASCII binary signal to analog signal and do Amplitude Modulation to send over a large distance. We also simulate the case where we got noise into our signal during transmission. Then, we use signal processing techniques which mainly was Fourier transform manipulation to simulate bandpass, lowpass filter and moving the signal back to base band and decode it. Although in reality, the process would have some difference, in which our AM process would add a piece of the carrier frequency and we would apply demodulation by mixing and then detect the signal with amplitude detection (as what I knew from signal and system course). Anyway, this is another option. I learned new things by doing this homework. I know the technique of power detection. The decoding part also made me to research about ASCII code. This is a very interesting homework.
In[257]:=

Out[258]=